App Authors
Sequential Pathway
Welcome to App Authors Sequential Pathway!
This approach to App Authors is broken into weekly sessions and assumes that participants will return from week to week to work on a project that will develop over 6 weeks. The sequential pathway is great for school programs where participants return from week to week.
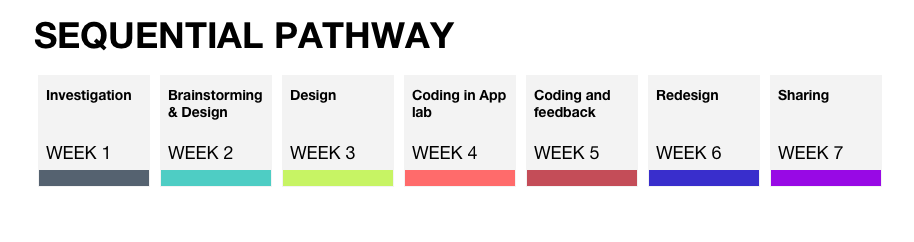
Sequential Pathway shows App Authors Lesson Titles listed by week.
Get Organized
App Authors utilizes Code.org lessons and unplugged activities to walk participants through the app building process. To get the most out of the App Authors program you will want to make sure that students have access to computers with adequate internet and access to Code.org. Every week prepare your ice breakers and unplugged activities with all the physical materials needed.
Prepare for the Participants:
One option is to set participants up with a folder of working documents that will follow them through the entire App Authors curriculum. This folder can include their activity sheets and personal stats charts. Additionally, as participants progress through the App Authors program, you may choose to print App Authors Badges when participants complete tasks. At the end of the seven week program participants can see how much they have learned.
Prepare Yourself:
Take a look at the slides, lesson plans, and activities for every week of App Authors. Choose which pieces you will use and which pieces you will adapt.
All of the lesson plans list activity times, so as you pick and choose activities you can design your App Authors sessions to fit your schedule. At the end of every App Authors session be sure to take time to reflect. App Authors has provided a retrospective survey for you to take at the end of every session. Remember, you do not have to be an expert to get kids engaged with coding and app production. By using our lessons and activities, App Authors will walk you through the process of learning to code alongside your participants. Time for retrospection is a great way for you to build confidence in your App Author leadership skills and learn from the process!
Get Ready To Code:
To utilize the following lessons you will need to familiarize yourself with the Code.org platform you and your participants will be using to learn to code and display your apps. To do this, login at https://studio.code.org
Create a teacher username and password, and a section for your App Authors program. You can then add students to your section and print out access cards including username, password, and section code so that students will remember their passwords from week to week.
Week 1: Investigation
Slides:
Lesson plan:
Idea/Introduction: Students will ask questions about apps and how they are used in their personal, school, and social lives; explain what apps are, why they are important, and how they can be used to solve problems; and identify the kinds of apps they use and/or like and justify why these apps are "good."
Activity:
Step 1. Introductions. Students share names, grade/teacher, and a fact about themselves.
Step 2. Collaborative "get to know each other" exercise. One option is to do a Cup Challenge. Students break into groups of four. Each group gets six cups and one rubber band with four strings tied to it. The group must work together to move cups from the starting position to a pyramid using only their strings-and-rubber-band tool. Have students think about how they communicate: how do they give instructions or ask questions? Take a few minutes after the activity to discuss what each group learned, or struggles they encountered.
Step 3. Let's Ask Questions. Get out a poster board, and give each student a post-it note. Each student will write on their post-it one question they have about apps. Collect all post-it notes and put them on the poster board. Refer back to the board of questions throughout the program, and try to answer the questions together.
Step 4. What are Apps? Prompt the group: what are apps? (Apps are software made specifically for mobile devices) Explain that apps are usually designed for a specific purpose, or to solve a specific problem. Ask the students to think of examples of apps that solve problems.
Step 5. Our Favorite Apps. Have students get out their computers. Take the rest of the time for the students to look up information about their favorite apps. Have them pay attention to the design of the apps; how do they look? Do you like the way they look? What problem might this app solve? Hand out App Investigation worksheets, and have students use the worksheets to take some notes as they look up information about the apps.
Step 6. Recap. Take some time for discussion. What is an app? What does an app do? What makes an app good? What are some things about the students' favorite apps that they might like to imitate in their own apps?
Activities:
App Investigation
Code.org lessons:
Unplugged Lesson:
- Course 2, Stage 1: Graph Paper Programming: https://studio.code.org/s/course2/stage/1/puzzle/1
- Course 2, Stage 2: Paper Planes: https://studio.code.org/s/course2/stage/2/puzzle/1
- Course 3, Stage 10: Dice Race: https://studio.code.org/s/course3/stage/10/puzzle/1
- Course 4, Stage 1: Tangrams: https://studio.code.org/s/course4/stage/1/puzzle/1
Practice on Code.org:
- Course 2, Stage 3 & 4: https://studio.code.org/s/course2
- Course 3, Stage 2 & 3: https://studio.code.org/s/course3
- Course 4, Stage 2 & 3: https://studio.code.org/s/course4
Week 2: Brainstorm & Design
Slides:
Lesson plan:
Worksheets:
Idea/Introduction: Students will brainstorm at least three fully developed ideas for apps, including an app title, a proposed solvable problem, and a target audience. Students will select one app idea and justify why this app is important to them before moving on to planning and constructing the app. Students will participate in unplugged activities such as paper prototyping, wireframing, and mind mapping in order to prepare for their app design and coding.
Activity:
Step 1. Review of last time. Remind students that last week we talked about apps and what they are, researched our favorite apps and decided what we liked about them, and decided what makes apps "good."
Step 2. Introduce today's agenda. Today we will do three things: we will think of at least three app ideas, talk to each other and pick our favorite app idea that we would like to develop, and start designing our app.
Step 3. Brainstorm. The first step of the design process is identifying a problem. Hand out Brainstorming worksheets, and have students fill out the Mad Lib to come up with a problem. Then give students some time to brainstorm ways to solve that problem with an app. Students can free write, draw, create a mind map, or use another brainstorming method.
Step 4. Paper Prototype. Hand out Paper Prototype worksheets, and have students start designing the screens of their app. Challenge students to fully design only four screens to begin with. Take a few minutes at the end of the session for students to test each other's prototypes.
Activities:
Brainstorming
Participant Handout:
Personas
Participant Handout:
MVP Definition
Participant Handout:
Code.org lessons:
Unplugged Lesson:
- Course 2, Stage 5: Getting Loopy: https://studio.code.org/s/course2/stage/5/puzzle/1
- Course 4, Stage 8: For Loop Fun: https://studio.code.org/s/course4/stage/8/puzzle/1
Practice on Code.org:
- Course 2, Stage 6-8, 19: https://studio.code.org/s/course2
- Course 3, Stage 11- 13: https://studio.code.org/s/course3
- Course 4, Stage 9 - 11: https://studio.code.org/s/course4
Week 3: Design
Slides:
Lesson plan:
Idea/Introduction: Students will finish their paper prototypes and start to translate their designs into App Lab. Students will differentiate between design interface and code. Students will design a beginning maximum of four screens in App Lab that utilize buttons, images, and text in order to illustrate their app idea. Students will summarize what design features App Lab provides and hypothesize about how they might use them in their apps. Students will utilize design features in App Lab that reflect their brainstorms and preliminary sketches.
Activity:
Step 1. Review. Talk about last session. Focus on the idea that apps should be FUN (feasible, useful, and new). Remind students that their app should be pretty simple to start off with. Start with only four screens, and make sure the app has a beginning and an end.
Step 2. Users. Hold a brief discussion about users; what are users? What is a User Interface? If an app is designed (but not coded), will it work? Discuss the difference between design mode and code mode in App Lab, and emphasize that fully designed apps might look great, but will not work without code.
Step 3. App Lab. Hand out login cards, and get everyone logged in to Code.org. Use the rest of the time for students to begin designing their screens in App Lab, working from their paper prototypes.
Activities:
Finding Your Style
Participant Handout:
Icon Design
Participant Handout:
Code.org lessons:
Unplugged Lesson:
- Course 2, Stage 12: Conditionals with Cards: https://studio.code.org/s/course2/stage/12/puzzle/1
Practice on Code.org:
- Course 2, Stage 12 & 13: https://studio.code.org/s/course2
- Course 3, Stage 7-8: https://studio.code.org/s/course3
Week 4: Coding in App Lab
Slides:
Lesson plan:
Idea/Introduction: Students will code a basic mobile app that employs user interface blocks, control blocks, and function blocks in App Lab. Students will use UI control blocks to show text, images, buttons, and other app interface features on the screen. Eventually, students will create at least one functioning app that utilizes four screens. All apps should be functional, user-friendly, and have the capability to go back and return to the home screen.
Activity:
Step 1. Basics. Discuss with students that apps are programs that run on mobile devices. Code is the instructions that tell a computer what to do.
Step 2. Tutorial. Get students logged into Code.org, and have them follow along with the tutorial to the best of their abilities. Either show the students a video tutorial from Code.org, or do a teacher demo by working through a quick process of designing and coding an app.
Step 3. Problem Solving Activities. You can use the Do. Go. worksheet to help students consider how users will move through their app by breaking down each screen and task, or the Map What Happens worksheet for students to draw out a map of how users will move through the app.
Activities:
The App Lab Guide provides you and your participants with a shared understanding of what kind of coding App Lab supports. It is a quick cheat sheet to help figure out what interactions are most easy to utilize in the App Lab production space.
Do. Go.
Participant Handout:
Map What Happens
Participant Handout:
Code.org lessons:
Unplugged Lesson:
- Course 3, Stage 4: Functional Suncatchers: https://studio.code.org/s/course3/stage/4/puzzle/1
- Course 3, Stage 9: Songwriting: https://studio.code.org/s/course3/stage/9/puzzle/1
- Course 4, Stage 13: Songwriting with Parameters: https://studio.code.org/s/course4/stage/13/puzzle/1
Practice on Code.org:
- Course 3, Stage 5-6: https://studio.code.org/s/course3
- Course 4, Stage 12, 14-16: https://studio.code.org/s/course4
Week 5: Coding and Feedback
Slides:
Lesson plan:
Worksheets:
Idea/Introduction: Students will create at least one functioning app that utilizes four screens. Students will reflect about their app development process through individual writing, or group discussions. Students will edit and refine their apps after receiving verbal and/or written peer feedback in order to fully implement the design process. Students will question whether or not their apps are "done," and consider what edits could be made.
Activity:
Step 1. Elevator speech. Have students sit in a circle, and take turns giving a short elevator speech about their app. Give each student one minute to tell the rest of the group how their app idea has changed over the past few sessions, and who they envision as the user of their app.
Step 2. App Lab. Students spend time coding their apps. Hand out App Lab Cheat Sheets for the students to reference.
Step 3. Likes and Gripes. With about fifteen minutes left, have the students partner up for the Likes and Gripes activity. Each student will use their partner's app for about a minute, then write at least two likes, and two gripes about the app.
Activities:
This Happens, Then That Happens
Participant Handout:
Likes and Gripes
Participant Handout:
Code.org lessons:
Unplugged Lesson:
- Course 2, Stage 9: Relay Programming: https://studio.code.org/s/course2/stage/9/puzzle/1
Practice on Code.org:
- Course 2, Stage 10 & 11: https://studio.code.org/s/course2
- Course 3, Stage 14: https://studio.code.org/s/course3
Week 6: Redesign
Slides:
Lesson plan:
Idea/Introduction: Students will present their "beta" app with at least one peer and listen to their constructive feedback. Students will evaluate one peer's app, and offer at least one compliment and one constructive suggestion. Students will share their apps with peers, friends, and/or family.
Activity:
Step 1. Personas. Last time we talked about the users of apps. Hand out Personas worksheets and have students think about who their users are and how they would use the app. Remind students that apps are designed for people, and that apps are only as strong as their user.
Step 2. Demo Play Lab. It is likely that you will have a few students who want to create games. Generally, Play Lab is better for coding games than App Lab. Demo the basic features of Play Lab for your students.
Step 3. Coding. Give students time for coding and revising their apps, in either App Lab or Play Lab.
Step 4. Silent Test. Have students partner up. Each student will silently watch their partner use their app, making notes of anything the partner seems to struggle with.
Step 5. Showcase Reminder. Remind students to invite their friends/family to the showcase, and hand out invitations for the students to distribute.
Activities:
Personas
Participant Handout:
Silent Test
Participant Handout:
Explore For Bugs:
Participant Handout:
Code.org lessons:
Unplugged Lesson:
- Course 4, Stage 4: Envelope Variables: https://studio.code.org/s/course4/stage/4/puzzle/1
- Course 2, Stage 9: Relay Programming: https://studio.code.org/s/course2/stage/9/puzzle/1
Practice on Code.org:
- Course 4, Stage 6, 7: https://studio.code.org/s/course4
Week 7: Sharing
Slides:
Activity:
If time allows, give students the first half of the session to finish working on their app. Invite parents and guests to attend the second half of the session and let the students show off their hard work! Set up the students' portfolio posters around the room for guests to walk around and admire, or have students pull up their apps on their computers.
Semi-Sequential Pathway
Welcome to App Authors Semi-Sequential Pathway!
This approach to App Authors offers standalone lessons that each introduce a new coding concept with unplugged activities, coding lessons, and app creation in one three-hour session. Because this pathway includes six unique standalone lessons, it is great for public libraries where participants may attend one session or all of them.
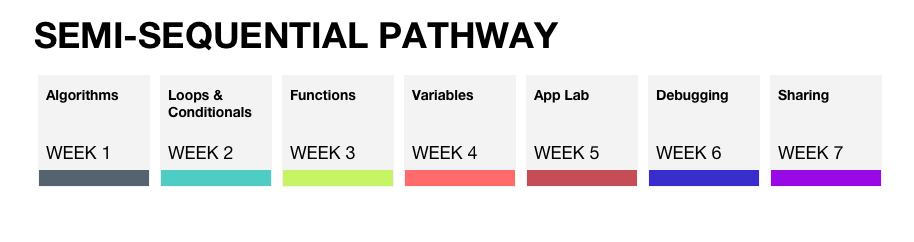
Semi-Sequential Pathway
Get Organized
App Authors utilizes Code.org lessons and unplugged activities to walk participants through app building procedures. To get the most out of the App Authors program, you will want to make sure that students have access to computers with adequate internet and access to Code.org, and every week prepare your ice breakers and unplugged activities with all the physical materials needed.
Prepare Yourself:
Take a look at the slides, lesson plans, and activities for every week of App Authors. Choose which pieces you will use and which pieces you will adapt.
All of the lesson plans list activity times, so as you pick and choose activities you can design your App Authors sessions to fit your schedule. At the end of every App Authors session be sure to take time to reflect. App Authors has provided a retrospective survey for you to take at the end of every session. Remember, you do not have to be an expert to get kids engaged with coding and app production. By using our lessons and activities, App Authors will walk you through the process of learning to code alongside your participants. Time for retrospection is a great way for you to build confidence in your App Author leadership skills and learn from the process!
Get Ready To Code:
To utilize the following lessons, you will need to familiarize yourself with the Code.org platform you and your participants will be using to learn to code and display your apps. To do this, log in at https://studio.code.org
Create a username and password, and a section for your App Authors program. You can then add students to your section and print out access cards including username, password, and section code, so that students will remember their passwords from week to week.
Week 1: Algorithms
Slides:
Lesson Plan:
Idea/Introduction: This lesson is split into three parts. Participants will learn about algorithms using real life "unplugged" examples, and will then translate the concept into their coding lessons on Code.org. Participants will then have time to explore Code.org's Play Lab platform, and create algorithms to code their own apps.
Unplugged:
Time: 1 hr
Definition: Algorithm: A list of steps to complete a task or solve a problem.
Activity:
Step 1. Introduce the topic. Explain what algorithms are, and remind participants that computers cannot read your mind, so algorithms have to be very specific. Give an example, such as the algorithm you used to get out of bed this morning, or have the students help you write an algorithm. One option is to tell the participants you have never heard of a square before, and ask them to help you draw one. Follow their directions exactly; for example, draw in mid air until they tell you to touch the marker to the white board.
Step 2. Unplugged Graph Paper Programming activity. Show participants how to draw arrows to signify which way to move, and demonstrate a scribble to signify "fill in the square." Do an example design as a class, then have participants pair up. Hand out Graph Paper Programming unplugged activity. One partner will write the algorithm, the other will test the algorithm.
Step 3. Unplugged Paper Planes activity. Hand out the Paper Planes unplugged activity. Have each participant cut out the steps and glue them in order to create an algorithm for a paper airplane, then their partner will test the algorithm by following the algorithm and making a plane. It can be a lot of fun to have a plane throwing contest to celebrate success!
Unplugged Lessons:
- Course 2, Stage 1: Graph Paper Programming: https://studio.code.org/s/course2/stage/1/puzzle/1
- Course 2, Stage 2: Paper Planes: https://studio.code.org/s/course2/stage/2/puzzle/1
Code.org Lessons:
Time: 1 hr
Activity: Hand out Code.org access cards to participants, and get everyone logged in to Code.org. Participants will complete a few coding lessons to practice their knowledge of algorithms.
Practice on Code.org:
- Course 2, Stage 3 & 4: https://studio.code.org/s/course2
- Course 3, Stage 2 & 3: https://studio.code.org/s/course3
App Coding:
Time: 1 hr
Activity: Participants will explore the Play Lab platform and use algorithms to create a game or story.
Step 1. Show participants how to start a new app in Play Lab, how to add actors, change the background, code the arrow buttons to make actors move, etc.
Step 2. Participants can either start coding in Play Lab, or work their way through the Play Lab lesson.
- Code.org Play Lab Lesson: https://studio.code.org/s/playlab/
Step 3. With about 15 minutes remaining in the lesson, ask participants if they would like to share what they've created with the rest of the class.
Additional Activities:
Unplugged Lesson:
- Course 3, Stage 10: Dice Race: https://studio.code.org/s/course3/stage/10/puzzle/1
- Course 4, Stage 1: Tangrams: https://studio.code.org/s/course4/stage/1/puzzle/1
Week 2: Loops & Conditionals
Slides:
Lesson Plan:
Idea/Introduction: This lesson is split into three parts. Participants will learn about loops and conditionals using real life "unplugged" examples, and will then translate the concepts into their coding lessons on Code.org. Participants will then have time to explore Code.org's Play Lab platform, and create algorithms using loops and conditionals to code their own apps.
Unplugged:
Time: 1 hr
Definitions:
Loop: The action of doing something over and over again.
Conditionals: Statements that only run under certain conditions.
Activity:
Step 1. Introduce the topic: Loops. Begin by asking for a volunteer to come to the front of the room. Ask the volunteer to do an action, like spin in a circle. Then ask the volunteer to do the action again. And again. And again. Ask the participants if they can think of an easier way to ask the volunteer to perform all those actions without having to say "spin in a circle, spin in a circle, spin in a circle, spin in a circle." The participants will catch on that it would be easier to just say "spin in a circle four times," which is a great example of a loop!
Step 2. Introduce the topic: Conditionals. Define "conditionals" for the participants, and explain that conditionals are often "if... then" statements. Give an example, such as "if the sky is cloudy, then it will rain."
Step 3. Unplugged: Conditionals with Cards. Practice conditionals with participants by using a deck of playing cards. Give your participants conditionals such as "if the card I draw is a 7, then clap your hands." You can also throw in some "if... else" statements, such as "if the card I draw is a 7, clap your hands. Else, stomp your feet." If a deck of cards is not handy, you can also play with dice.
- Course 2, Stage 12: Conditionals with Cards: https://studio.code.org/s/course2/stage/12/puzzle/1
Step 4. Conditionals and Loops Game. Have all your participants stand up and move to an open space in the room. Combine loops and conditionals into instructions, such as, "if you are wearing a green shirt, clap three times." After you have given a few instructions, let the participants take turns being the leader and giving instructions in the form of conditionals. Play as long as it is entertaining.
Code.org Lessons:
Time: 1 hr
Activity: Hand out Code.org access cards to any new participants, and get everyone logged in to Code.org. Participants will complete a few coding lessons to practice their knowledge of loops and conditionals.
Practice on Code.org:
- Course 2, Stage 6-8 & 13: https://studio.code.org/s/course2
App Coding:
Time: 1 hr
Activity: Participants will explore the Play Lab platform and use loops and conditionals in their algorithms as they create a game or story.
Step 1. Show participants how to start a new app in Play Lab, how to add actors, change the background, code the arrow buttons to make actors move, etc.
Step 2. Challenge participants to practice using loops and conditionals in their apps today, and show an example of each. Let participants begin coding.
Step 3. With about 15 minutes remaining in the lesson, ask participants if they would like to share what they've created with the rest of the class.
Additional Activities:
Unplugged Lesson:
- Course 1, Stage 12: Getting Loopy: https://studio.code.org/s/course1/stage/12/puzzle/1
- Course 4, Stage 8: For Loop Fun: https://studio.code.org/s/course4/stage/8/puzzle/1
Week 3: Functions
Slides:
Lesson Plan:
Idea/Introduction: This lesson is split into three parts. Participants will learn about functions using real life "unplugged" examples, and will then translate the concept into their coding lessons on Code.org. Participants will then have time to explore Code.org's Play Lab platform, and create algorithms using functions to code their own apps.
Unplugged:
Time: 1 hr
Definition: Function: A named group of programming instructions; a piece of code that you can call over and over again.
Activity:
Step 1. Introduce the topic. Explain the concept of functions, and talk with participants about how we can use them in coding. For example, if we want to write a code that draws squares, it would be much simpler to create a "draw square" function, rather than having to write out the full code each time you want a square.
Step 2. Unplugged: Songwriting. One way that we can think about functions is by using a song. The chorus of the song that repeats is like a function. Once we define the chorus, we know what to sing when we see the word "chorus" between verses. Teach participants the chorus to a simple song, such as "I'm a Nut." Have the lyrics to the song on a slide, with the word "Chorus" between verses. Make sure participants understand that when we finish a verse, we will not sing the word "chorus," but we will sing the chorus to the song as we have defined it. Sing through the full song together.
- Course 3, Stage 9: Songwriting: https://studio.code.org/s/course3/stage/9/puzzle/1
Step 3. Unplugged: Functional Suncatchers. Show participants an example suncatcher, and explain how you made it ("I put on a bead, and tied a knot. Then put on a bead, and tied a knot. Then put on a spacer, and tied a knot. Then I repeated that; bead, knot, bead, knot, spacer, knot. Then I added a charm, and tied a knot"). Work through creating a function together. Ask participants if there is a part of the algorithm that they see being repeated or used more than once. Write "Skill 1" and "Skill 2" on the board, and let the participants figure out the best way to break up the algorithm into chunks or functions. Hand out materials (each student should receive 4 beads, 2 spacers (larger beads), a piece of string, and a charm), and have students follow the algorithm to create a suncatcher.
- Course 3, Stage 4: Functional Suncatchers: https://studio.code.org/s/course3/stage/4/puzzle/1
Code.org Lessons:
Time: 1 hr
Activity: Hand out Code.org access cards to any new participants, and get everyone logged in to Code.org. Participants will complete a few coding lessons to practice their knowledge of functions.
Practice on Code.org:
- Course 3, Stage 5 & 6: https://studio.code.org/s/course3
- Course 4, Stage 12 & 15: https://studio.code.org/s/course4
App Coding:
Time: 1 hr
Activity: Participants will explore the Play Lab platform and use functions in their algorithms as they create a game or story.
Step 1. Show participants how to start a new app in Play Lab, how to add actors, change the background, code the arrow buttons to make actors move, etc.
Step 2. Challenge participants to use functions in their apps today, and show how to create a function. Let participants begin coding.
Step 3. With about 15 minutes remaining in the lesson, ask participants if they would like to share what they've created with the rest of the class.
Additional Activities:
Unplugged Lesson:
- Course 4, Stage 13: Songwriting with Parameters: https://studio.code.org/s/course4/stage/13/puzzle/1
Week 4: Variables
Slides:
Lesson Plan:
Idea/Introduction: This lesson is split into three parts. Participants will learn about variables using real life "unplugged" examples, and will then translate the concept into their coding lessons on Code.org. Participants will then have time to explore Code.org's Play Lab platform, and create algorithms using variables to code their own apps.
Unplugged:
Time: 1 hr
Definition: Variable: A placeholder for a piece of information that can change.
Activity:
Step 1. Introduce the topic. Start with a quick refresher of functions from last time. Remind students that when using Play Lab, the functions used parameters like "height" and "actor." Explain that these parameters are a lot like variables, which are placeholders for information that can change.
Step 2. Poem Variables. Tell the class you would like to write a poem about someone, and ask for volunteers. Choose three or four volunteers to come to the front of the class. Write a poem on the board about the first participant (Jenny): Roses are red, Violets are blue, Coding is cool, and Jenny is too! Have all participants clap for Jenny, then erase and rewrite the full poem for the next student (Roses are red, Violets are blue, Coding is cool, and Josh is too!). Repeat for the next two volunteers, then say something like "Goodness! If everyone wanted a poem written about them, this could take a while!" Ask if anyone can think of an easier way to write poems about everyone. Participants will notice that only one word is changing (the name). Explain that we can call that a variable and use a "placeholder" so we don't have to rewrite the whole poem each time. This time, use the placeholder [name] in your poem, and at the top of the board write "set [name] to: ___." Now we can substitute names into the poem much more easily!
Step 3. Mad Libs as Variables. Hand out Mad Libs Worksheets, and give participants time to come up with their own values for each variable. Once everyone is finished, pull up the "Mad Libs Story" slide, and ask for volunteers to substitute their own values into the Mad Libs story.
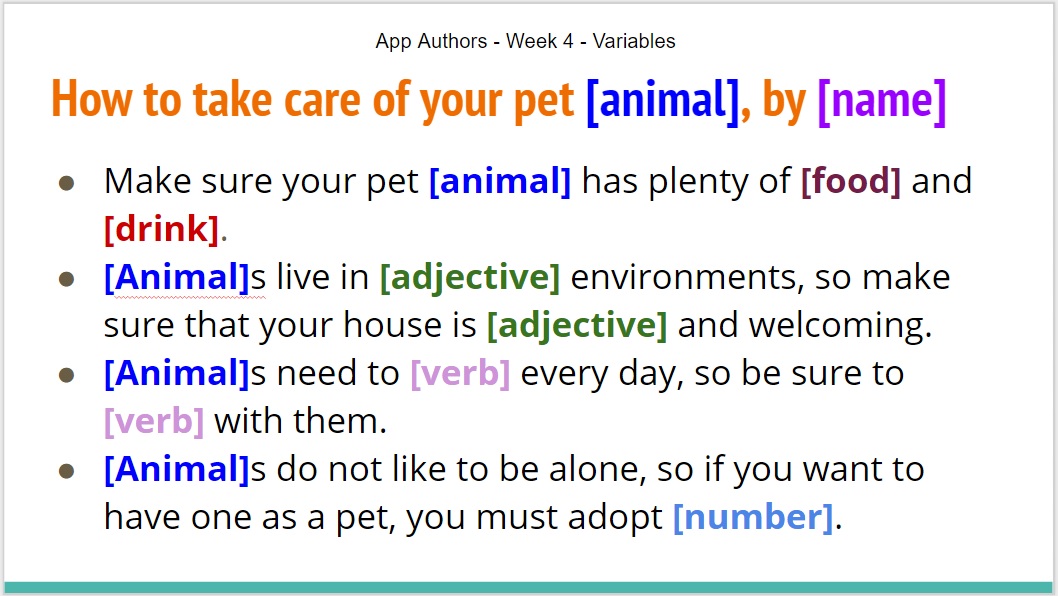
Mad Libs as Variables Story
Code.org Lessons:
Time: 1 hr
Activity: Hand out Code.org access cards to any new participants, and get everyone logged in to Code.org. Participants will complete a few coding lessons to practice their knowledge of variables.
Practice on Code.org:
- Course 4, Stage 6 & 7: https://studio.code.org/s/course4
App Coding:
Time: 1 hr
Activity: Participants will explore the Play Lab platform and use variables in their algorithms to create a game or story.
Step 1. Show participants how to start a new app in Play Lab, how to add actors, change the background, code the arrow buttons to make the actors move, etc.
Step 2. Challenge participants to use variables in their apps today. Talk about how setting your actors and background actually uses variables; we set a value for "Actor 1" and then use the placeholder "Actor 1" to code that actor. Explain that a score is also a variable, and show how to create a game with a score. Let participants begin coding.
Step 3. With about 15 minutes remaining in the lesson, ask participants if they would like to share what they've created with the rest of the class.
Additional Activities:
Unplugged Lesson:
- Course 4, Stage 4: Envelope Variables: https://studio.code.org/s/course4/stage/4/puzzle/1
Week 5: App Lab
Slides:
Lesson Plan:
Idea/Introduction: This lesson takes participants through the design process of building an app in Code.org's App Lab platform. Participants will work through brainstorming, prototyping, wireframing, and finally coding an app.
Identify a Problem/Brainstorm
Time: 30 min
Activity: Students will identify a problem that could be solved with an app, and brainstorm solutions.
Step 1. Explain that the best apps solve problems. For example, Google Maps solves the problem of getting lost, social media apps help you stay connected to your friends, etc.
Step 2. Explain the limitations of App Lab. While participants will not be able to create the next big video game, App Lab is great for creating a poll, a choose-your-own-adventure game, or anything else that can be created with buttons and screens.
Step 3. If time allows, show participants examples of apps created in App Lab to give them some ideas. There are some great videos and example apps at https://code.org/educate/applab.
Step 4. Hand out Brainstorming Mad Lib worksheets. Have the students fill out the front to identify a problem, then use the back of the worksheet to brainstorm.
Paper Prototyping and Wireframing
Time: 1 hr
Activity: Students will begin to design and plan their app on paper.
Step 1. Hand out Paper Prototype Screens worksheet, and have students design the screens of their app with buttons, images, and text. Encourage students to start by fully designing only four screens.
Step 2. Once students have completed their paper prototypes, hand out Wireframing worksheets, and have students wireframe their app. Encourage students to draw out what each button will do, and how users will get from one screen to the next. This can look like an arrow from a button to the next screen.
App Lab
Time: 1.5 hr
Activity: Participants will use the App Lab platform to recreate and code their app prototypes.
Step 1. App Lab Design Mode. Walk participants through App Lab's design mode, showing how to add buttons, images, and screens to their app. Show how to find free-to-use images by filtering by usage rights in an advanced Google search, or by using free stock photos from Pixabay or another source. Have participants recreate their paper prototypes to design the screens of their app.
Step 2. App Lab Code Mode. Now that participants have designed their app, it's time to code it! Walk participants through App Lab's code mode, showing how to code their buttons, change to the next screen, add sounds, etc., then have participants spend the rest of the time coding their apps.
Step 3. With about 15 minutes remaining in the lesson, ask participants if they would like to share what they've created with the rest of the class.
Additional Activities:
Code.org Lessons:
- Course: Intro to App Lab Tutorial: https://studio.code.org/s/applab-intro/
Week 6: Debugging
Slides:
Lesson Plan:
Idea/Introduction: This lesson is split into three parts. Participants will learn about debugging using real life "unplugged" examples, and will then translate the concept into their coding lessons on Code.org. Participants will then have time to explore Code.org's App Lab platform, and practice debugging on the apps they create.
Unplugged:
Time: 30 min
Definition:
Bug: Part of a program that does not work correctly.
Debugging: Finding and fixing problems in an algorithm or program.
Activity:
Step 1. Introduce the topic. Define "bug" and "debugging." Give an example of a problem (for example, a sunburn), and encourage participants to think in terms of "What happened? What was supposed to happen? What does that tell us, or how can we fix it?"
Step 2. Unplugged: Relay Programming. Divide students into groups of 3-5. You can make this activity a race against other groups or a teamwork activity within groups. Each group gets an identical graph image to recreate. Have the first student write the algorithm to get to the first filled-in square. The next person will debug the algorithm so far, then write instructions to the next filled-in square. Repeat until the program is complete, then test the program the participants have created. Repeat with a new design as many times as is entertaining.
- Course 2, Stage 9: Relay Programming: https://studio.code.org/s/course2/stage/9/puzzle/1
Code.org Lessons:
Time: 1 hr
Activity: Hand out Code.org access cards to any new participants, and get everyone logged in to Code.org. Participants will complete a few coding lessons to practice their knowledge of debugging.
Practice on Code.org:
- Course 2, Stage 10 & 11: https://studio.code.org/s/course2
- Course 3, Stage 14: https://studio.code.org/s/course3
App Coding:
Time: 1.5 hr
Activity: Participants will spend the first half of App Coding time creating in App Lab, then the second half debugging any problems.
Step 1. Creating with no help. Give participants a brief tutorial of App Lab; show design mode and code mode, how to add buttons and screens, how to code those buttons, etc. Have participants work on the app they started last time, or begin a new app.
Step 2. Debugging. Hand out Explore for Bugs worksheets. For a few minutes, have participants go through their own apps to check for any bugs.
Step 3. User Testing. Hand out Likes and Gripes worksheets. Have participants trade computers with a partner and explore the partner's app, making notes of elements they like, and suggestions for improvements.
Step 4. Redesign. Participants return to their own computers and spend time fixing any bugs and considering making any changes recommended by their partner. Show participants how to use the Debug Console in App Lab, and let them spend the rest of the time fixing or improving their apps.
Additional Activities:
This Happens, Then That Happens: Participants work out what is working, and what is still confusing about their app.
Silent Test: Participants pair up, and silently watch their partner try to use their app, making notes of anything their partner seems to struggle with.
Week 7: Sharing
Invite friends and family and let participants show off all their hard work! You can make this event as formal or informal as you choose. It can be fun to play a slideshow displaying screenshots of apps that have been created over the course of the program.
Non-Sequential Pathway
Welcome to App Authors Non-Sequential Pathway!
This approach to App Authors covers a full production topic in one hour and a half program. This pathway is great for public libraries and after-school programs where participants may not return from week to week.
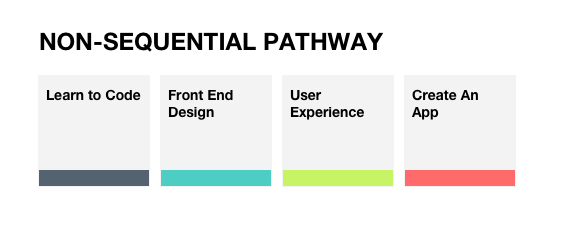
Non-Sequential image shows the Non-sequential lesson titles
Get Organized
App Authors utilizes Code.org lessons and unplugged activities to walk participants through app building procedures. To get the most out of the App Authors program, you will want to make sure that students have access to computers with adequate internet and access to Code.org, and every week prepare your ice breakers and unplugged activities with all the physical materials needed.
Prepare for the Participants:
When participants finish an App Authors session, celebrate what they have learned by handing out experience Badges.
Prepare Yourself:
Take a look at the lesson plans and activities for every week of App Authors. Choose which pieces you will use and which pieces you will adapt.
All of the lesson plans list activity times, so as you pick and choose activities you can design your App Authors sessions to fit your schedule. At the end of every App Authors session be sure to take time to reflect. App Authors has provided a retrospective survey for you to take at the end of every session. Remember you do not have to be an expert to get kids engaged with coding and app production by using our lessons and activities App Authors will walk you through the process of learning to code alongside your participants. Time for retrospection is a great way for you to build confidence in your App Author leadership skills and learn from the process!
Get Ready To Code:
To utilize the following lessons you will need to familiarize yourself with the Code.org platform you and your participants will be using to learn to code and display your apps. To do this, login at https://studio.code.org
Create a username and password and a section for your App Authors program. You can then add students to your section and print out access cards so that students will remember their passwords from week to week.
Learn to Code
Lesson plan:
Learn to Code: Introduction to Drawing with Code
Idea: Coding is a series of instructions. A developer assigns variables and writes functions to have those variables perform tasks, and then improves on the efficiency of those tasks. App Lab offers this simple drawing coding lesson complete with an instructor guide and a student code base with pieces missing; links are included in our attached Drawing with Code worksheet.
List of objectives: By the end of this lesson participants should be able to have a simple grasp of variables, functions, and loops; they will also have a simple app in App Lab that will draw shapes.
Time: 1.5h
List of required materials: Each participant should have access to a computer with adequate internet access.
Welcome 10m: Introduce yourself and go around the room have participants introduce themselves. Ask if the participants have ever used App Lab before. Ask participants what they know about coding.
Define the instructional component 10min: To introduce participants to the concept of drawing with code stand at the board and tell the participants that you have never heard of a square before. Ask a participant to direct you how to draw a square, make sure you do not start drawing without explicit directions to get the chalk, touch it to the board, and if they don't tell you to draw straight lines draw wiggly lines etc. This introduction will likely be silly but it exemplifies the basics of coding. The code is a series of directions that tell a computer how to accomplish a task.
Coding Practice 1h: Have students login to the App Lab. The practice URLs are listed in the coding exercise worksheets below. Encourage participants to help each other and explain how they have successfully completed tasks.
Wrap up summary 10m: Pass out development badges to each of the participants, and ask questions about what the participants have learned about coding after they have spent an hour learning to code.
Reflection 10m: After the participants have left reflect on the App Authors experience.
Worksheets:
Learn Front End Design
Lesson plan:
Learn Front End Design: Designing an App
Idea: Design is an important component of web development; it creates the look and feel for the apps' users. This simple lesson will give participants the chance to design an app.
List of objectives: By the end of this lesson participants will have a four screen app visually designed in App Lab and will be able to share their designs.
Time: 1.5h
List of required materials: Each participant should have access to a computer with adequate internet access. Each participant should have the three design handouts for the session. Participants should have drawing implements, preferably pencils and pens of all different colors. As a facilitator, you can bring participants' hand drawings into their digital App Lab design if you bring a phone and take pictures of participants' designs and then share those images with each of the participants' computers.
Welcome 10m: Introduce yourself and go around the room have participants introduce themselves. Ask if the participants have ever used App Lab before. Ask participants what they know about design.
Define the instructional component 10m: To introduce participants to the concept of design ask them about their favorite apps. project one or two of them up on a screen so that you and the participants can look at them all together. Why do they like these apps? What colors do they like in the app? What feelings do they feel as they look at these apps?
Drawing Design Process 30m: Give participants the Finding Your Style handout and have them get inspired on their own. Give participants the Do Go handout and the Icon Design handout so they can draw out different motifs for their app.
Computer Design Process 30m: Have participants login to App Lab (https://code.org/educate/applab) and as they look at the creation tabs listed at the top of their sample phone on the left-hand side of the screen, help them switch the from "Code" to "Design" mode. Give participants time to design their Apps in App Lab, and offer to digitize some of their drawings if you have the ability to take photos and share their drawings with the computers they are working on.
Wrap up Summary 10m: Pass out design badges to each of the participants, and ask some questions about what the participants learned about design. If participants are willing have them show off their designs and talk through their ideas.
Reflection 10m: After the participants have left reflect on the App Authors experience using the retrospective form.
Worksheets:
Finding Your Style
Icon Design
Do. Go.
Learn about User Experience
Lesson plan:
Learn about User Experience: UX and App testing
Idea: User Experience is how we analyze a process and take steps to make it more user friendly. This activity will allow participants to look at an app and analyze how user friendly it is, and make a plan to improve the app.
List of objectives: By the end of this session participants will have analyzed an app and identified some strategies to change the app to improve its user experience.
Time: 1.5h
List of required materials: Each participant should have access to a computer with adequate internet access. Each participant should have the two testing handouts for the session.
Welcome 10m: Introduce yourself and go around the room have participants introduce themselves. Ask if the participants have ever used App Lab before.
Define the instructional component 10m: To introduce participants to the concept of testing ask them if they have ever noticed something that is difficult to use. Talk about why it was difficult to use and what might be done to solve the problem. Think of an example in your own life and describe it to participants to get the conversation started.
User experience testing: Have participants log in to App Lab and find a public project they would like to test: https://studio.code.org/projects#/
Once all participants have found an app they want to test, pass out the Likes and Gripes handout and the Silent test handout.
Likes & Gripes 30m: This is most fun to do with a few people in groups of 3-4.
Prepare two different sections for feedback. This can be on the board or on individual handouts - it depends on the space you have available. One section will have Likes and the other section will have Gripes. Every participant takes turns showing the rest of the group the function of the app they are testing. This can be done by having participants click through one another's App Lab screens. Participants are encouraged to write down what excites them about the app and what confuses them about the app.
Step 2. Sticker Voting
After all the participants have shown the app they are testing and received a list of Likes and Gripes it is time to vote. Give participants stickers or markers and have them vote on which comments they agree most with. Which “Like” do they agree with the most? Which “Gripe” do they agree is the most worrisome? This allows for participants to prioritize and suggest redesign options for the apps
Give participants time to consider what they would change about the app they analyzed and give them free time to remix their app and add or change functionality.
Silent Test 30m: This exercise is about listening. Have participants open up their app and find a partner. Their partner should be instructed to use the app and talk about everything they are doing, verbalizing why they are making some choices and not others. During this activity, the participants who are sharing their app cannot speak; they have to let their partner move through their app and click around without saying a word. They can write down what they hear, but they cannot speak. You may encourage participants to place their hand over their mouth.
After the activity, have participants journal about what they saw their partner do when they were silent. Come together as a group and talk about the shared experience.
Wrap up summary 10m: Pass out UX badges to each of the participants, and ask questions about what the participants learned about UX. If participants are willing have them share how they would redesign their apps.
Reflection 10m: After the participants have left reflect on the App Authors experience.
Worksheets:
Likes and Gripes
Silent Test
Create an App
Lesson plan:
Create an App
Idea: Fast prototyping is a great way to start coding, using the constraints of App Lab students can create simple apps with basic functions.
List of objectives: By the end of this lesson participants will have created a simple app that performs a task.
Time: 1.5h
List of required materials: Each participant should have access to a computer with adequate internet access. Each participant should have the three handouts for the session.
Welcome 10min: Introduce yourself and go around the room have participants introduce themselves. Ask if the participants have ever used App Lab before.
Idea/Introduction: Thinking of just one problem to solve can be difficult. This activity is meant to get the participants’ creative juices flowing and help them frame a project idea.
Learning Outcome: Participants will be able to specify a problem that interests them - and frame that problem so that it is ready to prototype.
Time: 1h
Brainstorm:
Use the Brainstorming Mad Lib to help participants narrow down their ideas. Participants will select "where" their problem takes place and "what" type of problem they are interested in solving. This should help participants who may need some structure to begin their creative process, and it may also help highly creative participants focus the scope of their project.
Framing for slower-paced participants: Participants who struggle with higher-level problem solving may need to work through the thought process out loud. Have App Authors volunteers talk participants through the worksheet together if participants seem unable to work through it by themselves. Have participants circle a where and what and then help them fill out the Mad Lib.
Framing for faster-paced participants: For participants that have clear ideas about their apps, we want them to be able to break down those ideas into individual actions. Translating ideas into app interactions is the first step to conceiving the kind of code development that will be needed to construct an app.
App Lab Guide:
After participants have brainstormed a problem hand them the App Lab guide. This guide will help them understand what App Lab can do. Participants can use App Lab to create components, edit components, and get info about components. It would be useful for you as the facilitator to try to make a simple app before you begin helping the students' troubleshoot. Have students log in to App Lab and create a component and decide what they want the component to do in their app to help solve their brainstormed problem.
Wrap up summary 10m: Pass out development badges to each of the participants, and ask participants about what they learned about coding.
Reflection 10m: After the participants have left reflect on the App Authors experience.
Worksheets:
Brainstorming
App Lab Guide