Business Intelligence Integration Services Project: Creation and Deployment
Objectives
This chapter will enable you to:
1. Extract-Transform-Load (ETL) data from several data sources to the data warehouse
2. Deploy ETL package to the Integration server
3. Execute the deployed ETL package
Introduction
This chapter introduces the SQL Server Integration Services (SSIS) and SQL Server Data Tools (SSDT) as the major software tools to build ETL packages. Several examples are provided to enable you to extract data from several sources, transform these data into their desired state and load them to the data warehouse.
In addition to the creation of ETL package, this chapter also covers the deployment of the ETL package to the Integration Server to allow a package to be executed by the user or by the system based on schedule.
Throughout this chapter, an ETL project is also referred to as SQL Server Integration Services (SSIS) Project or simply Integration Services Project.
Understanding SQL Server Integration Services (SSIS) and SQL Server Data Tools (SSDT)
SSIS stands for SQL Server Integration Services. This is part of Microsoft’s Business Intelligence (BI) Stack. It is a service that was developed and continuously being updated to enable the developers to extract data from homogenous and heterogeneous sources, transform these data to their desirable forms and load them to their destinations and in most cases, data warehouse databases.
SSIS offers a graphical user interface (GUI) to make the creation, deployment and maintenance of Integration Service projects easier. This is made possible through the use of SQL Server Data Tools (SSDT) which acts as a front-end tool which allows developers to create BI-related projects such as Analysis, Reporting and Integration Services. However, there is also an option to do most of the tasks programmatically if desired.
Required Resources
This resource is written based on the assumption that you have a running instance of SQL Server 2012 and already have prior knowledge and experience at least on the basics of the said software.
The ETL examples in this material will be requiring two SQL Server databases namely: AdventureWorks (as an OLTP or source database) and AdventureWorksDW (as an OLAP or destination database). These databases must be made available first in your SQL Server instance before working on the given ETL examples.
In reality, the source and destination databases are stored in different server instances but for simplicity and learning purposes, these databases will be hosted by a single SQL Server instance.
Creating the AdventureWorks Database
This will be used as a source or OLTP database.
1. Open the site: https://github.com/Microsoft/sql-server-samples/releases
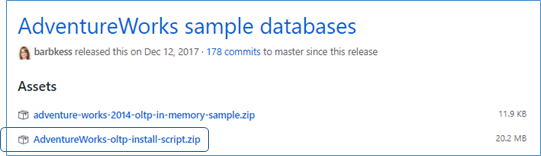
2. Scroll down the page until you’ve reached the part shown below.
.
1. Click AdventureWorks-oltp-install-script.zip
2. Extract the downloaded zipped file to "C:\Samples\AdventureWorks\"
3. Open the SQL Server Management Studio and connect to your SQL Server database engine instance.
4. In SQL Server Management Studio, click File > Open > File…
5. Go to C:\Samples\AdventureWorks\ folder and open “instawdb” file. You might be asked to login to the SQL Server database engine instance again before the file will be opened.
6. Click Query menu > SQLCMD Mode
7. Look for this statement in the file that you just opened:
:setvar SqlSamplesSourceDataPath "C:\Samples\AdventureWorks\"
Make sure that the path points to where you extracted the zipped file in step 4.
8. Execute the Query and wait for the database to be created and populated with data.
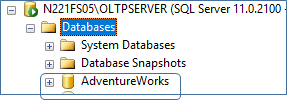
9. In the absence of any error, a database named “AdventureWorks” should have been created as shown by the screenshot below:
.
This database has a long list of tables designed to store sales-related data. It was prepared by Microsoft for anyone learning database-oriented technologies.
Creating the AdventureWorksDW (Data Warehouse) Database
This will be used as destination or OLAP database
1. Open the site: https://github.com/Microsoft/sql-server-samples/releases
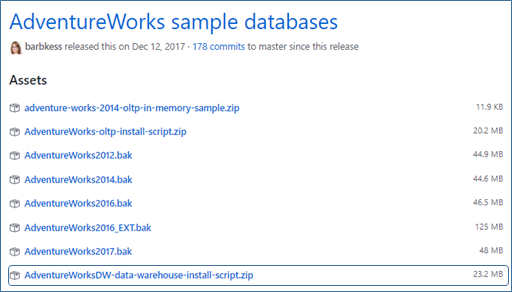
2. Scroll down the page until you’ve reached the part shown below.
.
3. Extract the downloaded zipped file to "C:\Samples\AdventureWorksDW\"
4. Open the SQL Server Management Studio and connect to your SQL Server database engine instance.
5. In SQL Server Management Studio, click File > Open > File…
6. Go to C:\Samples\AdventureWorks\ folder and open “instawdbdw” file. You might be asked to login to the SQL Server database engine instance again before the file will be opened.
7. Click Query then SQLCMD Mode (if not yet done or enabled previously)
8. Look for this statement in the file that you just opened:
:setvar SqlSamplesSourceDataPath "C:\Samples\AdventureWorksDW\"
Make sure that the path points to where you extracted the zipped file in step 4.
8. Execute the Query and wait for the database to be created and populated with data.
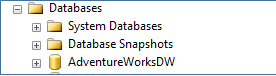
9. In the absence of any error, a database named AdventureWorksDW should have been created as shown by the screenshot below:
.
This database was prepared and made available by Microsoft for those who want to learn data warehousing using SQL Server technologies.
Getting Started with SQL Server Data Tools (SSDT)
Opening SSDT
To open SSDT, from the Start menu of Windows, click Microsoft SQL Server 2012 group, then click SQL Server Data Tools
Creating an Integration Services Project
1. Create a folder named “SSIS” in the Desktop folder.
2. In SSDT, click
File menu -> New -> Project
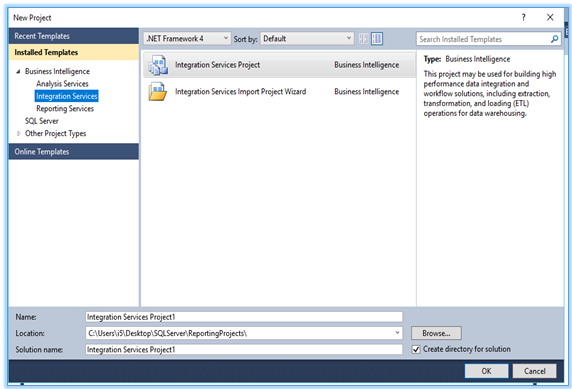
.
3. From the New Project dialog box (as shown above), click Integration Services under Business Intelligence template
4. Click Integration Services Project from the project types
5. Click Browse button and select your “SSIS” folder
6. In the Name box, type SSIS_Project_Sample1
7. Click OK
The SSDT Integrated Development Environment
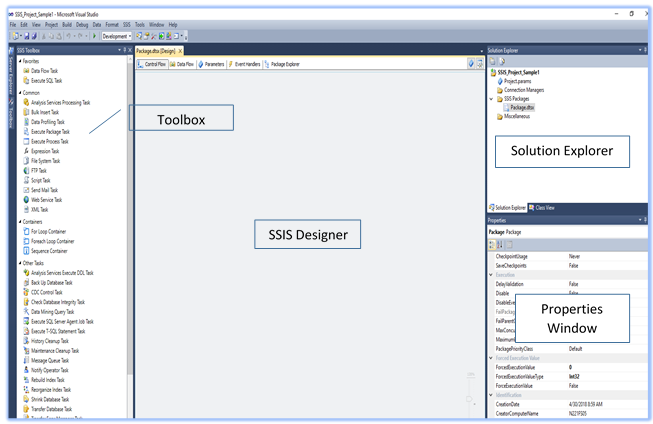
.
Toolbox
It contains the data and control flow controls that are needed in creating the Integration Services project.
Solution Explorer
This is a window which shows your projects including their respective files. From here, you can do a sort of file management task such as file creation, renaming and deleting.
Properties Window
This is a window where you can modify the value of a desired property
SSIS Designer
This is the space created for you to design your ETL package. On this, you can drop a desired control from the Toolbox. This is similar to dropping a control on a form when you are designing a Windows or web application form.
SSIS
Designer Tabs

.
1. Control Flow
It is on this tab where you can drop a control such as Data Flow Task along with other required tasks. In short, this is the place where you can build and show the top level implementation of your ETL package.
2. Data Flow
After inserting a control such as the Data Flow Task, you can switch to this tab and start implementing the logic behind the inserted control. Connecting the data source, data transformation and loading are actually done here.
3. Parameters
It is on this tab where you can create a parameter as maybe required in your package. Through parameters, you can provide a value for a particular property at runtime.
4. Event Handlers
On this tab, you can implement a logic in response to a certain event. For example, you can define here what should happen, such as displaying a message to the user, when a package encounters a runtime error.
5. Package Explorer
This tab shows the components of your package such as Connection Managers, Log Providers, etc.
6. Progress/Execution Result
This is the tab which shows when a package is executed. As the word “progress” means, it gives you a feedback on what transpires as each task in the package executes until it reached the end. You can see here whether a task is executed or failed.
SSIS Controls
SSIS controls are found in the Toolbox items which are grouped as shown below.
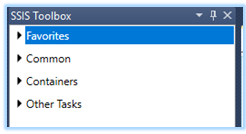
.
There is a long list of controls in the Toolbox. This resource does not intend to use them all but it aims to introduce the controls that are enough for you to implement the basic concepts of ETL project development. After learning how to use these basic controls, you can go several steps higher as you implement more advanced tasks with the use of appropriate controls.
Example 1. From Flat File to SQL Server Database
This example will demonstrate how data from a text or flat file can be extracted, transformed and loaded to the data warehouse.
Controls Required
Data Flow Task, Flat File Source, Data Conversion and OLE DB Destination
1. Open
Notepad and type the following data:

.
2. Save the file as Currency.txt
3. Using the Package of your SSIS_Project_Sample1, drag and drop a Data Flow Task from the Toolbox
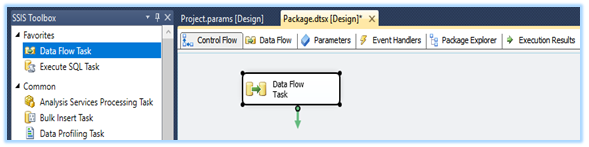
.
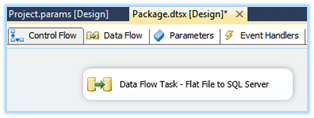
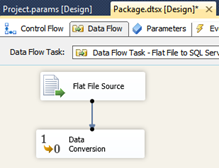
4. Right-click the inserted Data Flow Task, and click Rename from the context menu
5. Set the name to Data Flow Task – Flat File to SQL Server
.
6. Double-click the Data Flow Task – Flat File to SQL Server control. It switches to Data Flow page as shown. On this page, we will implement the
extraction, transformation and loading of data
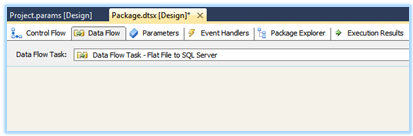
.
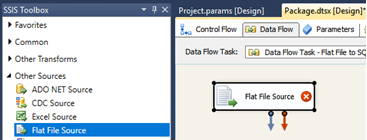
7. Add a Flat File Source to this page
.
8. Double-click the inserted Flat File Source. The editor shows.
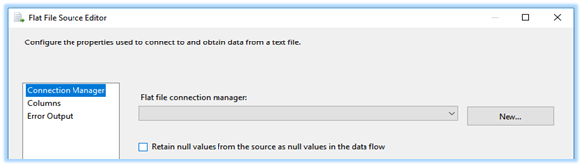
.
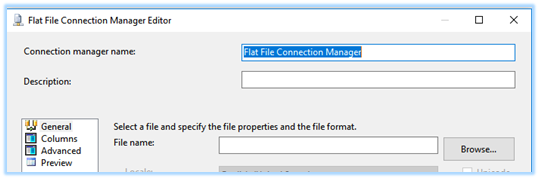
9. Click New…
from the Flat File Editor. The Flat
File Connection Manager Editor shows.
.
10. Click Browse… to select the source file
Currency.txt created in #1.
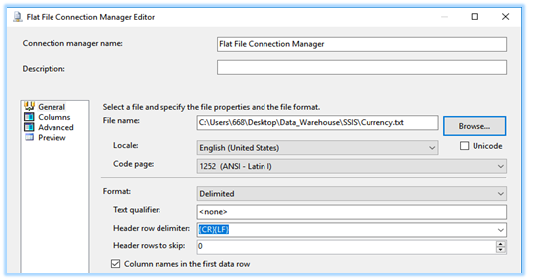
.
11. Click the Preview to see the records from the source file. You should be able to see the data stored in Currency.txt.
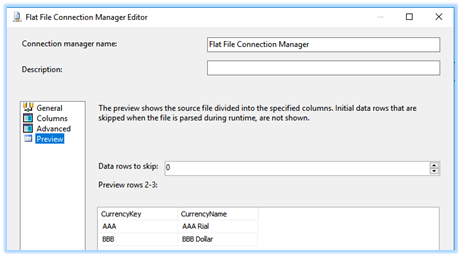
.
12. Click OK.
13. Drag and drop Data Conversion control from the Toolbox to the package.
Question: Why Data Conversion control is needed?
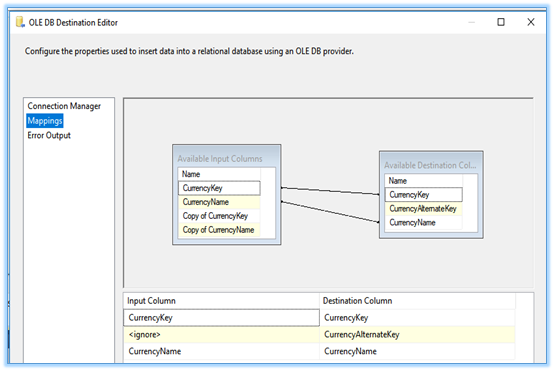
Answer: The data types of CurrencyKey and CurrencyName in the table DimCurrency are nchar and nvarchar. The “n” in nvarchar means that a column with this type can store Unicode characters while the data type of CurrencyKey and CurrenctName that are stored in the Currency.txt is char or character. This will result to an error during the loading of data to a table in the warehouse. To avoid this problem, character needs to be converted to a Unicode string.
14. Drag the blue line from Flat File Source control and drop it to the Data Conversion control. This should connect the two controls together.
.
15. Double-click the Data Conversion control. This will show the Data Conversion Transformation Editor.
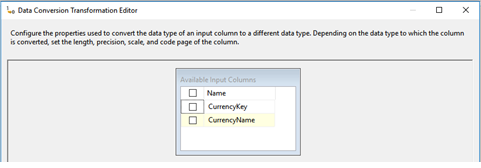
.
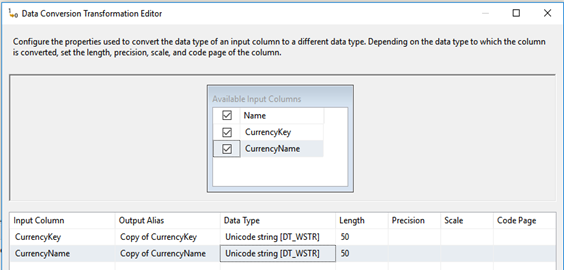
16. Tick/check the boxes before CurrencyKey and CurrencyName. The output is similar to the image below.
.
Make sure that the selected data type is Unicode string [DT_WSTR] for both fields. Notice also that each column has its Output Alias. You may edit this or keep it as it is.
17. Click OK
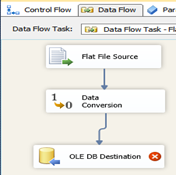
18. Drag and drop an OLE DB Destination control from the Toolbox to the package and connect it to Data Conversion control
.
19. Double-click OLE DB Destination control to show the Editor. Through this Editor, you will be able specify where the extracted data should be stored in the data warehouse.
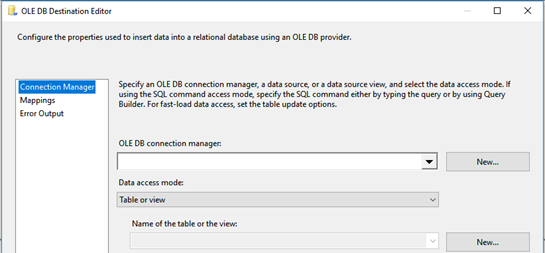
.
20. Click New… This will show the OLE DB Connection Manager.
21. Click New… again. The Connection Manager shows.
.
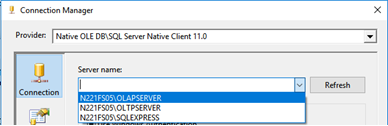
22. Select the server name that stores your desired data warehouse database.
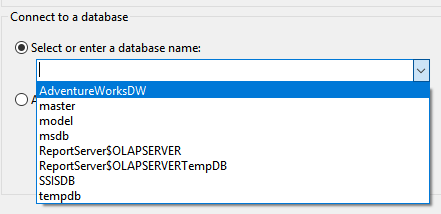
23. Next step is to select the data warehouse database from the list.
.
24. Click Test Connection button. You should be able to read the message “Test Connection succeeded”.
25. Click OK to close the Connection Manager.
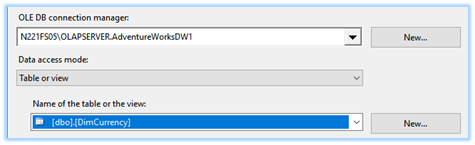
26. Click OK to go back to the OLE DB Destination Editor
27. Select the table DimCurrency from the list
.
28. Click Mappings
.
29. Modify the mappings as shown below:

.
The new mappings should now look like this:
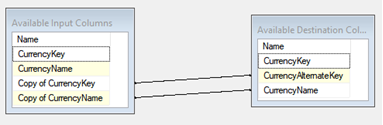
.
30. Click OK to close the Editor.
Notice that below your package that there are 2 connection managers already created. One for the flat file and one for the AdventureWorksDW database.

.
31. Right-click the package from the Solution Explorer and click Execute Package as shown below:

.
In the absence of any error, your output is similar to the following:
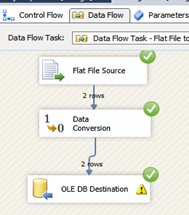
.
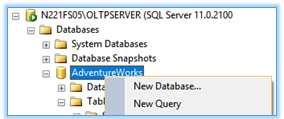
32. Check whether the data were actually loaded by creating a New Query in SQL Server Management Studio as shown below:
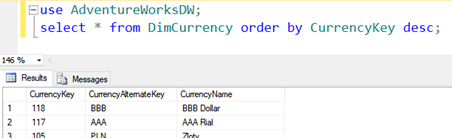
.
Notice that the first 2 records are the ones that were extracted from the text file.
This example demonstrated the basics of ETL package development. You have extracted data from the text file, transformed from non-Unicode to Unicode characters through Data Conversion and loaded the data into the data warehouse database.
Example 2. From Excel File to SQL Server Database
This example will demonstrate how data from an Excel file can be extracted, transformed and loaded to the data warehouse.
Controls Required
Data Flow Task, Excel Source, Data Conversion and OLE DB Destination
1. Open Microsoft Excel and type the following data:

.
2. Save the file using the filename Geography astype Excel 97-2003
3. Close the Geography file.
4. In your SSIS_Project_Sample1, create a new
package by clicking Project à New SSIS Package

.
5. From the Solution Explorer, right-click the new package and rename it to etlExcel
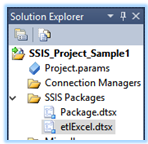
.
6. Drag and drop a Data Flow Task from the Toolbox on to your etlExcel package
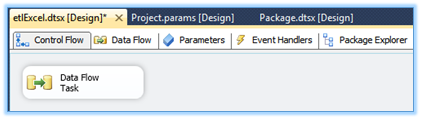
.
7. Right-click the inserted Data Flow Task, and click Rename from the context menu
8. Set the name to Data Flow Task – Excel File to SQL Server
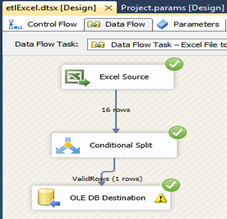
9. Double-click the Data Flow Task – Excel File to SQL Server control. It switches to Data Flow page as shown. On this page, we will implement the extraction, transformation and loading of data.
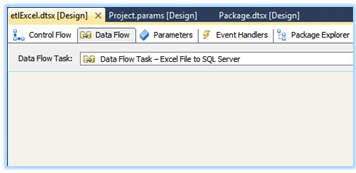
.
10. Add an Excel Source to this page
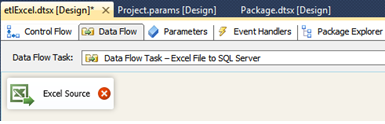
.
11. Double-click the inserted Excel Source to show the Editor.
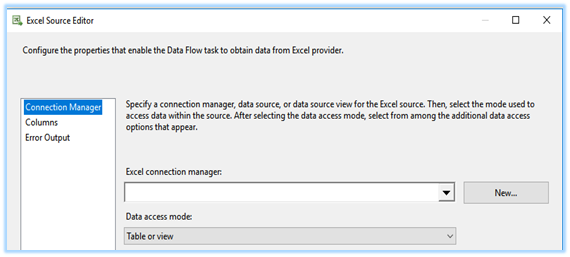
.
12. Click New… from the Excel Source Editor. The Excel Connection Manager Editor shows. Before doing the next step, make sure that the Geography Excel file is closed.
13. Click Browse… to select the Geography Excel file that you’ve saved before.
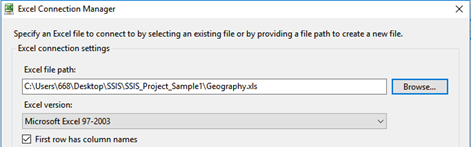
.
14. Click OK
15. Select Sheet1$ from the list. This is the sheet in Geography file where the records are stored.
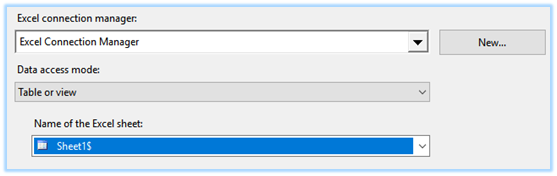
.
16. Click OK
17. Insert a Conditional Split control and connect it with your Excel Source.
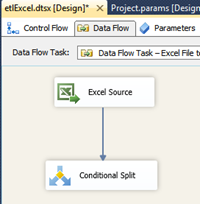
.
Conditional Split control will be used to select only the valid rows. Otherwise, even empty rows will be selected and entered in the destination table.
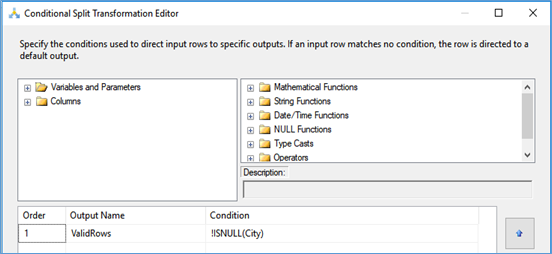
18. Double-click the Conditional Split control to configure it.
19. In the Output Name, type ValidRows, and in the Condition, type !ISNULL(City)
The condition means that it will only select
the rows whose City is not null.
.
20. Click OK
21. Insert an OLE DB Destination
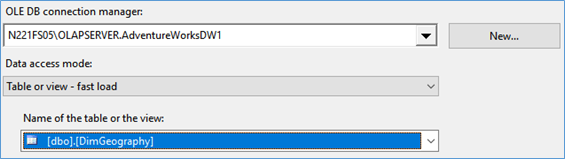
22. Double-click OLE DB Destination control to show the Editor.
23. Select the OLE DB Destination Manager which you have created from Example 1.
24. Select DimGeography as your destination table as shown below.
.
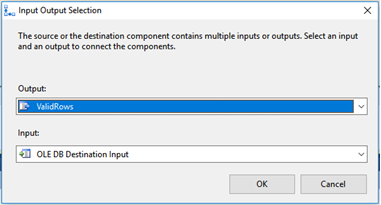
25. Connect Conditional Split and OLE DB
Destination through the blue-colored line.
26. In the Input Output Selection, choose ValidRows as shown below:
.
27. Double-click again the OLE DB Destination to set the mapping of columns between the source and destination. Refer to the screenshot below.
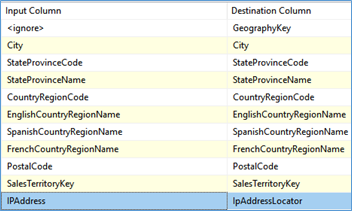
.
GeographyKey is automatically generated and therefore needs to be ignored.
Since there is no 64-bit driver for Excel, you
must set the project’s Run64bitRuntime to False.
28. From the Solution Explorer, right-click the project and click Properties
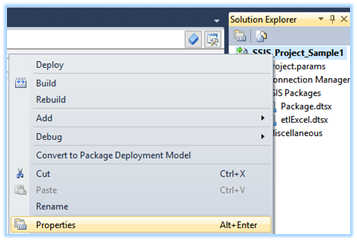
.
29. Under Debugging option, set Run64BitRuntime to False

.
This needs to be done because Excel does support
64-bit runtime for this particular task.
30. Execute the package. If everything has been done correctly, an output similar to the following screenshot should be generated:
.
Notice that from the 16 rows extracted from the
Excel Source, only 1 row had been inserted into the destination table. This is correct since there is only 1 record
in the Excel file.
31. Verify if the record was inserted into DimGeography table of the AdventureWorksDW database by executing the following query in SQL Server Management Studio

.
Example 3. From SQL Server Database to SQL Server Database
This example will demonstrate how data from an SQL Server database can be extracted, transformed and loaded to the data warehouse.
Controls Required
Data Flow Task, OLE DB Source, Data Conversion and OLE DB Destination
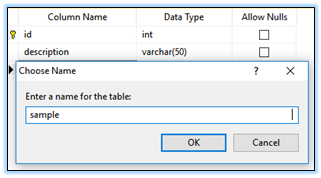
1. Using the SQL Server Management Studio, create a new table in the AdventureWorks database with specifications and filename shown below.
.
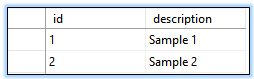
2. Open the sample table which you’ve just created and add records.
.
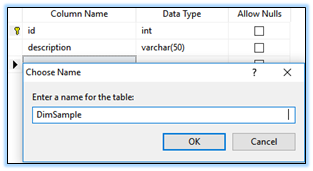
3. Create a new table in the AdventureWorksDW database with specifications and filename shown below.
.
4. In your SSIS_Project_Sample1, create a new package by clicking Project à New SSIS Package

.
5. From the Solution Explorer, right-click the new package and rename it to etlSQLDB
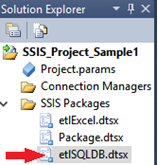
.
6. Drag and drop a Data Flow Task from the Toolbox on to your etlSQLDB package
7. Right-click the inserted Data Flow Task, and click Rename from the context menu
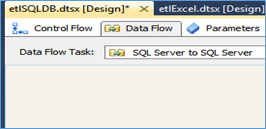
8. Set the name to "SQL Server to SQL Server"
9. Double-click the Data Flow Task – SQL Server to SQL Server control. It switches to Data Flow page as shown. On this page, we will implement the extraction, transformation and loading of data.
.
10. Insert an OLE DB Source
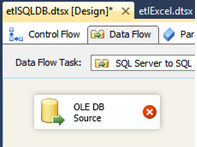
.
11. Double-click the OLE DB Source to show the Editor
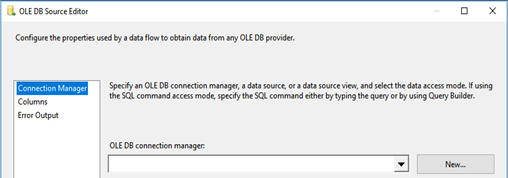
.
12. Click New… This will show the Configure OLE DB Connection Manager box
13. Click New…
14. Type . (dot) in Server name. This means your localhost where your SQL Server is running.
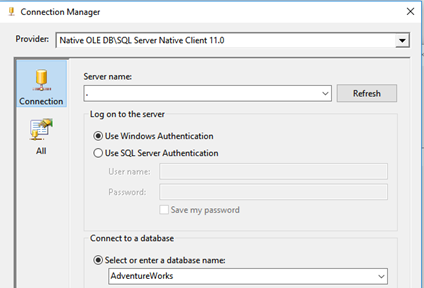
.
15. Select AdventureWorks as the database name. This is the database where data will be extracted from. Thus, data source.
16. Click Test Connection. If everything went well, a message similar to the one shown below should be displayed.
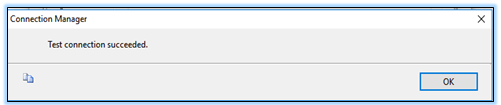
.
17. Click OK
18. Click OK again. This goes back to the OLE Source Editor
19. Select [dbo].[sample] table as shown below.
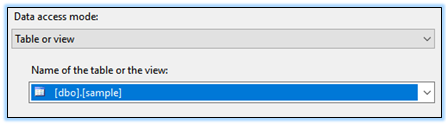
.
20. Click OK
21. Insert an OLE DB Destination control and connect it to OLE DB Source
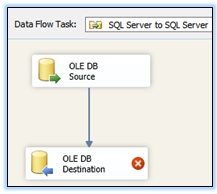
.
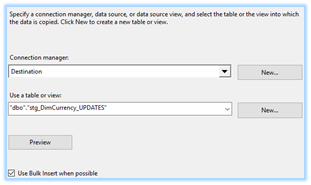
22. Double-click the OLE DB Destination to configure it.
23. Set the OLE DB Connection Manager to the connection object linked to your destination database.
24. Set the name of the table to dbo.DimSample as shown below.
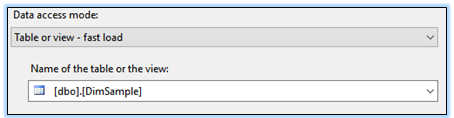
.
25. Click Mappings to make sure that the source and destination columns are properly connected.
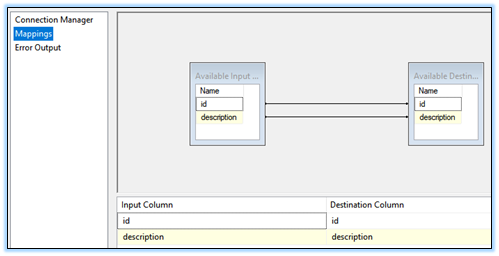
.
26. Click OK
27. Execute the etlSQLDB package. In the absence of error, your output should be similar to the following:
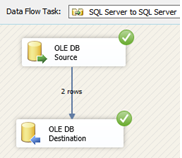
.
The above output shows that there were 2 records that have been extracted from the source and loaded to the destination. No transformation such as Data Conversion was used in this example since the destination and source tables are of the same types and specifications.
Example 4. Slowly Changing Dimension - From SQL Server Database to SQL Server Database
Once the initial set of data has been loaded to the data warehouse, the succeeding ETL processes are normally done in terms of increments. This means that only the newly inserted and updated records need to be extracted, transformed (if any) and loaded to the data warehouse.
This example will demonstrate how updates (insert, update, delete) made in Sales.Currency table of AdventureWorks SQL Server database can be loaded to the data warehouse.
Controls Required
Data Flow Task, OLE DB Source, CDC (Change Data Capture) and OLE DB Destination
Before creating the package, you must enable Change Data Capture feature of SQL Server.
Enabling the Change Data Capture (CDC) of SQL Server
1. In SQL Server Management Studio (SSMS), right-click AdventureWorks and click New Query.
.
2. Type and execute the query as shown below.
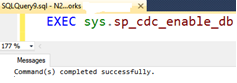
.
3. Enable CDC for Sales.Currency table by executing the following statement:
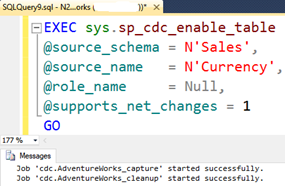
.
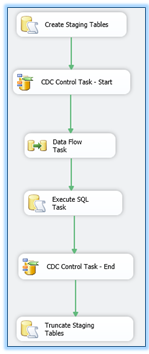
4. In your SSIS_Project_Sample1, create a new package and rename it to etlCDCCurrency
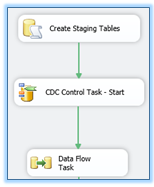
The following figure shows the desired flow for this example.
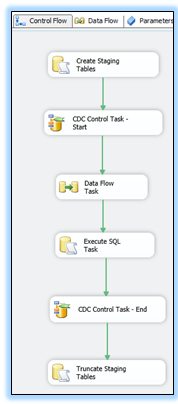
.
5. Insert an Execute SQL Task from the Toolbox on to your etlCDCCurrency package
6. Double-click the inserted Execute SQL Task control to show its Editor
7. Set the following properties:
Name : Create Staging Tables
Connection : connect to your AdventureWorksDW database
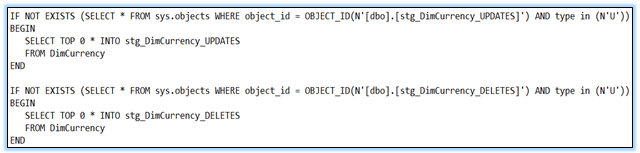
.
This means that if the tables named stg_DimCurrency_UPDATES and stg_DimCurrency_DELETES do not exist yet, create them. These tables will temporarily hold the values of the updated and deleted records.
8. Insert a CDC Control Task from the Toolbox on to your etlCDCCurrency package
9. Right-click the CDC Control Task and rename it to CDC Control Task – Start
10. Double-click the CDC Control Task – Start and show its Editor
11. In the Editor, set the properties as shown below:
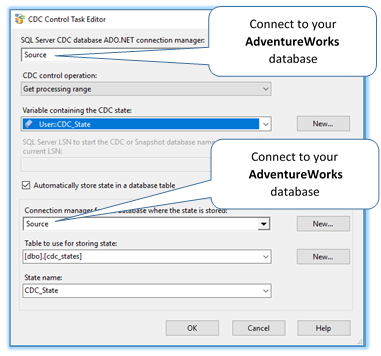
.
12. Connect Create Staging Tables to CDC Control Task – Start
13. Insert a Data Flow Task and double-click it. This switches from Control Flow to Data Flow.
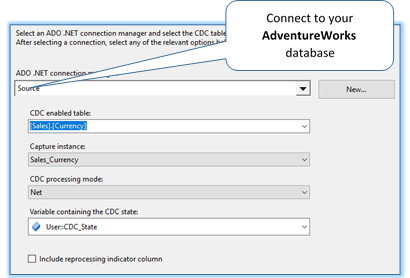
14. Insert a CDC Source and double-click it to show its Editor.
15. In the Editor, set the CDC Source properties as shown below:
.
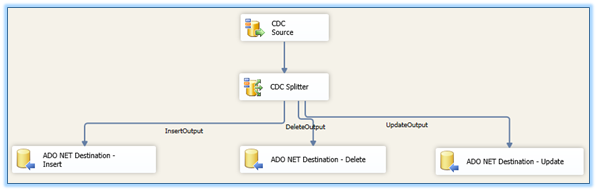
16. Insert a CDC Splitter and connect it to the CDC Source
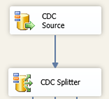
.
17. Insert three (3) ADO.NET Destination controls and rename them as shown below.

.
* Their names tell us their function.
18. Connect CDC Splitter to the ADO.NET Destination – Insert and configure as shown:
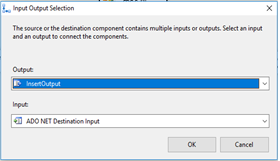
.
19. Double-click the ADO-NET Destination – Insert to show the ADO.NET Destination Editor
20. Set the connection parameters as shown:
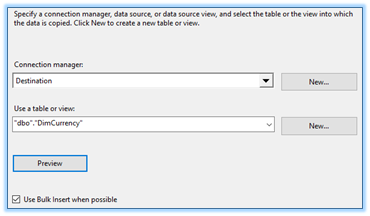
.
Destination is none other than your AdventureWorksDW (data warehouse database) and table is where the new currency record(s) should be inserted.
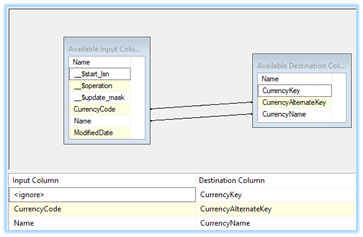
21. In the same ADO.NET Destination Editor, click Mappings and link the source columns to the destination columns.
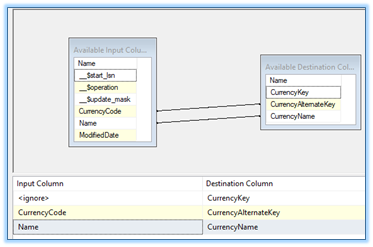
.
22. Click OK
23. Connect CDC Splitter to the ADO.NET Destination – Delete and configure as shown:
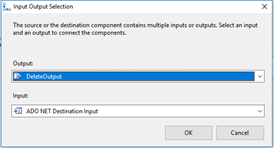
.
24. Double-click the ADO-NET Destination – Delete to show the ADO.NET Destination Editor.
25. Set the connection parameters as shown:
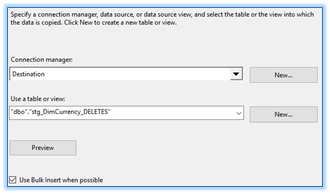
.
This means that those records marked as deleted from the source will be recorded in the staging table named stg_DimCurrency_DELETES
26. In the same ADO.NET Destination Editor, click Mappings and link the source columns to the destination columns.

.
27. Click OK
28. Connect CDC Splitter to the ADO.NET Destination – Update. Notice that UpdateOutput is automatically assigned.
29. Double-click the ADO-NET Destination – Update to show the ADO.NET Destination Editor
30. Set the connection parameters as shown:
.
31. In the same ADO.NET Destination Editor, click Mappings and link the source columns to the destination columns.
.
32. Click OK
.
33. Now, switch back to the Control Flow page and our output should look like what is shown below:
.
34. Insert an Execute SQL Task control and connect it to the Data Flow Task control.
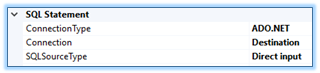
35. Double-click the Execute SQL Task control and set the following properties:
Connection : connect to your AdventureWorksDW database
SQLStatement :
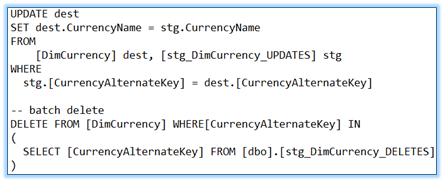
.
The above SQL statements mean that update the records in the data warehouse (AdventureWorksDW) based on the updates done from the source database (AdventureWorks) which are saved in the staging tables.
36. Click OK
37. Insert a CDC Control Task, rename it to CDC Control Task - End and connect it to Execute SQL Task
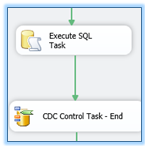
.
38. Double-click the CDC Control Task - End and set the properties as shown:
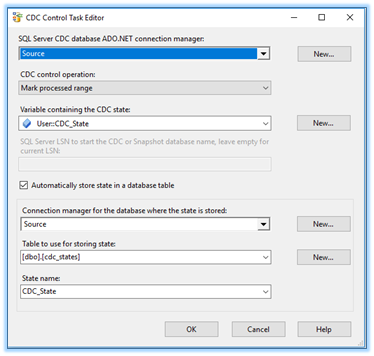
.
Source: this is your source database (AdventureWorks)
CDC Control Operation: Mark processed range
This means that
those records that have been processed by this package will be marked as
“processed” to avoid being processed again in the next executions of the same
package.
39. Click OK
40. Insert Execute SQL Task control, rename it as Truncate Staging Tables, and connect it to the CDC Control Task – End
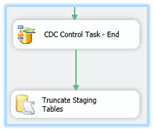
.
41. Double-click the Truncate Staging Tables control and set some of its properties as shown below:
.
Connection: connect to your AdventureWorksDW database
SQLStatement:

.
Your final output for this package should look like the following:
.
Testing the etlCDCCurrency Package
1. In SQL Server Management Studio, open the Sales.Currency table and add a new record:
CurrencyCode Name
ZZZ Currency ZZZ
2. Execute the etlCDCCurrency package
3. In SQL Server Management Studio, open the dbo.DimCurrency table of AdventureWorksDW database. You should see that the record that you inserted in the Sales.Currency table of AdventureWorks database is now added in the DimCurrency table of the data warehouse database.

.
4. Edit the same record in Sales.Currency table. Set the Name to Currency ZZZ 123
5. Execute the package again and verify from dbo.DimCurrency table of AdventureWorksDW database if update also took place.
The
expected output should be:

.
Summary
This chapter has introduced the basic concepts of ETL project development. It provided examples on how to extract data from several sources such as flat file, Excel file and SQL Server database and load to the SQL Server data warehouse database.
The next chapter will cover the deployment of ETL project to the SQL Server Integration Server.