Business Intelligence Integration Services Project: Creation and Deployment
Objectives
This chapter will enable you to:
1. Deploy your SSIS packages to the SQL Server Integration Server
2. Execute a package manually
3. Create a schedule for automatic package execution
Introduction
Just like a Windows, web or mobile application, ETL project is meant to be deployed to a server. This is to enable its execution independent of the source project. When package is deployed, it can be manually executed by an authorized user or by the system based on schedule.
Connecting to the SQL Integration Services (SSIS)
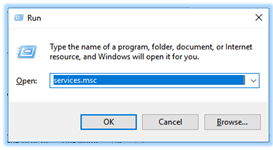
Before deploying your SSIS project, ensure that the SSIS is running. One way to check this is to run the Services application of Windows.
1. Press Windows key + R to open the Run utility application.
2. Type services.msc and press Enter
.
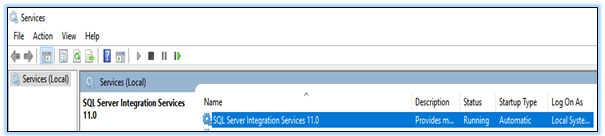
3. From the list of services, look for SQL Server Integration Services 11.0. The status must be Running.
.
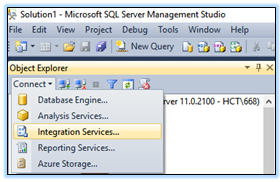
4. Open SQL Server Management Studio and connect to SQL Server Integration Services
.
5. If not sure about the server name, click <Browse for more…> from the
Server name list
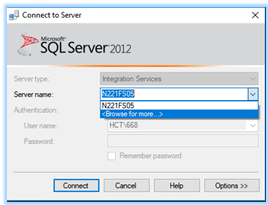
.
6. Select the desired server from the Integration Services list and click OK
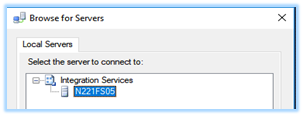
.
7. Click Connect. If successfully connected to the Integration server, you should see a similar output as shown below:
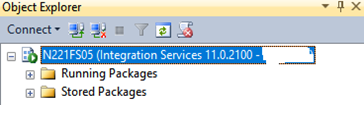
.
This means that your Integration server is ready to host your SSIS packages.
Creating the SSISDB
SSIS project deployment requires SSISDB (SSIS Database) to be created from the SQL Server.
1. Right-click Integration Services Catalog and click Create Catalog.
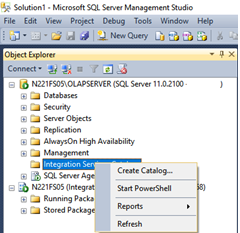
.
2. In the Create Catalog box, type the name of SSISDB (optional) and your password required for encryption
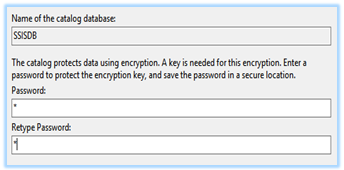
.
3. Click OK. You should notice that under the Integration Services Catalog of your server, SSISDB in in the list
Deploying the SSIS Project
1. Open your SSIS Project in SQL Server Data Tools (SSDT)
2. Build your project by clicking Build menu, then Build <Project Name>. In the absence of any error, you should see a message Build succeeded on the lower left corner of your SSDT screen
3. From the Solution Explorer, right-click your project and click Deploy

.
4. Click Next from the Integration Services Deployment Wizard
5. Select your SQL Server by clicking Browse…
6. Click OK when done.
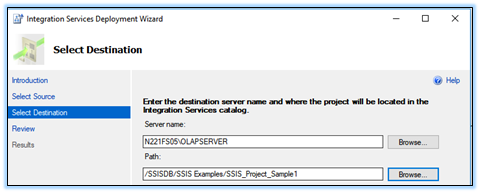
7. Click the Browse… button next to the Path: textbox
8. Click New Folder…
9. Type SSIS Examples as folder name and click OK
10. Click OK to go back to the Wizard. Your screen should be similar to the screenshot below.
.
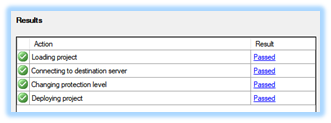
11. Click Next. This brings you to Review step
12. Click Deploy. If you’ve got the same results as shown below, then your SSIS project has been successfully deployed.
.
13. Click Close
Executing the Deployed Packages Manually
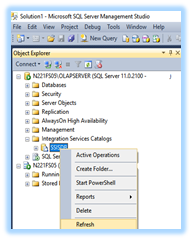
1. From the SQL Server Management Studio, refresh
your SSISDB
.
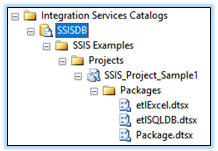
2. Collapse your SSISDB until your deployed packages are listed. Let us manually execute your etlSQLDB.dtsx package.
.
3. Before manually executing the etlSQLDB.dtsx package, open your Sample table in AdventureWorks database and edit the records as shown below.
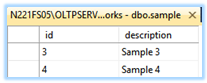
.
4. Close the Sample table window after editing.
5. In SQL Server Management Studio, right-click your etlSQLDB.dtsx package and click Execute… This opens up the Execute package dialog.
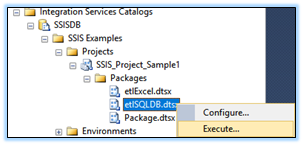
.
6. Click OK
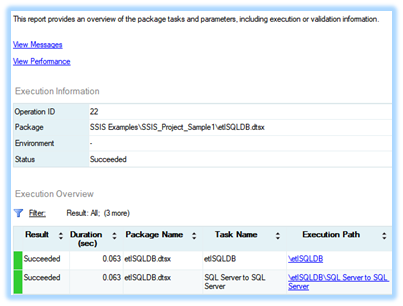
7. Click Yes from the message box. The successful package execution will give you an output similar to what is shown below:
.
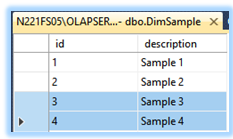
8. Open your DimSample table from your AdventureWorksDW database to verify whether the records have been loaded to it. You should see an output similar to the following:
.
The above output clearly shows us that the records with ID 3 and 4 were indeed loaded to the data warehouse after the manual execution of the package.