The Essential Guide to the Physical Therapy Aide Revised
The Profession of Physical Therapy
You are about to embark on a journey. Your travels will take you through the history of physical therapy, the importance of physical therapy, the roles of different staff, and your role with physical therapy, along with techniques and procedures required to be a physical therapy aide.
Physical Therapy dates its origin back to Ancient Greece, but has started to bloom within the last hundred years. Around 460 BC, a Greek physician recommended massage therapy as a method to promote physical healing and to relieve stress. This physician, Hippocrates, went beyond the use of massage therapy to include manual therapy, aquatic therapy, and the use of hot and cold techniques. These are just some of the ancient techniques that are still widely used in the fast-paced but rewarding field of physical therapy.

A sketched bust of Hippocrates.
Source: npr.orgHippocrates Bust
As a physical therapy aide, you will participate in the recovery of patients. You will have responsibilities, duties and privileges, all of which will be described here. To properly perform your job you will find the following skills invaluable: kindness, patience, sincerity, and accountability.
- Kindness is acting with compassion and politeness. It also means that you are authentic, meaning you are "true" and do not fake it.
- Patience allows you to endure difficult circumstances without acting annoyed or angry.
- Sincerity will let you voice your feelings and thoughts in a direct and professional manner.
- Accountability means taking responsibility for your actions and meeting expectations.
Perhaps the most important qualities in a physical therapy aide are honesty and integrity. You must not lie, cheat or steal. Old-fashioned honesty can pave your way forward in physical therapy. It's essential with patients as well as in your office duties, which may include answering telephones, taking messages, operating office machines such as copiers, scanners, fax machines, and computers. As an honest, compassionate, reliable physical therapist aide, you will not simply be punching in and out of work; you will find that each day is rewarding as you assist in restoring the dreams of patients who once thought these dreams were lost due to injury or disease.
The expectation in completing this course is not to qualify you in the diagnosis, treatment or evaluation of patients; this is reserved for physical therapists. This course will provide you with a descriptive, comprehensive presentation that will provide you with your foundation in the world of physical therapy.
There is an old Chinese proverb that says, "Every journey must begin with a single step." Today you begin yours by starting this aide course. Once you complete this course, then begin to gather experience in the field, you may find you want to continue your training and become a therapist.
Definition
Medicare defines physical therapy as “treatment of injury and disease by mechanical means, such as heat, light, exercise and massage.” Nearly everyone has used a bag of ice or even heat to relieve pain, but what about if this pain persists and becomes long term? This is where the physical therapy comes in. A physical therapist will perform an evaluation that will involve a series of tests and measurements as part of an exam that will identify a patient’s impairments. These impairments are the reasons why the patient is unable to do what they normally do. The use of stretching, strengthening, manual therapy, exercise, and conditioning techniques will be used to treat the impairments causing these functional limitations, allowing the patient to improve mobility and strength, decrease pain, and return to their prior level of function.
Impairments | Functional Limitations | Disability |
Impaired Range of Motion | Unable to squat | Unable to be catcher (baseball) |
Impaired Strength | Unable to jump | Unable to leap forward to throw |
Impaired Balance | Unable to stand on one leg | Unable to quickly pivot |
The above comments in the table are not meant for you to study, but to see the role of the physical therapist and therapist assistant. Therapy addresses impairments; impaired range of motion (ROM), strength, and balance are very common examples. These limit a patient’s function, such as his or her ability to squat, jump, or stand on one leg. These in turn translate into a disability. Being unable to sustain a squat would interfere with catching, jumping to throw a ball quickly, or standing on one leg to quickly pivot. During therapy, as the ROM, strength & balance are fixed, which should in turn fix the functional limitations, and remove the disability.
These techniques must be evaluated and identified by a physical therapist, and can be carried out by the physical therapist or the physical therapist assistant. Your role, as the physical therapy aide, must be performed under the strict supervision of the physical therapist.
History
While the history of physical therapy has components that date back to ancient times, it wasn't established as a field of study until 1881 when The Sargent School was chartered. Located in Boston, Sargent became the first school of physical education & physical therapy.
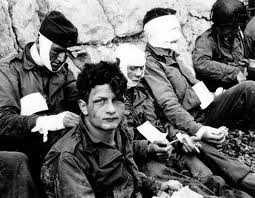
soldiers begin their recovery after injury.
Physical therapy grew considerably during World War I and World War II. During these large scale wars, there were notable advances in medicine that were able to save many lives. The survivors often had disabilities or impairments that doctors had not dealt with in the past. It was previously thought that disabilities were permanent and would not improve with additional medical intervention. This perception was due to the fact that most impairments and disabilities of the time were associated with the elderly. The World Wars caused many young men to return home as disabled veterans. Due to the youth of some soldiers, it become apparent that additional care would be needed. Congress passed legislation that created “Restorative Hospitals.” This allocated staff to the area of restoration of function.
There were several influential players during this initial surge of growth in physical therapy. Mary McMillan (1880-1959) is the earliest known therapist who pursued restorative medicine and played a pivotal role in therapy. She studied physical education and had a postgraduate degree in physical activity, including corrective exercises, massage, electrotherapy, aftercare of fractures, dynamics of scoliosis, psychology, neurology, and neuroanatomy. Mrs. McMillan’s work became crucial in the development of principles regarding what to do following injury, specifically the idea that early movement can enhance healing and prevent disability. Before retiring, McMillan drew those of similar minds and talent to create the American Women’s Physical Therapeutics. This organization eventually became the precursor to the American Physical Therapy Association, which remains the governing body for Physical Therapists in the United States.
As physical therapy began to grow, it touched people's lives on an individual basis. When the United States suffered a polio epidemic in 1916, the first physical therapy tests were established. Polio is a virus that when infected can cause muscle weakness to the point of flaccid paralysis. The varying degrees of weakness required a universal system to judge muscle strength. Here, physical therapy reached out to millions of lives all at once. Therapists were soon sought for their muscle training techniques. During this time further legalization passed, and multiple charitable organizations were created, most notably the March of Dimes in 1938. The March of Dimes recognized the importance of additional facilities for polio aftercare. Sometime between the two world wars, the term Physical Therapist was coined and remained. The demand for therapists escalated, spurring the creation of the Physical Therapist Assistant . Aides always played an important role, but the position wasn't named until years later. A term was required to identify an individual who assists with therapy, but is unable to bill for such services. This was termed "aide."
Current Practice
A therapist performs a muscle test, testing the patient's strength in her arm.
Physical therapy is the profession involved with the restoration of function lost due to illness or disease. It reaches into every aspect of the health care field. Through the American Physical Therapy Association and its state chapters, leaders in the field of physical therapy influence legislation to improve standards of care, and establish the Vision Statement for the Physical Therapy Profession.
The APTA has also been influential in the creation of the Doctorate of Physical Therapy, along with advocating on a state-by-state basis for Direct Access, which would allow a patient to be seen by a physical therapist without the need for a referral from that patient's physican. The APTA also supports the use of the title "doctor" only for those physical therapists who have completed a doctorate of physical therapy degree.
By becoming a physical therapy aide, you are taking one small step today, following the trail blazed by many who came before you. Your journey will begin as the student. You will learn and grow from a student to a skilled rehabilitation aide who assists with patients and their care. You will then find yourself teaching others around you, from patients to new aides.
Career Opportunities
Education
Physical Therapy Aide
There aren't any specific educational requirements to become a physical therapy aide. As we discussed, an ability to use computers and other technology is helpful, along with the various traits listed in Chapter One. The ability to read and follow instructions will greatly assist you. Many facilities are eager to hire aides, especially skilled and experienced ones. By being certified in this course, you accelerate your skills, knowledge, and ability to interact within the clinic. As many clinics are hesitant to hire new staff, then risk time and money to train them, you are essentially pretrained, gaining a competitive edge.
Many physical therapy and physical therapy assistant programs recommend or require experience in physical therapy settings for admission. Your role as a physical therapy aide will satisfy this requirement. If you are attending this certification to assist you with applying, please review the specific school requirements to be certain of what you are expected to know.
Physical Therapist Assistant
If you are interested in becoming a physical therapy assistant (PTA), being a physical therapy aide first will assist you. Most PTA degrees require two years of college-based courses. These courses often require lab time for hands-on training that can't be completed online. Upon graduation from an accredited program, you must sit for a national examination to obtain licensure. Physical Therapist Assistants can actually treat patients, though patients must consult a Physical Therapist for evaluation and re-evaluations. PTAs must treat the patient according to the original plan of care provided by the Physical Therapist.
Physical Therapist
At this time, all Physical Therapists must pass the national board exam. To sit for this exam, you must have graduated from an accredited Physical Therapy school, and have earned a Master's Degree or Doctorate Degree. Most schools at this time have phased out Master's Degrees in favor of Doctorate Degrees. In order to apply to a Doctorate program, most schools require a Bachelor’s Degree. This degree should include physics, chemistry, biology, anatomy, and physiology courses. Even with a Bachelor's Degree in hand, if the student's transcript does not include these courses, then they must be taken prior to application.
There are a few schools which offer a transition from PTA to PT. If this is your intention, you are encouraged to research schools which currently offer this program.
Career Opportunities
Fields of Work
Physical Therapy represents a broad spectrum in health care. The following are some of the facilities which offer employment as an aide.
- Acute Care Facilities
- Outpatient Clinics
- Fitness Centers
- Subacute Care Facilities
- Skilled Nursing Facilities
- Board & Care Homes
- Senior Retirement Communities
- School Based Therapy / On Site School Therapy
- Hospice Care Facilities
- Rehabilitation Hospitals
Acute Care Facilities:
These can vary from a large metropolitan hospital to a rural one, but they also include specialty hospitals, including ones that specialize in one type of care or many specific types, such as burns, pediatric or sports medicine.
Outpatient Clinics:

An exterior image of an outpatient clinic, capturing the blue and white sign that reads, "Outpatients."
These clinics are the physical therapy locations that normally come to mind. They may be privately owned and operated or run by organizations. Patients often are referred by a doctor following a sports injury, motor vehicle accident, or surgery. Depending on the laws of the state where the facility is located, patients may also be able to seek treatment using direct access. Direct access allows patients to seek a physical therapist without seeing a physician. States with this legislation allow insurance to pay for such services without a physician referral.
Fitness Centers:
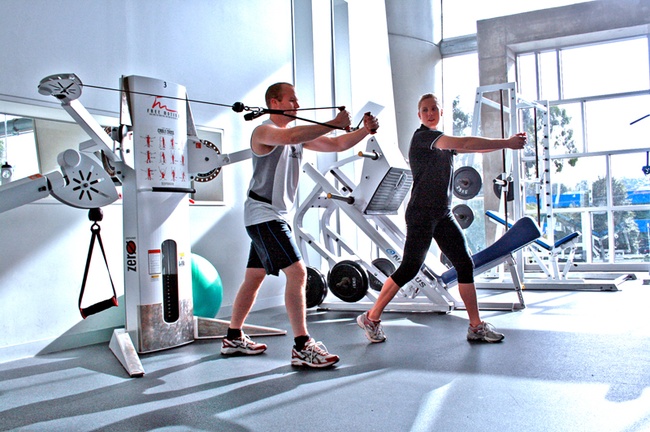
A trainer is helping a client with the proper use of cable equipment, using the adjustable cables to perform a chest muscle exercise.
Some large fitness centers have their own physical therapy staff on site for their gym members. This allows for better integration between physical therapists and personal trainers, who focus on fitness, weight loss, and muscle strength. The therapist works on the restoration of function. The therapist may work for an independently-operated therapy clinic that rents from the gym, or work directly for the gym. This partnership can make for a smoother transition from therapist to personal trainer when the patient no longer requires restorative medicine, but still desires input on sports performance, weight loss, fitness, and/or muscle performance. In-house physical therapists also consult with personal trainers whose clients who are having difficulty due to pain.
Subacute Care Facilities:
These offices represent a step down ("sub") from acute care. While the patients have recovered greatly, they are not well enough to return home or even be moved to a skilled nursing facility. Subacute facilities often have patients that require ventilation, significant medication through an intravenous (IV) feed, or have other needs that require continued nursing supervision.
Skilled Nursing Facilities:
These facilities (often abbreviated as "SNF") are a bridge from acute care facilities to home. They may be short term or long term. The patients can vary in impairment severity from those almost able to return home but who do not have family or friends to assist with the transition (thus, they need very little help), to patients who are dependent for all their needs, and for whom it is hopeful there will at least be a partial recovery at a SNF level of care.
Board and Care & Retirement Communities:
These may use therapy aides with the PTA or PT during home health invites.
School-Based Therapy / On-site School Therapy
This area of physical therapy involves children not reaching their milestones of development. Milestones are physical actions children perform, such as their first step, first word, being able to roll. They all correlate to a time frame. Therapists will treat students while on school grounds. Students' appointment sessions will represent "separate class time," and are often targeted towards specific pathologies. Any student who is not reaching his or her target performance due to a physical disability or impairment can benefit from school-based therapy.
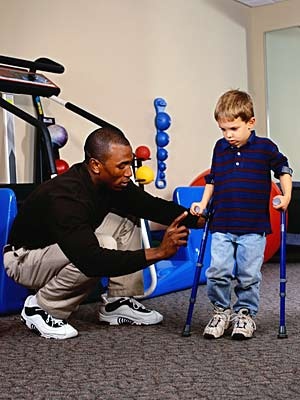
A physical therapist helps a young boy walk with two arm forearm crutches. The therapist carefully supports the boy and instructs him with an upraised finger when and how to take a step.
Hospice Care Facilities:
These unique facilities assist patients at the end of life. The patients are terminal in their diseases, and they may have days to months left, according to their physicians. Physical Therapy assists with the most basic of needs, such as bed mobility, transfer, prevention of bed sores, and basic exercises. The treatments will vary from patient to patient, and often involves considerable training of the patient's family by the therapists, so the family members may care for the patient during his or her final moments.
Rehabilitation Hospitals:
Rehabilitation hospitals are special therapy-based hospitals that are dynamic and high-powered, and which typically draw younger patients for high level therapy so that they may return to their function more quickly and effectively. Treatment often includes intense sessions lasting 2-3 hours per day, and can include a combination of physical, occupational, and speech therapy. These therapies are frequently targeted towards patients who will do well in intense environments. The criteria for admission are strict, and often only specific diagnoses are admitted such as stroke, traumatic brain injury, amputation, or cardiovascular surgery patients. Patients may be referred post-surgery, or from an orthopedist. Rehabilitation hospitals may also admit patients with "normal" pathologies but who have significant comorbidities (additional conditions or diseases) which require and are expected to benefit from rehabilitation.
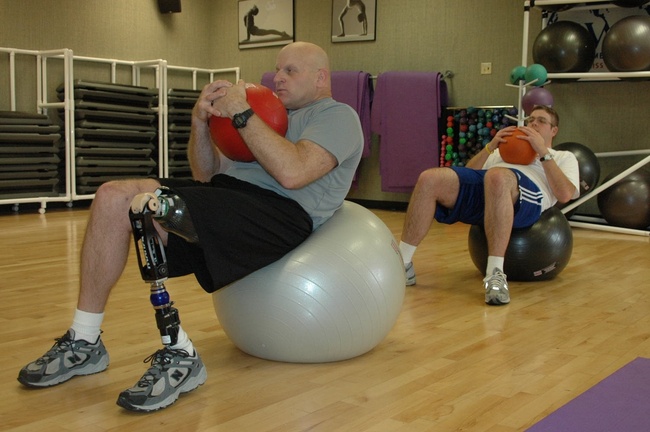
Sitting on an exercise ball, a man with a prosthetic left leg works his core muscles and practices his balance by crunching upward while holding a smaller medicine ball.
Skill Sets
Important Qualities in an Aide
While the location and position you choose as a therapy aide will primarily be based on your own unique interests and availabilities in your area, there are specific qualities that are essential in all locations, and this course will assist you in acquiring these skills, along with knowing when to apply them.
The Skill Set of An Excellent Aide
Dependability, accountability, organization, and flexibility are traits that are highly desirable for any therapy aide. Being dependable means that others can count on you, and you will not ignore your responsibilities. Being accountable means accepting both your strengths and faults. You will acknowledge when what you have done affects others positively, but also take responsibility for what affects people negatively. Organization allows for a smoother day, as you can plan what will occur in advance, yet it's also important to have some flexibility to change when it is needed. In essence, if you are always thinking of what is best for the patient before yourself, you will be an excellent aide.
Technology & Cell Phone Use

The image of a cellphone circled and crossed out in red to remind viewers to not use their cellphones.
Being a therapy aide also requires a level of technical skills. Society as a whole is becoming more and more dependent on technology and high-speed internet communication. While fluency in this technology is not required, familiarity is. Being able to open digitized documents, use email, schedule a patient using a computerized scheduling program, and use the internet for searches are just some of the tasks an employer may expect you to do. Having basic computer skills will greatly assist you in locating a job, and many employers see these skills as a requirement, not as an added bonus.
It is important to understand what is considered inappropriate use of technology in the workplace. Many clinics and offices restrict the use of cellphones or small mobile computers to outside the office only. Some offices have reported that smartphones interfere with their equipment, and if a malfunction occurs due to your phone, you will be charged for repairs. While at work, your phone should be set to "off" or "silent." Using the vibrate setting is usually acceptable; however, you should never check your phone during work. It is acceptable to check your phone before you clock into work, during your lunch break (when you clock out), then again after work. The use of your cell phone should remain for emergency use only during work hours. These restrictions not only apply to voice calls, but also include text messaging and use of the internet, including Facebook, Twitter, etc.
Not using your phone means you can focus exclusively on your patients, and you will notice the respect they will give you in return. This climate of respect encourages patients to also restrict the use of their phones to outside the clinic.
Skill Review: Vital Signs
A patient has her vitals taken by a smiling physician, who is carefully listening to the patient's heart through the stethoscope.
Depending on the setting, the specific procedures you will perform day to day may vary. One of these skills is checking vital signs. Checking vitals is a regular part of Skilled Nursing, Acute Care, and Home Health, but is becoming more popular in Outpatient Clinics as well.
Vital signs are measurements that represent physiological statistics. These are taken to allow assessment of basic body functions.
Blood pressure is a measure of the pressure of blood inside vessels produced by the beat of the heart. The first number is the pressure at the moment the heart beats, and the second number is the resting pressure. Blood pressure varies from person to person, but a normal reading is around 120/80.
Pulse rate is the heart rate, often measured at the wrist in beats per minute (bpm). It is common to count the pulse for 15 seconds, then multiple by 4. A more accurate method is to count the beat for 30 seconds, then multiple by 2. The most accurate is to count the beat for 60 seconds, giving you the exact heart rate. A normal adult heart rate is 50-80 bpm.
Respiratory rate for an average adult is 12-20 breaths per minute. You count a patient's breaths for an entire minute. Ideally, you should count when they are not expecting you, so they do not realize. Patients who know may change their respiration rate.
The last of the most commonly measured vital signs is oxygen saturation . This must be taken using a pulse oximeter, which measures percent of oxygen saturation in the blood. It is usually placed on the finger. Vital signs will be covered later in this course in detail, including how to obtain them.
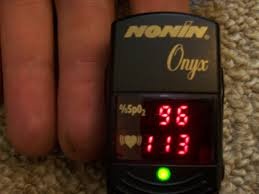
A picture of an operating oximeter placed on the patient's index finger, demonstrating the heart rate of the patient at 113 and the oxygen saturation of the patent at 96.
Exercise
To review the importance of vital signs, let's "take a break" from the textbook and take vitals on a partner. Be sure to accurately measure:
- Blood Pressure
- Pulse
- Respiratory Rate
- Oxygen Saturation
- Pain Level
- Pain Location
Aides will often be expected to engage in casual conversation with the patient, which allows them to gain unofficial, subjective information. A therapist will obtain a "subjective," which is a description of the patient’s expression and overall feeling of how they are doing. This will be discussed in more detail in Chapter 4. Often, patients may open up to an aide with greater ease. It is important for the aide to write this down for the therapist to review, so that the therapist can make sure what the patient discussed with the aide matches what is discussed with the therapist. The patient may have simply forgotten what was said earlier or may be intimidated by the therapist.
Job Duties
What Am I Doing?
At this point, many students will wonder, “What I am actually going to do as a physical therapy aide on a day-to-day basis?” We will go into more depth on the process of taking vitals, and this course will also cover the proper use of antiseptic practices, body mechanics, the knowledge and the application of both medical terminology and abbreviations. Before you can begin work, you must first learn and understand the tools of your trade. You will also be required to exercise ethical and confidential discretion, and respect patients' rights.
The Day-To-Day
Day-to-day duties will vary greatly depending on the setting you are working in. In Acute Care or Skilled Nursing, you may be the first to see the patient. Check with the nurse to ensure it is appropriate to see the patient before you enter the room. You will then likely greet the patient and obtain vital signs prior to the therapist entering the room. In a Rehabilitation setting, you may be required to transport patients from their individual rooms to the gym.
In all these settings, the aide must only work under the guidance and direction of the physical therapist. Aides are unable to provide direct patient care, unlike physical therapist assistants.
As many clinics have patients on strict schedules, there is little "down time" between patients. Patient areas must remain clean and sanitary. Equipment must be returned cleaned to its original location. Scheduling, faxing, and photocopying may be part of your day-to-day aide work. Many clinics request aides to wash the linen: towels, sheets, and pillow cases. You will be required to stock ultrasound gel, lotions, and ensure the cold and hot packs are ready to use between patients. You will make sure timers are set for patients who are undergoing cold or hot pack treatment, and be especially careful to remove the packs when the time has elapsed.
Ethical & Legal Issues
Ethics
Ethics are rules of conduct regarding human behavior. We often refer to them commonly as "knowing the difference between right and wrong." At some point in our lives, no matter whether trivial or life changing, we have all faced an ethical question. An ethical person doesn't just know the difference between “right” and “wrong"; he or she acts on that judgment. Though ethics may vary from culture to culture, each culture has a set of rules to govern behavior.
Beginning in ancient times with the Hippocratic Oath, healthcare has gone a step further by defining a code of conduct to govern itself. This code includes many details about right and wrong in an attempt to reduce "gray" areas.
Physical therapy is no exception. The ethics used by the profession of physical therapy are governed by the American Physical Therapy Association (APTA). The APTA lists eight principles that are to be not only followed, but to be modeled for our patients and other staff. These will be covered in the next section.
The APTA attempts to advance the profession of therapy by promoting physical therapy research, education, and maintaining professional standards. This involves a great deal of involvement in political lobbying, through which they are able to define issues that affect the profession of physical therapy. This includes funding for health research and compensation by insurance companies. They also pay close attention to other professions to see if their skill sets encroach on therapy, and ensure the current therapy practice laws remain intact. They also perform zealous guardianship to ensure that ethics remain intact.
Violations of law are subject to fine, jail time, and loss of license.
APTA - Code of Ethics
American Physical Therapy Associations Code of Ethics (Taken from www.apta.org)
Principle #1: Compassion & Integrity
- Physical Therapists shall respect the inherent dignity & rights of all individuals.
- Shall act in a respectful manner toward each person, regardless of age, gender, race, nationality, religion, ethnicity, social or economic status, sexual orientation, health conditions or disability.
Principle #2: Altruism, Compassion, Professional Duty
- Physical Therapists shall be trustworthy & compassionate in addressing the rights & needs of patients/clients.
- Shall provide physical therapy services with compassionate and caring behaviors that incorporate the individual & cultural differences of patients/clients.
Principle #3: Excellence & Integrity
- Physical therapists shall be accountable for making sound professional judgments.
Principle #4: Integrity
- Physical therapists shall demonstrate integrity in their relationships with patients/clients, families, colleagues, students, research participants, other health care providers, employers, payers & the public.
- Shall provide truthful, accurate and relevant information and shall not make misleading representations.
Principle #5: Professional Duty, Accountability
- Physical therapists shall fulfill their legal & professional obligations.
Principle#6: Excellence
- Physical therapists shall enhance their expertise through the lifelong aquisition and refinement of knowledge, skills abilities & professional behaviors.
Principle #7: Integrity, Accountability
- Physical therapists shall promote organizational behaviors and business practices that benefit patients/clients & society.
Principle #8: Social Responsibility
- Physical therapists shall participate in efforts to meet the health needs of people locally, nationally or globally.
Privacy
Patient Privacy
Patient confidentiality raised national attention in 1996, with passage of the Health Insurance Portability & Accountability Act (HIPAA). Specifically, Title II establishes the privacy and security of an individual’s health information.
Prior to the passage of HIPAA, the lack of standards to protect patient health information and the lack of access for patients to obtain their own records was a source of turmoil. Patients were unable to access their own records when needed; it was difficult for physicians to request each other's examination data and dictations. Finally, some information was even "sold" to third parties, as no laws existed to prevent this. If an insurance company bought out another insurance company, they had free rein over those documents.
A privacy rule was deemed necessary to protect consumers and restrict the flow of information to the right parties. With passage of the law, health care institutions could access records for the benefit of the patient. And, using the correct policy and procedures, the patient could now access his or her own records as well.
Patient Health Information (PHI) applies to all records: paper, electronic, even verbal. It also applies to lab values, diagnostic values, health care claims, payments, billing, phone calls, and emails. In order to maintain compliance, written policies and procedures must exist at each health care facility. In general, you may not pass more than two "bits" of information, that is no more than two pieces of information. In the presence of others, you can reference a first name or last name, but not both. You can reference a pathology, but then you can't reference the patient's name. It is best practice not to pass on any information about a patient to anyone other than the patient's own healthcare providers.
You will one day come across a patient you know or someone will ask about your day, and you’ll want to discuss specifics. Even if it is “for fun” or you try to keep everything a secret, you must not disclose information. As your experience grows, you’ll find it relatively easy to keep patients' information and privacy a secret.
To simplify things, here is a quick list of Do's And Don'ts regarding privacy:
| Do |
Before looking into a chart ask: "Do I need to know this?" |
| Close doors/curtains when caring for patients/discussing |
| Follow your clinic's procedures (shredding / locking up) |
| Inform management if Protected Health Information (PHI) enters a trash container |
| Change your passwords regularly |
| Adjust computer screens to prevent passersby from viewing |
| Verify email & fax numbers before clicking "send" |
| Log off computer (if you will be away for an extended time) |
Report anyone to management who breaks privacy rules |
| Do NOT |
| Talk about patients in public areas (break rooms, elevators, lobby, etc.) |
| Use predictable passwords |
| Share your computer password |
| Leave PHI around |
| Leave PHI in treatment areas unattended |
| Leave patient schedules in the open |
| Provide PHI over the telephone, unless you are 100% sure with documentation confirmation |
For more on the basics of HIPAA, you can go to the PrivaPlan's HIPAA Basics Online Training Program. Click here to learn more.
Laws & Regulations
Before you venture into the clinical setting, you must be aware of the laws that regulate physical therapists and physical therapist assistants. The first law regards doing what is best for the patient. This term is called "beneficence." This means performing what the patient needs most and not necessarily what the patient wants most. For example, a patient in an outpatient clinic may prefer to have simple massage and hot packs, asking to "opt out of exercise for the day." The therapist knows that this isn't right. The therapist informs the patient that he or she must perform the entire session and will not manipulate treatment. Here's an inpatient example: a patient may ask, "If it is all right, I'd prefer to skip therapy today. Missing one session will be okay, right?" The therapist must report the importance of physical therapy, that skipping sessions at the inpatient level can have prolonged consequences of immobility, increased risk of pneumonia, etc. It is important to know patients do have the right to refuse physical therapy; however, it is the therapist's duty to inform them of the consequences, both positive and negative, before continuing.
During treatment, a therapist may realize a patient is not progressing or may benefit from a specialist, be it a physican or another therapist. It is that therapist's duty to refer out. Most of us have heard the physican oath "First do no harm." This actually applies to all health practices, including therapy. For example, there are clinics who push their patients to purchase goods or equipment that are not needed, yet are implied to be essential for rehabilitation and speedy recovery of the patient. This is unethical.
We often speak of common sense , but at times it is helpful to define what common sense is in the therapy setting. Common sense is acting based on good judgment using the facts available. For instance, one should never walk into a dark alley at night alone because it is a potentially dangerous situation. Another example is when a flashlight doesn't work, you check to ensure it has batteries, and check to make sure they are inserted correctly before moving on to putting in new batteries or changing the lightbulb. Common sense is applicable in a therapy situation as well.
Another important aspect of the code of conduct is honesty. You must always tell the truth. You must also be just, which means you treat all patients equally, fairly, and appropriately.
Malpractice is a form of negligence defined as when a professional fails to act according to the profession's standards of conduct. If a physical therapist attempts to recommend or to prescribe medications against their own practice acts, this would be a form of negligence and, thus, malpractice. It would be malpractice if a therapist attempted to diagnose a patient's condition outside of the realm of a therapy-related diagnosis. Other examples include leaving a cold pack on for too long, causing hypothermia, or leaving a hot pack on for too long, or with insufficient padding, causing scarring. These are some of the more common forms of negligence in the world of physical therapy.
Administrative Role of the Physical Therapy Aide
The Medical Record
The most fundamental task you will be performing is interacting with the medical record. The medical record is a series of documents, either hand written, digital, or a combination of the two. These documents represent the facts and events that were performed while the patient was undergoing care.
As well, the medical record serves as a legal document and a reminder of what diagnosis was made and what clinical exams were performed on the patient. It can also be used by legal representation to prove what did or did not happen. Please note the significance of "DID NOT occur." If an item is not correctly charted or is missed, then it didn’t happen. For instance, a chart may indicate a patient is highly sensitive to cryotherapy (cold therapy). The therapist then informs you that you must double up on the layers of towels, as the patient is very sensitive to cold. You may also be required to monitor the patient as you perform another task, to ensure care of the patient. The therapist must also document the use of double towels to ensure safety, along with the patient being monitored by support staff. Even if you used double the towels, if the therapist did NOT document it, then as far as the law is concerned, it did NOT happen!
While each facility's medical records will vary, we'll discuss some basics that will be components of most medical records.
The first form is usually a simple intake form. This form contains the most basic of information including the patient’s full name (first, middle and last), address, and insurance information. It will usually list his or her emergency contact information as well.
Medical history is another document and is often labeled as "previous medical history," which may be a simple fill-in or a questionnaire. This document assists the physical therapist in his or her evaluation. It will provide the therapist with information relevant to this visit by allowing her to review which previous conditions and diagnoses may be relevant to the current visit.
There are often additional documents, specifically a HIPAA document that details what we covered in Chapter 3 about privacy and obtaining medical records. There may also be documentation in detail if the patient is a minor.
It is essential that you become familiar with this documentation. You may be asked to provide new patients with the necessary forms. Be prepared to answer their questions, along with checking for the completeness of the documentation prior to giving it to the office staff or the physical therapist. You may have patients who are unable to read or write in English. You may be requested to write in their place.
While many facilities have converted to electronic medical records (EMR), there are some offices that will still use pen-and-paper records. There may be a hybrid where they take pen-and-paper, then digitally scan them into the computer system for later review. There are some facilities that will have the therapist dictate information into an electronic recorder, to be played back by an aide who will type it into the computer system. It will be important to learn your role in the clinic regarding the medical record. You may be required to set aside an hour or so every day to use headphones to transcribe recordings from therapists. You may be required to review their billing for common errors and mistakes, before the office manager or billing staff review for Medicare errors. You may be in charge of scanning the documents into the computer system, even taking notes for the therapist during the exam.
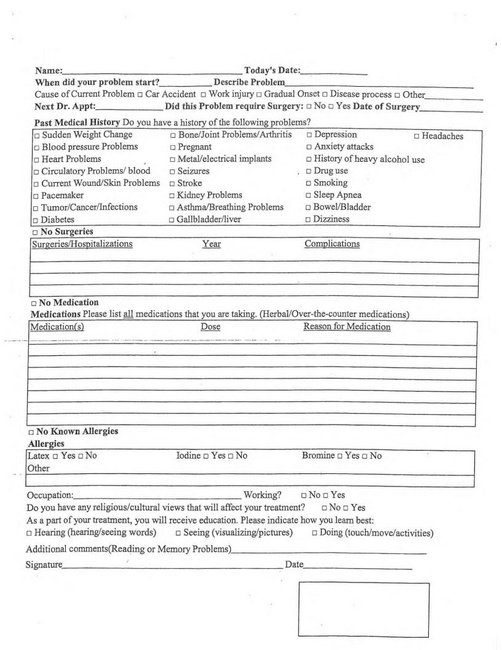
An example intake form is given, asking for a patient's personal and medical information, such as past medical history, medications, allergies, occupation, religious beliefs, and more.
Answering the Phone
It is necessary in all settings to answer the phone promptly and professionally. However, it is important that the importance of answering the phone should not interfere with patient care. If you are with a patient, simply observe to see if someone is going to get the phone. If no one is, ask the patient if you may excuse yourself to get the phone. The patient should be in a position of comfort when you leave and should not be on a modality that requires your attention. If you are performing an ultrasound, you will be required to pause the machine. If you are fortunate, you may be able to call out to other support staff to assist you. Here is where effective time management skills would be extremely useful.
An Example Problem and Solution:
You have been asked to place an ice pack on the shoulder of the patient by wrapping it with an ace wrap to add compression. The phone has started to ring just after you were asked. The phone has reached its third ring. You look at your patient, questioning if it is appropriate for you to get the phone. They let you know “Sure, get the phone. I do not mind." You move briskly to the phone, you answer the phone and then make a judgment of how long the call will take. Simply giving the address of or directions to the clinic can be performed quickly. However, a patient who wishes to schedule an appointment may require more time, and it may be best to request if the caller can be placed on hold for two minutes, until you can return. If the phone caller agrees, you have time to apply the ice pack, ace wrap it, even offer a magazine if the patient prefers to read as they wait. As you set a timer for the patient, you can resume the call, thus optimizing your time.
Ideally you should attempt to get the phone by the third ring. When you do answer it, you should do so warmly and professionally. The most effective method is to smile when answering. This expression will be felt across the phone. You should identify yourself, by first name, along with the business name. If you are in an inpatient setting, report your department. Your speech should be performed clearly and slowly . If you memorize a few specific facts about your clinic, you will find answering the phone easier. You should know the days of the week the clinic is open, along with the hours of operation, specifically the times which therapist will see patients. Knowing at least the first name of all the staff, ideally the first and last names as well, will also prove useful. Having memorized the clinic's primary phone number, fax number, address will help you quickly facilitate calls.
Taboo words are phrases you shouldn't be using in the clinic and especially on the phone. You should avoid saying, “OK," “no problem," “like,” or any slang terminology or endearments like "sweetie" or "hon." When you are taking a message, write clearly who the message is for, the purpose for the call, the caller's name, and return number. This should be very easy to read and should include the date and time the caller called. It is best to inform them of when they can expect a return call.
We have all been left on hold at some point and felt extremely frustrated. Placing callers on hold is a delicate subject. They should not be placed on hold longer than one minute. After two minutes, they should be offered to continue to hold or if they prefer, to leave a message. After each minute beyond the second minute, this should be repeated. If you sense the patient does become frustrated, you should attempt to assist yourself or address the problem or take a message for a therapist or other staff member to call back.
It is absolutely, positively important that you know the facility's phone number, fax number, primary email address and hours of operation. These are all facts that should be at your fingertips, ideally memorized so that you do not have to ask a coworker.
And finally, if the caller asks a question you do not know the answer to, do not say “I do not know." You should rephrase that as “Let me find out that information for you, may I place you on hold for a few moments as I find that for you?” As you can see, there is quite a difference between the two phrases. Saying “I do not know” implies that the conversation has ended and you will no longer assist. Saying “Let me find out that information for you. May I place you on hold for a few moments as I find that for you?” lets the caller know there is a bump in the road, but you are trying your best to solve the problem as quickly as you can.
To learn a few tool for effective telephone etiquette, go to OfficeSkills.org's Telephone Etiquette page by clicking here.
Phonetic Alphabet :
On the phone you will have to give and receive information from people with different accents, not to mention cope with bad phone connections and volume issues. To assist with clarity, it would be useful if you are familiar with the phonetic alphabet, which is located below. This will help you understand and communicate the alphabet in situations where simply saying the letter may cause confusion. For instance, saying "b" can sometimes sound like "p," but using the phonetic alphabet will help reduce that confusion.
In addition, the video below will list and pronounce the letters, followed by the phonetic. This is ideal for you to review. If you can call out the letter phonetic before the announcer can, you have properly demonstrated knowledge.
The NATO alphabet was created to ensure clear communications over radio transmissions. It is more formally used in military. This demonstrate is to act as a reminder. You will more likely use your own system, such as "A" as in apple, "B" as in bubblegum.
Appointments
Appointment planning and creation will be a daily part of your activity as an aide. You must be able to review the schedule, find empty and appropriate times that the therapist is free, plus coordinate with the patient. You must know if it is a new patient, paperwork is to be involved prior to the appointment, if extra time is needed for an evaluation or if it is a treatment that may require less time.
At clinics, there are situations in which patients may miss appointments or be unable to create new appointments. It will be important to be able to track patients who are missing. This may vary somewhat from clinic to clinic. For instance, a clinic may have foot orthotics and will want patients to have follow-up calls at specific times to ensure the devices are fitting correctly. Another clinic may prefer follow-up visits for patients who are discharged, to ensure they are performing their exercise program or are just doing well.
The exact method of tracking may be your choice or there may be a method in place at the clinic where you will be assisting. A commonly used program for appointments is Microsoft Excel Spreadsheets. The record will have the patient’s name, the last date they were seen in the clinic, and the date/time they were called along with a comment. Other clinics may use an appointment book or appointment calendar with reminders.
Please review the sample calendar below. Following the chart, will be a series of questions regarding scheduling and appointment creation.
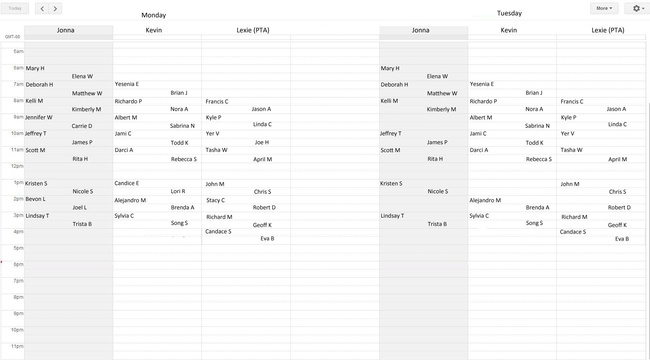
You are tasked to schedule three appointments. The first is an evaluation, which must be seen by a physical therapist (PT) NOT a physical therapist assistant (PTA). The second patient needs a treatment will require an hour of time with their therapist, but can be scheduled in a 30 minute block (to allow overlapping of patients). The last patient is due for a re-evaluation by a physical therapist (not a PTA) and will require the latest time the clinic is open. To assist you with this problem using the following information:
- Jonna & Kevin are physical therapists.
- Lexie is a physical therapist assistant.
- You are tasked to fill Lexie's schedule first (if possible), this will keep Jonna & Kevin's schedule open for evaluations.
- All staff must have lunch from noon (12:00pm) to 1:00 p.m. This schedule is to remain free at all times.
- Evaluations must be seen by Jonna or Kevin (PTs) and require 60 minutes of time.
- Re-evaluations must be seen by Jonna or Kevin (PTs) and require 30 minutes of time.
| Clinic Hours | 6:00am | 6:00pm |
| Office (Non-Clinical) | 6:00am | 4:00pm |
| Jonna (PT) | 6:00am | 4:00pm |
| Kevin (PT) | 7:00am | 5:00pm |
| Lexie (PTA) | 8:00am | 6:00pm |
All clinics use some sort of filing system. This is generally straightforward. Records are filed alphabetically A-Z by patient's last name, and may be cross-referenced by date. Each clinic will have varied documents. As more clinics move towards electronic medical records, methods of record keeping will become universal.
Of course, you are not expected to perform the above duties and more without compensation. In order to obtain compensation, you will likely be asked to record your own time sheets. As with other records, clinics may use electronic or written records. In an electronic system, you must remember to either swipe your badge to click in/out or use a login/password combination. If you are keeping a written record of hours worked, you are also required to clock in at the start of work, at the end of work, along with in and out for lunch break. It is normal to calculate the time you worked in two parts. The first is from clock-in in the morning until clock-out just before lunch. The second part will be from clock-in after lunch until clock-out at the end of the day. These two blocks of time are then added together to make your day's total hours.
Review the following time cards. The first is one is already filled out but you must calculate the total hours. For the second, use your best judgment regarding your start time and finish time for this week.
Example #1
| Day | Clock In | Clock Out | Total Time |
| Monday | 3:50pm | 6:55pm | |
| Tuesday | 3:55pm | 7:00pm | |
| Wednesday | 4:00pm | 7:00pm | |
| Thursday | 3:55pm | 6:45pm | |
| Friday | 3:53pm | 7:01pm | |
| Total | 3:50pm | 7:07pm |
To Assist you. The clinic uses a 7 min +/- rule. That means, if you clock 7 minutes or earlier, it counts as 15 minute early punch. If you clock in 7 minutes or more after the hour, then it counts as a 15 minute punch, late 15 minutes. Please take note when you perform your calculations.
Example #2
| Day | Clock In | Clock Out | Total Time |
| Monday | |||
| Tuesday | |||
| Wednesday | |||
| Thursday | |||
| Friday | |||
| Total |
Please fill in the chart varied on your times in the this class.
Letter Writing
Being able to create and correctly present a letter remains an important skill in business. You may be asked to draft a letter, basically outlining the main points. You may also be required to type a letter based off a handwritten one. It will be your responsibility to ensure the organization is correct, the letter is free of spelling errors and is grammatically correct. Below are some tips about how to write effectively in the workplace.
These are some tips, developed by Scott McLean and Flat World Knowledge, to help you write in the workplace. Please respect the copyright and terms of use displayed on the document above.
In addition to the above tips, here is an example business letter to help demonstrate effective formatting for business letter communication:
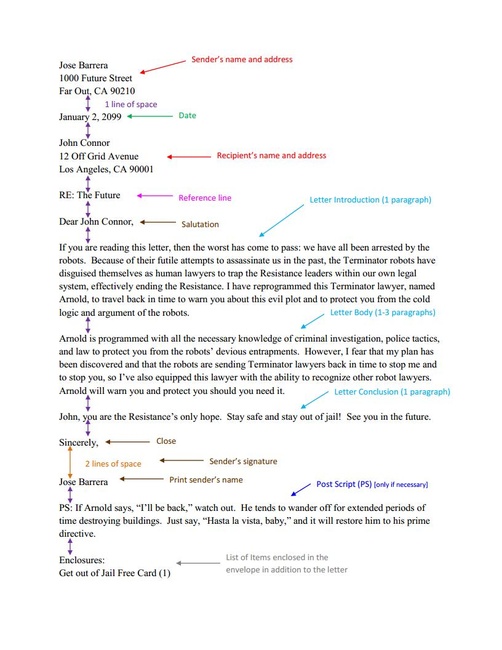
The image depicts a properly formatted business letter, indicating the appropriate information needed, like sender and recipient address information, and appropriate spacing throughout.
In addition to the above tips, there should be a one inch (1”) margin around the entire letter. The date goes on the first line. Then insert a blank line, followed by the address of the recipient. There is an additional blank line that separates the address and the greeting, followed by an additional space then the body of the letter. Please ensure a space separates each paragraph. At the end of the letter, add four blank lines, followed by the name of the sender.
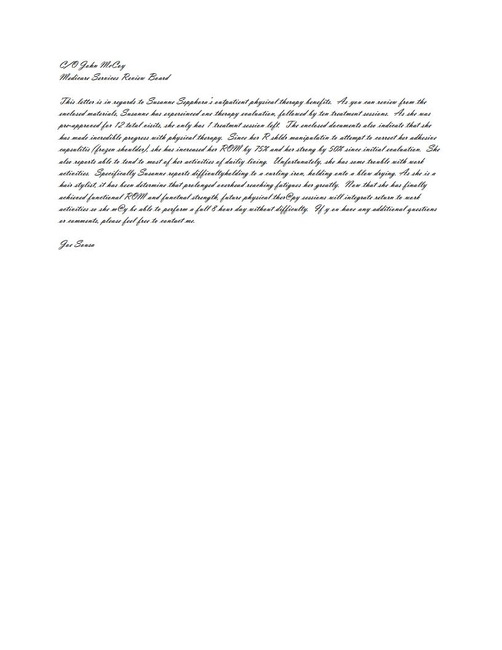
This image depicts an ineffective business letter that uses hard-to-read cursive font and lacks proper letter formatting.
Documentation
We have discussed medical records, but now it is time to review daily documentation. While your interaction with the documentation will vary from clinic to clinic, this section will discuss documentation as an overview. Daily treatment notes will likely consist of four parts:
S: Subjective
O: Objective
A: Assessment
P: Plan
The subjective is whatever the patient is feeling at the time, their pain level, and their description of their pain level. In essence anything that relates to their condition. You will often be greeting patients, then asking them about their day. If this is a follow-up visit, you'll be asking about their home exerise program, their pain level, and status of their condition. You will then verbally repeat this to the therapist.
There may be clinics in which you are not allowed to write anything in the medical record, while other clinics will require you to write on scratch paper, while yet other clinics will want you to write down exactly what the patient said directly into the subjective of the patient chart. This will vary according to the flexibility of the therapist, your ability to write correctly and clearly, along with specific insurance issues. You should clarify with the therapist what is expected of you. As your experience grows, you and the therapist will come up with your own system of questions to obtain a detailed and concise census, which might include:
1) Greet the patient openly and ask how they are feeling.
Then ask:
2) "Have there been any changes in your condition, better or worse?"
3) "Have you found any activities that make the pain worse or better?"
4) "What is your current pain level? What activities have you performed since your last visit (job, yard work, child care)?"
5) "Do you have any questions or concerns about your home exercise program? Do you need review on specific exercises? Are you having trouble with any specific exercises?"
6) "Do any of these exercises aggravate your pain?"
7) "Are you using (or continuing to use) ice, heat, pain relievers?"
You may be asked to summarize these items, then document them on scratch paper for the therapist. You will always be required to verbally inform the therapist. Clinics may ask you to initiate these questions so that the therapist has a basis to start their own questions as well.
The objective findings are what is performed in the clinic. This can be basic therapeutic exercise, manual techniques performed by the therapist, or other modalities. You may be asked to keep track for the therapist(s) or asked to mark and check off as the patient reviews. You will likely be required to keep track of what exercises are performed and how many are performed. This will be discussed in more detail later in the course.
The assessment is the therapist's interpretation of how well the patient performed the objective findings, whether the objective findings caused a change (positive or negative) in terms of the objective, along with reactions.
The plan is what will be performed in the future, most notably the next visit. The assessment and plan will remain the scope of the therapist(s) only. They may, however, comment to you their thoughts, especially reminders for themselves. You should note all of this information.
Scheduling
Let's look at some basic concepts regarding scheduling, and ideally memorize them so that you can properly schedule patients.
The most basic thing to memorize is the office hours of the clinic or department where you are currently working. For example, your clinic may be seeing patients from 9:00 am to 12:00 am, be closed from 12:00 pm to 1:00 pm, then open to patients again from 1:00 pm to 5:00 pm. It is also important to know whether the patient you are booking is a new patient who will require an initial evaluation, a current patient needing basic treatment, or a patient who requires a re-evaluation. Your clinic may allocate 45 minutes to 60 minutes for an evaluation, but only 30 minute windows for treatments. This is important to clarify with the physical therapist(s), physical therapist assistant(s), office managers, and aides as well.
Double-booking is when two patients are given the same time or overlapping times. The therapist(s) may see two patients at 9:00 am, two more again at 10:00 am (when the first two from 9:00 am are done). They may see patients every half hour, allowing a 30 minute overlap. This method is often referred to as “Stream Scheduling.”
It is important to know which patients can be booked and which ones cannot. For instance, patients who are using Medicare as a payment may only have 1:1 time with their physical therapist--they may NOT be billed with another Medicare patient, ever. Your therapist may also discuss with you that he or she does not mind seeing two “Total Knee Replacements” at once, but wants to see a Temporal Mandibular Joint (jaw) patient privately. There are also some considerations based on culture, age, or gender of the patient that may require more private time, specifically in a treatment room so the patient is more comfortable. It is good to have a detailed dialogue with your therapist to ensure you do not schedule incorrectly.
It will be important to discuss and inform the patients if they are in fact double booked. You must assure the patient that their care is provided by the therapist(s), that no one else is creating the treatment plan. If a problem arises that you are unable to solve, you must defer to the physical therapist.
Communication
Introduction
Communication represents the most important aspect of your occupation as a physical therapy aide. In fact, with effective, clear, and correct communication you will not only be an asset to your clinic, but the patients will admire your ability to work with others. The following are all important traits for effective communication:
- Active Listening:
- Involves paraphrasing or repeating back what the speaker has said.
- Is done discreetly.
- Conveys to the speaker you are actually listening.
- Direct/Assertive Expression:
- Involves being clear.
- Avoids miscommunication and misunderstandings.
- Ensures you know the situation .
- Body Language
- Uses positions & patterns that show you are open to communication.
- Avoids positions & patterns that block communication.
- Empathy:
- Involves understanding another's feelings.
- Accepts that personal feelings can cloud people’s judgment.
- Understands that interpretation, specifically incorrect interpretation, can cloud people’s judgment.
Lessons in Active Listening
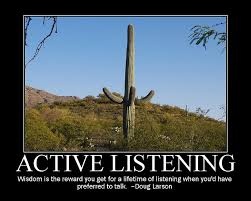
An image of a cactus standing tall and alone with the heading active listening, the picture attempts to depict the benefit of being quiet and listening. It quotes Doug Larson who said, "Wisdom is the reward you get for a lifetime of listening when you'd have preferred to talk."
Acknowledgment :
You first need to acknowledge the speaker's thoughts, ideas and feelings. This is better-performed subtlely, through the use of nods, “uh-huhs” and affirmation. For example: “I understand that you are in quite a bit of shoulder pain now, but can you describe the pain in more detail, specifically location and type? This way I can provide this information to the physical therapist who can better help you.”
Paraphrase:
If you are able to paraphrase the speaker's words, it implies that you are reflecting upon them. The key is to put it into your own words, but do not add or subtract anything that wasn’t already there. For example: Patient reports, “It has been over six weeks since I’ve played basketball. I hurt myself during that last game. I just want to get back to playing!” An example of your reply: “Sounds like it has been a rough six weeks, it is hard to not enjoy the activity you were playing, but it is important to get better, too.”
Open-Ended:
There will be times when a conversation can be so detailed or discussed quickly that you may have lost your way. The best way to find your path again, is to ask open-ended questions that stay away from directly answerable questions to get more input. Examples: “Please explain…” “Describe for me…” A sample sitatuion: "You are telling me that your pain is making you frustrated and you can’t do what you want to do. Please start from the beginning. Tell me, what can’t you do?”
Summarize:
It will be important to review the conversation. For example: “You said you were going to follow up with your physician. Have you already set the appointment? Do you need the phone number?”
Providing an Opinion:
While this section is important when you have a conversation, it is important that you proceed with caution in regards to health care. You are NOT allowed to provide education with pathology, you are NOT allowed to diagnose or prognose. In order to maintain safe and appropriate discussion, you should report how you will help the person, and most importantly you should follow through with what you say you will do.
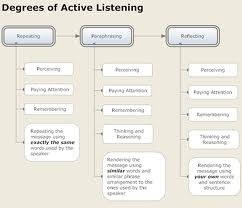
This image depicts three different degrees of active listening: repeating, paraphrasing, and reflecting. Each degree takes more thinking and invovles greater understanding, moving from perceiving and paying attention to remembering to thinking and reasoning.
Direct and Assertive Expression
You are on your way to master active listening, but speaking is another component of good communication. You need to ensure your replies and comments are not personal or threatening. You should say "I" often, so you and your listener(s) realize your comments aren't meant personally. Please review the follow examples:
Incorrect: “You do know you are doing that exercise wrong?”
Better: “For the best benefit from this exercise, let's try to adjust it like this.”
Incorrect: “This is really irritating me.”
Better: “I’m feeling really irritated right now because of…”
This is important because the incorrect statement doesn’t specify what is the irritation. You do not want the patient thinking it is them. Make it very clear to the patient what is wrong.
Incorrect: “You are not listening to me. Pay attention!”
Better: “I don’t feel heard. What can I do to make this easier for you?”
Your task now is to recall five scenarios or examples that happened to you. These situations could have occured in the last week or even the last month. Paraphrase what was said by writing out the situation. THEN you are to improve your reply so that it is direct and assertive.
Body Language
Your body language is a passive method of demonstrating your interest or disinterest in a conversation. Look at a movie or television show and pay close attention to the body language demonstrated by the actors. Does their body language match their words? Do they appear to be interested or disinterested? Examples of effective communication include an open body stance, sitting at the edge of your chair, and focusing your eyes on the other person. Some bad examples include pointing your index finger, wringing your hands, crossing your arms on your chest, and casting sideways glances. These will block effective communication.
Remember the old game "Red Light / Green Light"? Here are some sample body languages, the "Red Light" postures are those that you need to avoid, while the "Green Light" postures are okay to use.
Red Light
- Arms folded on chest
- Clenched jaw
- Fists clenched
- Running fingers through hair
- Tapping on table
Yellow Light
- Hand over mouth
- Frown
- Raised eyebrow
- Clearing throat
- Picking fingernails
- Stroking chin
Green Light
- Uncrossed legs
- Open hands, palms up
- Tilt of the head
- Sitting on edge of chair
- Eye contact
- Mouth/chin relaxed
- Nodding
The Red Light gestures indicate boredom, defensiveness, impatience, not listening, and even frustration. These are all negative traits you do not want to convey. If you are listening to someone who is doing these things, you need to take note.
The Yellow Light gestures demonstrate concern, nervousness, disbelief, doubt. These lean towards negativity, but are not as bad as the Red Light signs.
Good signs, or Green Lights, indicate openness and willingness, implying agreement, interest, and listening to ideas.

This image shows a golden retriever mix in a low crouch, hind legs down, head held low and straight forward, tail tucked under, and one paw tentatively stepping forward.
The following is a bad example of public speaking. Your task is to identify five traits that make it bad. Do not limit them to just what we have discussed today. Use your own insight to help you.
The following is a good example of public speaking. Please identify five traits that are good . You may use your own imagination as well. Do not feel limited to what we discussed here.
Empathy and Interpersonal Skills

This image depicts a woman crying, zooming in on her face and tears and showing her downturned mouth, the redness of her eyes, and the trail of her tears down her cheeks.
Empathy
Empathy is your ability to recognize the emotions being felt and expressed by others. By using empathy, you can demonstrate compassion, which is the understanding of the suffering (or pain) of others.
Your emotions, for better or worse, will play a part in the conversation. It is important to avoid the terms "better," "worse" or "should," as they often make listeners defensive. It is also important to realize that others' emotions can affect the conversation as well. Always acknowledge the person's thoughts, ideas and feelings. This will help them relax. Remember to take action and keep your promises. Sometimes the promise is as simple as making a follow-up call or photocopying the patient's home exericses.
Interpersonal Skills
Interpersonal Skills are skill sets that involve communication and interaction with others. This includes adhering to social rules (knowing what to say or not to say), following verbal communication, and following body language. If you have a great set of these skills, you will fit easily in the clinc. If you do not, your skills will be refined and improved during this course and the clinical process.
Keeping up with the pace of a clinic, managing phone calls, assisting the therapist(s), and assisting patients can be daunting at first. It is important that with each call and interaction with a patient you remain calm, provide them 100% of your attention in a calm, paced motion. If you appear uninterested, hurried, or anxious, it will seem to the patient you do not care about their condition, only about getting paid. If, however, you remain interested, engaged, and patient, they will realize that you will take care of them. If you treat them in such an excellent way to set an appointment, how well will they be treated as a patient? You may, in fact, serve as the first person to interact with the patient, and first impressions count.
Screening the appointment is the final aspect that you must review. Does the patient require a specialty? Your clinic may have multiple therapists, each with a sub-specialty, such as Orthopedics, Vestibular, Women’s Health, or Geriatrics. You must schedule the patient accordingly.
Pain Scales
Recording the patient’s pain level will be important to the therapist, regarding treatment. The patient's relative pain level may affect the therapist's plan. Instead of ending with a particular modality, they may start with it instead. The two most popular methods are the Verbal Numerical Rating (VNRS) and the Visual Analogue Scale (VAS). The VNRS is the common 0 to 10 scale in which 0 is no pain at all, while 10 is the worst, a horrible pain that will require emergency treatment. The VNRS is also known as the NPRS or the Numeric Pain Rating Scale. During the VAS, as seen below, the patient marks their pain on the scale.
Be consistent with how you discuss pain with the patients. You do not want to add to their pain. Keep your questions as clear as possible so that you do not influence their answers. Proper procedures should be discussed with the therapist, but some clinics use a rubric to provide perspective on the pain scale if the patient has trouble coming up with a number on their own. Please review with the clinic and the therapists if they wish you to use the following rubric:
| Pain Levels | Comments |
| 0 | No pain |
| 1,2,3 | The pain is present at this time. |
| 4,5,6 | The pain is interrupting normal activity. |
| 7,8,9 | The patient is missing work because of pain. |
| 10 | The worst pain imaginable |

This image depicts the Visual Analog Scale for pain using a bar scale ranging from 0 to 10. 0 is having no pain, and 10 is having the worst pain possible.
You may also request details about the pain. Here are some common descriptors:
Achy, Burning, Crippling, Dull, Gnawing, Irritated, Sharp, Stabbing, Tender, Tight, etc.
Outcome Measures
It will be important to be able to perform and calculate scores on outcome measures. Outcome measures are tests that can be used to objectively determine the baseline function of a patient at the beginning of a treatment. By having a completed initial outcome measure, the physical therapist establishes a baseline. These outcome measures can be repeated, often during re-evaluation. This can be used to determine if progress has been made with a specific treatment or if physical therapy has improved.
Sample Outcome Measures
It is important to read the instructions carefully, to yourself first, and understand the importance of each outcome measure along with how it is administered. If a patient has questions, be careful with phrasing or rephrasing the question. You do not want to cloud their judgment or bias them in any way. It is important to know there are literally hundreds of outcome measures, but each clinic shouldn’t have more than six. The following are the most common.
QuickDASH: http://www.dash.iwh.on.ca/home
“The Quick DASH is a shortened version of the DASH Outcome Measure. Instead of 30 items, the Quick DASH uses 11 items to measure physical function & symptoms in people with any or multiple musculoskeletal disorders of the upper limb.”
The Quick DASH contains a Work & Sports/Performing Arts Module. These are optional and are not part of the main scoring. There are circumstances in which the therapist may require them, such as if this is a work injury or the patient had a sports injury. It is best to discuss with the therapist if they want those options before you discuss with the patient.
Review the QuickDASH now on your own. Then when you notice another individual in the class is ready, review the QuickDASH with that student. They are to remember an old injury or make one up. You are to practice asking the QuickDASH and marking their questions, then score it. They will repeat the QuickDASH on you.
Please note the QuickDASH may only have 1 missing item . The optional modules may not have ANY missing components. The physical therapist will inform you if they want the optional modules used.
The Lower Extremity Functional Scale
“The Lower Extremity Functional Scale (LEFS) is to measure patients' initial function, ongoing progress and outcome for a wide range of lower-extremity conditions.”
You are to review the LEFS, then perform the outcome measure on another individual (not the same person as you did with the QuickDASH). They are to then review it with you.
Neck Disability Index
This Outcome Measure estimates the patient's function and measures the disability caused by neck pain. This outcome measure is scored by asking a series of questions. Each answer has an assigned point value with a maximum raw score of 50. The raw score is then converted to a percentage. These intervals are as follows:
- 0 - 4 = no disability
- 5 - 14 = mild
- 15 -24 = moderate
- 25 -34 = severe
- >34 = complete
Please note: This means 15-24 (the RAW SCORE) equates with moderate disability.
You are to review the NDI alone, then score another individual in the class.
Low Back Pain Scale
The low back pain scale is an outcome measure used to assess the functional disability of patients with back disorders. The document below is a sample of the low back pain scale. Scoring: the Index Score is the raw total divided by the total possible score (for every question not answered, the total possible score reduces by 5). Multiply the answer by 100 to get a percentage.
You are to once again find a partner in the class. They are to mimic a back injury (if they can recall a sore back experience, that is best) then provide and fill out the form. You are to then score it.
This section is complete once you hand all the scores to the course instructor. Make sure you include your name along with the names of your patients.
Medical Terminology
Introduction to Medical Terminology
Medical terminology represents a language of its own. It was created to describe the human body, including pathologies, conditions, and processes. Medical terminology uses Greek and Latin as its original source. This allows it to be truly universal across multiple languages. Medical words begin with a root word. This word is the basis of what is occuring. It contains a prefix, a word added to the start of the word to change it slightly. It may also have a suffix, which is an ending to the root word. This also changes the word slightly.
Before we go into details, it is important to understand body position and direction. This allows for direct orientation of the body. This is highly useful for a patient’s exercise program, which should indicate first the position of the body when performing an exercise.
Positions & Orientation
Term | Direction | Term | Direction |
Anterior | Toward Front | Posterior | Toward Back |
Medial | Toward Midline | Lateral | Away from Midline |
Internal | Inside | External | Outside |
Proximal | Closer To | Distal | Further From |
Superior | Above | Inferior | Below |
Cranial | Toward The Head | Caudal | Toward the Tail |
Term | Position |
Erect | Standing Position |
Supine | Lying Down |
Prone | Lying Flat on Stomach |
Sideling | Lying on Side (left or right) |
You will find these positions much easier to grasp if you review them while you are performing these motions. You may want to review with your fellow students. A group of three students would be ideal. One student is the "patient," another will be the "answerer," and the third will be the "asker." The asker will ask for a position such as "show me 'supine.'" The "patient" must have an idea of what to do, but will not go into a position until told by the person answering the question. They are to think in their head what the correct answer would be. The answerer will think of the question, then tell the "patient" to assume the position using common every day terms. A sample answer to this example would be for the answering student to say, "Please lie down on your back."
Movement:
Body movements are also classified according to specific motions so that therapists can be certain what motion is being peformed. Below are a list of motions. It would be beneficial for you to review them on your own, then find a partner and quiz each other. Your partner should perform one of the motions then you should call it out. This will be repeated for each motion until both of you can identify all of them.
Movement:
Flexion | Bending a joint | Extension | Straightening a joint |
Abduction | Away from center | Adduction | Towards center |
Pronation | Moving palm downward or posteriorly | Supination | Moving palm upward or anteriorly |
Eversion | Turning foot outward | Inversion | Turning foot inward |
Rotation | Rolling a part on its axis (think head) |
|
|
Now that you have a basic foundation of orientation and movement, it is time to expand your medical vocabulary. This will be important, especially if you perform dictation for the department. There are literally thousands of terms in medicine, but this will guide you in the most commonly used terms to ensure you understand what is being discussed.
If you want some more in-depth study of planes and directions, take Insight Medical's "Anatomical Directions" course. It's free! You'll just need to register with your name, email, and school. You can find it here at their website: http://www.insightmedical.org/.
Sample Terminology
A | |
a or an- | Not, without |
angi(o)- | Blood vessel |
ante- | Positioned in front of another |
anti- | Against or opposed to another |
arteri(o)- | Artery |
arthr(o)- | Joints or limbs |
articul(o)- | Joint |
-asthenia | Weakness |
Atri(o)- | Atrium (of the heart) |
Aur(i)- | Pertaining to the hearing |
Axill | armpit |
B | |
Bi- | Twice or double |
Brachi(o) | Relating to the arm |
Brady- | Slow |
Bronch(i) | Bronchus |
Bucc(o) | Pertaining to the cheek |
Burs(o) | Bursa (Fluid Filled Sack) |
C | |
Capit- | Head |
Cardi(o)- | Heart |
Carp(o)- | Wrist |
Cata- | Down Under |
Cephal(o)- | Head |
Cerebell(o)- | Cerebellum |
Cerebr(o)- | Brain |
Cholecyst(o)- | Gallbladder |
Chondr(i)o- | Cartilage |
Circum– | Around Another |
Col-/colo/colono – | Colon |
Contra- | Against |
Cost(o)- | Ribs |
Cox- | Hip Joint |
Cry(o)- | Cold |
Cyan(o)- | Blue |
D | |
De- | Away from Cessation |
Dermat(o) | Skin |
Dors(o), dors(i)- | To The Back |
Dys- | Bad or Difficult |
E | |
-ectomy | Surgical Operation or removal of a body part |
-emia | Blood Condition |
Encephal(o)- | Pertaining to the brain |
Endo- | Inside or Within |
Eosin(o)- | Red |
Enter(o)- | Pertaining to the Intestine |
Epi- | Upon, Above |
Erythr(o)- | Red |
Ex- | Out Away |
Exo- | Outside of Another |
Extra- | Outside |
G | |
Gastro- | Stomach |
Genu- | Pertaining to the knee |
Gloss(o) or Glott(o)- | Tongue |
Gluco- | Sweet |
Glyco- | Sugar |
H | |
Hema or Hemo- | Blood |
Hemi- | Half |
Hepat- or Hepatic- | Liver |
Homeo- | Similar |
Homo- | Same |
Humer- | Shoulder or Upper Arm |
Hydro- | Water |
Hyper- | Above Normal |
Hypo- | Below Normal |
I | |
Infra- | Below |
Inter- | Between Among |
Intra- | Within |
Ipsi- | Same |
Iso- | Equal |
Itis- | Inflammation |
M | |
Macro | Large |
-malacia | Softening |
Mamm(o)- | Breast |
Melan(o)- | Black Color |
Mes(o)- | Middle |
Micro- | Small or Relating To Small |
Muscul(o)- | Muscle |
N | |
Nas(o)- |
|
Necr(o)- | Death |
Neo- | New |
Nephr(o)- | Kidney |
Nerv- | Nerves |
Normo- | Normal |
O | |
Ocul(o)- | Eye |
Odyn(o)- | Pain |
Ophthalm(o)- | Relating To The Eye |
Oseo- | Bone |
Ossi- | Bone |
Ost(e) or Oste(o)- | Bone |
P | |
Para- | Abnormal |
-paresis | Slight Paralysis |
Parvo- | Small |
Patho- | Disease |
-pathy | Disease or Disorder |
-paresis | Weakness |
-phoboia | Fear/Sensitivity |
-plasia | Formation or Development |
-plasty | Surgical Repair or Construction |
-plegia | Paralysis |
Pneumo- | Lungs |
Poly- | Multiple |
Pre- | Before |
Pro- | Before Another |
Proct- | Anus/Rectum |
Pyro- | Pyro/Fever |
R | |
Radio- | Radiation |
Rhin(o) - | Nose |
Rrhage- | Burst Forth |
S | |
Sclero- | Hardness |
-sclerosis | Hardening |
-scope | Viewing Instrument |
-scopy | Use of Viewing |
Semi- | One Half |
Splen(o)- | Spleen |
Spondyy(o)- | Vertebrae |
-statis | Stop |
Staxis- | Dripping |
Sten(o)- | Narrow |
-Stenosis | Narrowing |
Stoma- | Mouth |
Sub- | Beneath |
Super- | Excessive |
Supra- | Above Excess |
T | |
Tachy- | Fast |
Therm(o)- | Heat |
Thromb(o)- | Blood Clot (Relating To) |
Tome- | Cutting Instrument |
Tri- | Three |
To get a more detailed understanding of medical terminology, look at Wikipedia's List of Medical Roots, Suffixes, and Prefixes.
Planes of Motion
Sagittal Plane:
This divides the body into left and right halves. This is a vertical plane that passes front to back.
Coronal Plane:
This is a plane that divides the body into a front and back section.
Transverse Plane:
A plane that divides the body into an upper and lower half.
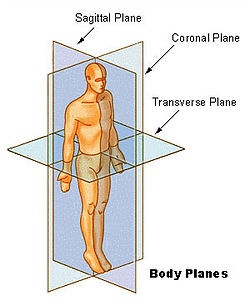
This image depicts a human body upon which square and rectangular planes are imposed to demonstrate the direction of the traverse plane, the sagittal plane, and the coronal plane.
Abbreviations
Abbreviations:
The use of medical abbreviations is meant to boost efficiency in the work place. While it will boost your ability to write, you must ensure you’re never writing solely in abbreviations. Too many abbreviations will give you "word soup." The context of the wording should allow someone to easily interpret the abbreviation. Some abbreviations crossover, so it is important that to ensure it is clear. If you are in doubt, it is always best to write the entire phrase or word and avoid the abbreviation all together.
You will find some hospitals and clinics that restrict specific abbreviations to avoid misunderstandings. There is a movement in the health community, due to the use of technology, to avoid the use of abbreviations and use the full terminology instead.
Abbreviations | ||
BM | Bowel Movement | |
BP | Blood Pressure | |
ć | With | |
CHF | Congestive Heart Failure | |
cm | Centimeter | |
CNS | Central Nervous System | |
CVA | Cerebral Vascular Accident | |
DC | Discontinue or Discharge | |
Dx | Diagnosis | |
EKG | Electrocardiogram | |
fx | Fracture | |
H&P | History & Physical | |
ICU | Intensive Care Unit | |
kg | kilogram | |
L | Liter | |
MI | Myocardial infarction (heart attack) | |
NG | Nasogastric | |
NPO | Nothing by Mouth | |
O2 | Oxygen | |
OOB out of bed |
| Out of Bed |
PO | By Mouth | |
PRN | Whenever Necessary / As Needed | |
Rx | Prescription | |
SOB | Shortness of Breath | |
URI | Upper respiratory infection | |
VO | Verbal Order | |
ś | Without | |
♂ or ♀ | Male or Female Gender Symbol | |
b.i.d. | Twice A Day | |
q.d. | Every Day | |
q.h. | Every Hour | |
q.2h | Every 2 Hours | |
q.i.d. | 4x/Day | |
q.o.d | Every Other Day | |
t.i.d | 3x/Day | |
t.i.in | 3x/Night | |
Wikipedia gives a long list of abbreviations, complete with highlights for what NOT to use in the US and those that have caution for use. Check out their list here: http://en.wikipedia.org/wiki/List_of_abbreviations_used_in_medical_prescriptions.
General Terminology
Fractures
A fracture is the separation or a splintering of bone. A bone that is fractured must be reduced by the physician. Fractures can be either displaced or nondisplaced. A displaced fracture means the fragments have shifted and are no longer in alignment. A nondisplaced fracture means they have not shifted or moved. In the case of a displacement, the bone fragments must be brought together. This may be done either surgically or nonsurgically. Once they are in place, they must remain in place. This can be done through open reduction internal fixation (ORIF), which uses metal screws and metal plates to hold them in place or by the use of a cast. Casts are often made of air casts or plaster or fiberglass. Plaster casts are often very heavy and in many forms have been replaced using fiberglass.
This image depicts a pink fiberglass leg cast that extends around the foot to the toes and up to the top of the person's calf.
Traction
Traction is a pull exerted by a series of weights, pulleys, and ropes connected to a frame, with straps over the area of a patient. Its purpose is to pull on the tissue/bones of a patient. It can be used to align bone, specifically femoral or tibia fractures. This will assist the restoration of misalignment after a fracture. Traction is also common to relieve pressure, specifically to relieve the pressure between the intervertebral discs of the back.
Electrical Stimulation
This image depicts the front interface panel of an EStim machine, showing the different currents available and the display of selected modality.
The use of electrical current can stimulate a muscle or a series of muscles to contract. This mimics the stimulation signal sent by the nervous system. This repetitive contraction strengthens the muscle in the same way that strengthening and endurance training does. Electrode pads are placed on the skin. The area is identified by the physical therapist to ensure the correct muscle fibers are targeted. The strength of the contraction may be adjusted by the amount of electrical current passing through the electrodes.
Transcutaneous Electrical Nerve Stimulation (TENS)
This unit is battery powered and portable, in comparison to normal electrical stimulation machines, which are often large and must be placed on a cart and plugged in to use. It includes controls to adjust pulse width, frequency, and intensity. Generally, the TENS is placed at a high frequency, but a low threshold for intensity (low muscle contraction). In the physical therapy setting, this is often used as a modality for pain relief.
It's important to recognize the distinction between E-Stim and TENS. Current research is reviewing the effectiveness of TENS for pain, and attempting to narrow down the subgroup of patients who would receive the most benefit from TENS. Current potential categories include: effectiveness of TENS in acute vs. chronic pain, in types of pain, surgical vs. nonsurgical, just to name a few examples. In the clinical setting, TENS is often used in conjunction with ice.
Radiographs
Radiographs are commonly referred to as "x-rays." X-Ray imaging is effective because the x-ray beam creates different images on film depending on the type or density of the object it passes through. X-rays become absorbed they reach a dense object, such as bones. They will pass through areas that are less dense, such as skin, fat tissue, muscle, ligament, or tendons. A broken bone or fracture can be seen on film because the areas at the bone are absorbed, but pass through the fractured area. X-rays can also detect pneumonia and foreign objects. In pneumonia, the area in the lungs should be black, indicating it is clear. If it appears on film as foggy, then it is “filled” due to mucous or infection.
Computed Tomography (CT)
CT takes radiographs a step further, using computers to take multiple "slices" of a specific part of the body. The computer analyzes all of these cross-segments to reconstruct an image.

This image depicts a CT (computed tomography) scan of a patient's head. Several slices of the patient's head are visible.
Magnetic Resonance Imaging (MRI)
An MRI uses a large magnetic field to create an image of an area of the body. This field magnetizes some atomic nuclei of the body, specifically the water molecules. As the MRI scanner covers a rotating field, this information is recorded to build a representation of the body. What makes MRI beneficial is that it provides an excellent differentiation between soft tissues of the body. It is ideal for examining the heart, muscles, ligaments, even brain tissue. The MRI also does not use any ionizing radiation, effectively making it "safer" than an x-ray or CT Scan.
Orthotics
Orthotics is the medical specialty dealing with orthoses. An orthosis (sometimes referred to as an orthotic) is an externally applied device used with the intent to modify the structural or functional characteristics of the musculoskeletal system. One of the most common orthoses is for the foot, and is placed within the shoe. "Dr. Scholls” is a common brand of over-the-counter foot orthosis.
Custom foot orthoses can be created using plaster of paris. An orthosis in this case is used to alter weight bearing of the foot, to improve the arch.
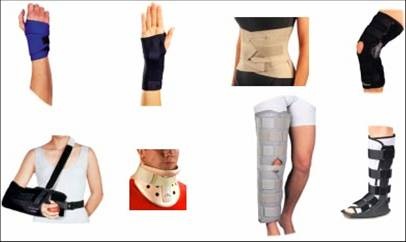
Depicted are eight common orthotics, including hand, hand and wrist, back, knee, arm, neck, leg, and foot orthotics.
Orthoses are created to limit mobility of a joint, assist movement in the desired direction, even attempt to realign shape or position. By limiting movement to improve function, an orthosis improves quality of life for the patient. The following are the most common forms:
AFO - Ankle Foot Orthosis
One of the primary purposes of an AFO is to control foot drop, a weakness of the foot lacking dorsiflexion. The foot is unable to rise sufficiently against the ground. This can be due to damage to the nerve or generalized weakness, generally to Tibialis Anterior. It is usually a symptom associated with pathology, not pathology itself. An AFO goes around the foot, holding the foot in a neutral position.
KAFO - Knee Ankle Foot Orthosis
As the name implies, this orthosis has influence over the knee, ankle, and foot areas. It can restrict motion at the knee in all three (3) planes of motion. This can maintain a neutral ankle position, keeping dorsiflexion. It can be adjusted at the knee to prevent flexion and/or extension. It can also be adjusted to prevent rotation. Typically, once the restrictions are in place, it requires a skilled prosthetist to adjust the orthotic.
Knee Orthosis
This is primarily to support or align the knee. This orthosis can prevent flexion and/or extension, improving stability of the knee. It offers great support for disease or conditions that affect the ligaments or carriage of the knee, even patients with neurological (such as stroke) or muscular impairment (such as a dystrophy). It is important to understand that the brace is NOT a treatment. It is used in connection with treatment, often with medications, possibly with surgery, and with therapy to restore movement and enhance the patient's joint function.
HKAFO - Hip Knee Ankle Foot Orthosis
This orthosis encompasses the hip joint as well as the knee, ankle and foot. For its uses, see the above comments regarding the foot, ankle, and knee. This orthosis is less commonly used.
Spinal Orthosis
Spinal or back orthoses are common in cases of vertebral fracture. The thoracolumbar spinal orthosis (TLSO) covers and attempts to stabilize the back. This reduces pain and promotes healing in the correct way. A TLSO is usually a plastic body case, often similar to a clam shell design. It is often used to restrict flexion and/or extension. TLSO can also be soft shell design.
Prosthetics
An orthosis is typically meant to be a means to an end-- a temporary piece of equipment. Prosthesis is an artificial device designed to replace a missing body part. Ideally, a patient will progress beyond the need of an orthosis. A patient who requires a prosthesis will always require a prosthesis. In general, prostheses can be broken down into 4 main types:
- Transtibial (Below Knee Amputation)
- The term applies to any amputation across the tibia
- It is often known as BKA (Below Knee Amputation)
- The ankle may be:
- Fixed and unable to move
- Fixed to allow only dorsiflexion/plantar flexion
- Allowed motion in all three planes
- Transfemoral (Above Knee Amputation)
- This orthosis must include motion at the knee
- May be fixed, thus not allowing any motion
- May limit specific extension or flexion
- Set to lock when weight bearing
- Set to unlock when not weight bearing
- The complexity can go from simple to socket/suction to very complicated
- Can use electronics contained inside the prosthesis
- Benefits are often 80% more energy, due to the complex movement pattern a knee would provide
- The use of lighter materials, computers, motors are improving technology
- Transradial (Below Elbow Amputation)
- Two Types:
- Cable operated using a harness around the opposed shoulder
- Electronics sensation of the upper arm
- Myoelectric sensation allows for opening & closing of the hand
- Two Types:
- Transhumeral (Above Elbow)
- This prosthesis often will be fixed, as it is more simple to use
- New technology may make future prostheses more functional
Taping & Bandaging
The use of taping and bandaging in physical therapy can provide preventative management and treatment in sprains, tendonitis, even dislocations. The basic guidelines to taping involve protection of the skin, using proper anchor taping, and spray anchors/skin guards. This will be performed by the therapist, but it will fall to you to gather these items, along with removing the tape carefully for a new application if needed. You must take great care in performing the removal correctly, so as not to tear the skin. As taping techniques vary clinic to clinic, if you are to use taping techniques, you will be educated by your physical therapist.
Treatment of Common Medical Disorders
Introduction
By now you should understand that the "subjective" is the record of information provided by the patient. This can include pain level, the patient's experiences, their performance with their exercise program, just to mention a few examples. The subjective is important to the physical therapist and physical therapist assistant when creating the treatment plan. There are some examples below. As an aide, you are not responsible for a physical therapy diagnosis, but you must grasp the importance of your communication with the patient, and remember this when interacting with them.
Musculoskeletal Disorders Examples
- Pain that occurs after a patient rests and then improves with movement
- Usually a sign of osteoarthritis joints
- Occasionally sprains & strains
- Pain occurring on weight bearing
- Usually a sign of overstraining of the lower extremities
- Usually a sign of osteoarthritis of the lower extremities
- Pain occurring immediately after an injury
- Usually equated with a fracture, tear of muscle, ligament of other tissue
- Pain occurring after a time interval (worse after warm up)
- Usually indicates presence of a minor strain or sprain
- Pain occurring on movement of a joint and stoping when joint is at rest
- Usually a sign of acute joint disorder
- Sometimes a sprain or strain
- Pain radiating along the distribution of a nerve
- Usually suggests the presence of a lesion or nerve impingement
- Pain when a person is working or after work
- Usually indicates injury sustained during work or part of occupation
These are just a few examples of the many insights a physical therapist may have about a patient's condition. Your duty isn't to find the cause or relationships, but to ensure what you pass onto the physical therapist is correct. For instance, let's say you ask the patient how his/her day was, and the patient replies, "It hurts every time I bend my hip." If you report to the therapist, "He/she has hip pain," this would be incorrect. Your proper response is that "the patient reports that every time he/she bends the hip, there is pain." This will allow the therapist to consider hip pain and low back pain as causes of hip pain. It will be important that you do not attempt to perform realizations or generalizations.
Modalities
Modalities
A modality is the application of a therapeutic agent. This is the use of an item with specific properties to obtain a treatment effect. Here are the most common examples of therapeutic modalities:
Heat
Moist hot packs are often used during therapy sessions. They are wrapped in several layers of towels, not only to protect the patient but to allow a gradient of heat from the pack to the patient. A moist hot pack can relax tight muscles, which can ease pain by decreasing muscle tension, even muscle spasms. Heat also increases blood flow through vasodilation. "Vaso-" refers to blood vessels, while dilation refers to enlargement. The heat causes the blood vessel to vasodilate, meaning its radius gets larger. A patient who has muscle strains, spasms or arthritis will often receive benefit from moist heat packs.
You are to ensure there are 6-8 towel layers between the pack itself and the patient. The covers themselves count for 2-3 of those layers, depending on the thickness. If you fold a towel in half, that will count as 2 as well. A patient who lies on the hotpack will require more, often 8-10 layers due to the pressure they provide, which will result in a more rapid and intense feeling of warmth.
Patients should never say that a pack feels "hot" or "too hot." Instead, it should feel only very warm. The area of skin at most should be pink, and the treatment should last only 15 minutes.
Remember, heat can't be applied to an area with jewelry, piercings, or metal implants as this can cause the area to overheat and become painful. You should also be mindful of putting any heat on a pregnant woman.
Cold
Cold packs are filled with a frozen gel that allows them to be as cold as ice but remain flexible. The flexibility is important to allow proper contact with the body. They are often used to treat pain and inflammation, and are applied directly, but must be wrapped in a towel to avoid frostbite to the area affected. Cold is first transferred to the skin, then the underlying muscle tissue. The layers of cloth will minimize irritation to the skin, while still allowing cold to transfer to the muscle and underying tissue. The use of cold causes vasoconstriction, meaning the radius or the size of the blood vessel gets smaller. This decreases inflammation, pain and swelling.
Cold packs are usually shielded from the patient by one pillow case, then directly applied. Patients who are sensitive to cold will require additional layers. The pack may be bound to the patient with ACE Wrapping.
Ice Massage
Ice massage involves using a special cup to hold a fragment of ice--often a dixie cup with the edge torn off. This is most often applied to an inflammation that is very close to the surface of the body. The intensity of direct ice contact means this therapy should be used for no longer than 7-8 minutes. It is applied in a circular fashion.
Ultrasound
An ultrasound uses sound waves for treatment. The frequency may be low or high. The frequency allows the treatment to bypass skin & fat tissue and go directly to muscle. The use of ultrasound on muscles causes them to warm, promoting tissue relaxation, thus decreasing tightness and spasms. The warming effect also causes vasodilation, similar to heat. This can facilitate healing. Ultrasound is ideal for deep muscle relaxation and pain relief where the affected area is too deep for moist hot packs to reach.
Settings
Frequency is determined by the depth of the tissue that needs to be treated. A setting of 1MHz is used for 5 cm of depth, while a setting of 3 MHz is used for 1-2 cm of depth.
Duty Cycle
This setting varies on the degree of warmth needed in the tissue. If the goal is to increase the temperature or warmth, then 100% duty cycle is used. This means it is running continuously. When this is not the intention, then a pulsed cycle of 20% is used.
Intensity
When heat is the desired effect, then an intensity of 1.5 to 2.0 W per square centimeter will be used. The intensity is increased if no sensation of warmth is felt within 2-3 minutes, but decreased immediately if there are any complaints. Nonthermal options will use intensity of 0.5 - 1.0 W per square centimeter.
Duration
The setting for ultrasound is usually from 5 to 10 minutes. Since the effective treatment area of most ultrasound machines is 10 square centimeters, this means it will take 5-10 minutes to treat this area. Larger areas will require more time.
It is important to NEVER keep the ultrasound in one place! Always keep it moving, using ultrasound gel to form a barrier between the skin and the ultrasound head. The ultrasound head should always remain in contact with the skin while the unit is on.
WARNINGS
Ultrasound should NEVER be used over known tumors, pregnancy, cement or plastic (artificial joints), a pacemaker, the eyes, reproductive organs, epiphyseal plates (growth plates in long bones), fractures or breast implants.
TENS
TENS is an abbreviation for transcutaneous electrical nerve stimulation. The unit is often small and run off batteries. It uses electricity to stimulate the muscle and decrease pain. Electrodes are applied to the affected area. The machine sends signals through wires to the electrodes. A tingling sensation is often felt in the underlying skin and muscles. The electricity disrupts the pain signal from the nerve to the brain.
TENS units include more sophisticated models to deal with acute pain, muscle relaxation or target chronic pain. These are often configured using preprogrammed settings that the physical therapist will show you. In some circumstances, they may require adjustment. Always begin with the lowest setting possible, then gradually increase by the smallest unit of measurement. As the intensity increases, allow a few moments to pass to let the patient adjust to the new intensity. The pad should be placed around the area affected, as seen in this video.
Electrical Stimulation
Electrical stimulation is more commonly called "e-stim" in the clinic. Like TENS, it uses current to stimulate a muscle or muscle groups. It also uses electrodes on the skin to activate specific muscles. The electricity causes contraction of the muscles, just like in actual exercise, which can assist in strengthening. The device can be adjusted to produce gentle contractions, or increase the forcefulness of contractions. It also increases blood supply to the area. A common use of estim is for foot drop, to assist with dorsiflexion.
Channels
When talking about e-stim, it is important to know about "channels." When you have one channel, you have two pads to place on the patient. If you have two channels, you have four pads. You should never have more four pads per area, in case of pain. A patient may use multiple pads for multiple areas of pain, but at maximum four pads per area should be used.
Waveforms
Typically, either a pulsed biphasic or an interferential current is used. Pulsed biphasic uses only 2 electrodes (pads), making it easier and faster to set up. Interferential current (IFC) requires 4 electrodes, which is effective over a larger area and is longer lasting. IFC must allow the channels to overlap-- the same channels are at diagonals to allow this effect.
Settings
As with most technology, different models will vary. It is important to become familiar with your clinic's model and get good instruction before using it on a patient. Units also must be monitored periodically by an external company to ensure they are safe to use on patients. The most common setting that needs to be adjusted is amplitude, which is increased until the patient can "barely" feel it. The patient is then informed the amplitude is to be increased until the patient feels it is strong, not painful. The duration may vary by the therapist, but it is usally 10 to 20 minutes.
GameReady

This image depicts a common interface for a GameReady, showing the dial for intensity, the buttons that control time and start and stop, and the digital display.
A GameReady (tm) is a device that circulates a slushy mixture of ice and water from a pump through a compression garment. It moves from the garment to the machine and back, which keeps it chilled for the duration of the treatment. The garment compresses the body part. This combination of compression and persistent cold is fast-acting, and the unit is relatively easy to use.
Range of Motion (ROM)
Range of Motion
Range of motion, abbreviated ROM, is a the distance a movable object may normally travel when properly attached to another. In physical therapy, this refers to the body's joints. This motion may be linear or angular. The ROM of joints is measured in degrees by a device called a goniometer. ROM is further divided into three subtypes of activity. Passive Range of Motion, or PROM, is when someone else moves the joint through the range, with no effort from the patient. Active Assistive Range of Motion or AAROM, is when the patient uses his or her own energy and muscle on the joint to perform the motion, but requires some help from a therapist or from equipment, such as a wand or strap. Active Range of Motion, AROM, is when the patient moves the joint without any external assistance.
The purpose of ROM exercises is to preserve the patient's current ROM, and to ensure the joint is moving “correctly.” A patient may have normal ROM, but may be inadvertently moving incorrectly, causing pain, discomfort, strain, etc. It is essential that when a patient is doing ROM exercises it be relatively pain free. If it is not, the physical therapist or physical therapist assistant should be consulted. Depending on the diagnosis, ROM exercises may not be allowed by the surgeon until a specific time. These will often be dictated by the post surgical protocol, which will be discussed with you by the therapist.
The Hand & Wrist
Setup:
Have the patient rest his or her wrist so the forearm is on the table, but the wrist/hand are off the edge. The top of the hand faces upward.
- Extension:
- Bends the wrist upward
- Flexion:
- Bends the wrist downward
Now turn the thumb upwards.
- Radial Deviation:
- Patient turns thumb upwards
- Ulnar Deviation:
- Patient moves thumb downwards
- It is normal to have more radial deviation than ulnar deviation
- Abduction:
- Patient spreads fingers open
- Adduction:
- Brings fingers together
The Elbow
- Flexion:
- Patient turns their palm upward, then bends the elbow, bringing the palm to the shoulder.
- Extension:
- Straightens the elbow.
- Supination:
- Turns and rotates the palm upward from a downward position.
- Pronation:
- Turns the palm downward from an upward position.
The Shoulder
- Flexion:
- Patient moves the shoulder forward, bringing the hand up and overhead.
- Abduction:
- Moves the shoulder to the side, then brings the hand overhead.
- External Rotation:
- Keeps the elbow tucked to the side.
- Bends the elbow to 90 degrees flexion.
- Rotates and brings the hand backwards.
- Internal Rotation:
- Keeps the elbow tucked to the side.
- Bends the elbow to 90 degrees flexion.
- Rotates and brings the hand towards the stomach.
The Ankle
- Dorsiflexion:
- Bends ankle and brings the foot upward.
- Plantarflexion:
- Points the foot downward.
- Circumduction:
- Rotates ankle in a circle.
The Knee
- Flexion:
- Bends the knee.
- Extension:
- Straightens the knee.
The Hip
Patient performs all of these exercises in a standing position.
- Flexion:
- Bends the hip upward.
- Extension:
- Takes the knee and brings it backward, behind the body.
- External Rotation:
- Turns the foot outward.
- Internal Rotation:
- Turns the foot inward.
Manual Muscle Testing
Manual muscle testing is a technique to grade a patient's voluntary strength. It is used to screen and attempt to identify a patient's suspected or actual impairment of muscle performance. (Muscle performance is a combination of strength, power and endurance.) The exact procedures for manual muscle testing are detailed by the physical therapist assistant and physical therapists. It is important to know the basics of testing so that you can assist with documentation, taking dictation, taking notes, or in any other way the therapist needs.
Grade | Comment | Description |
5 | Normal | Completes ROM against gravity, maximal resistance |
4+ | Good + | Completes ROM against gravity with moderate-maximal resistance |
4 | Good | Completes ROM against gravity with moderate resistance |
4- | Good - | Completes ROM against gravity with minimal-moderate resistance |
3+ | Fair + | Completes ROM against gravity with only minimal resistance |
3 | Fair | Completes ROM against gravity without manual resistance |
3- | Fair - | Doesn’t complete the ROM against gravity, but at least half of the range |
2+ | Poor + | Able to initiate movement against gravity |
2 | Poor | Completes ROM with gravity eliminated |
2- | Poor - | Doesn’t complete ROM in a gravity eliminated position |
1 | Trace | Muscle contraction can be palpated, but there is no joint movement |
0 | Zero | Patient demonstrates no palpable muscle contraction |
Want to learn more about MMT? Take a look at this website from the University of Findlay. Videos are available in the links to the left, under Manual Muscle Testing. You can access the videos at their website: http://theuniversityoffindlayfunctionalmovementresourcecenter.wikispaces.com/Manual+Muscle+Testing.
Basic Structure and Function of the Human Body
Introduction
This image depicts Da Vinci's symmetrical measurement by demonstrating a human's reach is near the human's length, making the diameter of a circle.
You will now be learning about the different body systems and the most common disorders and pathologies that physical therapy treats. This overview will allow you to more easily step into the clinic as a therapy aide.
Musculoskeletal System
There are three types of muscle tissue: smooth (involuntary, found in organ systems), cardiac (found only in the heart), and skeletal. You will almost exclusively be dealing with skeletal muscle tissue.
The musculoskeletal system is the "bread & butter" of physical therapy. It is composed of all the bones, muscles, tendons and ligaments of the body. When two or more bones meet, a joint is formed. Muscles cross over these joints allowing for motion. In therapy, we focus heavily on skeletal muscles, because these are the muscles we are able to move when we want to. The term for this motion is "voluntary."
Muscles don’t attach directly to the bones themselves, muscles instead become tendons and these tendons attach directly to the bone. Ligaments, which are similar to tendons, connect bones together. If muscles or tendons are overstretched due to injury, we call them strains. When ligaments are overstretched causing an injury, that is called a sprain . This is different from a dislocation , in which the joint itself is no longer aligned in its normal position.
Common Musculoskeletal Disorders & Treatments
Arthritis & Rheumatic Conditions
- Acute Arthritis:
- No Massage
- No Exercise
- Joint to be moved through full ROM
- Subacute Arthritis:
- Moist Heat
- Mild Infrared heat
- 30 minutes duration, times per day per PT
- Subacute & Chronic Stage Arthritis:
- Heat
- Massage
- Graded Exercises (Progressive Resistance Exercises)
Heat Modalities
It is important to avoid the use of heat in acute conditions because it can make the pain worse. Medication is often used during the acute phase, while heat is a treatment of choice for the subacute and chronic stages.
- Paraffin Baths:
- Ideal for the treatment of hands and fingers
- Infrared Heat:
- Most convenient form
- Keep at least 18" from body, typically used for 30 - 45 minutes
- Electric Heating Pad:
- Ideal as it can be used by the patient themselves
- Should be wrapped in a towel to protect patient
- Typically used up to 45 minutes
- Hot Tub Baths:
- Used prior to exercise
You are expected to understand the implementation of each of these, monitor the patients, and monitor the timers.
Massage Modalities
Massage, often called soft tissue mobilization, begins with gentle broad strokes. Deeper strokes follow next, usually incorporating cross friction, kneading, and deep tissue. It is important not to over-massage. All massage must be performed by the physical therapist or physical therapist assistant.
Range of Motion Exercises
These exercises are primarily used to improve the range of the joint, and improve mobility by reducing pain levels. The level of exercise must be balanced: sufficient enough to improve joint motion and flow, but not so excessive as to aggravate an injury. If there is pain, the exercise should be adjusted in frequency or modified by the therapist. It is common for the patient to have some pain or soreness an hour or two afterwards. There may be patients who will be unable to tolerate soreness at all, which will require the therapist to adjust the exercises.
Low Back Pain
Low back pain is one of the most common pathologies known to physical therapy. It affects all ages, and it is virtually a guarantee that you will come across a patient with low back pain at least once. Even though the patient's chart may simply say "back pain," it's important to realize the different types of low back injury:
- Ligament tear
- "Snapping" or "slipping" or "popping"
- Arthritis of the spine
- Pain when waking up
- Rapidly improves after day's activities
- Intervertebral disc damage
- Pain intensified by sneezing or coughing
- Pain down leg
- Sudden or traumatic fall
- Fracture of spine
- Poor body mechanics, poor posture, poor body position
- Improves during sleep
- Improves with change of position
- Aggravated following day of work
Working with back pain patients
Many patients with back pain find a firm supine position is the most comfortable. They may benefit from low back support. As an aide, you should offer a firm chair with good back support, not a stool. You may even offer to elevate their legs when lying supine. Patients with low back pain may have taping or a binder. This is important to know about during treatment.
Back pain patients usually are treated with a heat modality. The amount of time the heat is applied depends on the severity of pain on that particular day. If the injury is exacerbated, the therapist may opt to use heat prior to therapy. The therapist may choose to use heat after therapy if the patient is feeling well and wishes to avoid muscle soreness.
Therapeutic Exercises for Low Back Pain
There are particular exercises indicated for low back pain patients which strengthen the stomach muscles while stretching the contracted back muscles. As with all exercises, some discomfort is to be expected, but pain should not occur. If pain does occur, it should never persist to the next day.
- Abdominal Prep Beginner
- Supine, elevate and support legs
- Hands held beside head
- Tilt pelvis to flatten the lower back by pulling up
- Using lower abdominal muscles
- Hold back flat, breathing in/out
- Abdominal Prep Intermediate
- Supine
- Knees bent (hook lying)
- Hands upward beside head
- Back flat
- Legs lifted slightly off the table
- Back remains flat to table
- Return to neutral
- Abodominal Prep Advanced
- Supine
- Knees bent (hook lying)
- Hands upward beside head
- Back flat
- Knees are straightened one at a time
- Return to neutral
These exercises should progress in difficulty. The focus should be on small movements to improve back support and stability.
- Single Knee to Chest
- Patient lying on side or supine
- Knees bent (hook lying)
- Hands placed to side of body
- Back flat
- Patient brings one knee to chest, slowly
- Patient returns knee to hook lying
- Repeat on opposite leg
- Double Knee to Chest
- Patient lying on side or supine
- Knees bent (hook lying)
- Hands placed to side of body
- Back flat
- Patient brings both knees to chest, slowly
- Patient returns knee to hook lying
- Repeat on opposite leg.
If a patient is having significant difficulty grasping the small motion of these activities, give feedback. You may be asked to use a blood presure cuff (sphyngmomanometer). The cuff is placed under the patient's back, then pumped gradually to 35mm HG to 45mm HG. As the patient performs the exercises, they must maintain this pressure at all times. This ensures they maintain a strong core.
"Neutral spine" is the midpoint between full flexion and full extension of the spine. In general, you place your hand on the small of the patient's back, then you ask them to move away from your hand as much as possible. You then tell them to average this distance. This is neutral spine. ALL the above exercises are often performed in neutral spine. You should clarify with your therapist.
- Pointer
- Patient gets on hands and knees (all fours)
- Patient assumes "neutral" spine (see above)
- Patient sustains neutral spine, brings one arm upward
- Patient returns to normal, then may alternate arms
- Patient may alternate legs
- Pointer Advanced:
- Patient brings upper extremity and contra lower extremity up
- Patient returns knee to hook lying
- Repeat on opposite leg
Therapeutic Exercises for Bursitis
This common pathology is the inflammation of the bursa. Bursae are small fluid-filled sacs which act as a cushion between bones and tendons to help reduce friction. Treatment for bursitis usually involves applying an ice bag to the affected area, and performing active ROM exercises in a pain free range. Another treatment, iontophoresis, will be discussed later in the course.
Cervical Spine (Neck) Treatments
Cervical spine (neck) pain is commonly treated with physical therapy. Sprains or strains are often the result of motor vehicle accidents (MVA). Here are some of the most common treatments for cervical spine pain:
- Heat Packs
- Cold Packs
- Cervical Retraction
- The patient is often in a sitting position
- Patient looks straight ahead and moves head back
- Sufficient stretch only to avoid aggravating symptoms
- Progression
- Used against a ball or balloon
- Cervical Lateral Flexion / Side Bending
- Patient sitting
- Patient brings ear to shoulder (not reverse)
- Patient may hold onto chair for more stretch
- Levator Stretch
- Patient sitting
- Patient brings chin to armpit
- Stretch felt on opposite side of neck
Osteoarthritis Treatments
Osteoarthritis is a common pathology resulting from the wear and tear of the cartilage that lines the joints. The hip and knee are the most common sites for osteoarthritis as they are weight-bearing joints. The following are typical exercises for patients with osteoarthritis:
- Rest, especially non-weight-bearing rest
- Patient is to reduce activity
- Patient is to reduce weight-bearing
- Sufficient rest between treatment sessions
- Complete Bed Rest
- Is NOT advisable except for the most extreme conditions
- Even then, only 1-2 days at most (often inpatient)
- Range of Motion
- AROM ideally, but non-weight-bearing
- PROM if required
- Inpatient Setting
- Activity typically very functional
- Bed Mobility:
- Rolling
- Supine to sitting
- Sitting to supine
- Transfers
- Sit to standing
- Standing to sitting
- Bed to chair (etc)
- Ambulation
- Using assistive equipment
Cardiopulmonary System
The cardiopulmonary system is composed of the heart, lungs, veins, and arteries. They work very closely with each other to provide sufficient oxygen to the body, along with removing carbon dioxide. Let's look at the cardiac portion of this system.
The heart is of course at the center of the cardiac system. The heart is a large muscle, made specifically of cardiac muscle. It is involuntary, meaning you do not have to think about making your heart beat. It is divided into four chambers, two for the left, two for the right. There are two atrium chambers on the top and two ventricle chambers on the bottom. Blood returns from the body to the right atrium without oxygen. It goes from there into the right ventricle, then is pumped to the lungs to get saturated with oxygen. The right atrium and right ventricle create the pulmonary blood flow. Blood then returns from the lungs to the left atrium. The left atrium then pumps the blood to the left ventricle, which will pump the blood to the rest of the body.
Because the heart is a pump, it wouldn’t be useful without an extensive network through which to move blood. Arteries and veins make up this network. Arteries take blood away from the heart, while veins take blood toward the heart. Arteries contain a layer of smooth (involuntary) muscle, while veins lack muscle, but contain one-way valves to prevent back-flow. You may already have heard that when these valves fail, varicose veins or spider veins result.
Common Cardiovascular / Cardiopulmonary Pathologies
Peripheral Vascular Disorders
How peripheral vascular disorders are treated depends on the severity of the patient's condition, as well as the specific type of disorder: arterial or venous. While the specific details are beyond the scope of this course, it is important to clarify with the therapist what treatment will be used. You may have multiple patients with PVD, but each may receive a different treatment.
Heat should be avoided on the affected extremities, though it is often used on the opposite extremities. Exercises are used sparingly, and any activity that exacerbates the condition should be avoided. If the patient is pooling blood, then any activity conducted on their feet will promote pooling. They need to remain active, but ensure adequate rest periods are provided. In addition, any time they are at rest, their legs should be elevated. If at any time the legs become pale, they must be elevated. Elevation will assist with circulation. The most important aspect of therapy is the integration of education. This education will be discussed with the patient by the therapists.
Emphysema, Asthma, Bronchitis, Chronic Obstructive Pulmonary Disease
These are all common pulmonary pathologies, which means they affect the lungs. The following are very generalized activities that may help these patients:
- Pursed Lipped Breathing
- Patient is to inhale through their nose (mouth closed)
- Patient is to exhale out their mouth (pursed)
- We often call this "smell the roses, blow out the birthday candles."
- Posture Exercises / Positioning
- Patient sits upright
- Upright in bed, keep the lungs open
- Pacing Activities
- Take adequate rest periods
- Spread activities throughout the day
- Energy Conservation Activities
- Use adaptive equipment to minimize exertion
- Sitting down to do laundry instead of standing
- Sitting down to put on clothing instead of standing
Skill Assessments
You will be required to obtain blood pressure and heart rate of patients. Heart rate, also known as pulse, is the number of beats the heart is pumping over a minute of time. It is normally felt in the neck, wrist, or leg. Blood pressure is the amount of force exerted by the blood against the inside of the blood vessels. Here, you have two forms of pressure. The first, systolic , is the pressure measured during the time in which the heart is contracting. Diastolic is the pressure when the heart muscle is relaxed. Please note, even in a “relaxed” state, there is still some pressure-- your heart is never flaccid or completely at rest. This is why we write down blood pressure using two numbers. The systolic is the top number, the diastolic the bottom number. For example: 128/72. 128 is the systolic, and 72 is the diastolic.
Neurological System
Nervous System
If the cardiopulmonary system serves as the “plumbing” of the body, then the nervous system serves as the "network." The nervous system integrates the body’s systems via a communication network. The Central Nervous System is the brain and spinal cord. The brain issues commands to the body and organs through nerves in the spinal cord, and processes the information it receives in return. The Peripheral Nervous System covers the outlying parts of the body.
Cerebrovascular Accident / Transient Ischemic Attack
The most common nervous system disorder is a stroke, more formally called Cerebral Vascular Accident. You may have also heard of a “mini-stroke,” which is a TIA, or Transient Ischemic Attack. In a CVA, the patient has a decreased blood flow to the brain. It can occur due to a blockage, which is ischemic, or it could be a bleed, which could damage surrounding cells. In a TIA, caused by a brief blockage, blood flow and full function are restored quickly.
The image shows a CT scan of a brain where the left side of the picture shows a darkened segment of the brain, demonstrating a cerebral ischemia.
CVA / TIA - Treatment:
The most effective form of treatment is early intervention. As soon as the patient is medically stable, therapy should begin. As an aide, one of your most important duties is to prevent deformities due to contractures, or shortening of the muscles. The use of pillows and towels placed in specific positions can prevent these contractures, which occur when part of the body is weakened, causing the opposing muscles to contract and shorten.
- Pillow placed under axilla (armpit):
- Prevents shoulder adduction
- Promotes weight bearing through the arm
- Pillow or multipodus boot placed on affected foot:
- Prevents shortening of the Achilles tendon.
- Pillow placed on outside or inside of leg:
- Prevents excessive external or internal rotation of hip
- Pillow or towel rolled underneath ankle:
- Ensures there isn't rubbing on ankle
- Promotes knee extension
- Prevents decubitis sores on the heel
Range of Motion
While this will often be performed by the therapist, your knowledge of ROM will be useful, especially if the therapist intends to apply splints for the patient. Emphasis should be on slow and controlled motion.
Lab Review
Patient Positioning (including awareness and care of prominences)
PROM of Upper and Lower Extremities
Guillain-Barre Syndrome:
This is an autoimmune disease in which the immune system targets the host's own systems. The body becomes sore, weak, and there is a sudden loss of motor function. In acute exacerbation, physical therapy is typically limited, and medical treatment must occur first. As the patient begins to improve, therapy is initiated, beginning with passive range of motion activity. As the patient begins to return to strength, functional mobility work begins. The patient progresses from basic bed mobility, to transfer training, then to gait training.
Multiple Sclerosis
This image depicts President Roosevelt sitting in his wheelchair, with a dog across his lap and a young girl at his left.
Though there are several subtypes of multiple sclerosis, MS will be generalized for this session. MS involves changes to the white matter of the brain, resulting in "flares" and remissions. The most common symptoms include weakness, ataxia, and slurred speech. Patients often experience difficulty with walking, repeated losses of balance, and eventually may fall.
Patients who are undergoing treatment for MS will have their programs detailed by the therapist. Depending on the location of the lesions on the white matter, their symptoms will vary in severity and location. As an aide, one of the easiest and most difficult things to understand is how to help the MS patient help him or herself. The more the patient is able to take care of herself, the better. You provide safety, and prepare or lay out items such as equipment, but they are to perform as many of the activities as possible on their own.
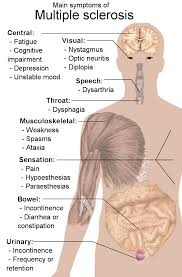
This image depicts a model human body with each area designated with the symptoms of MS that affect that area. For example, in the musculoskeletal system, MS can cause weakness, spasms, and ataxia.

Parkinson's Disease
This is a degeneration of the nervous system. The body slowly stops producing dopamine, resulting in tremors and bradykinesia (slowness of movement), which leads to loss of balance, falls, and eventually trouble with gait.
Physical therapy can only attempt to treat symptoms and improve safety. Therapy will encourage normal motion patterns, improve safety with ambulation, and may include instruction in use of assistive devices. The therapist will usually integrate the use of cues. Cues can be visual, verbal, or tactile. Visual cues use the patient's vision to orient him or herself. This could involve using a family member as a frame of reference, such as looking into the eye to assist with upright posture. A therapist may give verbal cues for the patient to follow. Tactile cues are when the therapist places his or her hands on the patient to signal when to move.
Anatomy and Physiology of the Musculoskeletal System
Skeletal System
This image depicts sketches from Da Vinci of the human skeletal system, showing the ribs, the vertebrae, the pelvis, and the legs.
The Human skeleton is made up of 206 individual bones. The largest is the femur, which is the bone of the thigh, and the smallest is the stapes that is located in your inner ear. While the femur supports the weight of the upper body and serves as a lever for walking, the stapes assists with the transmission of sound from the outer ear to the inner ear. It's important to understand that bones are not static--they're not just "rocks" made of calcium. They are a living and dynamic structure. It's true that they contain our storage of calcium, but this is a dynamic process, and they are highly vascularized and innervated. This means they have a large blood flow and a good network of nerves. Your bones remain very much alive even after you stop growing. They support the body, protect the organs, and act as levers that the muscles pull on to cause movement.
The Axial Skeleton
The axial (located around the central axis) skeleton represents about half of the entire skeleton, but contains only the skull, vertebral column, rib cage, chest bone, and the bones of the inner ear. The axial skeleton protects the vital organs, namely lungs, heart, and brain. We will not cover the 80 different bones here, as this is an overview only, though it is interesting to note that there are 22 bones just in the skull itself. The vertebral column, ribs, and jaw are the axial bones most addressed by physical therapy.

This image depicts the human skull, highlighting the different skull bones in different colors to help demonstrate their placement and separation.
The Appendicular Skeleton
This is the skeleton we consider "the normal skeleton," including the upper and lower extremities. It is composed of 126 bones. These are the bones primarily affected by physical therapy. Here is a breakdown of the major appendicular bones:
Upper Extremity
- Shoulder Girdle
- Scapula (shoulder blade)
- Clavicle (collar bone)
- Arm, Upper
- Humerus
- Arm, Lower (Forearm)
- Ulna
- Radius
- Hand
- Carpals (16) (wrist bones)
- Metacarpals (10)
- Fingers
- Are divided between proximal, middle and distal (28 total)
Pelvis
- Pelvic Bone and Ilium
Lower Extremity
- Thigh, Upper Leg
- Femur
- Shin, Lower Leg
- Patella (knee cap)
- Tibia
- Fibula
- Ankle
- Tarsals
- Metatarsals
- Toes
- Proximal, middle and distal (28 total)
This image depicts the different bones in the hand, highlight the different sections in different colors to help demonstrate the placement and separation of the bones.
Continue to review bone structure on your own. The Muscle Bone app located on the iPad is a good start. You are free to serach the web for additional tools to assist you. When you are ready and competent with the material, you may progress.
Muscle System
This image depicts Da Vinci's sketches of the human muscle, noting particularly the muscles of the arm and shoulder.
Every single muscle has attachments, a blood supply and a nerve supply. The nerve supply allows conduction of impulses to inform the muscle to contract. The lack of input causes them to relax. The blood supply, of course, delivers oxygen and removes carbon dioxide. Muscle movement is called contraction and requires a significant amount of energy and oxygen to perform. The attachments are what allow the muscles to pull on the bones. These attachments are normally designated as “origin” or “insertion.” The origin is the area where the muscle begins, while the “insertion” is where the muscle ends.
Commonly, it is the “insertion” that moves, but not always. There are circumstances in which the “origin” will move instead, but that will not be covered in this course. Due to these circumstances, there is some discussion among physical therapists if attachments should be called “proximal attachments” and “distal attachments.” You are to understand the concept of origin, insertion, innervation, proximal and distal attachments, but you do not need to memorize them at this time. If you are considering a future as a physical therapist assistant or physical therapist, spending a little of your own free time reviewing this material will pay dividends when you attend school.
You will be responsible for memorizing a list of specific and common muscles that are often treated in the clinic. You are also responsible for knowing their actions. There are over 640 muscles of the human body. You may want to use the animation of the applications to assist you as well. You will only be responsible for the names and actions of the following:
Arm | |
Biceps | Flexes elbow/forearm |
Triceps | Extends elbow/forearm |
Deltoid | Abducts shoulder, some flexion and extension |
Forearm | |
Pronator Quadratus | Pronates the forearm |
Supinator | Supinates the forearm |
Neck | |
Sternocleidomastoid | Single: Tilts head to same side; rotates toward the opposite side Both: flexes neck |
Trapezius | Rotation, retraction, elevation and depression of scapula |
Latissimus Dorsi | Adducts, extends and internally rotates arm |
Leg | |
Gastrocnemius | Plantar flexes foot |
Quadriceps femoris* | Extends knee |
Hamstrings** | Flexes knee |
Soleus | Plantarflexion |
Biceps femoris | Flexes knee |
Tibialis Anterior | Dorsiflexion of foot, inversion of foot (weak) |
Tibialis Posterior | Inversion of foot |
Piriformis | Rotates laterally |
Gluteus maximus | External rotation and extension of hip joint |
Gluteus minimus | Abduction of hip |
*The “quads” are divided into four heads: vastus intermedius, vastus lateralis, vastus medialis, rectus femoris.
**The hamstrings are composed of three different muscles: semitendinosus, semimembranosus and biceps femoris.
For additional information on the muscular and skeletal system, check out Saylor.org's free online Anatomy class. You can find their classes at the following link: http://www.saylor.org/courses/bio302/. Pay particular attention to Unit 3 and 4. For even more information, check out the additional units. NOTE: Some links may not work on the iPad due to their use of Adobe Flash. Try them at home or on a lab computer.
Pre-patient Care
Professionalism and Demeanor
Your behavior and professionalism will be noticed before you say a word. Your level of preparedness and your presentability will carry significant weight. Your behavior should remain appropriate for the clinic or hospital setting. You only have one time to make a first impression, so make it a good one.
Proper Attire
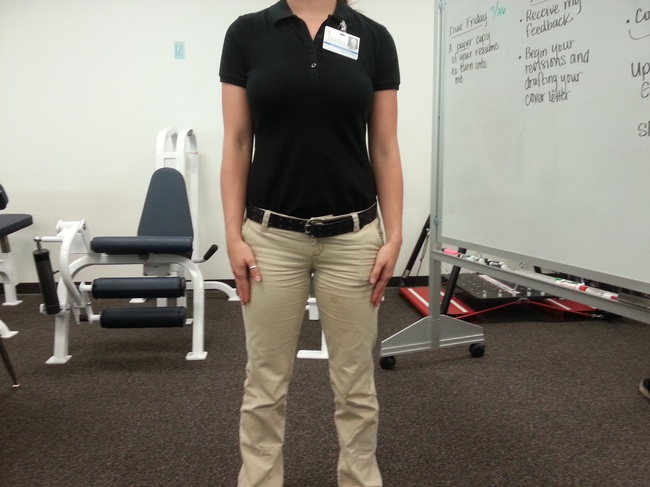
This image depicts a female PT Aide student in acceptable attire. She is wearing a black polo tucked in, a pair of brown khakis, a belt, and a pair of athletic shoes.
For better or worse, what you are wearing is usually the first thing people notice. It sends a message about who you are, what you do, your assumptions, your personality, and your values. As such, it is important to be aware of this at all times and dress appropriately for the situation and environment.
The cardinal rule for professional clothing is to follow the business's policies. This may cover clothing, headwear, footwear, jewelry, and, depending on the workplace, may even extend to piercings, tattoos, perfume/cologne, hair and more. Part of these guidelines have to do with the social expectations that surround the profession. For instance, we expect bankers to be dressed in business attire. The other part of these guidelines has to do with work efficiency and effectiveness. It would be difficult for a construction worker to do his/her job in slacks or a skirt. Morever, there are safety concerns that require certain work envrionments to restrict attire. Large diamond rings, for example, do not do well in rubber gloves, so wedding rings may be discouraged in certain situations.
In the clinic setting, typical clothing may include the following:
- Clothes : Flexible but professional. This is scrubs for most clinics because they allow the workers to perform job duties with greater ease and they send the message that the workers are healthcare professionals. However, the clinic may allow nice, looser jeans or slacks and a professional but comfortable shirt like a polo. Remember, you'll be moving, lifting, reaching, bending, and squatting, so skirts, tight pants, short shirts, low necklines, too baggy pants, etc. would be inappropriate for the work environment.
- Shoes : Wear sensible work shoes, like running shoes. They will allow you to be on your feet and perform the duties of the job. High heels, sandals, boots, or casual shoes may send the wrong message and interfere with the job.
- Jewelry : You may want to keep this to a minimum. Visualize that you will be working with patients and equipment. You do not want to snag on a patient's clothing or entangle yourself in equipment. Too much jewelry may not match the work environment and will inhibit your ability to perform tasks.
- Cologne/Perfume : Wear light, non-intrusive scents or none at all. Some patients may be allergic or sensitive to your aroma, and you will be in close proximity to patients often, so leave it off or go very, very easy.
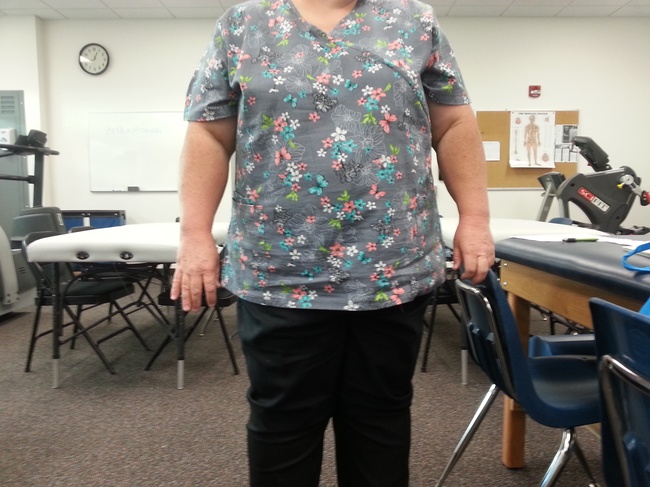
This image depicts a female student wearing a set of gray and black scrubs. Her top is gray with multi-colored dots, and her pants are fully black.
Unsure what the proper attire is? Feel free to ask! Ensuring that you arrive at a job wearing the right clothes not only prevents a potential mistake, it also says that you ask for information when you do not know, and that you are interested in getting things right.
Body Language
In addition to what you are wearing, people often make judgments based on how you carry yourself. It is beneficial to present yourself in the best way that fits the situation. For example, the way a boy meets the father of his girlfriend says a lot to the father, and the way you greet a prospective boss is important in a job interview. A social situation requires different body language than meeting a coworker.
Below is an article about effective body language. Read the tips, and with a partner practice some of the tips, like how to have an effective handshake. Practicing now will help you implement changes later when you are in the work setting.
Office Etiquette
"Etiquette" means the rules of behavior that should be followed in a particular setting. While some of these rules change depending on the situation, many are good rules to follow even outside the workplace. Following these rules will help you express a responsible, courteous, diligent, and professional personality and mentality.
Here are few things that demand particular attention:
- Punctuality : Follow this saying: "If you are on time, then you are late." Always arrive a few minutes early before any scheduled meeting, whether that is your shift, an appointment, a meeting, or whatever. If you allow yourself this time, it will provide you the opportunity to find parking, get your bearings, put away your belongings, do some final preparation, and demonstrate that you value your time and the time of the client or company. The occasional tardiness may be excused or understood, but being late to any appointment may convey that the late person is careless.
- Technology : We live in a time of mobile technology. Cell phones, music players, tablets, readers, etc. all have many benefits, but in the workplace, these gadgets should be limited to work use. During work hours, putting your devices away and making them silent is the best policy. Text messaging or personal phone calls should be limited to your personal time, like before or after work or during scheduled breaks.
- The Golden Rule : Treat others like you want to be treated. You appreciate kindness, support, gratitude, courtesy, and general positivity, so be sure to provide the same to your coworkers, clients, and bosses. This kind of behavior often sends the message for others to behave in the same fashion, creating a positive work environment. While you can count on adversity and conflict in almost any situation, following this guideline can also often make tense, unpleasant, and difficult situations have better outcomes.
Diversity
In the clinic you will meet many different clients from a variety of backgrounds, so it is important to be sensitive to those backgrounds. You must understand that other cultures, countries, languages, and customs don't always follow the same rules as Americans do, so in addition to following the Golden Rule -- everyone wants to be treated with respect and care -- here are some things to keep in mind:
- No Such Thing as 'Common Sense' : Often when we don't understand why someone does something, we say, "It's just common sense." But common sense is only sense that is held in common. In other words, common sense is an agreed upon set of behaviors, so it can be different from country to country, culture to culture, even city to city. Instead, reserve judgment and try to understand things from the other person's perspective. This can often remove unnecessary frustration and conflict, and, most importantly, it will help make all your clients feel welcome and understood.
- Confidentiality : Whatever you experience with a client, it is important to respect their privacy. Do not share those experiences with friends or family. This will preserve doctor/patient privacy and respect the patient's right to privacy.
- Language : You may have clients that speak different languages, and it is important to respect that. Be patient and keep an open mind and open ears. It is probably more difficult to speak a language you are unfamiliar with than to listen to it. Lending an understanding ear can often make clients feel more comfortable. If you are having trouble communicating, remember your effective communication techniques. Don't focus on the problem; focus on solutions or strategies. Instead of saying, "I can't understand you," you might say ask the client to hold and say, "One of my colleagues speaks Farsi, and she could really help us. Would you mind if I asked her to talk with us?"
Preparedness
Preparedness means assessing the environment and adjusting to it as appropriate. You will become familiar with many forms of exercise equipment, from stationary bicycles to treatment tables to ice packs. It is important that if you notice any unusual wear, tear or malfunction, you should report it to the office manager and all therapists to prevent patient injury. All items must be correctly sanitized before patient use. Items and equipment should be returned to their original location when not in use. If they are in use, they shouldn’t become an obstacle or burden to anyone in the office. All equipment should be used correctly, per its operating instructions. Equipment is only to be used under the direct supervision of the physical therapist. Finally, it is critical that all areas remain free of clutter, relatively clean, and organized.
Preparedness begins before you arrive at work. If a patient witnesses someone arriving late to work, it sets an example that tardiness is acceptable. If a patient arrives late, it can scramble the entire workday. If your office encourages punctuality of its patients, then you must also be held to the same standard. Arrive early to allow sufficient time to put any items you have away, such as coat, purse, cell phone, and be ready to begin “on time."

This image depicts a gym focusing on a clean and clear aisle with equipment properly stowed and ready for use.
Precautions
The term "precautions" means taking advance action to prevent an unpleasant situation. In a clinic, precautions are taken to prevent the spread of infection. The most effective precaution is the use of hand hygiene, which means applying a hand rub solution that contains 60-95% alcohol and/or handwashing with soap and water. Alcohol-based hand rub is ideal for decontaminating hands if they are not visibly soiled. If dirt, blood, body fluids, etc. are present, or you have cared for patients with known or suspected infections, soap and water should always be used. The following are sample instructions for hand hygiene, but please refer to your department’s specific procedure.
Hand hygiene should be performed prior to interacting with the patient or their environment. It should also be performed after interacting in the environment.
Hand Hygiene
- Using alcohol-based hand rub
- Dispense the recommended volume into your hands
- Rub hands together, cover all the surfaces of the hands & fingers until they are dry, at least 15 seconds
- If dry before 15 seconds, you used insufficient rub.
- Handwashing with soap & water
- Wet hands with water
- Apply soap to hands
- Rub hands vigorously for 15 seconds
- Ensure to cover all surfaces of hands & fingers
- Rise hands with water & dry thoroughly with paper towel
- Use paper towel to turn off water faucet
Personal Protective Equipment, PPE
PPE is specialized equipment worn by facility staff for protection against infectious materials.
Gloves are the most common form of PPE. They should fit appropriately: gloves that are too small may cause them to rip, and too large gloves may allow contaminate to enter, or the gloves may catch or tear. It is important to never wash gloves, never use the same pair of gloves more than once, and never use alcohol rub in gloves.
Gowns are worn to protect skin and clothing during contact with patients and equipment. It is important to never reuse the same gown, and to remove the gown and perform hand hygiene before leaving the patient’s environment.
Face masks are used when there is potential contact with respiratory secretions/mucous or spray of blood or body fluids.
Other Precautions
Besides preventing infection, precautions may involve equipment or procedures to prevent injury.
- Cervical
- Surgery or traumatic accident
- Use of neck collars
- Restriction of all motion
- Back
- Surgical or traumatic
- May have a back brace
- Restriction of all motion
- Use of neutral spine
- Hip Precautions
- Posterior Approach
- Do not cross legs (adduction)
- Do not twist hip inwards (internal rotation)
- Do not bend hip >90°, (flexion >90°)
- Posterior Approach
- Anterior Approach
- Avoid extension
- Do not perform external rotation
- Do not perform abduction
- MRSA Nares
- MRSA to nose hair, use of gloves avoid secretions
- Sternal
- Open Heart Surgery
- No Pushing, No Pulling, No Lifting > 5 pounds for 8 weeks.
- Weight Bearing
- Non-weight-bearing: Leg is not permitted to touch the floor. 0% of body weight.
- Touch-down weight bearing: Foot may touch floor, but only to assist with balance. It must NOT support any weight.
- Partial weight-bearing: Small amount tolerated on leg, may be up to 50% (meaning the patient may stand evenly between to the two).
- Weight-bearing as tolerated: Patient may attempt to place any and all weight to their preference, they are allowed up to 100%.
- Full weight bearing: Patient can now carry 100% of their weight.
Antiseptics & Disinfectants
Antiseptics are substances that are applied to “living tissue” to reduce possibility of infection. Disinfectants are substances that are applied to non-living objects to destroy microorganisms that are living on the objects. The treatment areas and equipment should always be properly disinfected after use by the patient to allow the next patient to use it without waiting.
The Treatment Area
The actual treatment area may vary from setting to setting. It may be a plinth, a high to low table, a gurney, even a hospital bed. The area should be clear, with a sufficient path to allow the patient to move without bumping into anything. Any items that aren’t needed should be placed out of the way. Any items that are required, such as walkers, foot stools, or curb steps should be left within reach. In the outpatient setting, you may need weights, theraband, theratubing, hot packs, and icepacks to be readily available. In the outpatient setting, phone lines, call lights, IV Lines, or tubing may have to be detangled and arranged prior to mobility to ensure patient safety.
If one has to stop midway to rearrange equipment, it puts the patient in jeopardy of falling in the inpatient setting, and wastes valuable time in the outpatient setting.
Body Mechanics and Transportation
Body Mechanics & Transportation:
Physical therapy is a hands-on profession. You should observe and understand correct posture and body mechanics to limit stress and strain on you and your patients. This is something you must demonstrate at all times, but especially while moving patients. Mastering and using these skills will not only keep your patient safe, but it will keep you safe. Before going into more detail, we need to cover some basics of physics to give better clarity.
Center of Mass: “The distribution of mass in space is the unique point at where the weight relative to the position of distributes mass sums to zero.” Said plainly, it is the point in a body where the whole mass may be considered concentrated.
Base of Support: the distance between the feet. The wider the base, the more support is provided. The narrower the stance, the less support there is. The closer the center of mass is to the base of support, the more stability. The base of support can be increased using equipment, such as a cane or walker.
Now that we have this covered, it is important to use your largest and strongest muscles to perform heavy work. Your legs and core are much stronger than your back. It is important to maintain your center of gravity close to your base of support. It is also essential to keep the center of gravity, both yours and the patient's, centered within the base of support. Now, this base of support may be the two of you, or may include a walker or cane. The center of gravity may also be altered with casts, braces, boots, or other types of equipment. Finally, the base of support should be appropriate for the load.
Turning and Positioning the Patient
Introduction
Patient positioning and adjustment is crucial for patient recovery. Positioning can provide initial pain relief for the patient. It can also provide the patient a mechanical advantage in order to perform tasks that they would otherwise be unable to perform. A particular position may even be required by the physician as part of post-surgical precautions. It is important that while the patient is in your care, the same technique that was originally set by the therapist be repeated precisely. Don't forget: “practice makes perfect.” Do not let yourself get sloppy or careless. Also remember that while you will perform these techniques hundreds of times, the patient you are instructing and reviewing a position with may only have done this a few times at the most.
Bed Mobility
Skills Lab Training
In this session of lab training you will work with a partner to practice patient positioning, including static techniques in which the patient is braced by pillows, as well as how to assist the patient to change position.
Supine to Side Lying
In this technique, the "patient" is lying down in bed on their back, face up (supine). You will help the patient to move to their side. There are two ways to do this, depending on whether you elevate the head of the bed or not. This is a very important decision, and must take into account the therapist’s plans for the patient’s discharge. If the patient has an electronic or pneumatic bed at home that can be adjusted, then teaching them to raise the head of the bed in order to shift position is appropriate. If the patient instead has a normal, flat bed, then it is not helpful to teach them to raise the bed prior to getting out of bed. It will lack functional carryover to their discharge plan. Please be sure to review the therapist's plan. Aides in inpatient settings, such as Acute Rehabilitation or Skilled Nursing, will transfer the patient from bed to wheelchair, and then bring the patient to treatment in the main gym area. You are to practice all of these techniques with at least two additional classmates.
Please note the differences between the techniques. The first requires the patient to do more of the effort, which helps promote function. The second will require more assistance from the aide.
- Using the table
- Elevate bed to 30 to 40 degrees. Pivot turn to the edge, roll to sitting.
- No table / flat bed
- Patient is supine. The patient bends both their knees. They then reach their shoulder across the body to the edge of the bed. As they reach, the shoulder, hips, knees are to roll as one unit. This maintains neutral spine (no twisting, rotation of the spine), which is excellent for patients with back pain or who are post-surgical. It is also maximizes mechanical leverage. For an added benefit they should push with their heel to get onto their side.
- Side lying to sitting
- The patient is side lying, not rolling backwards. They lower both their legs off the bed, then push upward into sitting using their arms. They are now sitting.
Body Mechanics
Introduction
"Body mechanics" is the correct use of body posture, body position, and movement patterns. Moving correctly prevents injuries associated with poor body mechanics. It can also decrease pain or problems associated with bad technique while improving endurance and tolerance of the activity. You must use good body mechanics without thinking as it will keep you and your patients safe for many years to come.
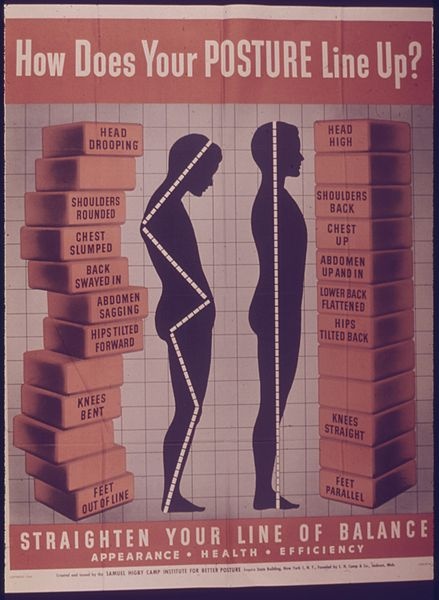
This image depicts to standing humans, one with straight posture and the other with bad posture, including sloped shoulders and forward hips. Alongside the good-postured figure, the image lists the common characteristics of good posture. Alongside the bad-postured figure, the image lists the common characteristics of bad posture.
Personal Space
An individual’s personal space is also known as their comfort zone. When people enter this comfort zone without consent or permission, discomfort, anger, or anxiety can be triggered. You can view this as a "bubble." In physical therapy, the bubble is within a foot. You must ensure you get permission before you approach a patient closely, especially if you need to place your hands on them. This is especially important if you are assisting with a cold or hot pack. An excellent technique is to inform the patient exactly what you will be doing. This allows people to open up and share personal space.
Informed Consent
Informed consent is when a person has given you approval or agrees within the guidelines provided to them. When a therapist asks an aide to place an icepack on a patient, often the aide will ask the patient, "Would you like a magazine to read with your icepack?" You are requesting consent to put the icepack on them, and this is their opportunity to refuse the icepack. You should go a step further by letting them know you will be returning with an icepack to place on them. If placing the icepack involves removing any clothing, you must ask first. An effective method to obtain informed consent is to explain clearly what you will be doing.
Draping
Draping is the use of cloth arranged to cover a patient during treatment or examination, and protects their decency and dignity. You always want to ensure the patient feels warm, safe, and unexposed. The body is to remain as covered as when the patient entered the clinic. The only spot exposed should be the area being treated. Draping commonly uses sheets for large surface areas or towels for small surface areas. Use towels if an area is expected to build moisture, such as when an icepack or a warm moist pack is used. You may be expected to prepare a drape for a patient who is to be massaged or manipulated prior to the therapist entering. In this scenario, sheets would be used.
Lifting
Correct body mechanics should be used during all lifting activities for your own safety. Always start in a partially squat position. You should never fully squat, as it puts your legs at a mechanical disadvantage. The feet should be slightly apart. This will boost your base of support, improving your stability. A stride stance can also be used. You should keep your spine straight and upright in neutral spine position. As you reach around the object, keep it as close to your body as possible. This gives you a mechanical advantage. Placing items further away is much more difficult. This technique is straightforward and simple with boxes, cartons, and other inanimate objects.
The first rule of lifting items is that if the item looks like it requires two people to lift, use two people to lift it. Do not attempt to take shortcuts that will put you at risk of injury. You may think you're helping the therapist and the clinic, but if you get hurt, you will be unable to assist anyone to your fullest potential. If you ask for assistance, then the job will be completed more effectively, proving you were correct in asking for assistance.
When you are about to lift a patient or an object such as a milk crate full of weights, a box of patient charts, or move heavy equipment, remember these tips:
- Get as close as you can to the item or person
- Equipment should always be pushed, not pulled
- Try to keep your feet wide enough to improve your base of support, ideally with your heels maintaining contact with the ground as you squat, sticking your rear end out but keeping your back straight
- Hold onto the item, then push upward using the muscles of your legs
- Do NOT attempt to stand using your back
Sit to Stand
A sit to stand is composed of many smaller simpler sequences combined into a larger complex sequence. A patient who is not sick, injured, or otherwise limited in physical or mental capacity can do it simply, and the steps are quick. Everyone performs a sit to stand in a sequence in this method. The person first scoots forward to the edge of the chair or bed. Their feet should be in full contact with the ground. They then lean forward slightly until their buttocks clear the surface they're sitting on. They push downward on their feet, and then they begin to straighten their legs as they begin to look ahead and straighten up their trunks and hips as they straighten their knees. You should spend a few minutes now looking at each other as you move to stand from a sitting position to understand this process.
A patient who is physically or mentally ill will require assistance. In fact, they may be having difficulty with the entire process. The therapist will identify the areas that need to be worked on, but it is important you recognize the sequence for these patients so you will be able to help them. The patient is to scoot to the edge of the bed gradually until both their feet touch the ground. They are then to place at least one hand on an armrest of the chair or bed frame to assist with pushing upward. The second arm is to be placed on a walker if they have one. Otherwise both hands should be placed on the chair. The patient is often verbally cued to count to three. During the counts of one and two, the patient is to rock forward then backward. On three, the patient is to lean forward and sustain leaning forward, pushing upward with one or both of their arms, at the same time pushing downward with both their feet. Once they assume a full standing position, they should be tall and upright.
If the patient reports their feet are “slipping,” ensure they have anti-slip socks or adequate shoes. If this persists, often the patient is attempting to "catch" their feet on the ground instead of pushing downward to stand. This can be corrected by the therapist when they push downward and lean forward sufficiently. Patients who are unstable in standing often are not engaging their buttocks and should be encouraged to “squeeze” their butt, tuck their tail in, and look directly ahead.
Transfers
Introduction
Transferring is the process of assisting a patient from one point to another. The most common is from a mat table to a chair in the outpatient setting, or a bed to a chair in the inpatient. A wheelchair is often a common transfer point as well. There are a variety of transferring techniques. It's important to understand that you are performing transfers, not teaching the patient these techniques. You may be required to assist with a patient transfer at the start or end of their treatment, moving them to a mat or low table, which optimizes efficiency of the treatment and increases 1:1 time between the therapist/patient.
Assist Levels
Assistance Level | Abbreviation | Description |
Independence | I | All activities are performed without need of equipment, within normal time frame, without safety concerns, without help, without cues |
Modified Independence | Mod I | The individual requires any combination of the following:
|
Supervision | S | At most requires occasional cueing or coaxing, but no physical contact |
Stand By Assistance | SBA | Per above, but someone must remain near them to ensure safety |
Contact Guard Assistance | CGA | Patient requires contact to maintain balance or to improve their stability |
Minimal Assistance | Min Assist | Patient can perform >75% of activity, only requires touching (at most), may require assistance with one extremity (arm OR leg, but not both) |
Moderate Assistance | Mod Assist | Patient can perform 51% - 75% of activity, assistance required to assist with two extremities (any combination) |
Maximum Assistance | Max Assist | Patient can perform 26% - 50% of activity |
Total Assistance | Total Assist | Patient can't perform activity |
Scooting
Scooting Forward
- Patient leans to right, until their bottom clears the surface.
- Brings the left hip forward.
- Brings the left hip down, then continues to lean to the left until the right hip lifts off the surface.
- Brings their right hip forward.
- This sequence is repeated until they reach the edge of the surface.
Scooting Sideways
For scooting to the left:
- The patient's ankles are directed towards the left
- The toes are to the right
- This will assist with the scoot
- The patient leans forward enough to allow their bottom to clear the surface, but just barely
- This is often called "bring your nose over the toes"
- The patient then swings their hips to the left, straight out with their legs and they sit completely
- This is ALWAYS supervised the first time by the therapist, who will encourage the patient to break the activity down into small segments.
Squat Pivot Transfer
This is ideal for moving from one sitting position to another sitting position, and is highly effective for a patient who is unable to stand fully because of weakness, amputation, weight bearing restrictions, etc. It is also an easier technique for the patient and therapist if it is their first attempt.
Instructions
- Encourage the patient to scoot to the edge of their seat
- You may have to assist them with scooting
- Patient is to sit up tall; both their heels should be pointing towards their new position
- Ideally, they should be transferring towards their stronger side
- Both feet should be under them, as far as they can tolerate, but their heels should remain in contact with the floor
- They are to reach towards the surface they are going to transfer to or hold onto you
- They will go into a “squatting” position, just enough to lift themselves from the bottom
- The wheelchair locks should be enabled
- You should squat over their feet
- Your feet should be in position to block them at the knees
- Guide the patient to lean forward
- The emphasis is guide--y ou will tell them and show them, not force them
- Once they are sitting, they may require re-cues to go back into place
Stand Pivot Transfer
This transfer technique is similar to the squat pivot transfer, but the patient will go into full standing. While they are standing, the patient will take a few small steps, often in a circle, then towards the chair.
- Encourage the patient to scoot to the edge of their seat
- You may have to assist them with scooting
- Ideally, they should be transferring towards their strongerside
- Both feet should be under them, as far as they can tolerate, but their heel should remain in contact with the floor
- The wheelchair locks should be enabled
- You should squat over their feet
- Your feet should be in position to block them at the knees
- Guide the patient to lean forward
- Patient goes into full standing
- They are guided, often by hips or shoulders, even gait belt
- The emphasis is guide-- you will tell them and show them, not force them
- Once they are in position, they are to sit down, always slowly to ensure safety
- Once they are sitting, they may require re-cues to go back into place
Cues
You will eventually be required to speak with patients, either giving instructions under the direct supervision of the physical therapist, or just guiding the patient into the treatment area to see the therapist. Your cueing will take any or all of the three forms: verbal, visual, or tactile. These are often used by therapists during treatment sessions, but it is important to know how you will use them yourself.
Verbal Cues
When speaking to patients, it is best to speak simply, clearly, and without room for interpretation. If you tell someone to sit down, then they will do so in any form they choose. If, however, you inform them “For safety, sit down, keeping the walker with you, and touch the chair with the back of your legs before you sit, reaching back with one hand and sitting down slowly.” As you can see, both statements ask your patient to sit down, but the second statement says exactly what you want done.
Tactile Cues
Tactile cues indicate to your patient what to do through the use of your hands/body language. Think of it this way: imagine arriving late to a movie theater with your date. You wait for your eyes to adjust and you lead your date by the arm to your seats. This act of leading them by the arm, without use of visual or verbal aids, is a tactile cue. Dancing is another example. The leading partner touches his partner on the hips or shoulders to “lead” into the steps without speaking or visual aids. At times, you may need to use tactile cues. They are especially useful in transferring.
Visual Cues
Finally, visual cues show a patient what to do. They may be as simple as reviewing a sheet of paper, or demonstrating for the patient using a physical example.
Career Skills
Introduction
You are nearing the end of the physical therapy aide certification program. You have completed almost all the skill check offs, quizzes, exams, and competency skills. Accumulating volunteer hours prior to actually being hired will allow you to apply what you have learned.
Job searching is a primary concern for students. The choice between outpatient, inpatient, full-time, and part-time are all important considerations. You must balance the opportunities of what is available to you versus what you want to do. You must review the entire package and not focus on a few highlights that attract you or a few disappointments of the job. Consider the following examples:
Job A:
Offers a higher salary, but you are expected to work 50-55 hrs per week. Since it is salaried, you are expected to work more than 40 hours a week without additional pay.
Job B:
Offers a competitive salary that falls within the average range. They are flexible with their schedule and time off.
Job A will entice most students due to its higher wages, but are you willing to work the required time? Does that time fit into your schedule and can you remain flexible when you have to work late? Job B may entice students with families, allowing trips to daycare or allowing flexible hours to arrive early then leave early to take care of children. There is no right or wrong answer, but there is a right and wrong for your needs. These examples are generalized; you would need specific details, such as the vacation time, sick leave, exact pay, personal days, working holidays, benefits, and insurance. Many clinics and areas offer mentorship programs. These programs take a new graduate and assign a mentor to assist them through training and beyond. Keeping that in mind, consider the following:
Job C:
Looking for a full-time aide. Aide is expected to train new aides after 1 year. Will schedule part-time and summer-time aides. Ideally to be groomed into an office manager experience, to monitor and review insurance purposes.
Job D:
Full-time aide position, with expectation to enrolled in a PTA program within 2 years and completion of PTA program at 5 years. Patient will be educated in clinic policies first as an aide and as patient progresses through PTA program to become a PTA clinician and not an aide.
Job E:
Full-time aide, no options for advancement
When you apply for a job, you will likely be asked what are your short-term and long-term goals. Short-term goals are 6 months and 12 months. Longer-term goals are 3 years and 5 years. Where do you want to see yourself in 3 years or 5 years? If you see this certification as a terminal degree, your option is simple. However, as the job becomes more second nature to you, you may want more. This may mean that Job C or D might be more appealing. Then again, you may have times in your life that you wish the job to change. Perhaps some variety in a job, different locations, and different therapists is better than no options for advancement?
Interview Skills
As you begin to apply to various clinics and various settings, you will be expected to undergo an interview. The interviewer will review your resume and pose questions. We will cover some sample questions and guidelines for an interview. First let's talk about the first impression.
A first impression is when two people meet first the first time and an "image" is created in each of their minds. This can be accurate or inaccurate, but it is important to always put your best foot forward. You should always follow these steps:
Mobile Phones
- Shut off your cell phone before going into the interview.
- If you have to have it on, set it to silent. Silent, not vibrate.
- If you are an compulsive phone checker, shut it off.
- If the interviewer sees you check your phone, he or she will believe you have "more important" things to do, or perhaps you have a better interview lined up later.
Dress the Part
Avoid “casual” clothing. If the clothing is what you would wear for an outing with friends, then it is likely inappropriate. Never wear something you’d wear to a club. In general, all clothing is expected to be clean, well-ironed and free of wrinkles.
Women
- Black slacks or a quality black dress are both appropriate. They should fit well and appropriately. A sweater gives a business casual look, while a button down shirt gives a formal look. Heels should be at moderate height at most.
- That is just a small sample of what is appropriate, searching the web can assist you if you are stuck.
- Use perfume sparingly or not at all.
- Neck line should be modest; avoid exposure of cleavage and ensure the bra is covered.
Men
- Correctly fitting clothing is more important than expensive clothing.
- Black slacks give a more formal appearance. Khakis give a softer approach, which is more ideal for a business casual environment.
- A button-up shirt with a tie, tucked in and with a belt, is simple, yet appropriate. In an environment that is casual, the tie can be skipped.
- Use cologne sparingly or not at all.
When you introduce yourself, always provide a firm handshake and eye contact.
Use the following links to help you prepare for a potential interview:
During the Interview :
- Listen attentively; you don’t need to be hanging on every word, but you should provide 100% of your attention.
- Make your words count. Avoid rambling or awkward babble. If you do not know the answer, take a few moments to consider, ask the interviewer to repeat the question. If you do NOT know the answer, then you need to admit this, and attempt to answer the best you can. You should never make up an answer. Answer their questions directly and to the best of your knowledge. Do not run on and on explaining the same point multiple times. If you want clarification, ask for it.
The interviewer is NOT your friend! Do not use slang; use proper English. While it is important to mimic the interviewer's demeanor, you should remain professional at all times. You are to bring enthusiasm and energy to this job position. You are to avoid topics such as religion, race, politics, sexual orientation, and age. Be careful if they are brought up as it is illegal for an interviewer to ask you these things.
Be positive about your accomplishments, such as the successful completion of this program, but do not overstretch what you know. If you have experience filing charts, state that. Do not make it sound like you organized all the texts in the Library of Congress. Finally, show confidence. You know in your head and your heart that you have the skills and talents they need. Yet, remember there could be other applicants. State what you can supply the clinic or the company, but do not exaggerate.
Sample Interview Questions:
In addition to the above general interview questions, you should be prepared for specific, Physical Therapy interview questions that ask you to consider common issues in the clinic. The interviewers may want to see what you know, how you problem solve, and how you approach situations that you are not familiar with or that are complex. For example, the following are possible questions that may be asked:
- You are experiencing trouble with a patient. What do you do?
- You are experiencing trouble with a physical therapist. What do you do?
These are only two possible examples. To help prepare yourself, it would be helpful to create possible scenarios for yourself and consider how you would respond to them. It would be additionally helpful for you to reflect on your answers and revise them as you continue to learn more about the profession.
Want more in-depth information? Here is a link to Saylor.org's Interview Skills course: http://www.saylor.org/courses/prdv103/.
Preparing for the Interview
You should begin this process about 5 or 6 days before the interview. Use a piece of paper and pen. Draw a line down the paper vertically (middle). The left side is the traits the potential employer wants. The right side is how your skills/abilities fit these requirements.
Use the internet to find the potential employer's website. Locate the job description and make sure all of the points are on your list. If the company has a mission statement, you should incorporate this as well, but focus on the job description.
As we discussed earlier, you can ask questions at your interview, and you should. You MUST have at least 5 questions regarding the job, other than salary. You should have already researched salaries in your area based on that description. You should also know what salary you should need to cover your living expenses. Also, make sure you thoroughly read the job description as many job postings include information on salary and benefits so that applicants understand them before applying. If you insist on discussing wages, ask, "What is the benefits package offered by this position?" This way you inquire about insurance, retirement, grace periods before they go into effect. The employer may also bring up wages as well. For tips on discussing wages, go back to Saylor.org's (in the last section) Interview Skills Unit 3 on Negotiating Wages.
Here is a sample website that may assist you.
http://my.monster.com/Career-Assessment/Dashboard.aspx
You should arrive at least 15 minutes early for your interview. You should take into account stop lights, school zones, traffic that may slow you down. If you have never been there before, you should get ready for the interview the day before, dress as you would, then drive there at the same time to "clock" yourself in time and driving/directions. This will prepare you. It will be alright for you to "wait in the car" a few minutes if you arrive even earlier.
You should attempt to use the restroom if you are nervous, even just to check your appearance. Check your teeth; use a breath mint as well. Remember to smile! Remember, as much as you want this job, they equally want to fill this position.
After the interview, ask for their business card for follow up. After the interview, you should immediately write down your thoughts and feelings. This may help you for future interviews. What did you do really well, what could have used work? You should write a thank you letter that day and mail it.
Cover Letter for Resume
There are a few different types of cover letters, but the one you should use is an application letter. These are cover letters about a known job opening. A prospecting letter will inquire about possible position, which is ideal if you wish to work in a location, but are unsure if there is an actual opening.
The cover letter is a chance for you to provide narrative and context to your experiences and illustrate to your potential employers how and why you are a perfect match for their job opening.
To better understand the following summary, refer again to our example of a business letter. Use this model to write the following sections.
Sections:
Greeting:
"Dear _______," or "To Whom It May Concern," if you do not know the hiring person's name.
First paragraph (Introduction):
Mention the job you are applying and how you found the listing. It may also be beneficial to include a "thesis statement" that generally states why you would be a great candidate for this position.
Second & third paragraph (Body) :
State why you are a qualified candidate for this job. What work experience do you have that will fit and why? Why did you seek employment at this company, exactly? Focus on the desired skills, qualities, and employment history that you possess. It is important to develop your answers with specific, but succinct, information.
Final paragraph (Conclusion):
Wrap up what you discussed and review in a sentence or two why you are the best fit. Discuss what you'll do next. Will you follow up by phone call or look forward to an interview and discuss in detail? Also, provide your contact information, email, and phone number. Mention your resume is attached, and be sure to attach it. It is best to phrase it politely, like "Please find attached my resume," and, of course, be sure to thank them for their consideration.
Close:
Close your letter by saying "Sincerely," or something similar. Then, using at least two lines of space in between, type your name. Place your signature between the close of the letter and your typed name.
Here are a few more tips from Penn State University on writing cover letters for employment:
Writing a Resume
The following information is a general guide to help you navigate all your experiences and construct a useful resume for potential employers. Above all else, remember that your resume, like all other writing, is determined by its purpose . Resumes will change depending on the job, the employer's desires and requirements, and the job field's conventions. Be aware of all these factors as you develop your resume so that you can tailor your resume for each job's particular needs.
How to Write a Resume
- You must use bullet points
- You should describe your key points.
- Do NOT list hobbies; discuss them at your interview, if brought up.
The resume must include your contact information, first and last name, address, phone number, and professional email address. Your email you made when you were young may not be appropriate. For example, the email player69@yahoo.com would cause most people to dismiss the resume entirely.
Your resume’s sections should contain the following:
- Education History
- Employment History
- Potential Categories:
- Honors
- Volunteer Hours / Locations
- Participation
- Certifications
- Additional Skills/Information
You should not list "references on request." Rarely will an employer seek more information that you have not provided. Thus, you can approach this sitatuation in two ways: (1) include a brief list of references at the end of your resume or (2) have a separate document with all your references typed and ready to provide if they request it. Either way, they should be ready to provide to the employer at any point. If you choose the latter option, make sure you have that list printed out and in hand when you turn in a resume and/or attend an interview. Should the employer ask, you will have the references handy. In general, your reference list should include the following as a minimum:
- Academic reference
- Professional/Past Employer
- One Personal Reference
Here is a website that may help you write more effective resumes:
Here are a couple resume templates as examples. If you have Microsoft Word, these resumes are available to download.
Therapeutic Exercises
Definition & Purpose
Therapeutic exercise involves the use of a planned series of physical activities, movements or postures that are performed by the patient in effort to reach a specific health goal. They are used together to restore musculoskeletal function. This restoration of musculoskeletal function can reduce pain, improve posture, improve alignment, improve athletic performance, or prevent injuries.
The physical therapist's evaluation will determine which muscles need to be strengthened, shortened, stretched or otherwise adjusted. Exercises can be performed in any position, but are most often done Supine, Sitting or Standing. The correct method of documentation is to first write the position first, followed by the activity, then the repetitions and sets.
For Example:
Supine Heel Slides 10x3
Seated Ankle Dorsiflexion 10x3
Using the above examples, Supine indicates the patient is to lay down, face up. They will take their heel and slide it across the table, going from a straight leg to a bent leg. This is to promote flexion of the knee. They are to perform this ten times, rest for a short period of time, then perform again ten times, rest, then again ten times.
Seated informs the patient is to be in a seated position, in either a chair or at the edge of the table. The patient will then perform dorsiflexion on the ankle The "10" means the patient performs it ten times, then rests, followed by two more rounds of ten, with a brief rest period between each ten. The resistance must also be documented, which is usually in weight (lbs or pounds), theraband (document the color or resistance level).
As you review the examples of exercise in this chapter note this is no way a comprehensive list. In fact, there are textbooks dedicated to describing the most common exercises. This chapter is to review the most common and expected exercises an aide is expected to understand and comprehend.
Shoulder
Flexion
Description:
Patient stands upright, feet shoulder width apart. Patient grabs dumbbell or resistance band then brings arm to shoulder height. Some versions require to go higher. Speak to the therapist for specifics.
Emphasis:
Patient's shouldn't hike nor shrug their shoulders. The exercise usually requires palm down when holding the weight. If above the shoulder, the palm must be rotated.
Abduction
Description:
Patient stands upright, feet shoulder width apart. Patient grabs dumbbell or resistance band then brings arm to shoulder height. Some versions require to go higher. Speak to the therapist for specifics.
Emphasis:
Patient's shouldn't hike nor shrug their shoulders. The exercise usually requires palm down when holding the weight. If above the shoulder, the palm must be rotated.
External Rotation
Description:
Patient stands upright, feet shoulder width apart. Patient grasps theratubing with arm furthest from the tubing. The patient places their arm ahead of them, then slowly steps away until all tension is taken up by the tubing. The patient keeps a small towel under their arm and it must be kept in place by the shoulder to ensure it is being performed correctly. Any slippage from the towel indicates incorrect stabilization and incorrect technique. The patient then moves their arm out to the side in fluid motions.
Emphasis:
This activity is to promote stability of the shoulder. The patient must ensure they are not shrugging nor hiking their shoulder. They are to keep their arm to their side and hold the towel in place. Patient should be able to perform the entire arch comfortably.
External Rotation @ 90 Degrees Shoulder Abduction
Description:
Patient lays down on table face up. The patient then brings their arm out to the side of them, a small towel is placed to elevate the shoulder slightly. The patient then takes their thumb and reaches behind them slowly. The patient is to perform the motion as far as they are able to in a fluid pain free range. Limiting the range is appropriate so long as the patient maintains pain free range.
Emphasis:
Patient's shouldn't hike nor shrug their shoulders. The exercise usually requires palm down when holding the weight. If above the shoulder, the palm must be rotated.
Internal Rotation
Description:
Patient stands upright, feet shoulder width apart. Patient grasps theratubing with arm closest from the tubing. The patient places their arm ahead of them, then slowly steps away until all tension is taken up by the tubing. The patient keeps a small towel under their arm and it must be kept in place by the shoulder to ensure it is being performed correctly. Any slippage from the towel indicates incorrect stabilization and incorrect technique. The patient then moves their arm across their body in fluid motions.
Emphasis:
This activity is to promote stability of the shoulder. The patient must ensure they are not shrugging nor hiking their shoulder. They are to keep their arm to their side and hold the towel in place. Patient should be able to perform the entire arch comfortably.
Internal Rotation @ 90 Degrees Shoulder Abduction
Description:
Patient lays down on table face up. The patient then brings their arm out to the side of them, a small towel is placed to elevate the shoulder slightly. The patient then takes their thumb and reaches behind them slowly. The patient is to perform the motion as far as they are able to in a fluid pain free range. Limiting the range is appropriate so long as the patient maintains pain free range.
Emphasis:
Patient's shouldn't hike nor shrug their shoulders. The exercise usually requires palm down when holding the weight. If above the shoulder, the palm must be rotated.
Scapular Stabilization
Standing Bent Over Row
Description:
Patient stands near table, they place the opposite forearm on the table, opposite leg forward. They bend forward at their waist. The patient grasps the dumbbell then pulls the backwards, pulling their shoulder blade back. This exercise resembles pulling the cord on a lawn mower, but it isn't to be performed quickly.
Emphasis:
Patient must be bending at their hips, not their back. It is important the patient begins with their arm, then pulls back with their shoulder blade. Patient's shouldn't hike nor shrug their shoulders.
Standing Two Arm Row
Description:
Patient stands and faces forward. They grasp both ends of the tubing. Patient bends their elbows to 90 degrees, then walks backwards slowly until the tubing is taunt. Patient then pulls the resistance bands backward trying to pinch their shoulder blades together.
Emphasis:
Good upright posture and pulling the shoulder blades together.
Elbow
Elbow Flexion
Description:
Patient stands with feet shoulder width apart. Patient grabs weight palm facing forward. Patient bends their elbow and touches the weight to their arm.
Emphasis:
Not rotating the arm during the curl, as it can affect different muscle groups.
Elbow Extension
Description:
Patient stands near table. Feet are shoulder width apart, then patient steps forward with opposite leg. Patient bends at their hips, places forearm on the table. The patient grasps the weight. Patient then straights their elbow to full straightened length.
Emphasis:
Bending forward at waist, not at back.
Push Up with a Plus
Description:
Patient stands near a wall with feet shoulder width apart. Patient places their hands on the wall in a neutral push up position. The patient lowers themselves as appropriate. The patient then rises, then at the peak they push upward allowing their shoulders to go and lift them a bit further.
Emphasis:
Neutral spine, both back & neck. Neutral grip. The hand position may vary between patients.
Pronation/Supination
Description:
Patient stands and faces forward. They grasp both ends of the tubing. Patient bends their elbows to 90 degrees, then walks backwards slowly until the tubing is taunt. Patient then pulls the resistance bands backward trying to pinch their shoulder blades together.
Emphasis:
Good upright posture and pulling the shoulder blades together.
Wrist
Flexion
Description:
Patient is seated with the affected forearm placed on a stable surface such as a table. A towel maybe used for comfort. Usually the palm is faced upwards, the patient grasps the dumbbell then attempts to bend their wrist making the palm of their hand closer to their wrist.
Emphasis:
Neutral wrist; no deviation into ulnar nor radial sides. Grasping the weight firmly so it won't slip, but do not overgrip.
Extension
Description:
Patient is seated with the affected forearm placed on a stable surface such as a table. A towel maybe used for comfort. Usually the palm is faced downwards, the patient grasps the dumbbell then attempts to bend their wrist towards the back of their arm, away from their pam.
Emphasis:
Neutral wrist; no deviation into ulnar nor radial sides. Grasping the weight firmly so it won't slip, but do not overgrip.
Radial Deviation
Description:
Patient is seated with the affected forearm placed on a stable surface such as a table. A towel maybe used for comfort. The arm is placed with thumb upwards. Patient then begins to move their wrist in a motion so their thumb rocks upward. Emphasis:
Emphasis:
Neutral wrist, not flexed nor extended.. Grasping the weight firmly so it won't slip, but do not overgrip.
Ulnar Deviation
Description:
Patient is seated near a table for support. Patient rotates their arm upwards, so the small finger is pointed upwards. Patient supports this arm with the opposite arm. Patient then begins to move their wrist upwards.
Emphasis:
Neutral wrist, not flexed nor extended.. Grasping the weight firmly so it won't slip, but do not overgrip.
Hip
Hip Flexion / Knee Flexion
Description:
This is a common supine exercise often provided with both patient who just underwent total knee replacement or total hip replacement. A patient who received a total hip maybe limited in the amount they flex or bend their hip. It is important the patient, the therapist and you are aware of any precautions. Patient is to lay supine, then they are to bend their knee and hip as they slide their heel along the surface of the bed or table.
Emphasis:
Emphasis is to perform in a pain free range, especially if a patient recently had surgery. They are to move with only the slightest change in pain. Ensure the leg is not rolling outward nor inward. The foot can be placed inside a pillowcase to allow it to move more smoothly.
Supine Hip Abduction & Hip Adduction
Description:
This activity is performed supine, on a treatment table or the hospital bed. Patient may be required to slide to the side of the bed to allow enough room to perform this activity. It is important that an obstacle is in place to avoid falling off the bed, such as the bed rail or a wall. The patients begins with their legs together, then gently slides one leg outwards towards the side. You must ensure the leg doesn't turn inward nor outward as this performs. The exercise is completed once they return to middle.
Emphasis:
Neutral hip, ensure the hip is not internally rotated nor externally rotated. A pillow case maybe used to allow the heel to slide with more ease.
Hip Flexion / Seated Marching
Description:
Seated marching is an excellent approach to promote hip flexion as it is closer to walking, something we naturally know how to do. The patient is to seat in a char or at the edge of the bed. The patient begins to march in place, lifting their knees up in the air bending their hips. They may hold onto the chair or table for support, unless the therapist wishes to challenge their balance, in case they are not allowed to.
Emphasis:
Safety with balance, ensuring the patient alternates their legs.
Hip Abduction
Description:
The patient lays on their side. They have the option to lay completely with their head resting on a pillow or partially upright as shown above. Patient places the top leg directly above the bottom leg. Patient then lifts the top leg directly upward, ensuring they do not roll backward.
Emphasis:
Ensure the patient does not roll backward, they maintain forward/neutral. They may bend their top knee slightly. Ensure they do not roll their leg inward nor outward. Their toes should be pointed ahead.
Hip Adduction
Description:
The patient lays on their side. They have the option to lay completely with their head resting on a pillow or partially upright as shown above. The patient places the above leg just ahead of their bottom leg, with the knee bent. Patient then attempts to raise the leg that is resting on the table, upwards.
Emphasis:
Ensure the patient does not roll backward, they maintain forward/neutral. They may bend their top knee slightly. Ensure they do not roll their leg inward nor outward. Their toes should be pointed ahead.
Hip Flexion (Closed Chain)
Description:
The patient stands near a table for support & balance. Patient places their feet shoulder width apart. Patient then goes into a squat position. They are to be comfortable with this position. Often they need to be told "pretend you are sitting down, but not all the way."
Emphasis:
Patient should keep their heels in contact with the floor. Patient is to keep their back straight, the bend should come at their hips, not their back. Patient's need to be encouraged to use their gluteus muscles, so they are often told "stick your butt out!". This will encourage more leg movement, less back movement. The patient is to stand upright as this is performed.
Knee
Knee Flexion / Heel Slides
Description:
This is a common supine exercise often provided with both patient who just underwent total knee replacement. A patient who received a total hip maybe limited in the amount they flex or bend their hip. It is important the patient, the therapist and you are aware of any precautions. Patient is to lay supine, then they are to bend their knee and hip as they slide their heel along the surface of the bed or table.
Emphasis:
Emphasis is to perform in a pain free range, especially if a patient recently had surgery. They are to move with only the slightest change in pain. Ensure the leg is not rolling outward nor inward. The foot can be placed inside a pillowcase to allow it to move more smoothly.
Supine Short Arc Quads
Description:
Patient is placed in supine with a small bolster or rolled up towel placed under the knees. It is essential the patient remains comfortable and this is a favorable position. Patient's who experienced surgery behind the knee may find this painful or uncomfortable and will need adjusting by the therapist. Patient then straightens their leg to normal, then usually holds it for a count of 5 seconds, then slowly lowers the leg.
Emphasis:
Patient's initially do not perform a hold when they are first learning this exercise. As they progress they may be required to perform a 3 second hold or a 5 second hold. Any further time, the patient will likely require a more challenging exercise for their time. Patient is to straighten their knee to neutral or completely straight, ensure they do not attempt to over straighten. Ensure they do not rotate their leg.
Long Arc Quads
Description:
Patient is placed in a seated position often at the edge of the table or a hospital bed. A chair is inappropriate as the patient's foot may catch on the floor. Patient is to then straightens their leg to normal, then usually holds it for a count of 5 seconds, then slowly lowers the leg.
Emphasis:
Patient's initially do not perform a hold when they are first learning this exercise. As they progress they may be required to perform a 3 second hold or a 5 second hold. Any further time, the patient will likely require a more challenging exercise for their time. Patient is to straighten their knee to neutral or completely straight, ensure they do not attempt to over straighten. Ensure they do not rotate their leg. This exercise is often progressed using ankle weights to further resistance.
Ankle
Supine Dorsiflexion / Supine Plantarflexion
Description:
This exercise may also be performed with the patient in sitting. Patient is to keep their leg in neutral, without rotation. The patient is instructed to bend their ankle upward, pulling their toes and foot towards them. Plantar flexion the patient is to point their toes downward, similar to stepping on a pedal.
Emphasis:
Ensure patient is moving the ankle; not simply pulling their toes upward.
Seated Ankle Inversion
Description:
Patient is to be placed in a seated position. Patient is then instructed to point the bottom of their foot inward.
Emphasis:
Seated Ankle Eversion
Description:
Patient is to be placed in a seated position. Patient is then instructed to point the bottom of their foot inward.
Emphasis:
Cervical Spine
Chin Tucks
Description:
Patient is to be placed in a seated position. Patient is to draw their chin backwards, but only brining their head to neutral. The patient usually will hold for a 3 second count or a 5 second count.
Emphasis:
Patient is not to bring their head backward to cause pain or discomfort and not beyond neutral.
Levator Stretch
Description:
Patient can be either standing or sitting. Patient takes their chin and places it in the direction of the afected arm. Near the crease of their arm. Once a stretch is felt, they use their arm to gently pull downward to create a mild to moderate stretch. This should NOT be painful and infact relief any tension or pain the patient is experiencing in that area.
Emphasis:
Patient is overstretching or pulling with too much force causing pain.
Acknowledgements
Special Thanks provided to the following individuals who made this possible. They are all very dear to my heart and it was my honor to work with them during this project.
Erik Armstrong, MA, teaches English at College of the Sequoias as well as basic skills consultant working on the grant the developed the aide program with embedded basic skills as well as providing hours of editing.
Emily Jahr is our wonderful case manager for this project. She keeps all of us together and organized, including following up on the students during and after the completion of the course.
Jessica Jauregui is a rehabilitation aide at Kaweah Delta Rehabilitation Hospital. She balances her work with being a student. She was kind enough to allow video demonstrations for the exercise section. She will be pursuing her academic work full time and will ultimately seek out her doctorate in physical therapy. She is interested in critical and acute care.
Jonna Schengel, PT, MA, Ed.D. serves as the program director for the physical therapist assistant program at the College of the Sequoias. She was instrumental in establishing an open source literature to create the aide certification.
Joe Sousa, PT, DPT, is a full time acute care physical therapist. His clinical time is focused on rehabilitation patients along with intensive care at Kaweah Delta Rehabilitation Hospital. He is an adjunct faculty member at the College of the Sequoias Physical Therapist Assistant program for both Cardiopulmonary Rehabilitation & Pathophysiology. He is interested pursuing higher learning through alternative teaching methods, such as problem based learning and flipped classrooms.
Louanne Waldner, Ph.D. is Dean, Career Technical Education & Workforce Development at College of the Sequoias and provided the grant support and funding for this resource.