
Paper Memory Quilt
Paper Memory Quilt
Special Thanks to Dick Blick for graciously allowing Hildegard Center to link to DB lesson plans in conjunction with its “Art Bridges” Project. Dick Blick’s commitment to the educational community extends far beyond providing high-quality products at low prices. DB offers art lesson plans created for all ages and skill levels. Every project also meets several National Standards for Visual Arts education. PDF downloads and videos of these original lessons are available free of charge. Visit www.dickblick.com to see the many ways DB support schools, communities and art education and make DB your one-stop shopping destination for art supplies.
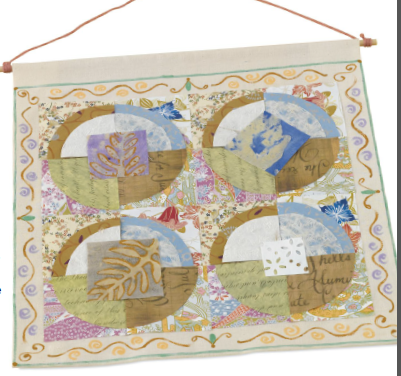
Example
The practice of stitching together layers of padding and fabric may date back as far as ancient Egypt. In America, quilt-making was common beginning in the late eighteenth century. During this era, quilts were viewed as decorative items that displayed the fine needlework of the maker. Quilters often used fabrics recycled from old clothing, invoking memories of the past.
A paper memory quilt is a fun way to preserve ephemera (paper items) that have personal significance for the creator. A beautiful paper quilt can be fashioned using special gift wraps, cards, candy wrappers, newspaper articles, ticket stubs, wallpaper or even old drawings! This project will teach important design skills as pieces of paper are cut apart and reassembled. Insight into pattern, rhythm and repetition is gained.
Grade Levels 2-12
Note: Instructions and materials are based upon a class size of 25 students. Adjust them as needed.
Preparation
1. Have students gather paper items they would like to use in their quilts, preferably with some personal significance. Gather additional assorted decorative papers.
2 Cut the muslin into 18" x 21" pieces.
Process
Step by step Images
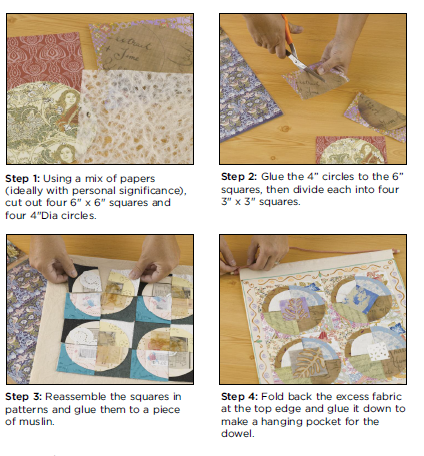
1. Have each student choose four papers that will form the base of his or her quilt. Cut four 6" x 6" squares, one out of each paper.
2. Next, choose four more papers and cut 4" circles out of each one. Use a compass or trace around an object with a 4" diameter.
3. Center one 4" circle on one 6" square and glue it down to create a “quilt block.” Repeat with the remaining papers. Have students embellish their quilt blocks in any way they wish. They can add additional papers in smaller concentric circles or decorate the blocks with stitching, painting or drawing.
4. After the four quilt blocks are complete, cut them into four equal 3" squares.
5. Reassembling the quilt is a lot of fun! Mix and match the small squares to see what patterns, rhythms and repetitions can be made. Once the final composition is decided upon, glue each square to the piece of muslin.
6. Begin by gluing the upper left square 6" from the top edge and 3" from the left edge of the muslin. (This will leave enough extra material at the top to fold over to make a pocket for hanging.)
7. Once all four squares are glued in place, a border can be created around the design with fabric or permanent markers. Decorative stitching or beading are other options for embellishment.
8. Turn the top edge of the muslin over toward the back of the piece to create a hanging pocket; attach the edge with a thin line of fabric glue.
9. Cut the dowel to the length you desire. Tie a piece of yarn to the ends of the dowel and hang the finished piece.
Materials
- Unbleached Muslin, 38" wide (63104-1338); share nine yards among the class
- Decorative Paper Assortment, 1-lb (12440-1001); share among the class
- Roylco® Decorative Paper, assorted patterns (11262-); share one among the class
- Delta® Sobo® Craft and Fabric Glue, 8-oz (23820-1008); share two among the class
- Foam Brush, 1" (05114-1001); one per student
- Wooden Dowel Rods, package of 12, 1/4" x 36" (60448-1436); one per student
- Caron® Craft and Rug Yarn, assorted colors (62801-); share one among the class
OPTIONAL MATERIALS
- Roylco® Creature and Animal Value Pack, 96 sheets (61786- 1096)
- Creativity Street ® Embroidery
- Floss, 24-skein set (63100-1009)
- Potpourri Glass Beads, assorted colors (61518-)
- Crayola® Fabric Markers, set of 10 (21259-0109)
National Standards for Visual Arts Education
Content Standard #3 Choosing and evaluating a range of subject matter, symbols and ideas others.
K-4 Students select and use subject matter, symbols and ideas to communicate meaning.
5-8 Students integrate visual, spatial and temporal concepts with content to communicate intended meaning in their artworks.
9-12 Students apply subjects, symbols and ideas in their artworks and use the skills gained to solve problems in daily life.
Content Standard #4 Understanding the visual arts in relation to history and cultures.
K-4 Students demonstrate how history, culture and the visual arts can influence each other in making and studying works of art.
5-8 Students know and compare the characteristics of artworks in various eras and cultures.
9-12 Students analyze relationships of works of art to one another in terms of history, aesthetics and culture, justifying conclusions made in the analysis and using such conclusions to inform their own art making.