
My Story Collage
My Story Collage
A Lesson Developed and Submitted by Cathy Harrington and Marilyn Stadler
Objectives:
The participants will:
1. Collect mementoes, pictures and art elements that are important and meaningful to them
2. Utilize art elements and the art form of Collage to create art
3. Use language, written and oral, to share information about the art they have created
Audiences:
Would be suitable for ages elementary to senior citizens. Storytelling has wonderful healing power. When it is combined with Collage, it provides an avenue for the creation of personal art and gives a “voice” to the artist.
Supplies/Materials:
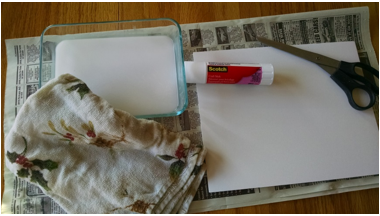
- 9x12” pieces of Masonite for each participant or other suitable base such as poster or foam board
- Glue Mixture: 3 parts white glue to 1 part water, glue sticks, and glue guns
- Disposable bowls (one for each participant) to hold glue at their work station
- A pitcher to replenish glue for participants during the class
- Damp towels for each student for cleaning hands
- Scissors
- Cleaning supplies
- Magazines, greeting cards, etc.
- Items from the participants
Important Note: This lesson was designed for participants to use a glue mixture and Masonite backboard to create the collage. Following is a recommendation from Christine Hennig (artist, registered art therapist and licensed mental health practitioner) concerning creating collages: “Liquid glue is recommended only for collages on a firm base, such as the Masonite mentioned. If collages are to be made on paper, you should use glue sticks as liquid glue will make the paper buckle. This might seem like a little thing, but it’s important when working with people without much art training that the facilitator make media choices that are likely to produce an attractive result. Inexperienced artists tend to blame themselves for any failures or problems in the art—i.e. “My collage buckled because I’m a bad artist/not artistic/not creative, etc.”, not realizing that the truth is “My collage buckled because I used the wrong kind of glue.”’
Prior to the Class:
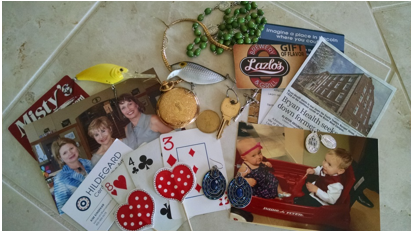
- Several days prior to the class, ask the participants to gather up photos, mementoes, ticket stubs, programs, newspaper clippings, images, trinkets, 3-dimensional objects such as flowers, jewelry, guitar picks, etc.—any memorabilia that will help tell their “Story”—who they are, what they like, where their passions lie, what they’ve experienced, how they see themselves. In other words, the items the participants will select will help define their history and give them the tools to tell the story of their lives in art. Since these objects will become a permanent part of the artwork to be created, the facilitator may want to make color photo copies of the “artifacts” brought to class to be used in creating the art so the participants can keep the originals.
Prior to Class
- The facilitator should also make images from magazines and other sources available if the participants would like to add to their work.
- Prior to the beginning of class have a station set up for each participant which includes the base for their collage, a bowl for glue (or glue sticks if that is preferred), damp towels for cleaning hands, scissors, etc., as well as a resource table with a glue gun (for 3-dimensional objects), additional images and other embellishments.
Supplies
Class Instruction:
1. Review the art form of Collage (See the Lesson “Introduction to Collage”) and the process used to create collages.
2. Ask the participants to layout the materials they brought to incorporate into their collages at their workspace. Encourage them to experiment with cutting or tearing these photos, articles, etc., into different shapes and sizes (having everyone one size will make the collage uninteresting).
3. Point out the resource table if the participants would like to supplement the materials they’ve brought to class.
4. Without applying any glue, ask the participants to “lay out” their items on the collage backing in a visually appealing and interesting manner. Encourage the participants to avoid placing all the items in straight lines but to experiment with tilting and overlapping.
Step 4
5. Once the participants are satisfied with their arrangements, they can affix their items to the board using the glue mixture, glue sticks, and/or glue guns.
6. Once all the items are affixed, a coat of Modge Podge or suitable substitute can be applied to cover the entire collage to preserve it. Allow the collage to dry completely.
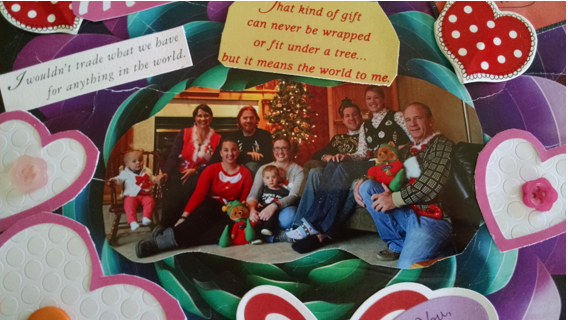
Completed Example
At the Conclusion of the Class:
- Once the collages have been completed, consider taking the class around the room to look at each Story Collages individually, inviting each “artist” to give an art talk to explain special meanings behind their artwork and share stories. This is a great way for individuals to be encouraged to “open up” and can also help to unlock memories.
- Consider asking the participants to write a brief artist statement to accompany their collages. They can point out one or two elements of the art that may be of particular interest to those viewing the art and provide insights into the life of the artist.
- Consider having a display of the “My Story” Collages or return them to the participants.