The Great Escape
University of Nebraska- Lincoln Digital Commons - Honors Club
The Great Escape
By: Caleb Kowalsk Copyright 2018 by Caleb Kowalsk under Creative Commons Non-Commercial License. Individuals and organizations may copy, reproduce, distribute, and perform this work and alter or remix this work for non-commercial purposes only.
Escape Room Files Check off List – Version 1 and 2
Master Facilitators Guide • 1 Copy, 11 Pages + Cover
Design Worksheets • 20 Copies
Answer Sheets
• 3 Copies – (1 is Extra)
Escape Room (1 or 2) Set-Up Guide
• 1 Copy, 5 Pages + Cover
Escape Room (1 or 2) Files
• 22 Pages
Other Items Needed:
• Box for activity
• Large Business Envelopes
• Small Business Card Envelopes
• Velcro, Clear Tape
• Laminator/pouches (optional)
• For best quality print in color!
Total 64 Pages (including this one) This sheet can be discarded once printed.
The Great Escape Facilitator’s Guide - also in PDF link

Image
Introduction................................................................................................. 2
Week 1 – Classroom Escape Activity......................................................... 3
Week 2 – Brainstorm Activity ..................................................................... 5
Week 3 – Legos Activity ............................................................................. 6
Week 4 – Brain Energizers Activity ............................................................ 7
Week 5 – Electronics Activity ..................................................................... 8
Week 6 – Create Your Own Activity ........................................................... 9
Week 7 – Finishing Touches .................................................................... 10
Week 8 – Escape! ..................................................................................... 11
Introduction
Welcome to the Great Escape! In this activity, students will separate into
two teams, and create escape-room puzzles for the other team to solve.
A new puzzle will be created each week, and then put together into an escape-room layout for the other team to complete. Before the students create their own, they will be challenged to complete a pre-prepared escape room activity on the first day. The facilitator will be given instructions on how to set up this activity based on the age group of the students participating.
This is a program that will challenge your problem-solving skills and
will require your creativity and imagination.
Over the course of this program, you will divide into two teams, and
create escape-room puzzles for the other team to solve. You will
create new puzzles each week, and then put them all together at the
end.
Week 1 – Classroom Escape
THE FIRST WEEK WILL REQUIRE THE FACILITATOR TO SET UP AN ESCAPE ROOM ACTIVITY FOR ALL THE STUDENTS TO SOLVE. Set up time: 5-10 Minutes
FACILITATOR: Please select one escape room to set up: Escape Room 1: Grades 3-5. Easier escape room. Escape Room 2: Grades 6-8. More difficult escape room.
READ ALOUD ONCE READY TO START: “Welcome to the Great Escape! This activity is an escape-room activity that will require you to solve a series of clues to escape the room within the time limit. Today, all of you will be challenged with solving all the clues correctly to escape this very classroom. This activity will challenge your creative problem-solving skills and ability to work together as a team. Before we begin, here are the guidelines:
• You will have 30 minutes to complete this activity. If you get
stuck, you are allowed to ask the facilitator for three hints to
help you along the way.
• There are no clues hidden in or around the teacher’s desk, or in
the cabinets (or any area of the classroom that’s off-limits).
• The clues for this activity are hidden in plain sight! Meaning do
not tear the classroom apart looking for clues. The classroom
should be left just as clean as when the activity was started.
Now, here are a few tips to help you get started:
1) Spread out. If everyone works on the same activity, you will run
out of time. Divide the work among yourselves.
2) Communicate with each other. Keep all your clues together. It is
important to have all the information available to everyone.
3) Work quickly, but efficiently, and remember to think creatively!
4) If you find a clue you do not understand, save it, because it may
be a clue to a puzzle you haven’t found yet!
Remember to work together as a team to solve this activity and successfully escape the classroom.
Are there any Questions before you get started?
You have 30 minutes to escape. Go!”
Extra Tips
• If possible, display the time on the board or through a computer for the students to see. Otherwise keep track of time using the classroom clock.
• Follow along closely with the Facilitators Answer Guide to make sure
the students are on the correct path
Week 2 - Brainstorm
This week we will use supplies from the Brainstorm Bin from the TMC.
This puzzle will test your creative problem-solving skills.
Use supplies from the Brainstorm bin to create a puzzle for your escape
room. Use the Design Worksheet to help you think about how this puzzle
will work. Here are some suggested activity ideas:
• Use Dry Erase markers and Dry Erase Boards
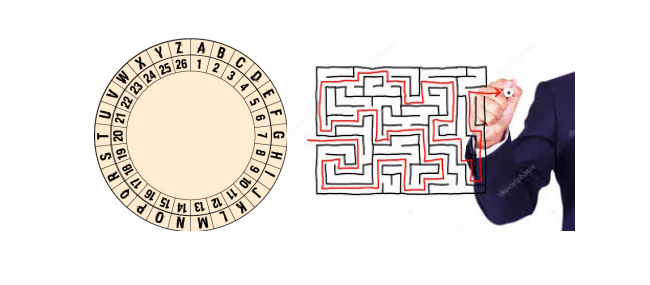
• Create a secret code using the Code Dial from the first escape room
• Draw a maze and keep track of the correct path
• Draw a secret picture and have the other team guess the picture
Don’t forget to write your puzzles down on your Answer Sheet!
Week 2 Image
Week 3 - Legos
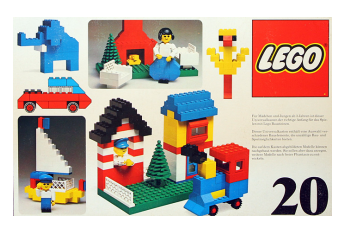
This week we will use supplies from the Legos Bin from the TMC.
This activity will test your creative building skills.
Use supplies from the Lego bin to create a puzzle for your escape room.
Use the Design Worksheet to help you think about how this puzzle will
work. Here are some suggested activity ideas:
• Create a building challenge
• “Build a Red Car out of Legos”
• “Build a Green House out of Legos” - The House must have 1 door and 3 windows
• Build a Lego tower that is at least 20 layers high
• Build a Lego bridge across two tables that are at least: - 3 inches apart - 6 inches apart - 12 inches apart
Don’t forget to write your puzzles down on your Answer Sheet!
Week 3 Image Legos
Week 4 – Brain Energizers
This week we will use supplies from the Brain Energizers Bin from the TMC.
This activity will test your physical coordination.
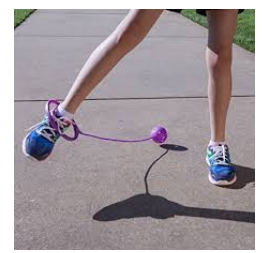
Use supplies from the Brain Energizers bin to create a puzzle for your escape room. Use the Design Worksheet to help you think about how this puzzle will work. Here are some suggested activity ideas:
• Create an exercise puzzle
• “Jump Rope 20 times, then throw the Frisbee into a basket”
• “Jump Rope around 3 cones, then Skip ball 15 times”
• Create an instruction sheet with these activities on them for the other
team to complete
Make sure there is a designated area with proper space in your classroom
for these activities.
Don’t forget to write your puzzles down on your Answer Sheet!
Week 4 Image
Week 5 - Electronics
This week we will use supplies from the Electronics Bin from the TMC.
This activity will test your technological skills.
Use supplies from the Electronics bin to create a puzzle for your escape
room. Use the Design Worksheet to help you think about how this puzzle
will work. Here are some suggested activity ideas:
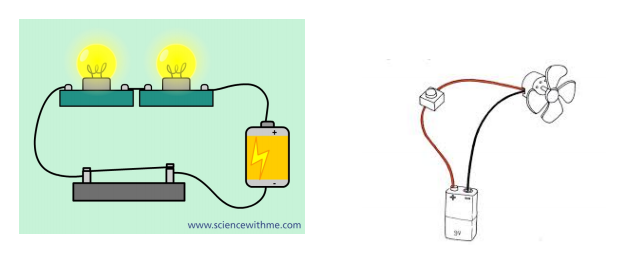
• Experiment with the electronics bin to create an activity
• Create an activity with instructions
• “Create a basic circuit using batteries and light”
• “Make a circuit that lights up a blue LED light”
• “Use batteries and wire to turn on the motor”
Don’t forget to write your puzzles down on your Answer Sheet!
Week 5 Image
Week 6 – Create Your Own
This week we will create our own activity, using supplies from the TMC.
This activity will test your creativity and imagination!
Use supplies from one of the following bins to create a puzzle for your escape room. Use the Design Worksheet to help you think about how this puzzle will work. Here are some suggested activity ideas: Suggested TMC Boxes:

Week 6 Examples
Remember to create a Final Puzzle that when solved completes the
escape room. This custom puzzle should be the last puzzle in the
sequence of the activity.
Don’t forget to write your puzzles down on your Answer Sheet!
Week 7 - Finishing Touches
This week we will finish our escape rooms and
prepare to test them next week.
Make sure each teams Answer Guides are complete
and have the correct answers to their puzzles.
If there is time, they can create an extra activity this week similar to the
activity from week 6. This activity can include anything from the TMC.
Use supplies from one of the following bins to create a puzzle for your
escape room. Use the Design Worksheet to help you think about how this
puzzle will work. Here are some suggested activity ideas:
Suggested TMC Boxes:

Suggested Ideas
Don’t forget to write your puzzles down on your Answer Sheet!
Week 8 - Escape
This week we will be setting up and testing our Activities!
Now we will test your escape-room solving skills.
Gather all necessary supplies from the TMC with the proper bins. One group will leave the room while the other group will collect their materials and set up their escape room. Once finished setting up, the other team will have 30 minutes to complete it. Reading the instructions from Week 1 should be repeated to remind the students of off-limit areas and tips for successful solving.
Once this first escape room is finished, the second group will repeat the process above.
• If necessary, this can be extended to the following week.
• Please make sure all TMC bins are correctly put away after using
them. Thank you.
WORKSHEET - Multiple copies needed
Worksheet 1
Worksheet 2
The Great Escape Set-Up Guide Version 1
Introduction
Welcome. This is the set-up guide to the first and easier version of the
escape room. This activity is meant for 3rd-5th graders. If you have a highergrade audience, please grab Version 2 of this escape room activity.
Overview
Using this guide and the materials included, it will take you 10-15 minutes
to set up the escape room properly. Please allow enough time before the
activity to properly set up.
Included with this Set Up Guide is the Answer Key to the escape room.
This Answer Key is the order in which the students will solve the clues, one
clue leading directly to another. You will use this to follow along with the
progress the students make while solving the clues.
Set Up
The steps and puzzles are numbered in the order they will be completed. The numbers are located in the lower left-hand corner of each puzzle and envelope, with a star on the answer sheets for the facilitator.
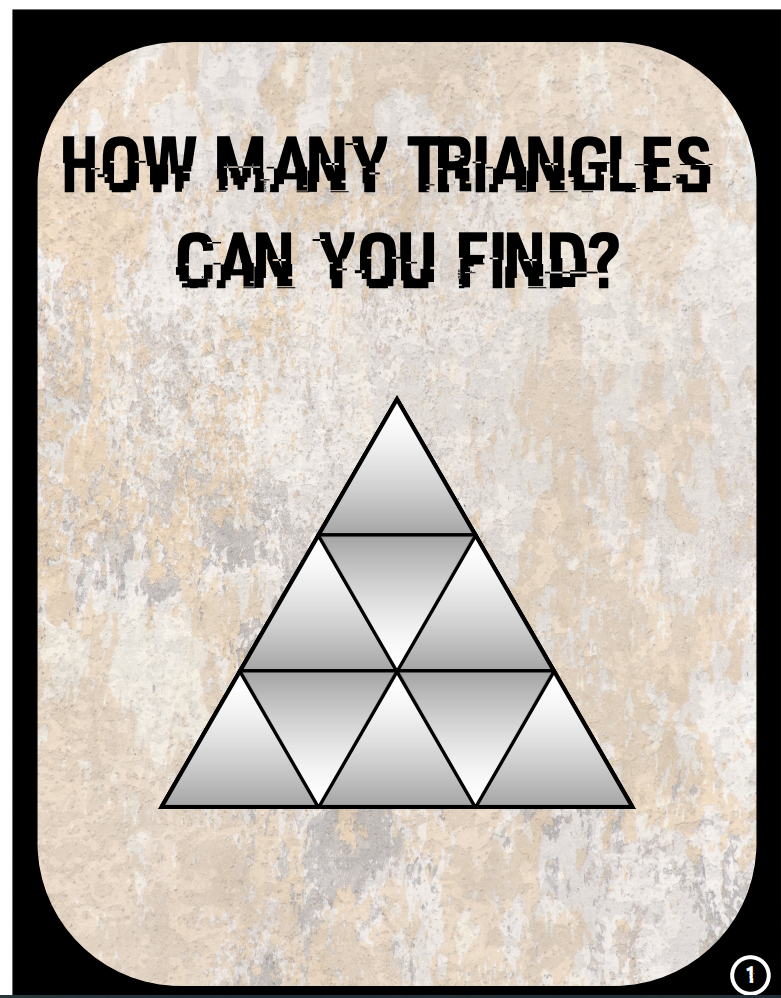
1) Logic Puzzle
• The students will open this envelope first, as this puzzle will begin the escape
room sequence. Put this puzzle in the envelope labeled “Open Me” (1).
• Leave this on a table or open countertop space for the students to quickly find
and open first.
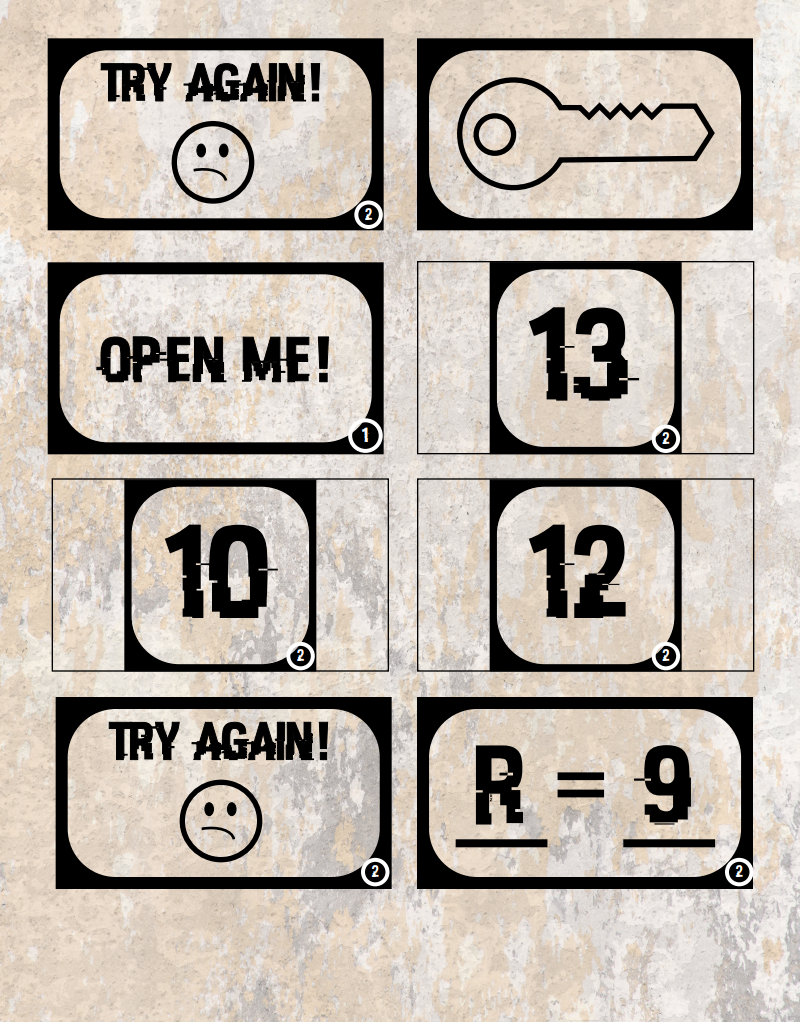
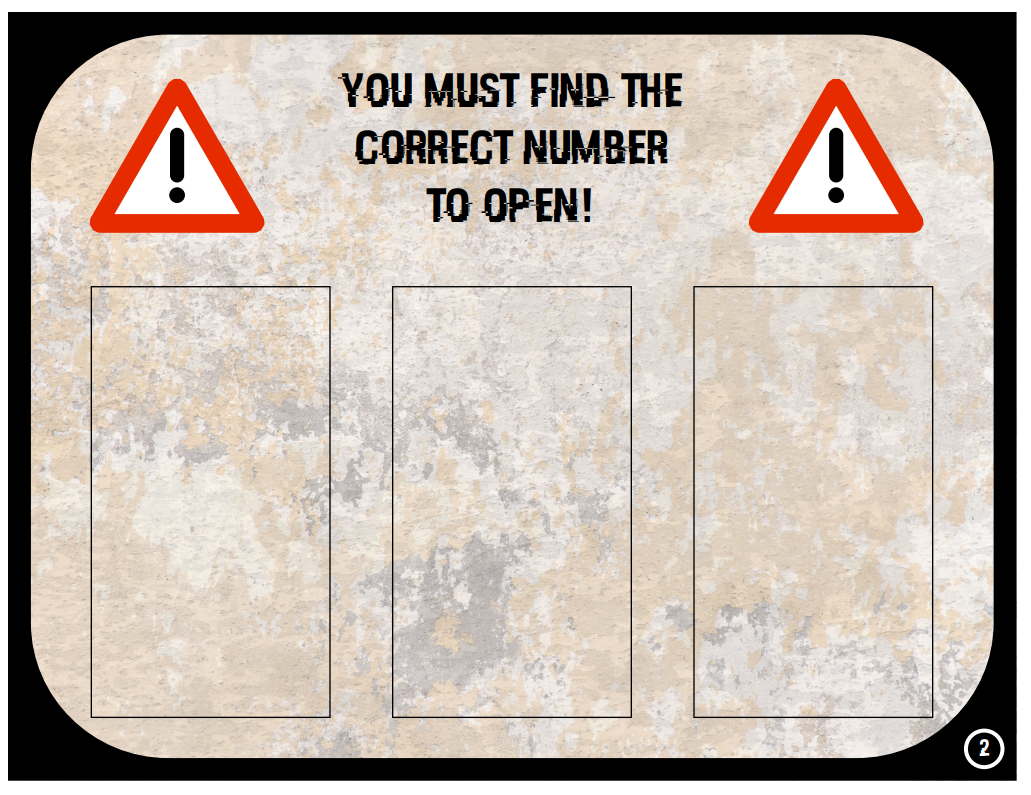
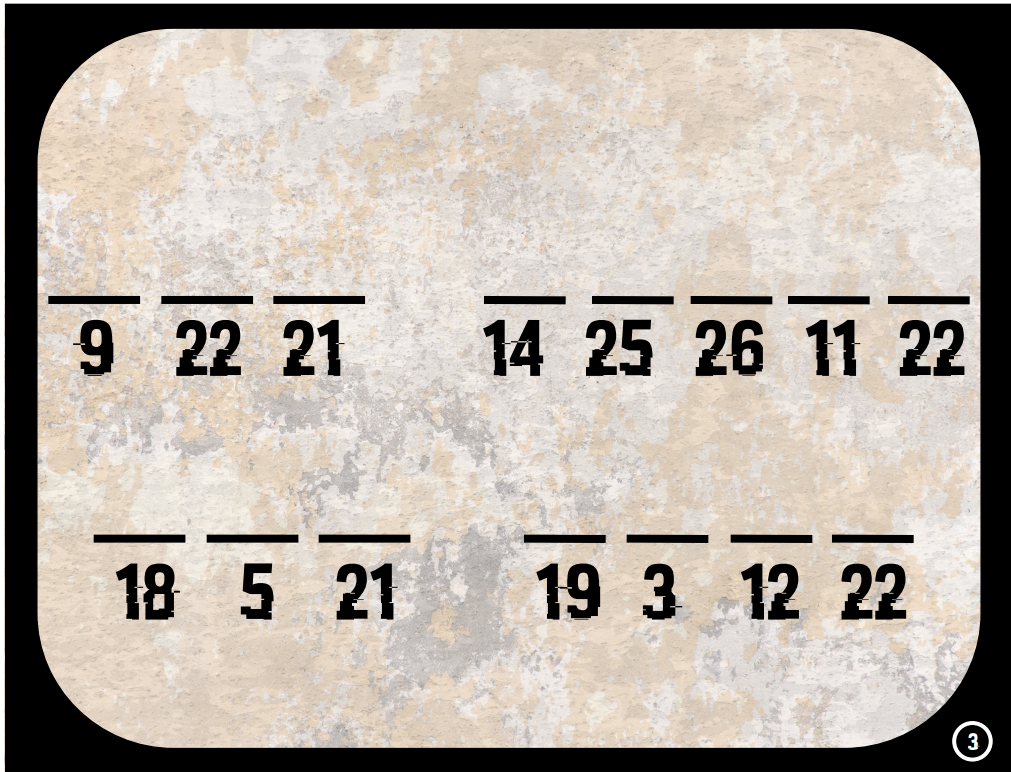
2) Number Envelopes
• The answer to the Logic Puzzle (13 Triangles) will lead the students to pick
the correct numbered envelope. The numbered envelope sheet should also
be placed on a table or open counter space for the students to see and chose
the correct envelope after completing puzzle (1).
• The Code card (R=9) should be placed in the “13” envelope for the students
to open and find. The “Try Again” cards should be placed in the remaining two
envelopes.
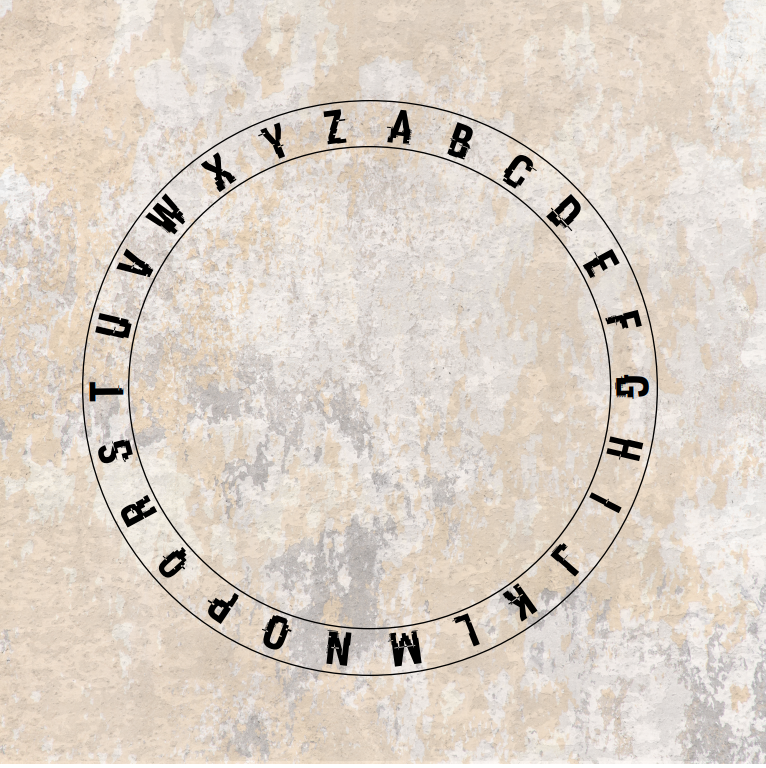
3) Code Dial
• The code inside envelope (3) will be used as a reference for the Code Dial,
and the corresponding letters will be used to solve the code (3).
o Inside Envelope (3) is the set up to the code dial. You can either:
Tape the (3) sheet somewhere on the wall, or Write the (3) sheet on a chalk board or white board
• The Code Dial can be placed on an open table for the students to find.
• The answer to the code on the board is “Red White and Blue” This hint is to
the American Flag.
4) American Flag + Clue
• Place a clue (Found in the Facilitator (*) Envelope) somewhere near the flag
so that it will not be found prematurely. Taping the clue to the backside of the
flag works well.
• There are a few different hints in the Facilitator Envelope, you can
choose the clue that best fits your classroom.
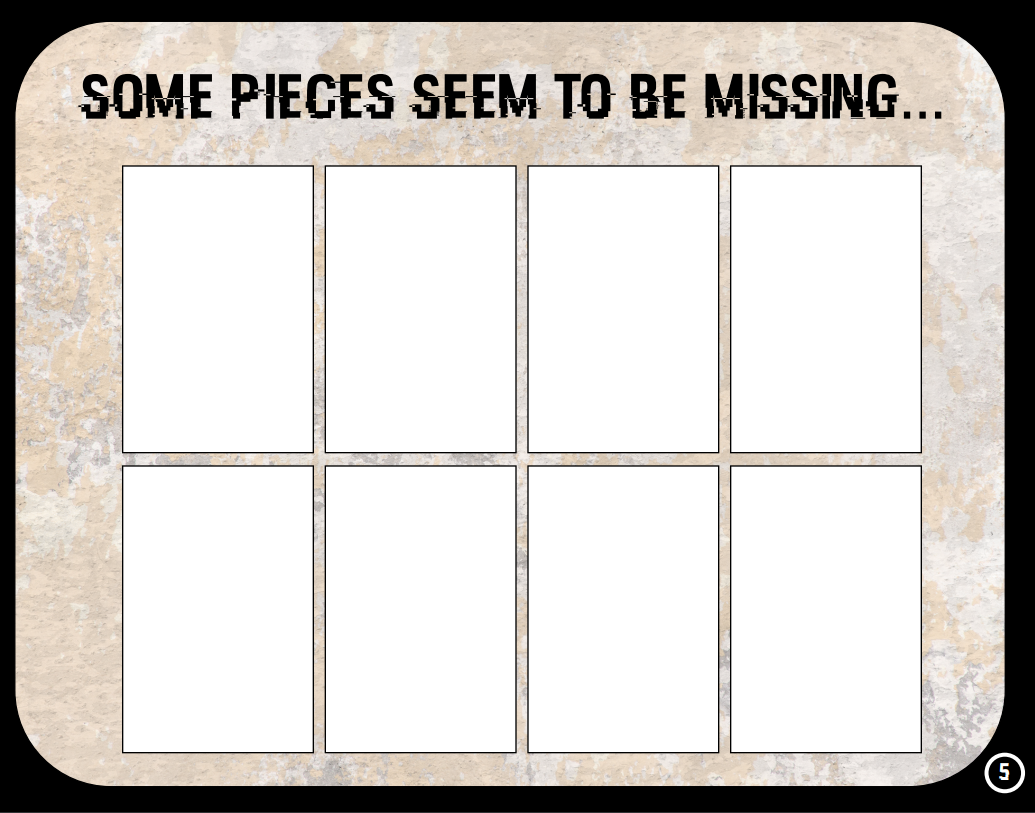
5) Puzzle Pieces
• The clue you chose for the American Flag will lead to somewhere in the
classroom. Place the (5) Envelope in this spot. The envelope will contain
puzzle pieces and numbered pieces that will be used later in the activity.
• The puzzle board (5) should be taped to the wall for the students to place the
puzzle pieces on. Once the puzzle is done, it will lead to a Tissue Box.
6) Lock Box
• The Key (Found in the Facilitator (*) Envelope) should be placed somewhere
near the tissue box, such as underneath it or sitting inside the box where it
can be found.
• The Key will open the Locked Box (6) (which is the Box the activity came in).
• The Locked Box should be placed in a hidden location around the room that
can still be found easily, such as on a shelf or on a chair.
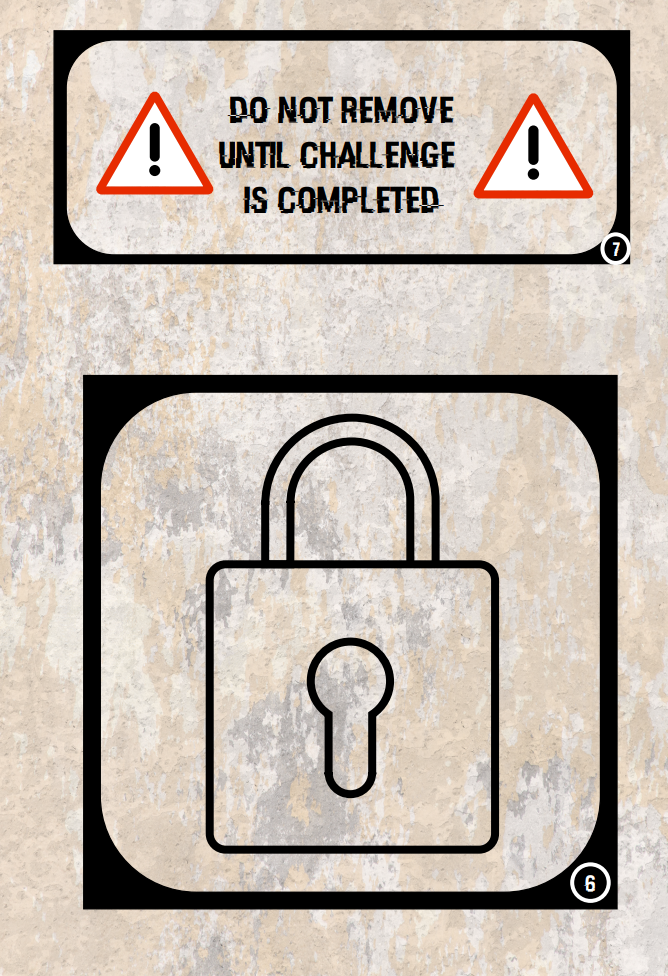
7) Challenge
• The Lock Box will contain the Challenge Envelope (7) and the proper
materials needed for the challenge.
• Once the Challenge is completed, the students may remove the warning,
leading to under a table.
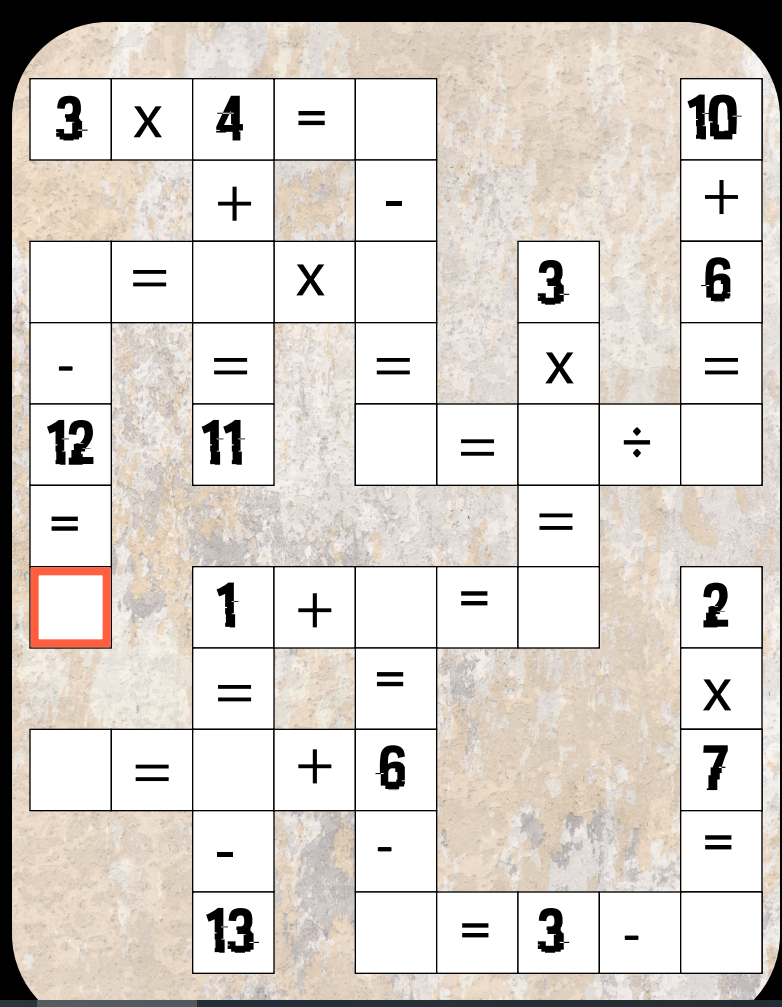
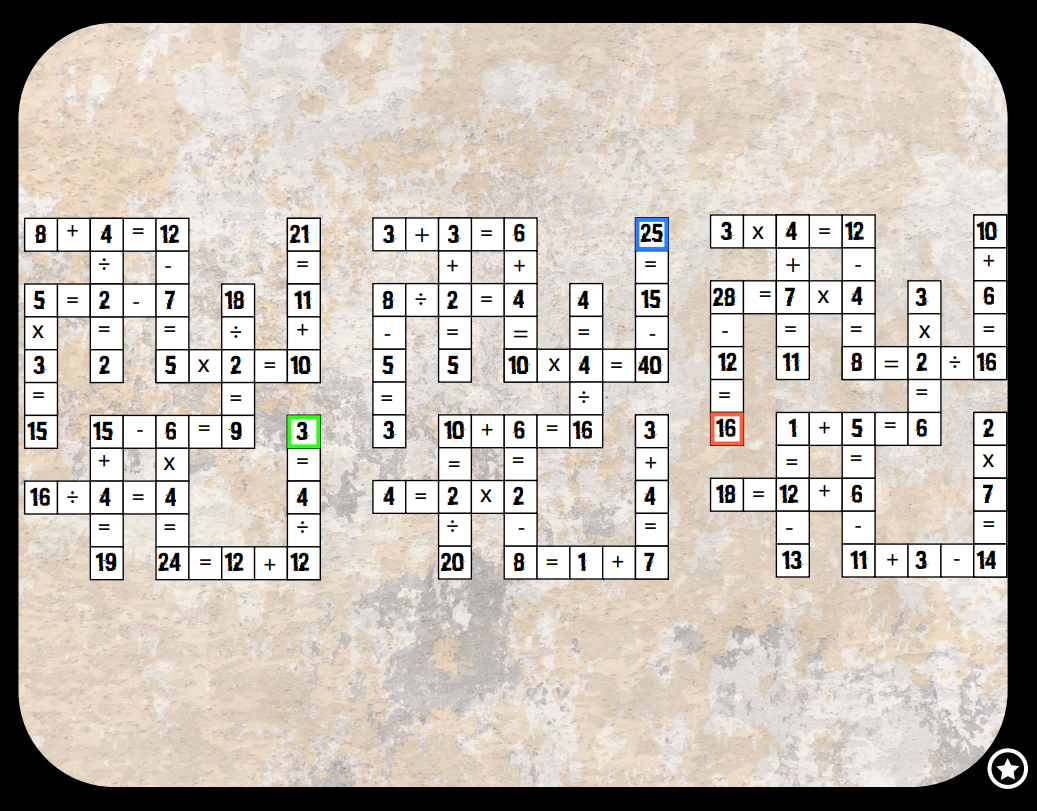
8) Math Puzzle
• The Math Envelope (8) should be taped to the underside of a random table.
• Try to pick a table that’s unsuspecting or out of the way, sometimes the
students find this envelope under the table before they reach this part of the
activity.
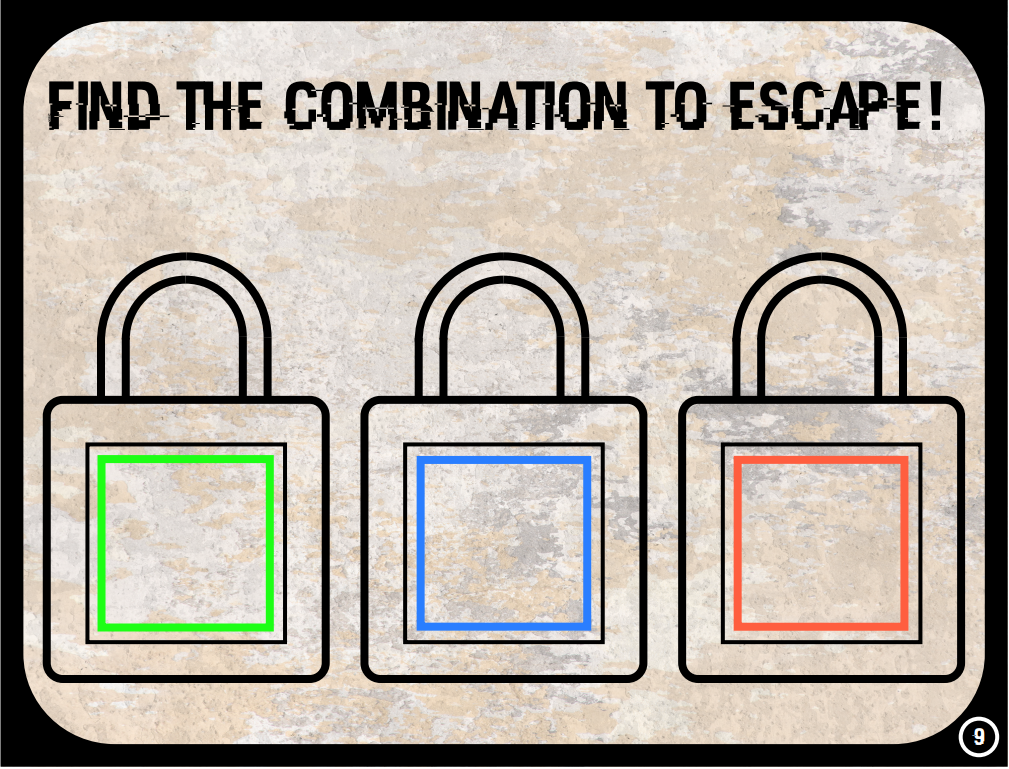
9) Final Lock
• The Final Lock Sheet (9) should be taped to the door to the classroom, which
needs to be solved in order to escape.
• Once the math puzzle is completed, the correct numbered pieces (that came
with the puzzle pieces) will be placed on the final lock on the door to unlock it
and escape the room.
Finishing Touches
Items in correct locations:
• Logic puzzle (1) envelope on table top
• Numbered Envelopes (2) on table top
• Code inside “13” envelope
• Code Dial (3) left on table top
• Code Sheet (3) written on board or sheet taped to wall
• Chosen Clue (4) taped to American Flag
• Puzzle Pieces and Number Pieces inside Envelope (5) hidden in location
• Puzzle Board (5) taped on Wall
• Key inside Tissue Box
• Lock Box (6) Hidden in room
• Challenge Envelope (7) inside Lock Box
• Math Envelope (8) taped under table
• Final Lock (9) taped on Door
You will have in your hand:
• Answer Guide
• Code Answer
• Math Puzzle Answers
When finished, please make sure all activities are in their correct envelopes and placed
in numerical order back into the activity box. Good Luck!
Triangles
CARDS TEMPLATE
Code Page

Dial Image 1
Dial Image 2
Code2
Puzzle Image

Puzzle Image 2
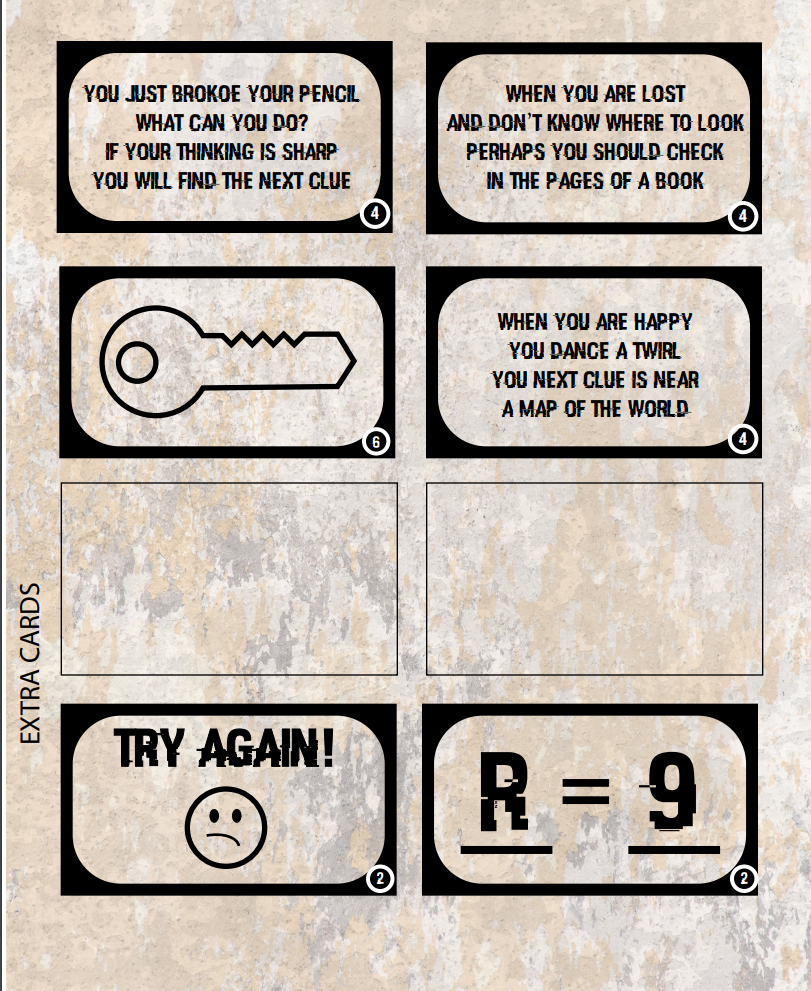
Extra Cards
Lock Image
Numbers
Numbers2
Locks Image
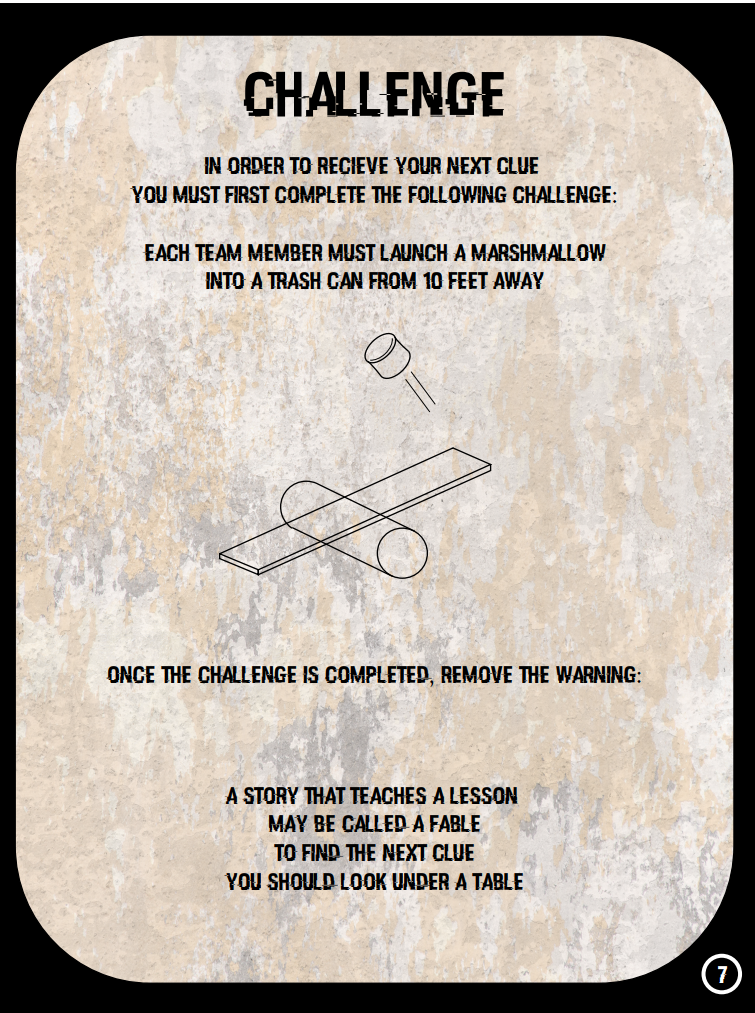
Challenge
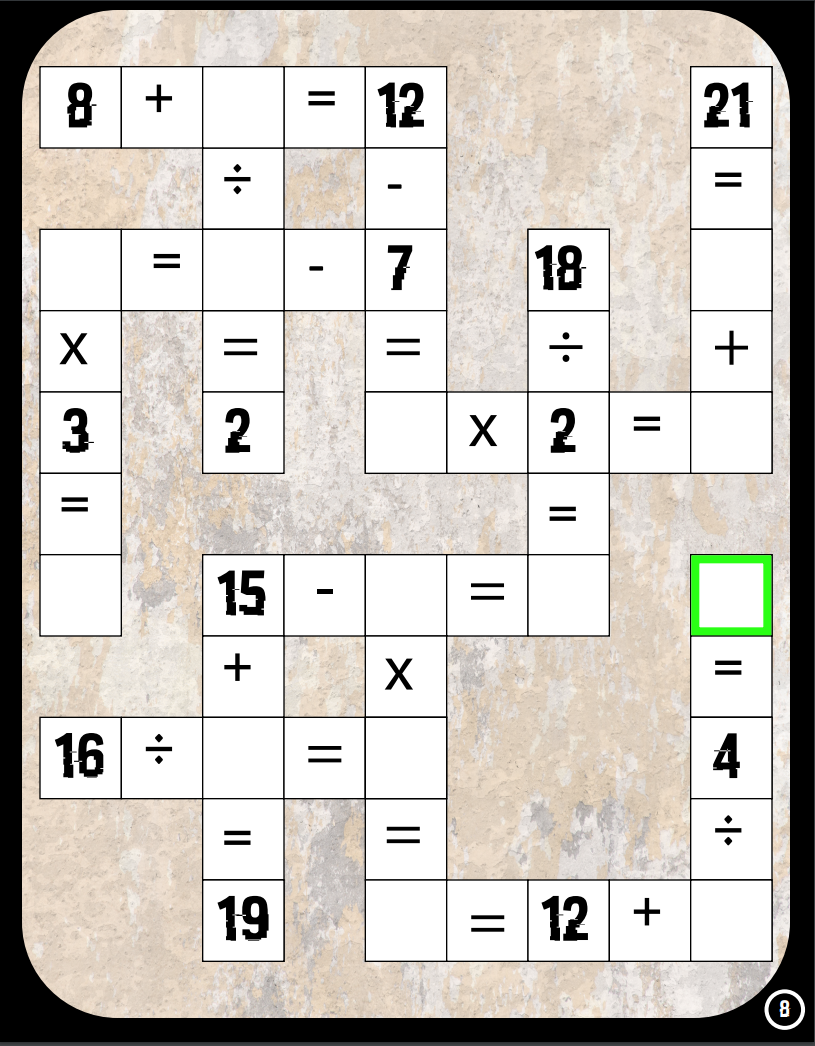
Math Challenge
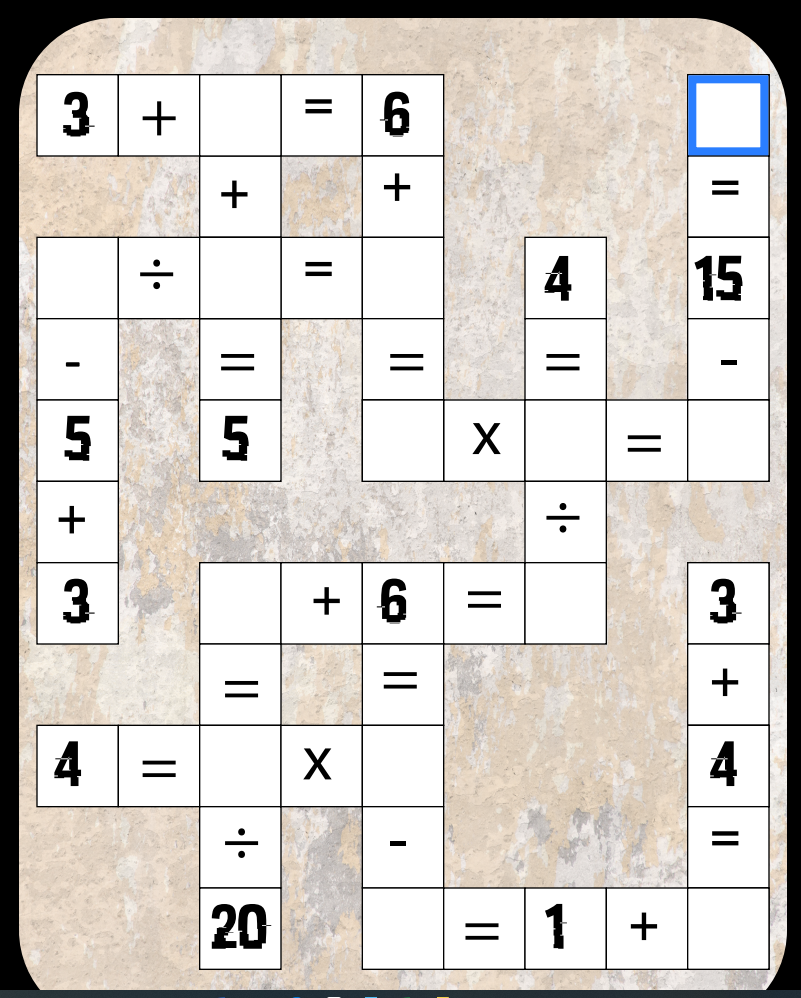
Math Challenge 2
Math Challenge 3
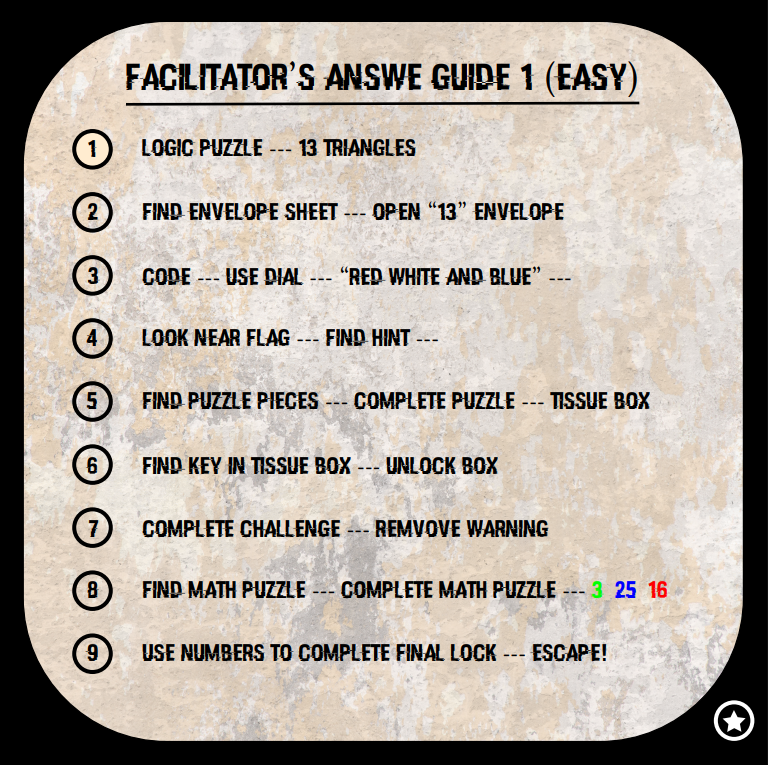
Faciltator Answer Guide

Answer Page 2
Answer Page 3
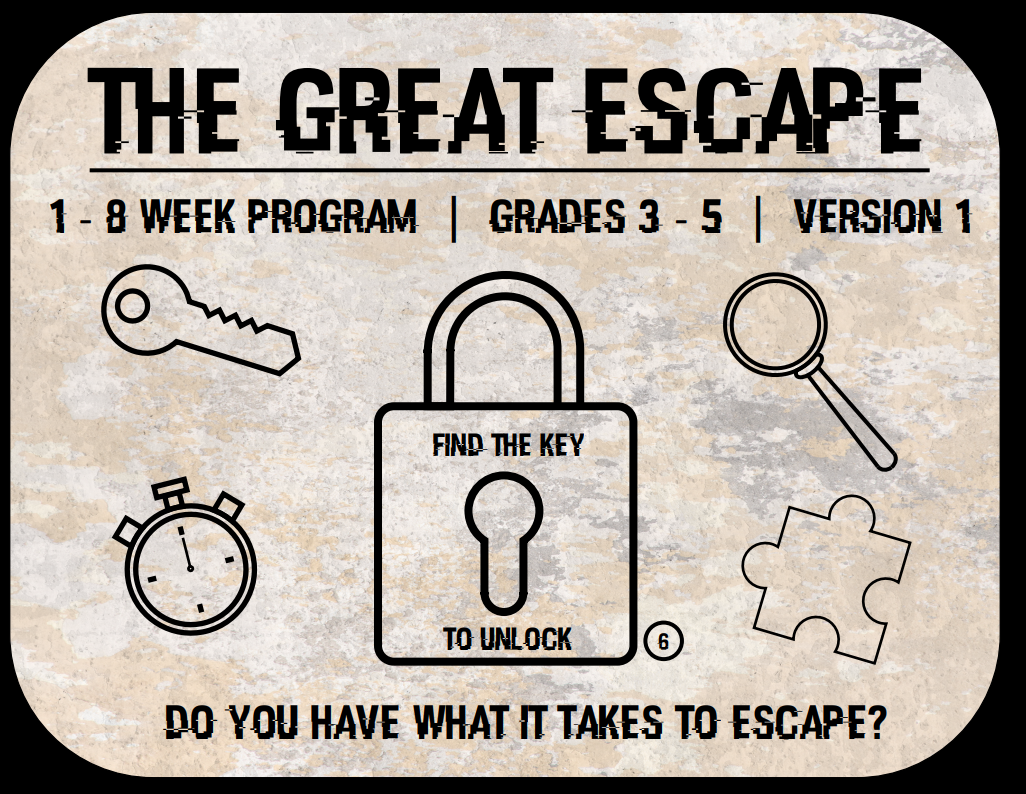
Recruiting poster
Title Page