3-D Mapping | Topography
University of Nebraska- Lincoln Digital Commons - Honors Club
3-D Mapping | Topography
By Dana Hoppe, Copyright 2018 by Dana Hoppe under Creative Commons Non-Commercial License. Individuals and organizations may copy, reproduce, distribute, and perform this work and alter or remix this work for non-commercial purposes only.
Topography - Design Challenge
Introduction - Expanded learning opportunities (ELOs) have the potential to be the great equalizer in American education. Regular participation in high quality before and afterschool learning, and enriching summer school programs have been shown to help low-income students succeed academically on par with their more affluent peers. These programs, characterized by strong school-community partnerships, can also help high-performing students stay engaged and achieve even greater levels of understanding. In short, high-quality ELOs are for everyone - and the benefits they create are critical to Nebraska's future economy. - Beyond School Bells I would like to thank Beyond School Bells as well as Nebraska Innovation Studio for providing me with the opportunity, resources, and encouragement to develop this program as an Innovation Fellow. Their willingness to give the intellectual and creative freedom to build upon my ideas and inspirations is what enabled this program to exist. I strongly believe that opportunities such as the Innovation Fellowship are planting the seeds for Nebraska's future. -Dana Hoppe, Program Creator
Concept and Purpose - Interdisciplinary Learning: This program is focused on developing fundamental STEM skills through
interdisciplinary learning. The truth is that all areas of study overlap
significantly in one way or another, and the cognitive skills that lead to
success in one area surely extend to other areas. A recurring theme I have
noticed through my personal experience of being and artist as well as a
scientist is that I have heavily utilized my creative thinking abilities to solve
challenging problems. Imagination and creativity, when combined with
background knowledge and understanding, allow us to find solutions that
often lie beyond the rigid structure often associated with mathematics and
the sciences. Once we begin to see the overlap between these areas, we
begin building bridges between them and new ideas and applications
emerge from a formerly empty space.
The concept of topography was always interesting to me. The strangeness
of being able to discern the shape of the land simply from the distance
between a hypnotizing assortment of lines on a flat piece of paper was
immediately intriguing. How does this flat sheet of abstract shapes translate
to the three-dimensional complexity of a mountain, a valley, or a bluff?
Topography is the platform of this program because it is a very versatile
concept and can be used to create art and models representing a diverse
range of fields.
The activities in this program focus on having the students follow processes
often found in Computer Science. Every process they complete can be
thought of as an algorithm, and when they repeat steps, it can be thought
of as a loop. They are also recursively calling the same function on each
resulting piece they create, mimicking the concept of dynamic programing.
The permutation matrix activities will familiarize students with moving
through the data in a matrix and adding data to stacks.
While they are doing all of these activities, however, there will be no jargon
they have to learn, and they will probably not even realize until they take
their first Computer Science course that it is even related. To the students,
they will simply be creating art in a new and interesting way.
A line is point that discovers left and right on a page
A shape is a line that then discovers up and down on a page
A three-dimensional object is a shape that discovers
it can leave the page
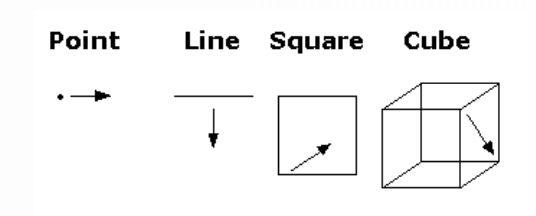
Drawings of Line, Shape and 3D
Facilitator Guide - Drawing Organic/Abstract Shapes This exercise is intended to warm the students up to drawing more organic and abstract shapes. This enables students to start creating their own shapes and is a simple exercise for creative thought.
Materials: Scratch Paper, Marker/Pencils, Reference photos
1. Pull public domain images from the web and group them together.
2. Print out one for each student/group.
3. Instruct students to copy the shapes onto their own papers.
4. Instruct students to put an "x" next to three shapes.
5. Have students draw around all selected shapes staying within a centimeter of the outside of the shapes.
6. Repeat 4 & 5 until all shapes have been included.
7. It is helpful to demonstrate on a whiteboard.
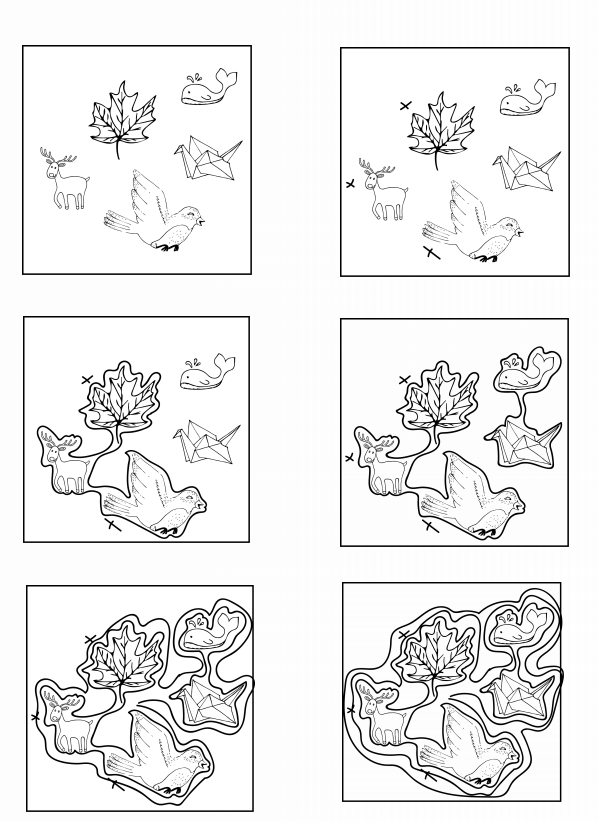
Examples of Abstract Drawings
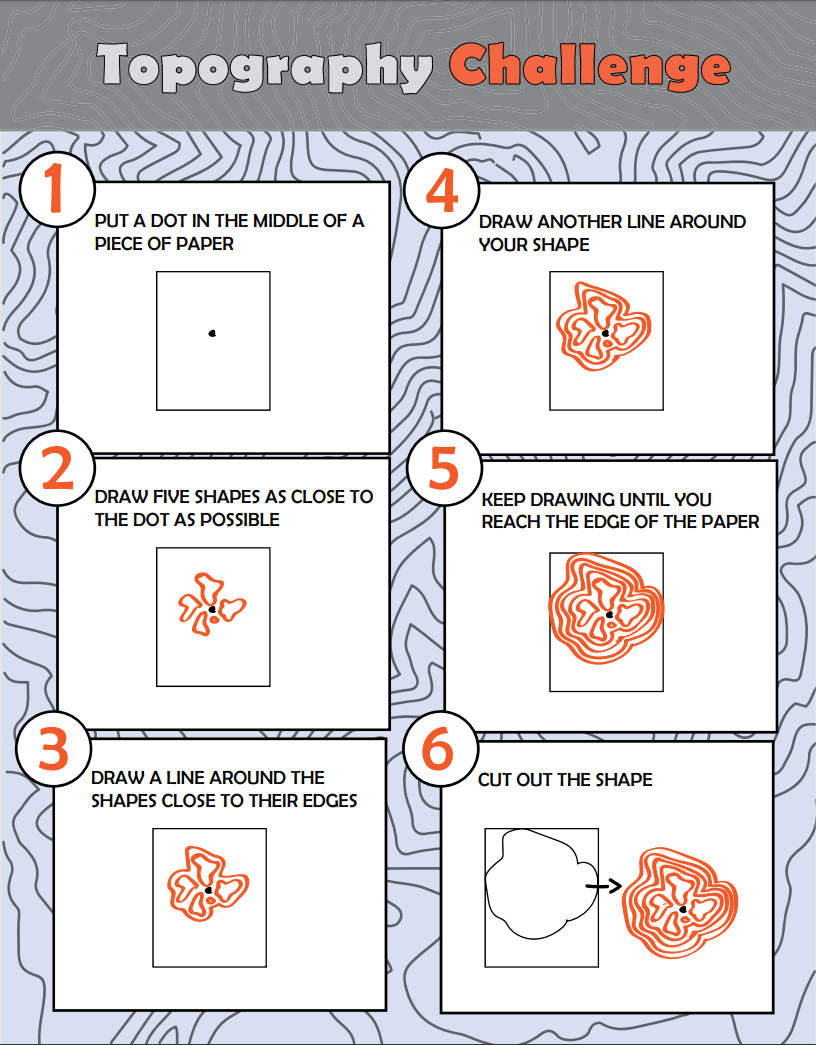
Drawing Topography This exercise is to familiarize students with drawing contour lines. It is a therapeutic form of doodling which can generate interesting compositions.
Materials: Scratch Paper Markers/Pencils Student Handout Page (30)
1. Hand out paper and markers/pencils.
2. Instruct students to draw a dot in the center of their paper.
3. Have students draw five shapes as close as possible to their dot. note: "as close as possible to" == "within a centimeter of"
4. Have students draw a line around all of their shapes, staying as close as possible to the edges of each shape.
5. Have students draw a line around this shape staying within a centimeter of the edge of the shape.
6. Repeat previous step three times.
7. Have students draw three new shapes as close as possible to the edge of their last shape.
8. Repeat steps 4-6
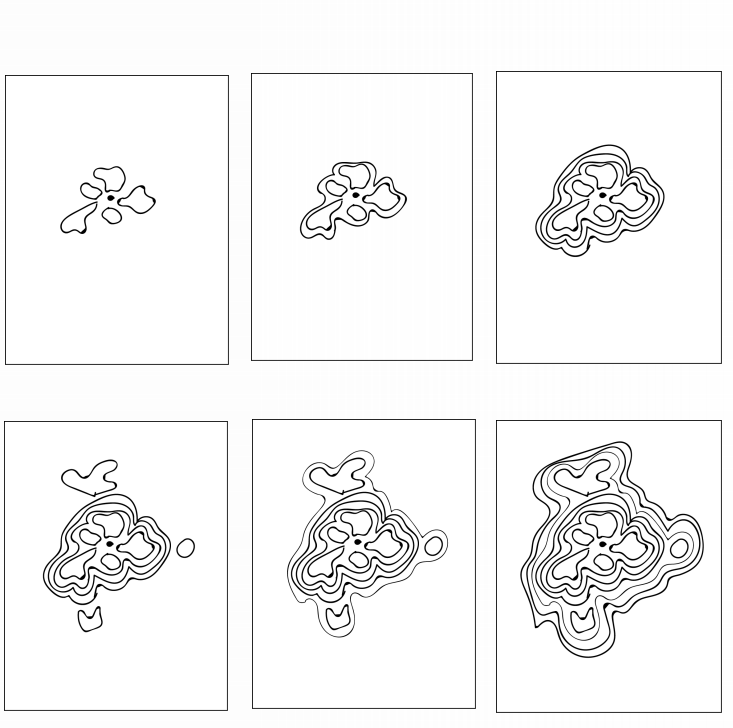
Topography Drawing Examples
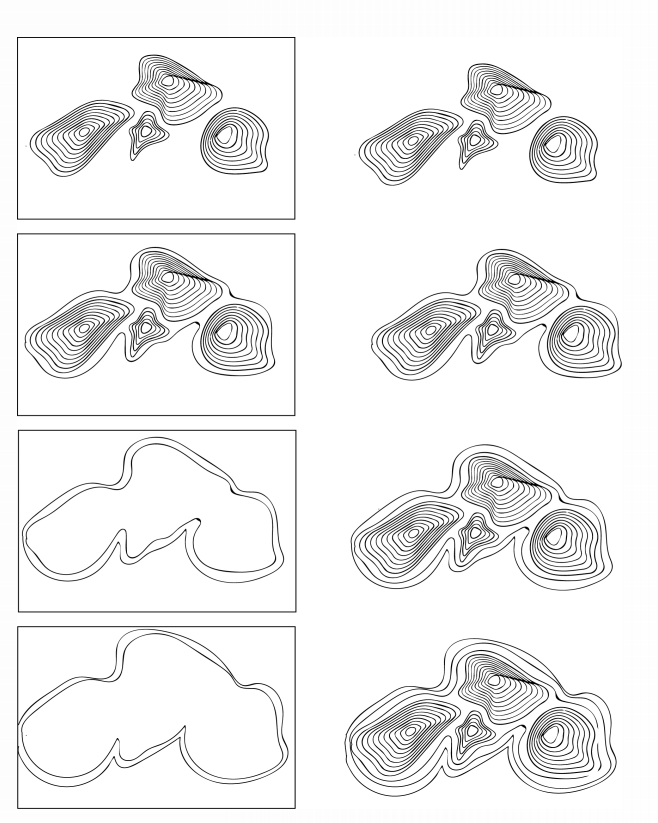
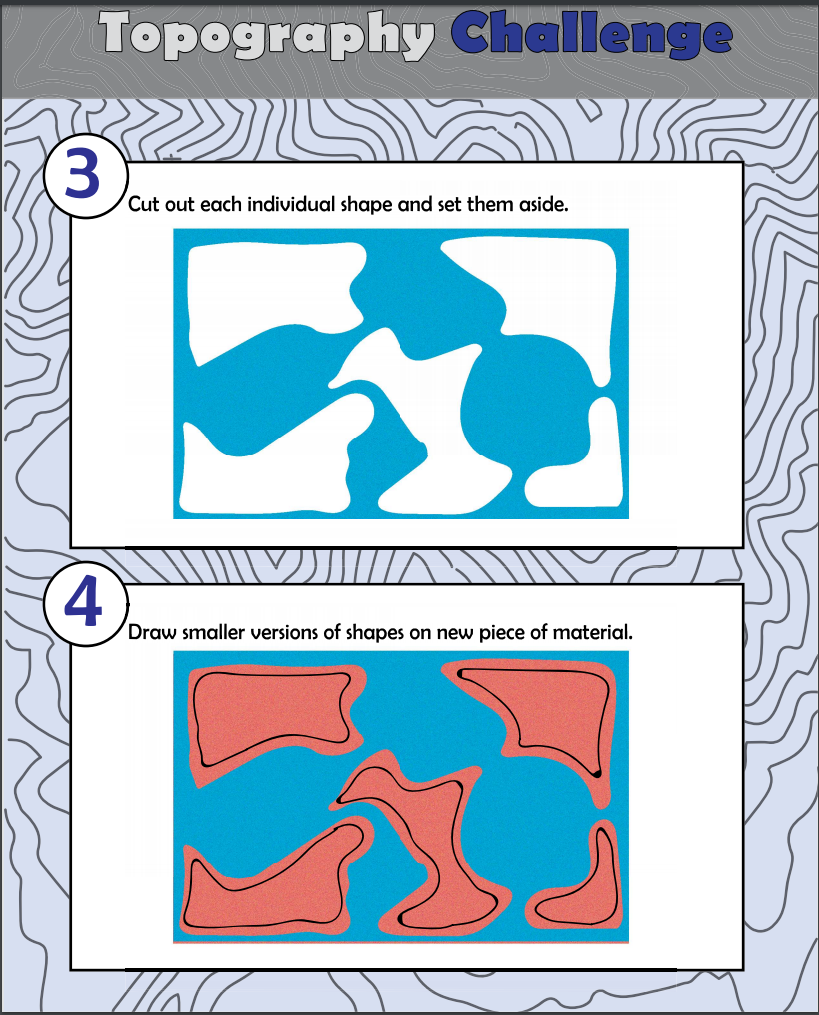
Generating an Expanding Topography - This exercise teaches students how expanding twodimensional shapes, when stacked on top of each
other, create a three-dimensional topographic map.
This exercise uses a recursive algorithm, a concept
key in Computer Science.
Materials: Scratch Paper, Markers/Pens, Freezer Paper(optional), Scissors, Student Handout Page(31), Felt/Cardboard
1. Cut out a small sized organic shape they have created in the previous exercises.
2. Trace the shape directly on felt/cardboard.
3. Cut shape out of felt/cardboard.
4. Label piece of paper "STACK"
5. Trace shape on new piece of felt/cardboard.
6. Keeping shape orientation the same, set old shape on "STACK" paper.
7. Draw line around - staying within a centimeter of - the edge of the traced shape.
8. Cut out the shape made from this line.
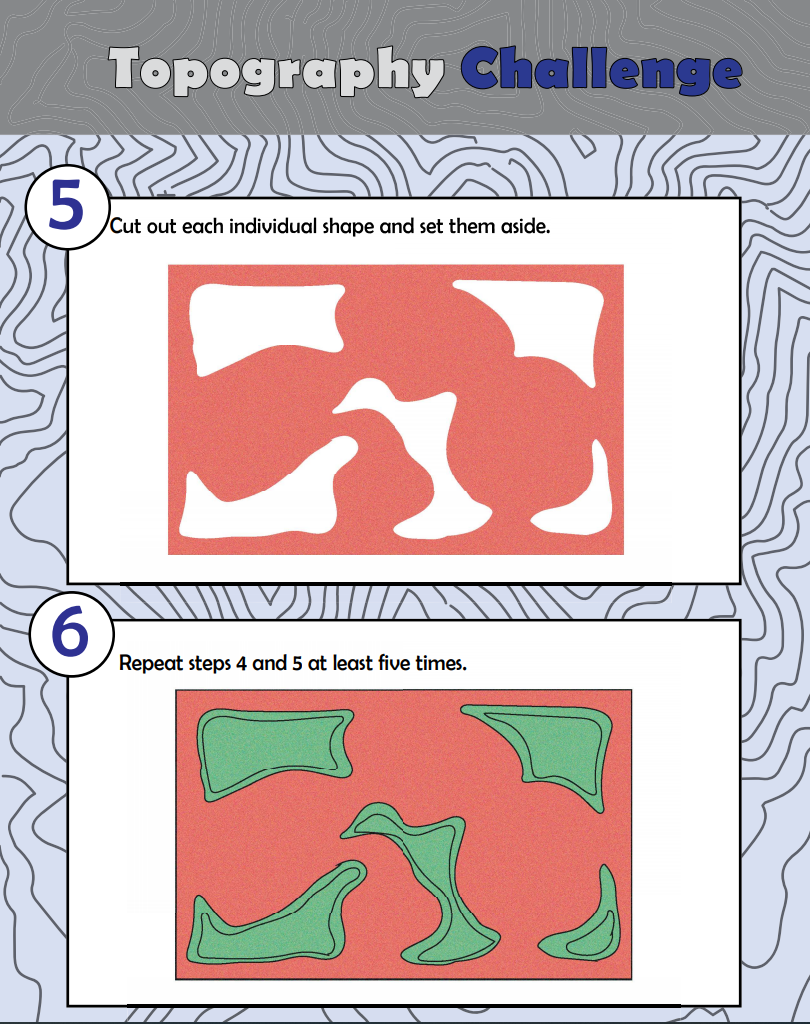
9. Repeat steps 5 - 8 at least five more times.
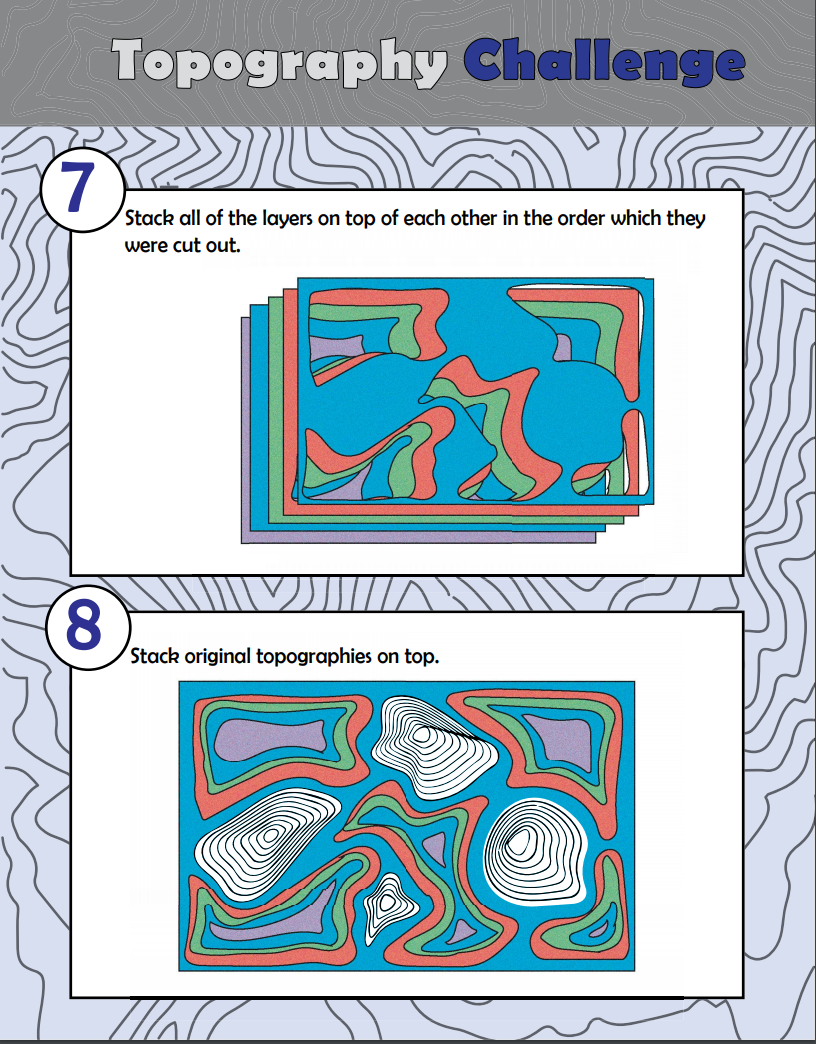
10. Put shapes on "STACK" on top of each other in order of
largest on bottom and smallest on top.

Expanding Topography Examples
Generating a Decreasing Topography - This activity is the same as the increasing topography except in reverse. The initial shape is large and subsequent layers become smaller. differences are in bold.
Materials: Scratch Paper, Markers/Pens, Freezer Paper(optional), Scissors, Felt/Cardboard
1. Cut out a large sized organic shape they have created in the previous exercises.
2. Trace the shape directly on felt/cardboard.
3. Cut shape out of felt/cardboard.
4. Label piece of paper "STACK"
5. Trace shape on new piece of felt/cardboard.
6. Keeping shape orientation the same, set old shape on "STACK" paper.
7. Draw line within - staying within a centimeter of - the edge of the traced shape.
8. Cut out the shape made from this line.
9. Repeat steps 5 - 8 at least five more times.
10. Put shapes on "STACK" on top of each other in order of largest on bottom and smallest on top.
This activity is the same as the increasing
topography except in reverse. The initial shape is
large and subsequent layers become smaller.
differences are in bold.

Decreasing Topography Examples
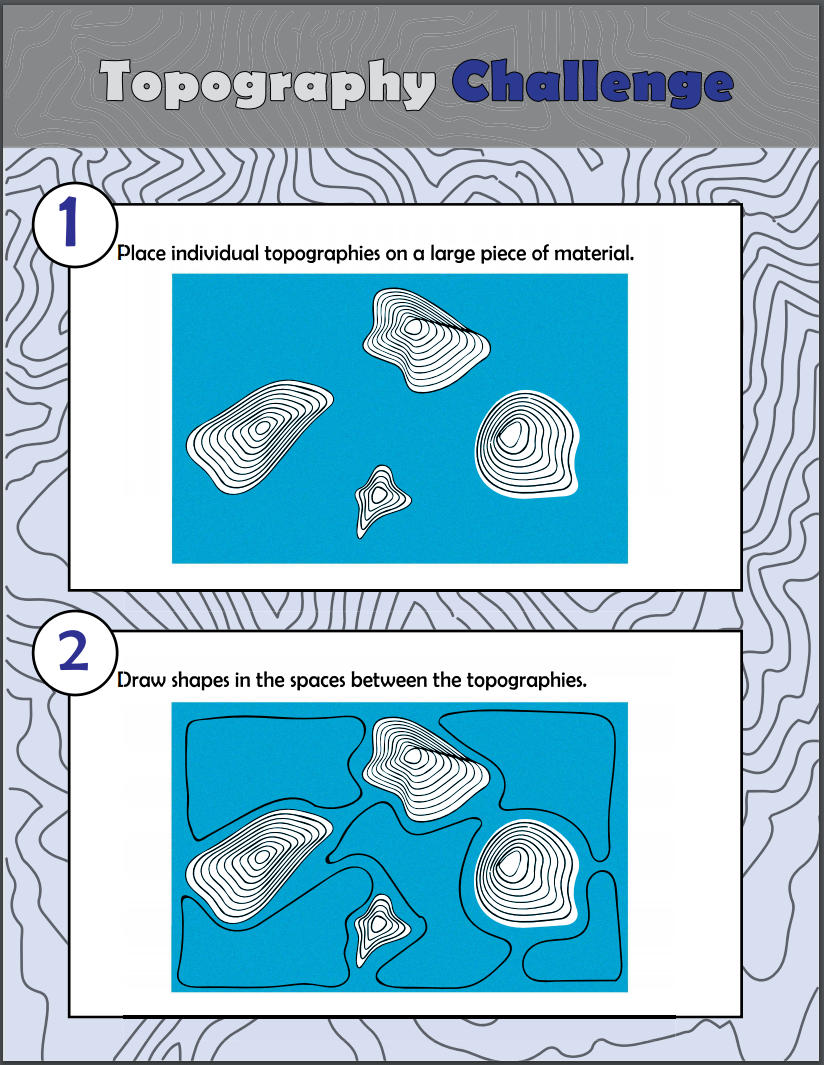
Combing Topographies - 1 This is one of several activities where students can combine topographies they have made independently. These lessons shows students how independent methods (or functions) can be part of a larger process and structure.
Materials: Two or more topographies (from previous activities), Felt/Cardboard, Marker/Pens, Freezer paper (optional), Scissors
1. Place topographies on one large piece of felt/ cardboard.
2. Draw a line around (staying within one centimeter of) the edges of all of the shapes.
3. Cut along this line, discarding the material outside the line.
4. Place shape on new piece of felt/cardboard.
5. Follow steps 5-10 in Generating Increasing Topography
Combing Topography Examples
Combing Topographies 2 -
This activity is an alternative method for combing
topographies that requires two partners. It shows
students how two people can arrive at different places
via the same process.
Materials: Same as Generating Topography Activities
1. Break students up into groups of two
2. Have each group either choose one pre-existing organic/abstract shape, or make a new one together.
3. For each group of two, have both students follow the direction for Generating Decreasing Topography activity using the same shape except flipped the other way (reflected).
4. Since each student used the same shape but reflected, the bottom layers of both of the students' resulting topographies should line up perfectly.
5. Have both students glue their topographies together by
reflecting the bottom layers.
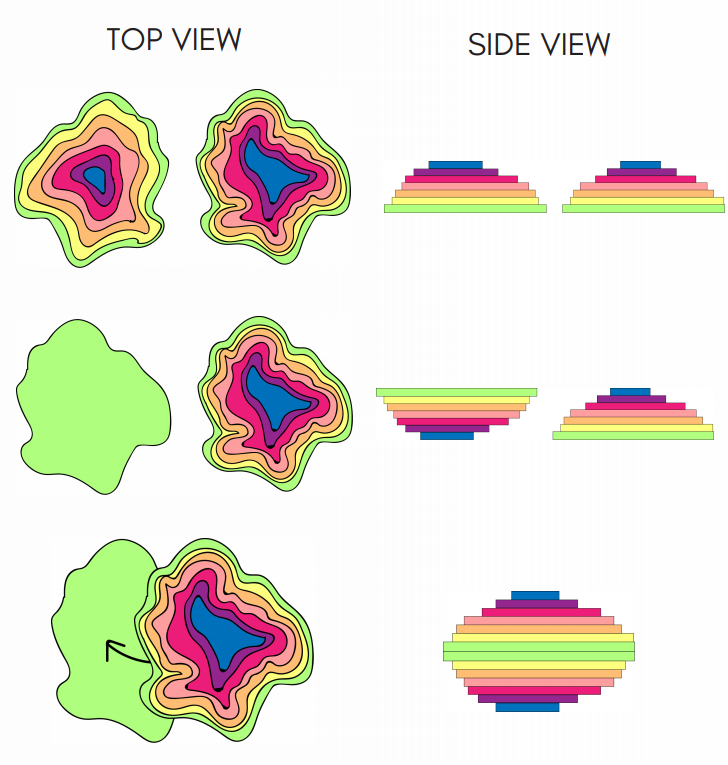
Top and Side Views
Combining Topographies 3 - This activity is an alternative method for combing
topographies that can have any number of partners. It
shows students can combine the products of different
processes if they use include an identical feature within
their process.
Materials: Same as Generating Topography Activities
1. Break students up into groups.
2. Have each student create a medium sized organic/ abstract shape.
3. Have the students overlap the edges of their shapes together and draw straight lines where they intersect.
4. Cut off the portions that overlapped.
5. Have each student complete the Generating Decreasing Topography activity with their shapes, with the exception that for step 7 - only for the straight edges - draw the line on top of rather than within the previous shape.
6. The students should be able to connect their
topographies based at the flat sections which result
from the straight edges.
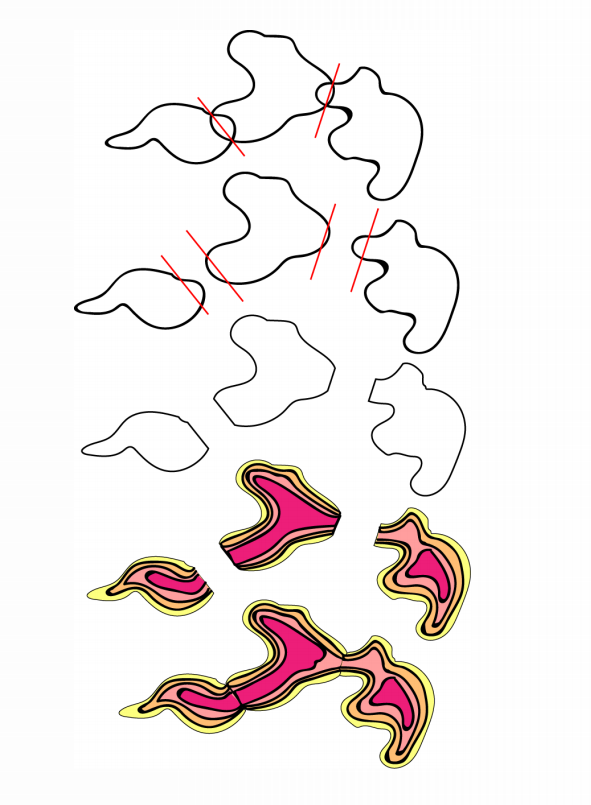
Combing Topographies 3
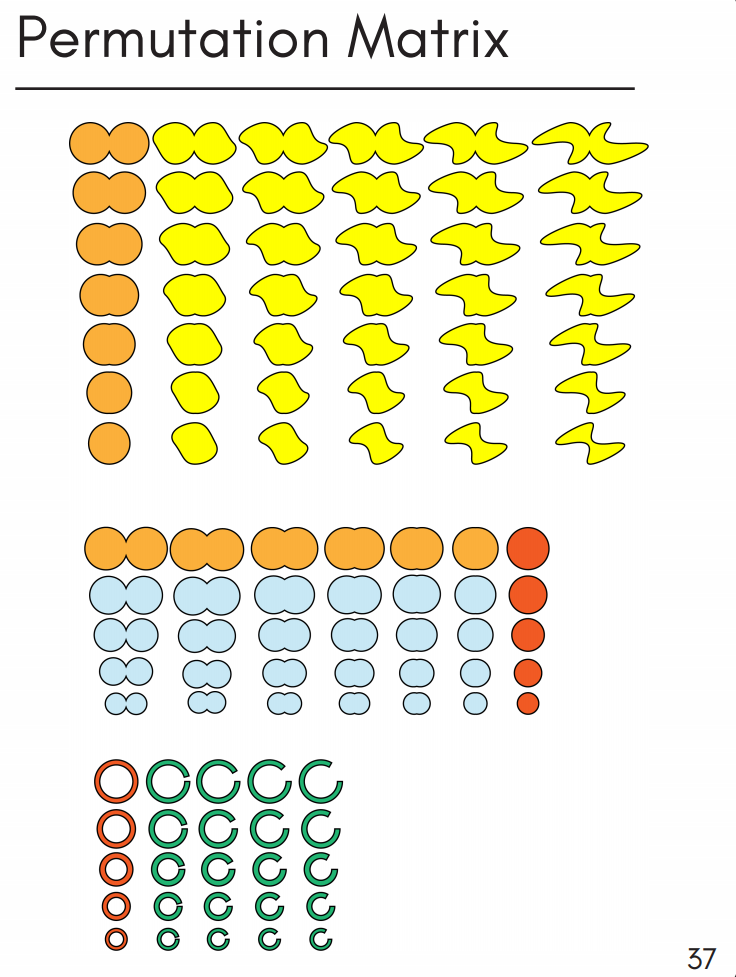
Using Permutation Matrices - The concepts of matrices are fundamental to many Computer Science and Mathematics topics. They can also be used for concepts such as generative design. The matrices I have created for use in this program consist of shapes which undergo small permutations or changes for each direction in the matrix. The permutations can be thought of as a result of a sort of algorithm where each shape is an aggregate (or combination) of the shapes around it.
Where this applies to topography is that when these shapes are stacked on top of each other, they create 3D objects that change subtly enough for a continuous surface yet dynamically enough for incredibly interesting abstract sculptures to form.
The permutation matrices enable students to create
abstract sculptures through algorithmic processes and
parameterized challenges.
Using Permutation Matrix How to use a permutation matrix:
1. Begin on any shape
2. Using any set of rules for movement - rolling the dice or solving math problems for example, move either up, down, left or right one space
3. Cut out shape at space and add it to the stack.
4. Repeat 2 & 3 as many times as desired
5. Using page(37) as reference, students may move to
different matrices if they have over lapping shapes
(designated by the same color).
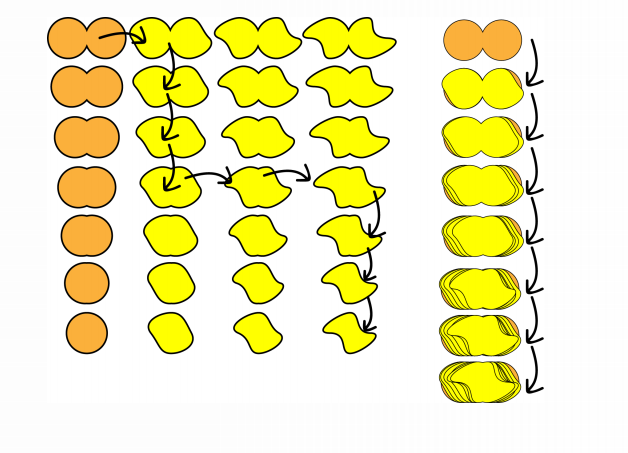
Permutation Matrices Examples
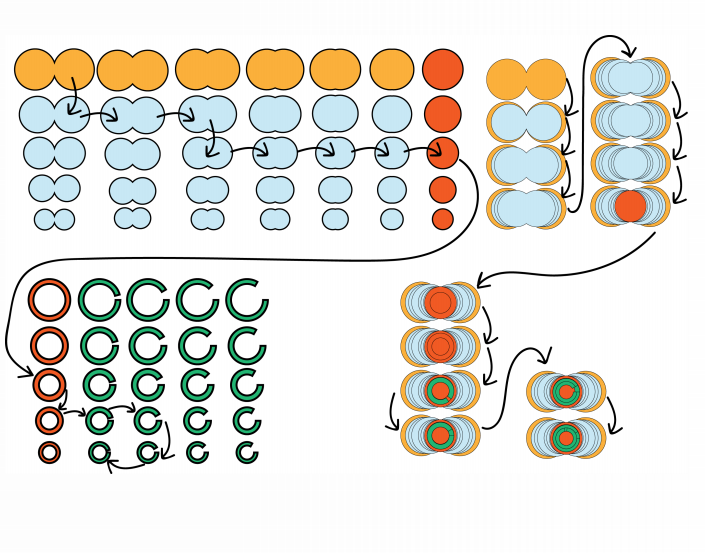
Permutation Matrix Examples 2
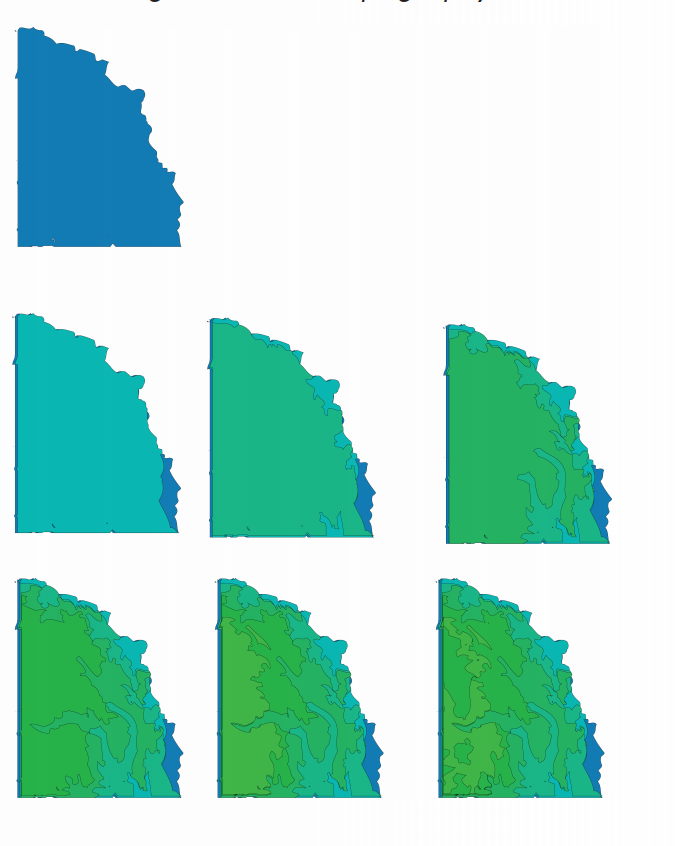
Recreating Nebraska's Topography - This project allows groups of students to create sections of Nebraska's topography one layer at a time. Once the groups finish their sections, they can combine them to create the entire state. This complete map can be used for various lessons on geography and state history.
There can be a lot of variation in how this activity is completed. I have generated each layer of Nebraska's topography, which are included in this program.
1. Break students up into 8 groups and assign one section per group, or break them up into 4 groups and assign two sections per group.
2. Have the students cut out each layer of their assigned topography by:
a. Tracing them from an overhead projector, with which the size can be changed more easily.
b. Or cutting out and tracing the topographies
from individual handouts
3. Each group must stack their given section in the proper order. In addition, as the sections move west they will have more square section representing lower elevations below. These are represented by colored boxes at the top of each section
4. Students will put their sections together to create the entire state. This can be glue together and put on a wall/ board or displayed flat.
Additional notes/tips
• The layers are color coded with blue, green, yellow, red representing lowest to highest elevation respectively. The instructor may have the students use whichever colors they want, but it may be easier to keep track of layers and learn about geography with color coding.
• Some of the layers are quite complex. They may be simplified when they are copied as long as the scale is consistent throughout.
• It would be helpful to calculate the total size ahead of
time before the scale of each section is decided.
Nebraska Topography Example
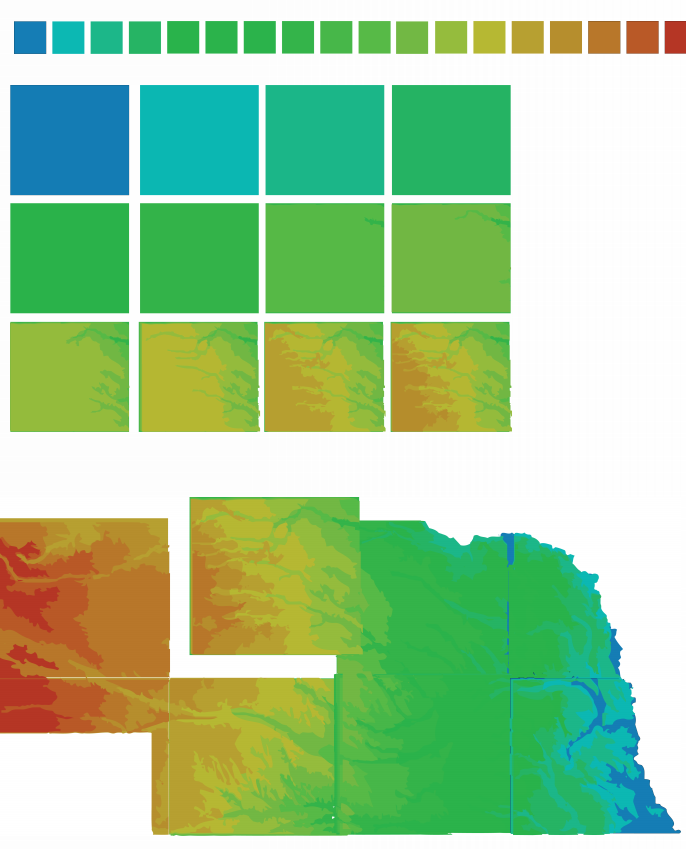
Nebraska's Topography 2
Additional Ideas - Here are some ideas I've had that could expand on the activities listed and connect them to other areas:
• A pyramid can be made by stacking squares of decreasing size.
• Prisms can be made by stacking duplicate shapes.
• Lessons with volume and area can utilized layeredtopography.
• A sphere is simply different sized slices of circles stacked upon each other (defined by the equation for a circle of course).
• Tessellations can be made more interesting by adding a 3D element
• Shapes can be stacked to create buildings and/or parts of buildings. For example a temple could be a series of cylinders (stacked circles) with a large semisphere (stacked decreasing circles) on top.
• A city plan can be map by stacking many different small rectangles and squares on a map.
• Challenge students to create 3D objects such as staircases and tables and combine them into one model or diorama.
• Give students free creative range after main
activities have been taught.
For reference during activities - These sheets may be useful to hand out to
the students in order to supplement their
understanding of the various activities and
challenges.
Topography Challenge

Topography Challenge 2
Topography Challenge 3
Topography Challenge 4
Topography Challenge 6
Topography Challenge 5

Topography Challenge 7
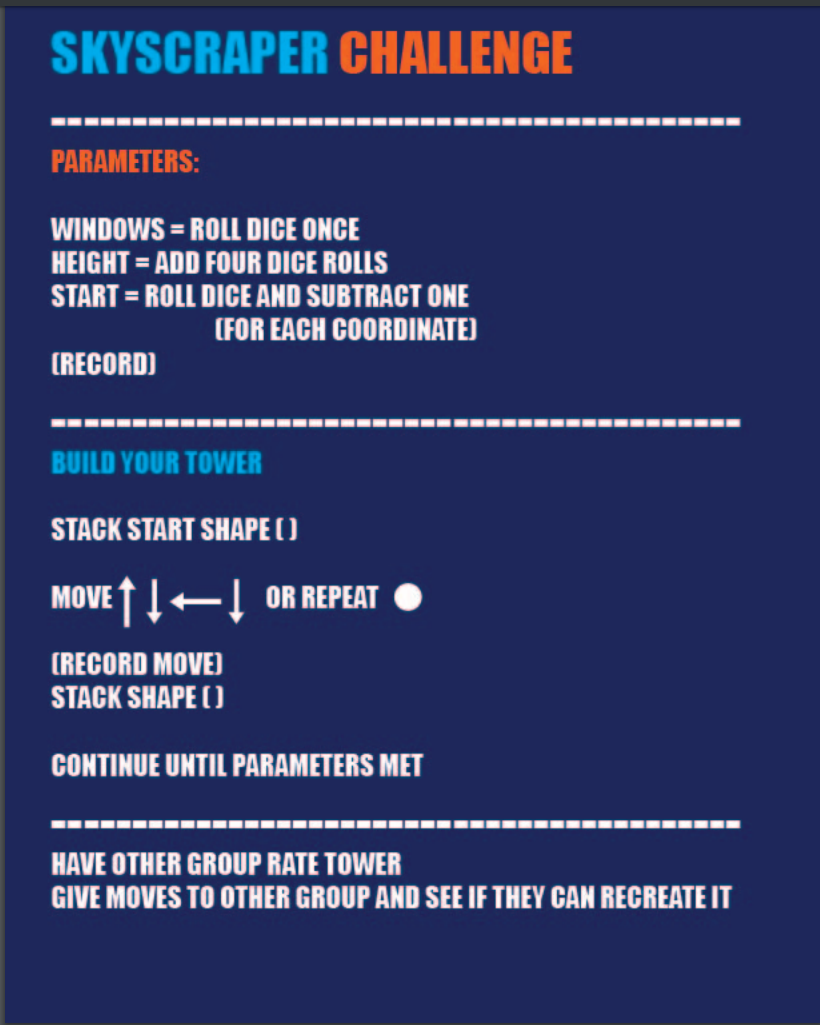
Skyscraper Challenge
Topography Page 37
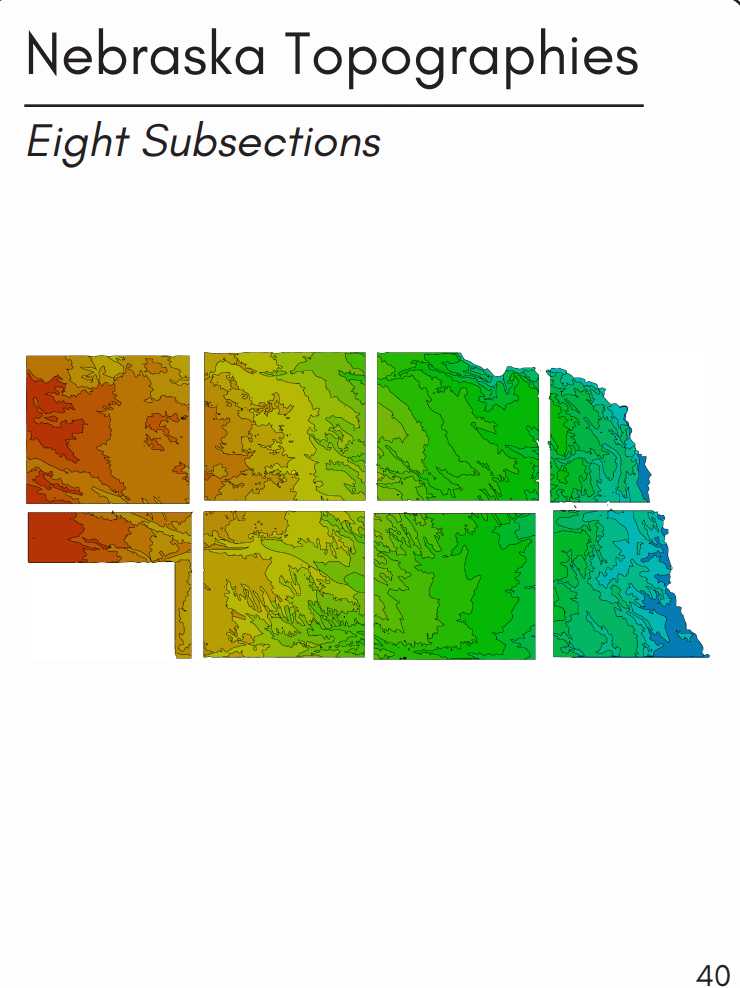
Eight Subsections of Nebraska
**The remaining images of the subsections can be found in the PDF which is shared at the beginning of this lesson.
Contact and Online Resources -Thank you for taking interest in the Topography Innovation
Expanded Learning Opportunity! I hope this program
continues to develop and grow in the future. If you found
this material helpful and fun for your students, feel free to
share it with other educators.
If you have any questions or suggestions, please email me, Dana Hoppe, at danafhoppe@gmail.com
"The greater danger for most of us lies not in setting our aim
too high and falling short; but in setting our aim too low, and
achieving our mark." - Michelangelo