Learn Easy Steps: Participant Guide
Learn: Easy Steps
Participant Guide
Orientation
Welcome
Welcome to Learn Easy Steps. This course provides introductory materials to help learners, who are new to technology, become familiar with the use of computing devices, productivity tools, and the Internet. Through guided exploration, you can learn to use technology in your personal and professional life.
Course Overview
The Easy Steps course is modular and includes five core modules focused on essential technology and computer skills. In the core course, you will:
- Learn basic computer skills to build foundational knowledge about device use.
- Explore productivity tools to help manage data, create documents, and display multimedia.
- Learn about the Internet and explore the use of email and online communication tools.
- Learn strategies for staying safe online.
- Explore ways to use social media for communication and building online communities.
Optional modules offer additional opportunities to explore the use of technology in your professional life.
Activity Cards
Activity Cards were included in the original course, offering step-by-step directions for activities related to the content presented in the course. In 2018, 15 activity cards were converted to OER and can be found at www.k12blueprint.com/publications/easy-steps.
Core Modules
The core modules of the course are structured to give you background information on the concepts, opportunities to try out tools through guided practice, a chance to apply your new skills, and time to share and reflect on your learning. Each module includes two to five lessons. Most lessons have three parts:
Learn: An overview of the content for that lesson, which includes an introduction to the terms used in the lesson.
Practice: One to three activities that are step-by-step experiences designed to give you a guided introduction to the tools that are presented.
Apply: Suggested activities for going further with the skills developed and applying them to something new.
In addition, each module includes a Share and Reflect section. This is an opportunity for you to share your work and discuss your progress. A checklist of skills is included for self-assessment at the end of each module. While the course is designed to be device agnostic, it does focus on laptop and desktop computers, although many of the directions and activities can also apply to tablets and phones. The course materials are designed to be operating system agnostic; however, when needed, the default is Windows* 8.1, using Microsoft Office* 2013. If you are using other operating systems or applications, you can still use this course.
This course is designed to provide you with many options for accessing and understanding how to use technology. It is meant to be a well-supported introductory experience to the world of computers and the Internet.
Module 1: Introduction to Computers
Module 1 guides you through many hands-on experiences to explore and discover basic uses of computing devices. In this module, you will:
- Understand the different physical parts of computers.
- Learn and practice the basic operations of computers.
- Develop skills to save and store on computers.
Module 2: Productivity Tools
Module 2 explores how to use productivity tools on a computer to create documents, organize data in spreadsheets, and present multimedia slideshows. In this module, you will:
- Develop basic skills for word processing by creating a flyer.
- Learn how to create spreadsheets to organize and store data.
- Explore multimedia tools that allow you to present information in a slide show.
Module 3: The Internet, Email, and Communicating Online
Module 3 explores how to use the Internet effectively to search for information, to communicate, and to connect with others around the world. In this module, you will:
- Develop Internet skills by conducting an information search.
- Learn how to create an email account and send or reply to emails.
- Explore online communication tools that allow you to connect with family, friends, and professionals through video and instant messaging.
Module 4: Keeping Safe Online
Module 4 explores basic information about keeping safe online. In this module, you will:
- Learn how to create a safe, strong password to protect personal information.
- Explore your digital footprint, or the bits of information users leave behind as they interact with the Web.
- Develop skills in recognizing some common online scams and threats, and learn to prevent identity theft.
Module 5: Social Media
Module 5 explores the social and community-building features of the Internet. In this module, you will:
- Explore the features of social networks and engage in setting up your own online profile.
- Learn about media sharing sites while viewing and uploading videos to the Internet.
- Explore safety guidelines for protecting yourself on social media sites.
Optional Module: Exploring Entrepreneurship
This optional module explores the use of computer applications in designing a business. In this module, you will:
- Generate some ideas for your business and think about how your business will meet your goals and help your community.
- Begin to write and organize a business plan that you can use to clarify your thinking and communicate with people who can help you make your business a success.
- Learn how to improve your work by giving and getting feedback on your ideas using a word processing application.
Optional Module: Market Your Business
This optional module explores how to use technologies to market and communicate about your business. In this module, you will:
- Use word processing templates to create a logo and brand for your business.
- Use presentation software to create materials for face-to-face and online marketing.
- Use online forms for getting customer feedback.
Optional Module: Money Management
This optional module explores tools for personal and business-related money management. In this module, you will:
- Learn how to use data validation lists.
- Track your income and expenses.
- Develop a cash flow for your sales.
Overview
Computers have become an important part of everyday life in today’s world. We use computers in many forms, whether in a traditional computer that sits on a desk, or a handheld tablet you carry in your bag, they are each powerful computers. Since the size and shape and use are so variable, these are now all generally referred to as computing devices, digital devices, or simply devices. Many people use computing devices to keep records, do calculations, search information, store pictures and music, play games, and communicate with others.
Many people who sit down with a computing device for the first time are unfamiliar with its parts and how to make it work. Module 1 is designed to help you develop new skills, which will enable you to use computers specifically, to communicate; solve problems; and research, collect, organize, and share information. Module 1 guides you through many hands-on experiences to explore and discover basic uses of computing devices. In this module you will:
- Understand the different physical parts of computers.
- Learn and practice the basic operations of computers.
- Develop skills to save and store on computers.
Getting Started
There are many types of computing devices. The parts they all have in common are hardware (the machine and other physical parts), an operating system (the programming that tells the device how to work), and applications (the programming that allows you to perform tasks such as writing a letter). Module 1 introduces you to those three elements.
In the past, the size of the device determined how fast it was or how many tasks it could perform, but today that is not necessarily true. Here is how computing devices developed.
- Desktop Computers: Desktop computers have three or more mechanical parts, which makes them more likely to be used only in one location such as a desk. They are typically very powerful and fast, and have the option to add more components, such as speakers and external storage.
- Laptop Computers: Laptop computers were developed as a way to have the speed and computing power of a desktop model in a device that could be portable.
- Tablets: Tablets were developed after laptop computers as even more easily portable devices. Tablets have touch screens, meaning you can give tablets commands using your fingertips.
- Mobile Phones: Mobile Phones have become increasingly popular as a portable way to carry some computing power. Although the smaller screen can be limiting, many mobile phones can now perform many of the same functions of desktop computers.
Lesson 1: Computer Hardware
Learn
A computer is an assembly of many electronic parts working together. Before you begin using a computer, become familiar with some terms that describe the basic parts of the hardware.
Desktop Computer

Laptop Computer

Central Processing Unit (CPU)
The CPU is the processing (thinking) part of the computer, like the computer’s brain. In a desktop computer, the CPU is usually in a separate rectangular box (called the tower) placed on or underneath your computer desk. In a laptop, tablet, or phone, the CPU is built into the body with the keyboard or it is built into the screen.
Monitor or Screen
The monitor displays the information from the CPU; it is similar to a television. On a laptop, tablet, or phone, the monitor is built into the device and is called the screen. On some laptops you can remove the screen and use it separately from the keyboard.
Keyboard
The keyboard is what allows you to type; it has keys for letters and numbers, as well as special keys. It is used to type and give commands to the computer.
Mouse
The mouse is a small handheld device that is attached to the computer. It controls the pointer on the screen and allows you to give commands to the computer. A mouse usually has two buttons: a primary button (usually the left button) and a secondary button (the right button). A mouse can also have a wheel between the two buttons, which allows you to move smoothly through screens of information.
Trackpad
A laptop computer may have a trackpad, which functions like the mouse. The trackpad enables you use your fingers to perform the functions that the right and left buttons on the mouse allow. An external mouse can also be attached to a laptop.
Disk Drive
In a desktop computer, the disk drive is usually located on the front of the tower. In a laptop, the disk drive is usually located on the side of the computer. The disk drive is used to “read” information from or “write” information to CDs or DVDs. These disks are used to store information for or from the computer. Not all computers have a disk drive.

Port
All devices have some number of ports, which could be located on the front, side, or back of the device. Ports are used to plug in additional elements such as audio speakers or a larger monitor, or for inserting a flash drive, which is a small device that can be used to store your data. A computer typically has many different types of ports for plugging in different items. On a laptop, one of these ports is for charging the internal battery.

Explore the Keyboard
The keyboard is the main way to enter information into a computer. Different types of keyboards are available, but all the keys on every keyboard can be divided into several groups based on their functions.

- Control keys: Control keys are used alone or in combination with other keys to perform certain actions. The most frequently used control keys are labeled as CTRL (Control), ALT (Alternate), the Windows logo key (Desktop/Start), and ESC (Escape).
- Function keys: The twelve function keys are used to perform specific tasks. They are labeled F1 to F12. The functionality of these keys differs from program to program.
- Numeric keypad: The numeric keypad, usually located on the right-hand side of the keyboard, can be used to enter numbers quickly. The keys are grouped together in a block like a conventional calculator or adding machine. Note that if your keyboard does not have a keypad, you can key in numbers using the character keys.
- Character keys: Character keys are used to type letters, numbers, punctuation marks, and symbols just like a typewriter.
Other keys are used for writing uppercase letters, indenting text, and making a new paragraph.
- Shift: Press in combination with a letter key to type an uppercase letter. Press in combination with a number key to type the alternate symbol for that key, typically shown on the upper part of the key.
- Caps lock: Press once to type all letters as uppercase. Press again to turn this function off Tab: Press to move the cursor several spaces forward or to the next box on a form or table.
- Enter: Press to move the cursor to the beginning of the next line.
- Space bar: Press to move the cursor one space forward.
Navigation Keys
The navigation keys allow you to move the cursor, move around in documents and web pages, and edit text.
- Left, Right, Up, Down: Press to move in the direction of the arrow.
- Home: Press to move the cursor to the beginning of a line.
- End: Press to move the cursor to the end of a line.
- Delete: Press to move the cursor forward, deleting each character as it progresses.
- Backspace: Press to move the cursor backward, deleting each character as it moves.
- Desktop/Start: Press to change the screen between the home desktop and the Start menu.
Practice
Activity 1: Explore the Computer
Here you will increase your understanding by reviewing the parts and functions of a desktop or laptop computer. Work with a partner to identify and discuss each of the following items:
Are you working on a desktop or laptop computer?
Identify each of the following items on your computer and describe what they do:
- Keyboard
- Monitor or screen
- Mouse or trackpad
- CD/DVD drive
- Ports
Examine your keyboard to find each of the following:
- Navigation keys
- Character keys
- Function keys
- Control keys
- Numeric keypad
Apply
Let’s see what you know about computers. Discuss the questions below with your classmates:
- Have you seen a computer before? Which types have you seen?
- What do you think a computer can be used for?
- Have you used a computer before? If so, what have you used it for?
- Do you know what an application is? If so, can you name some applications? Which applications have you used before?
- What do you plan on doing with your new skills?
- What questions do you have about computers?
Lesson 2: Computer Operating Systems and Applications
Each computing device works a little differently, and getting started will be specific to the device you are using. This section focuses on using desktop and laptop computers, but many of the steps will also work on tablets or phones.
Learn
The Operating System
Whenever you turn on a computer, the operating system is activated. The operating system (also called the OS) controls many of the computer’s basic functions, such as recognizing the input from the keyboard and mouse, sending a signal to the monitor, and organizing and managing files and folders.
There are different types of operating systems for desktop and laptop computers. Some computers have their OS inside the CPU. Some examples of this are Microsoft Windows OS*, Linux, and Mac OS*.
Some computers have an OS that is actually stored on the World Wide Web. Some examples of this are Google Chrome OS*, TransOS* and JoliCloud OS*. These are called cloud-based operating systems.
All operating systems have standard elements.
Desktop
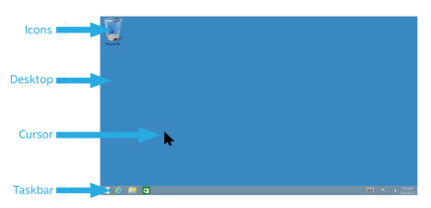
After you turn on a desktop or laptop computer, the monitor displays a main image on the screen. This is called the desktop. The desktop is so named because it functions like a “virtual” desk workspace; it has space to work and file documents and it is the location of various tools to help you complete your tasks. Note that on some computers you may first see the start screen instead of the desktop. If this happens, press the Desktop/Start key on your keyboard, which toggles (changes back and forth) between the start screen and the desktop.
Cursor
When you first turn on your desktop or laptop computer, an arrow appears on your screen; this is called the cursor. The location of the cursor is controlled by your mouse or trackpad. The cursor indicates where your words or numbers will appear when you begin typing. When you are performing certain commands you may notice that the arrow becomes a vertical blinking line, or a double-headed arrow.
Icons
Icons are small pictures that represent some of the actions or tasks you can perform on a computer. Other icons represent places where files can be stored. Icons provide an easy way to open the programs or files you use on a daily basis.
Taskbar
The colored stripe across the bottom of the desktop is the taskbar. When you first turn on your computer, notice that the bar has some icons. You can also add items to the taskbar (called pinning to the taskbar).
Start Screen (or Start Menu)
The start screen or start menu is the place to access many features of the OS, such as email, Internet, contacts, and documents.
You can access the start screen/menu by clicking on the icon in the bottom left corner of your screen.
Depending on what OS you are using, the start screen/menu will look very different, but it generally contains the same information.


The start screen/menu gives you access to applications on your computer. Applications are programs that tell your computer how to handle information, such as writing a document or making an accounting spreadsheet.
Some desktop and laptop computer operating systems allow you to access your applications in list form and are in the start screen/menu under “All Programs.”
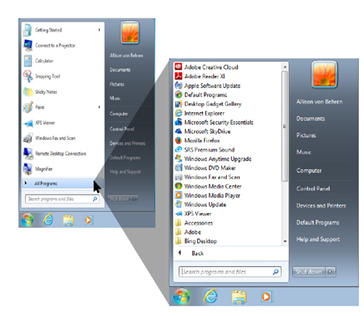
Other desktop and laptop operating systems lay out all the applications as visual tiles and also give you lists to choose from. To get to the list of applications from the start screen/menu, click the arrow on the bottom left corner of the screen.

Window
This is the generic term for any open workspace on your computer. When you are working inside an application it may open a new window that is a document. If you are working on the Internet you may open a new window that is a new web page.
No matter what kind of work you are doing on a computer, there are specific actions that you need to learn.
Hover
This is an action you perform with your mouse or trackpad. It involves moving the cursor to an icon or other element and holding it steady for a few moments. Hovering over an icon usually makes a label appear, telling you what command the icon stands for.
Click, Single Click, or Double Click
When you work with a mouse or trackpad, the action you take to implement a command is called a click. When you click the mouse, it tells your computer where you want to work by placing the cursor in that location. Some commands require you to click once (single click) and others require you click twice in quick succession (double click).
Right Click, Left Click
Your mouse probably has two buttons: one on the right and one on the left. The same is true for many trackpads. Clicking on the right button initiates one activity and clicking on the left usually initiates a different activity. Usually the left button (left click) is used for most commands, and the right button (right click) is used for less-common commands.
Tap and Double Tap
Some trackpads do not have buttons and instead you tap on the pad to simulate the click. Some pads are set up so that a single tap works like a single click on a mouse and a double tap works like a double click on a mouse. Each trackpad is set up differently, so you will need to adjust to the commands on each computer.
Click and Drag
When you want to select a portion of text or other content, you can click and drag. This action is done with the mouse or trackpad and involves holding down the button and moving the mouse at the same time. You will see the selection highlighted as you click and drag across it.
Scroll
Scrolling moves the image on your computer either from top to bottom (scroll up, scroll down) or from side to side (scroll left, scroll right). If your mouse has a wheel between the two buttons, the wheel lets you scroll up and down. If you have a trackpad, you can usually scroll by gesturing with your finger(s).
Using Applications
In addition to your OS, your desktop or laptop computer uses applications to perform certain functions. Applications are packages of computer programming language that tell your computer how to organize, display, and work with information. Some applications are specifically for handling text information and others are more for handling numbers or graphics. Each application has different properties and purposes.
Most operating systems come with some applications pre-installed. These usually include an email program (for sending messages), a simple text editor (for writing simple documents), and a web browser (the way to access the Internet).
Practice
Activity 1: Explore the Operating System
- Hold the mouse gently with your index finger resting on the left button and your thumb resting on the side.
- Move the mouse by sliding it slowly in any direction. Notice that as you move the mouse, the cursor on your screen moves in the same direction.
- Click the Start icon in the bottom left corner. What happens? (Remember to use the left click, unless a right click is called for specifically.)
- Click it again and you can toggle back and forth from your Desktop to your Start Screen. Try the same thing with the Desktop key on the keyboard. How do using the Start icon and the Desktop/Start key compare?
- Hover over a desktop icon. What happens?
- Click any desktop icon. What happens to the desktop icon? Is it different for each icon if you single click or double click? What happens if you right click those same icons?
- If you see a box open and it has a red X in the top right corner, click it and see what happens.
- Right click in an empty area of the desktop. What happens?
- Click and Drag any desktop icon to an empty area of the desktop.
- Click and Drag any taskbar icon to another position on the taskbar.
Activity 2: Working in an Application
Opening the Application
This activity will help you open and work inside an application.
- Using your mouse, move your cursor over to the Start icon on the taskbar.
- Once your start screen opens, move your cursor off of the taskbar and onto the start screen. You should see a white arrow icon appear.
- Clicking on this arrow brings up your list of applications. Use your navigation keys (Up, Down, Left, Right) until you find the application named Notepad. Note that while the applications are listed in alphabetical order, there may be more than one list and the alphabetizing will start over. If you keep moving to the right, you will keep revealing more lists. Look for the subheading Windows Accessories and you will find it there.
- Notice the bar across the bottom of the screen with a small rectangle inside it. This is called the scroll bar. Click and drag the small rectangle and see what happens.
- Click the name of the application (Notepad) and notice what happens.
- Notice that Notepad has opened in a new window. This window is on the top of the desktop. Find the Notepad icon on the taskbar.

Managing Application Windows
The title bar at the top of the application window shows the name of the application, for example, Untitled—Notepad. There are also icons across the top of the window for Minimize (making the window smaller), Maximize (make the window larger), and Close (to close the window). The taskbar at the bottom of the desktop displays the icon for the application that is currently open.

- Click the Minimize button at the top right corner of the Notepad window. What happens to the window? Click the Notepad icon on the taskbar and see what happens.
- Click the Notepad icon on the taskbar at the bottom of the desktop. What happens if you click the icon a few times? When an application window disappears but the icon remains, the application is still open and available, but it has just been minimized to allow you to work on other things. You can easily re-open the window with the icon.
- Click the Maximize window at the top right corner of the Notepad window. What happens to the window? Click it again.
- Click the Close button at the top right corner of the Notepad window. You have now closed the application. What happens to the window? Also, notice the change in the taskbar.
Practice Using Character Keys
- Using the steps described above, re-open the Notepad application.
- If your cursor is not already blinking in the top left corner, click your mouse or space bar to make it appear.
- Type your first name using the character keys of the keyboard. Press the Shift key in combination with the first letter of your first name to type an uppercase letter (e.g., Melinda).
- Press the Spacebar to move the cursor one space forward.
- Type your last name using the character keys. Press the Shift key in combination with the first letter of your last name to type an uppercase letter (e.g., Leonard).
- Press the Enter key to move the cursor to the beginning of the next line.
- Type your address in two or three lines. If you have a numeric keypad, try using the keypad for some of your address, and use the numeric keys for others.
Practice Navigation
- Place the cursor after the last letter of your name and press the Backspace key to delete the letter behind the cursor.
- Place the cursor in front of the first letter of your name and press the Delete key to delete the letter after the cursor. (Note that not all keyboards have a Delete key, and so you will need to place your cursor to use the Backspace key instead.)
- Place your cursor after the last letter of your name and press the Enter key. What happens?
- Place your cursor in front of your first line of text. Click the Down navigation key. What happens? Click the Up, Right, and Left navigation keys and see what happens.
- Click the Home key to return to the beginning of a line. Click the End key and see what happens.
- Continue to press the Enter key until your cursor reaches the bottom of the window. Now press it one more time. What happens to your name at the top of the page? It has not been erased, it has just scrolled upward off the top of the page. Press the Backspace key two to three times, which will delete some of the Enter commands, and the page will scroll back down to reveal your name.
- Press the Enter key again, until your name scrolls off the page. Notice the vertical scroll bar along the right side of the Notepad window. This scroll bar appeared because there is more to the window than can be seen all at one time.
- Find the small rectangle inside the scroll bar. This is the icon for scrolling. Use your mouse to click and drag the scroll bar up and down. What happens to the text in the Notepad window?

Apply
Type the following sentences. This will help you gain practice with the keyboard. Make note of the uppercase, lowercase, and special characters. Remember you will need to use the Shift key in order to access the characters on the top of the typing keys.
- The Quick Brown Fox Jumps Over The Lazy Dog!
- tHe fivE boXing wizArds jumP quiCkly!
- I have €500 in my Pocket; how much is it in US Dollars?
- The interest is @ 13% /Annum.
- 651 > (234 +97 - 36) & 3 < (2*2). (2+3+8 -3) = (2*5).
- He said, “Hello, my name is Dean Harris.”
- #Names: ‘Blue_Star’, {Flower}, [Square], ^Pup^.
- What is the difference between /,| and \?
Type a paragraph about yourself using the template below.
My name is [insert your name]. I live in [insert where you live]. I like to [insert at least three activities you enjoy]. My favorite music is [insert your choice]. If I could travel to visit anywhere, I would choose [insert your choice].
When you are done, share your work with a classmate.
Lesson 3: Saving and Storing Information
All computers have ways to save and store data, including music, addresses, photos, and other things. In this lesson, you will learn a few more basic operations to help you organize your work on most desktop and laptop computers. If you are working with a different device, the steps may have some similarities.
Learn
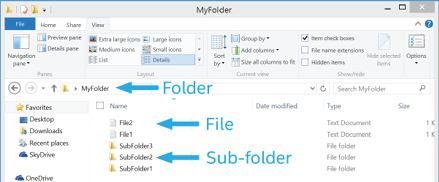
Just as you may want to save documents or letters you create freehand, you may want to save and store things that you create on the computer. You can do this by creating a folder. A folder is like an electronic filing cabinet, where you can store and organize your materials. All the materials you create for this course will be placed in specific folders to find easily. Saving materials means that you have stored that information and can view or revise it again, as often as you like.
Inside each folder you can store files—a generic term for individual items that are created in different applications. You can also create sub-folders inside your main folder, to help you organize your files. For example, you may want to create a sub-folder for each month of the year to collect your business information to reference later. Or you can make sub-folders for each of your different classes or family members.
Here are some of the terms you will use in this lesson.
Menus
As you look across the top of your open application window, you see a list of words: File, Edit, View, etc. Each of these words is actually a menu, which offers many other commands.
Drop Down
Drop Down indicates a menu command. When you select a menu, a box will drop down (open) with a list of choices.

Dialog Box
A dialog box is the way for the computer to ask you for or give more information. Dialog boxes appear when you give certain commands and the computer needs further direction. For example, when you tell the computer to print, the computer will ask you how many copies you would like.

Dialog boxes may also occur if you asked the computer to do something and it cannot complete the action. For example, when you tell the computer to turn off, it may respond with a dialog box warning you that you will lose the work you have been doing unless you save it.

Practice
Activity 1: Create a Folder
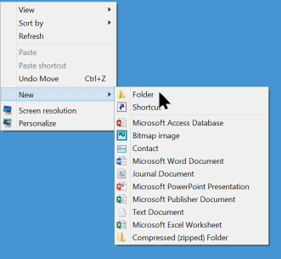
- Right click in the middle of the desktop, and you should see a dialog box. Select New, which opens another dialog box. Select Folder to create a new folder.
- Notice that a new folder icon appears on your desktop. It has a name underneath it: New Folder.
- You will see the folder name highlighted under the folder icon. Name your folder by typing your first name, and then your last name (e.g., MelindaLeonard).
- Press Enter. What happens?
- Double click the folder icon and it opens. You will see the name of your folder on the top, and that there is nothing in the folder.

Activity 2: Naming and Saving Files
- Open a new Notepad window and type your name and address.
- Look at the top left corner of your screen and you will see the menu for File. Select this by clicking File. What happens?
- Inside the drop-down menu, select Save As. This is a command you use the first time you save any particular file, because to save it you have to name it. Save As is the command that lets you name the file.
- In the dialogue box you will see the name of the folder you created. Double click that folder to tell the computer that is the location to save the file.
- Inside the Dialog Box, next to the prompt for File Name, enter the name of your Notepad document (e.g., MyAddressInformation).
- Select Enter. Open your folder and see what has changed.


Activity 3: Save Additional Changes
- Return to your Notepad file and type in today’s date.
- Select the File menu and then select Save. This is the command to use when the file already has a name but you have added more information to save permanently to the file.

Activity 4: Moving Files
- Create a new folder on your desktop and name it “Extra Folder.”
- Open the folder and resize it by clicking and dragging one corner of the folder.
- Open your first folder and locate the bar across the top of the folder window. Click onto that bar and drag to move the folder around on your desktop. Move the two folders side by side. If necessary, resize the folders so you can see them both at the same time.
- Click and drag the file you created, moving it from the first folder into your new folder, (named Extra Folder).
- Click the Close button in each window. You should see two folder icons on your desktop.
Activity 5: Turning off the computer
When you are not working on your computer, you may notice that it goes to Sleep Mode. When this happens, the computer is still on, but it has gone into a mode that saves power. Sometimes you will want to power your computer off, which means you need to shut down. Shut down means the process of closing all the open applications and turning the computer (and monitor) off.
- Open your Notepad file titled MyAddressInformation. Add one sentence that describes what you have learned today (e.g., “Today I learned how to use a computer.”).
- Begin the shut down process by clicking on the red X in the upper right corner, for closing the Notepad application. What kind of information does the dialog box present?
- After saving your work, you can continue with the shut down process. Close the Notepad application and then use the Start icon to open your Start screen. In the top right corner, you will see the Power icon.
- Clicking the Power icon gives you a drop-down menu, from which you can select Shut Down.
- Once the CPU has powered down, you can turn off your monitor. Note that if you are working on a laptop, the screen and CPU turn off at the same time.

Apply
Practice all the steps:
- Turn on the computer and monitor.
- Create a folder on the desktop and name it “Test.”
- Open the Notepad application.
- Type a welcome note for two of your classmates. The welcome note must mention the names of the classmates and the sentence “Welcome to the class.”
- Save and name the note “WelcomeClass” in the folder called Test.
- Close Notepad.
- Close the folder.
- Move the file from the Test Folder to your Extra Folder.
- Type a letter to your facilitator describing your progress using the computer keyboard. Type the letter as shown in the sample, and then name and save it to the folder with your name on it.
Dear Instructor,
I am very happy to share with you that I have learned to use a computer and I am amazed at my rapid progress.
I can type letters and numbers, and symbols such as $, &, @, !, and #. I have also learned how to type punctuation such as !, ? and :.
I will keep writing to you as practice and to inform you of my progress. Thank you very much for all your support and encouragement.
Best regards,
[insert your name]
- Click and drag your Test folder and your Extra folder into the folder that has your name on it, making them sub-folders. The folder with your name on it will now be your primary folder for storing all your work in the course.
Share & Reflect
- Think about other possible uses of computers in your day-to-day life. Make a list of what you would like to use computers for in the future. Share the list with your friends and note any additional uses you discuss.
- Pair up with a classmate and, using the terms and definitions in this module, quiz each other by pointing to each of the named items.
Skills Checklist
Read through the checklist to review what you learned.
- I can name the hardware parts of computers.
- I can identify the different parts of the operating system (OS).
- I can turn on and shut down a laptop or desktop computer.
- I know how to move the cursor using the mouse or trackpad.
- I know how to move the cursor using navigation keys.
- I can open the Notepad application.
- I can scroll in a window.
- I can name and save files.
- I can save new changes to files.
- I can make and name folders.
- I can move files and folders to organize them.
Module 2: Productivity Tools
Overview
Think about typical tasks in your personal or professional life. How do you store and organize information? How do you communicate information to others? This could be information about an upcoming community event, a letter to a friend, or you might be presenting business data to your work colleagues. Many of the tasks you want to complete can be accomplished effectively and efficiently using a variety of productivity tools on your computer.
Module 2 explores how to use productivity tools on your computer to create documents, organize data in spreadsheets, and present multimedia slideshows. In this module you will:
- Develop basic skills for word processing by creating a flyer.
- Learn how to create spreadsheets to organize and store data.
- Explore multimedia tools that allow you to present information in a slide show.
This module is divided into three lessons:
- Lesson 1: Word Processing
- Lesson 2: Spreadsheets
- Lesson 3: Multimedia Presentations
Getting Started
Creating electronic documents, spreadsheets, and multimedia presentations all require applications: tools that allow you to create, edit, and save a final product on your computer. Many application functions, such as typing words or changing colors, are available in most applications. But each application also has unique features that can perform specific tasks, such as performing a mathematical calculation on a large set of numbers or arranging a set of images. Choosing the right application for your task will make completing the task much easier.
Before you begin learning about productivity tools, it is helpful to understand the basic differences between these tools and their unique features.
Word Processing
Word processing allows you to use technology to write, reorganize ideas, easily make changes to your writing, and print or email your work to share with others.
Potential Use: Word processing can be used for writing letters, essays, reports, and résumés, and for creating marketing materials such as flyers and posters.
Spreadsheets
Spreadsheets allow you to efficiently organize and manage information. Spreadsheets use tables, mathematical formulas, and charts to help visualize and analyze different types of data.
Potential Use: Spreadsheets can be used for budgets, business expenses, inventory, contact information, bill payments, shopping lists, event schedules, and project timelines.
Multimedia Presentations
Multimedia presentations allow you to effectively communicate a message to an audience through pictures, diagrams, video, and sound.
Potential Use: Multimedia presentations can be used for business projects, community events, product marketing, sharing photos, teaching, or making public service announcements.
Productivity applications can be either computer based or cloud based. Computer-based applications are generally called software (compared to the hardware that makes up the physical computer) and it means that the programming that talks to the computer operating system is stored inside the computer. Cloud-based applications are sometimes called cloudware, and those are applications in which the programming actually lives on the Internet. To use cloud-based applications, your computer exchanges information with the Internet. This course uses the term “applications” to mean either software or cloudware. Some popular productivity applications are listed below.
Word Processing | |
Microsoft Word | Computer |
Google Docs | Cloud |
Apache Open Office Writer | Computer |
Microsoft Word Perfect | Computer |
Microsoft Office 365 Word | Cloud |
Spreadsheets | |
Microsoft Excel | Computer |
Google Sheets | Cloud |
Apache Open Office Calc | Computer |
Zoho | Cloud |
Microsoft Office 365 Excel | Cloud |
Presentations | |
Microsoft Powerpoint | Computer |
Google Slides | Cloud |
Apache Open Office Impress | Computer |
Microsoft Office 365 PowerPoint | Cloud |
Prezi | Cloud |
Some applications can only be used on desktop or laptop computers, while others are designed for tablets and other mobile devices. Creating documents, spreadsheets, or presentations is more easily done on desktop or laptop computers because the larger screen and keyboard make it easier to work in these applications.
Accessing the Tools
Most productivity applications provide a range of commands that you can access through icons on a toolbar at the top of the screen.
Some general terms that you will encounter when learning about productivity tools are described here:
- Toolbar: The toolbar is the collection of icons, tabs, and information boxes that appear across the top of most productivity applications.
- Icon: An icon is a small picture or button on the toolbar that performs a command, such as Cut or Undo, for example.
- Tab: Tabs are the words you see across the top of the screen, for example, File, Home, or Insert. These tabs contain icons that are organized by topic.
- Scroll bar: The small rectangular button placed inside the longer bar is your scroll bar. This allows you to move the page up or down, allowing you to see more of the item you are working on.
This is an example of a document (a blank page for typing) from the word processing application Microsoft Word. Like most word processing applications, it has icons, tabs, menus, and other ways for you to access the tools in the application. Your application may have a similar toolbar or it may appear very different, but the general use is the same.
Each application’s toolbar will offer you different types of commands, based on the purpose of the application. For example, a spreadsheet application will provide specific commands to add or subtract numbers, but you will not find these commands in a word processing application.

Lesson 1: Word Processing
Writing letters, résumés, and other documents may be essential activities in your personal or professional life. The process of writing usually involves drafting what we want to say, then revising and editing the content, and finally checking spelling and grammar. Unfortunately, many times when writing by hand, we end up rewriting large portions of the work, because of spelling mistakes, or we end up with an untidy document with many notes.
Fortunately, using word processing can make this writing process faster and simpler. You can change words and sentences, move paragraphs, change the size of the letters, and add pictures—all done quickly and easily once you learn how to use word processing tools.
In this lesson, you will explore word processing to create documents and add pictures. You will develop new skills by creating a flyer. These same skills can be used to create other documents, such as invitations, brochures, résumés, and other products that you use in everyday life.
Learn
Word processing is using cloud or computer-based applications in order to create, edit, and print documents.
Most word processing applications allow you to apply changes in three different ways: using the toolbar, using keyboard commands, and using commands in the drop-down menus. The activities in this lesson will show you how to apply changes using the toolbar.
Before you begin word processing, it is useful to understand some basic terms that you may encounter:
Document
Each new sheet that you open in a word processing application is called a document.
Formatting
Productivity tools will allow you to control the size, shape, and color of the text, as well as where it is placed on the page. All of these elements are considered formatting.
Alignment
As you enter text into a word processing document, you can decide where you would like to place the words on the page—to the left, to the right, or in the center. This positioning is the alignment of the text.
Fonts
Fonts are the style of the letters used. Word processing applications can include hundreds of fonts. Using different font styles can make a document have a different emotional quality such as business-like, humorous, casual or exciting.
In addition to choosing the font by name, you can change the size of the font. The size of the font is described as point size, and the larger the point size, the larger the letters will be.
Normal font is a font with no special characteristics applied. Italicized font is the same font, but in a slant (italic) style. Bold font is similar to Normal, but is thicker and heavier.
Row
In a table or grid, the rows run horizontally across the page.
Column
In a table or grid, the columns run vertically up and down the page.
Cells
In a table, the cells are the individual boxes.
Features of word processing applications include:
- Controlling type style, formatting, color, and size
- Checking spelling and grammar
- Inserting and positioning images and diagrams
- Inserting comments or notes while reviewing work
Once you learn the basic steps, word processing is very efficient for writing projects because you can see on the screen—in real time—exactly what your document will look like once it is printed.
Note that many of the techniques you learn for word processing work the same way in spreadsheets and presentations. This includes the steps for changing type size, color, and alignment as well as many other basic tasks.
Practice
Activity 1: Explore Word Processing Basics
One advantage of word processing is that it allows you to handle text quickly, and to make changes in documents easily. In this activity, you will begin to explore basic skills for handling text in a document. Note: This lesson uses Microsoft Word* 2013. Depending on which word processing application you use, your toolbar icons may look slightly different than the ones shown here. In most applications, you can roll your cursor over an icon to view its name or function.
Open and Save a New Document
- To begin, open the word processing application on your computer. This might be accessed on your taskbar or start menu or start screen, depending on your operating system (OS).
- A new blank document will open, similar to a sheet of paper. Note: You may need to select Blank Document to start a new document.
- Begin by typing the following three lines of text: On line 1 type: I am learning to make documents. On line 2 type: Will word processing help me? On line 3 type: Practice makes PERFECT!
- From the toolbar, select the Save icon. You will name your file and choose a location to save it.
Delete and Replace
- Begin by selecting the text you want to replace—in this case the first one of the three lines you have typed.
- Now, start typing some new text—anything you like. Your old text will be deleted and the new text will take its place.
Undo and Redo
- Select the first line of your text.
- Delete and replace that line with the words: A Mistake.
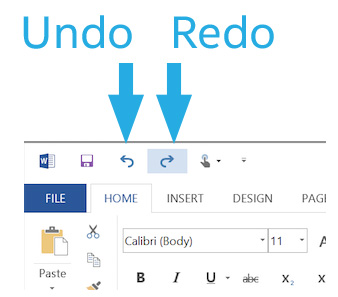
- Look for the Undo icon on the toolbar at the top of the page. It will usually be an arrow pointing to the left.
- When you select this icon, you will go backward step-by-step to your original text. Note: This command will undo only your most recent action, so you can undo one step at a time until you have the text you want.
- Sometimes you may undo more than you mean to, and in that case you can use the Redo icon. Search the toolbar for the Redo icon. It is usually located next to the Undo arrow, and is usually an arrow pointing to the right.
- You will see that your original text is gone, and the words you typed: A Mistake will reappear.
Activity 2: Change Text Formatting
In this activity, you will learn how to control the font size, color, and style in your document. Changing the text formatting can be used to draw attention to certain items, or to make a contrast for the reader.

Change Font Style
- To change the formatting of your text, you must first highlight the text you want to change. Selecting text in this manner will be the first step of all word processing tools, because this is how you determine that only certain text will be affected by your changes. Once the text is selected, you can use the icons on the toolbar to change the properties of the selected text.
- Look at your toolbar for the Font Style icon. Note: The Font Style icon may be a box under the Home tab in the word processing application.
- Select the down arrow or icon to reveal a list of all the fonts that are currently available on your computer. In some cases, the font names will display in the style of each of the different typefaces
- Scroll through the list and select a font different from the font that is currently in use. Notice that the font of your first line is now different than the font style of the next two lines.
Change Font Size
- Select the text you want to change and then look for the Font Size icon on the toolbar. This may just be a box with a number indicating the current size of the font. It is usually located next to the Font Style icon.
- Select this icon or the down arrow will open the Font Size menu.
- Choose a font size by selecting one of the numbers in the list. The larger the number, the bigger your text will appear on the page. Notice that you can use the scroll bar on the side of the box to get to larger sizes of fonts. Consider that you can have more than one font size in a single document by applying this format change to specific words, sentences, or paragraphs.
Change Font Color
- To begin, select the text you want to change.
- Select the Font Color icon in the toolbar. This icon is almost always some version of the letter “A” with a bar or box of color underneath it.
- Select the icon to open a menu of color choices. To choose a new color for your font, select the color you would like to use. Your text now is the color you selected.
Format Fonts
- Select the first line of your text.
- Search your tool bar for the icon for Bold format. This is usually a bolded letter B. Select the icon.
- Since you have not yet clicked on your sheet, you will see your text remains highlighted. Identify the icon for Italics—usually an italicized letter I. Select this and you will see your text is now both bold and italicized. Select the icon for Bold once more, and your text will be italicized but no longer in bold. Note that selecting an icon the first time typically applies a change. Selecting an icon a second time will remove that change.
- Select all the text on your document. Find the icon for Underline in the toolbar—this is most often an uppercase letter U with a line underneath it. Select the icon and note that all of your text is underlined. The text that was italicized remains in that format. Note that you can apply formatting (Bold, Italic, Underline) in any order and any combination.
Highlight Text
- Select a word inside one line of your text.
- Look for the Highlight icon, which will usually be a series of letters with a colored stripe underneath.
Activity 3: Change Text Placement
In this activity, you will explore the tools for quickly and easily changing the location of text in a document.

Copy and Paste Text
- Begin by preparing your document for inserting new text. Place your cursor after the last word on your third line of text. Press the Enter key five times. Your cursor will move down five lines. This is creating an anchor that will give you a place to insert your copied text.
- Next, select the last two lines of your sample text.
- Look at the toolbar to find the Copy icon. Select the icon. You will not see anything change in your document.
- Place the cursor where you would like to paste the text. Go to the Toolbar and select Paste.
- You will see the copied text appear on your screen. Note: when you have text in multiple places on your document, you no longer need to create the anchor. Simply move your cursor to where you want the text to Paste, click once, and then select the Paste icon.
Cut and Paste Text
- Select one line of your text.
- Go to the Toolbar and select Cut. Your text will disappear.
- Place your cursor somewhere else on the page. Select Paste. Your text will appear where you put your cursor.
Change Text Alignment
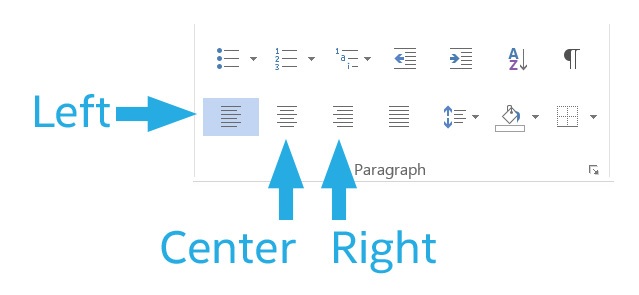
- As with all text tools, begin by selecting the text you want to change. For this activity, select the top block of text on your sheet. Notice that this block is aligned left. This means it is all lined up to the left side of the page. This is usually the normal setting in word processing.
- Now look at your toolbar and locate the icon for text alignment. It will usually be look something like the image below Note: You may see one icon that drops down to give you multiple alignment choices, or it may be three side-by-side icons showing alignment for left, center, and right.
- Select the icon for right alignment. Notice that the text you had highlighted changed its alignment, but the other text on the page did not.
Activity 4: Create a Flyer with Images and Borders
In this activity, you will practice the word processing skills you just learned while creating a flyer with images and a border. Flyers are used by individuals or businesses to inform people about products, events, services, or special offers. Flyers are usually single page leaflets handed out at events or posted on notice boards. They are also called pamphlets.
Imagine the type of flyer you would like to make. Is it for a business you have or would like to have some day? Is it announcing a fun event in your community or at your children’s school? Consider what you would like your flyer to include. Here are some samples of flyers:


Start a Flyer
- Plan out the content and layout of your flyer. Think about the following questions while you plan your flyer: What event announcement would you like to make? Who is the flyer talking to? What would you like to tell them? What are the important contact details, such as address or phone number? What kinds of images would you like to use in your flyer? Each time you open a word processing application, you will get a new blank document, but at times you need an additional blank page for your work. Instead of closing the application and starting over, use this process to open a new document
- Use your mouse or trackpad to open the File menu.
- Select New and then choose Blank Document. A new blank document will appear.
- Save the document to your folder and give it a name.
Add Text to Your Flyer
- Type a title at the top of the page that tells people the name of your event or the name of your business.
- Below the title, type a few words about your event. This could be a slogan or a catchy line.
- Make the text bigger or smaller.
- Change the look of the words.
- Change the alignment of the words.
- Save your work.
Add Pictures to Your Flyer
Now add pictures or graphic images to your flyer.
- Locate pictures or graphic images for your flyer. These may be something you already have, or you can use an Internet search engine to find and download some images. Note: If you are using an image that you have downloaded from the Internet, make sure the image is not copyrighted or properly cite the image’s author.
- Place your cursor on the document where you would like to place the image.
- On the toolbar, select the Insert tab. Select the Picture icon.
- Browse through your computer files to find the name of the image Select Insert and follow any additional instructions on the screen to make the image appear in your document.
- Save your work.

Modify Your Image
- Select the image. You will see a highlighted box with small circles or squares around the outside of the image. These are handles for manipulating the image.
- Select one of the handles that is on a corner and drag it outward. You will see the image get larger in both directions (height and width). Drag the same handle inward and see the image get smaller.
- Select one of the handles on the side of the image and drag it outward. Notice that when you do this, the image gets larger but only in one direction. This will affect the quality of your image but can also be used for an interesting effect.
- Select Undo and your image will return to its original size and shape.
- Make your image the correct size and shape for your flyer and save your work.
- Select your image again (so the highlight and handles appear around the outside). Drag the image to a location on the page.
- Add as many pictures as you would like, and adjust them to the position and size you would like. Save your work often as you go along.
Insert a Table
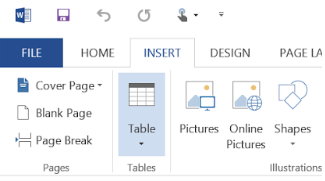
- Tables can add extra information to your flyer. Select the location on your document where you will insert the table.
- On the toolbar, select the Insert Tab.
- Find the Table icon, which will usually look like a small grid.
- Inside the drop-down menu, select the Insert Table option. You will see a grid that will allow you to fill in the number of rows and columns you would like in your document. Use the number keys on the keyboard to insert the number you would like for each. Then select “OK.”
- The table will be inserted into your flyer.
Insert Data into a Table
- Fill in the cells on your table with the information you would like to present.
- Select the text in each cell and apply your desired formatting, for example you may want the column header (the top row that names the topic for the column) to all be in Bold text or in Italics. Or you may want to align the text in one column to the right and another to be centered. All of the same steps for formatting text in your document will work inside your table. You can apply those changes to individual cells, to a whole row or column, or to the entire table.
- Save your work.
Add a Border
- On the Home tab, locate the Border icon, which will usually look like a grid with four squares.
- Select the icon and you will have a drop-down menu with options.
- Select a line style.
- Select the Color arrow, which will give you options for colors for your border. Select a color.
- Select the Width arrow, which will give you options for the thickness of your border’s lines.
- If you would like to replace the border line with a series of art images, select the Art arrow and then pick your new border.
- After you have applied enough changes to your border, save your work.

Print Your Flyer
- Make any necessary adjustments to finalize your flyer and save your work.
- Select the File menu. Inside the menu, choose Print.
- Check your selected printer and settings and then select Print.
Apply
In this section, you will apply what you have learned about word processing. Select one or more of the following activities to complete on your own.
- Use a table to make a list of tasks in your home, and assign people’s names to each task.
- Trade flyers with a classmate and make some additional changes to their work to improve the flyer in some way. Let them make some changes to yours too.
- Looking for a job? Impress employers by creating a nice résumé.
- Create an invitation card for a friend or relative
- Write a letter to a friend. Consider using a handwriting font and adding an image.
- Create a numbered list of ways you plan to use word processing after you complete this course.
Share & Reflect
You have learned many different word processing skills including formatting and aligning text, and inserting and handling images in documents. Working in small groups, discuss the following:
- What were the biggest challenges in learning to use the basic tools in word processing?
- When you compare word processing to working with paper and pencil, what advantages do you see that will help you in future projects?
- With the skills you have learned in word processing, what future projects will you do on a computer that you would have otherwise done with paper and pencil?
- Consider the tools you have learned so far. Are there other kinds of tools in word processing that you think you would like to learn?
Skills Checklist
Read through the checklist to review what you learned.
- I can open new documents.
- I can type text into documents.
- I can make changes to the font size, style, and color.
- I can highlight text.
- I can change text placement.
- I can insert images.
- I can resize images.
- I can add a border to a page.
- I can make a custom style border.
Lesson 2: Spreadsheets
Often in your daily life, you have to document and keep track of different kinds of personal and work-related information. In this lesson, you will learn how spreadsheets can help you organize, calculate, and update information in a simple way.
Learn
What types of information do you encounter in your daily life? Do you keep track of contact details for the different people you meet, your monthly expenses, bill payments, shopping lists, event schedules, project timelines for work, or other types of data? Maintaining such information often involves creating tables and making calculations. A spreadsheet application can help you organize and manage these types of information in a simple way.
A spreadsheet is an effective tool to record all sorts of data, such as addresses, business inventory, and income and expenses. One advantage of spreadsheet applications is that they can perform calculations and generate graphs to help you make sense of the information you enter.
Before you begin using spreadsheets, review some basic terms that you may encounter. Take some time to explore and locate these items in a spreadsheet application on your computer.

Workbook
A workbook is a spreadsheet file that contains one or more worksheets.
Worksheet
A worksheet is a single page or sheet in a spreadsheet application. You can select separate tabs to move between multiple worksheets in your spreadsheet workbook.
Data
Data is information that is stored in a spreadsheet application. Data is stored in the individual cells of a worksheet, and only one piece of data is stored in each cell. Data can be used in calculations, displayed in graphs, or sorted and filtered to find specific information.
Column
A vertical group of cells in a worksheet. A letter is used to identify each column.
Row
A horizontal group of cells in a worksheet. A number is used to identify each row.
Cell
A cell is an intersection point between a column and a row. Each cell is assigned a name according to its column letter and row number. When referencing a cell, you should put the column letter first and the row number second. For example, cell A2 or cell B3.
Active Cell
The active cell is the cell surrounded by a colored border. Data can only be entered into the active cell. To activate a cell, click on it to select it.
Range
A range is a group of cells in a worksheet that have been selected or highlighted. When cells have been selected they are surrounded by a colored outline or border.
Formula
A formula is used by a spreadsheet application to perform mathematical calculations on a set of numbers. Formulas are typed into the worksheet by the user and always start with an equals (=) sign.
Function
A function is a preset formula in worksheets that performs a specific task on a set of numbers, for example, adding numbers together.
Formula Bar
The formula bar displays a function or formula that has been entered in a cell. You can see and edit the contents of the cell in the formula bar and in the cell.
Getting Started with Spreadsheets
Spreadsheet applications include a number of tools to perform both basic and advanced tasks. When getting started with spreadsheets, it is useful to first explore the toolbars and begin to learn the basic tasks you can accomplish using the toolbar icons.
The icons in your spreadsheet application may be categorized based on their function. You can move between these categories by selecting the different tabs at the top of the screen. First, you will explore the Home tab category and read about each icon. You will have the opportunity to practice using many of these icons and explore other tab categories later in the lesson. Note: This lesson uses Microsoft Excel* 2013. Depending on which spreadsheet application you use, your toolbar icons may look slightly different than the ones shown below. In most applications, you can roll over an icon to view its name or function.
Home Tab

Border: adds or removes borders from a cell; also changes the thickness of a border
Fill Color: selects a color to fill the background of a cell
Text Align: specifies where you would like the text to appear in the cell (left, center, or right; top, middle, or bottom)
Wrap Text: if the text you enter is longer than the cell width, this icon wraps the text to appear on the next line in the cell
Merge and Center: merges the selected cells into one combined cell
Function: inserts a preset formula into a cell
Sort: arranges your data alphabetically or numerically, in ascending or descending order
Common Spreadsheet Functions
You learned that a spreadsheet function is a preset formula that performs a specific task on a set of numbers. Functions begin with an equal sign (=) followed by the name of the function (for example, SUM). The second part of a function indicates the range of cells to be included in the function. If you wanted to find the sum of all the numbers in column D, rows 1–6, your function would look like this:
=SUM (D1:D6)

Notice that the function appears in the formula bar, where you can view and edit the function as needed. Spreadsheet functions are a very useful tool because they can perform quick math calculations on a large set of numbers. Another advantage is that you can change the number in any cell, and the spreadsheet function automatically recalculates for you. This is especially useful if you are creating a budget, for example. You can adjust your data easily and see how this affects other numbers in your worksheet. Common spreadsheet functions include:
SUM: adds together numbers within a range of cells
AVERAGE: calculates the average value of a range of cells
MAX: finds the largest value within a given range of cells
MIN: finds the smallest value within a given range of cells
COUNT: counts the number of cells in a range that have numbers in them
Practice
Activity 1: Explore Spreadsheets
In this activity, you will begin to explore basic skills that you will use when you create a worksheet.
Input Data in Cells
- Open a spreadsheet application on your computer. A new blank workbook will open. Note: You may have to select Blank workbook to start a new workbook.
- Save your workbook often as you work. From the toolbar, select the Save icon. The first time you save your workbook, you will name your file and choose a location to save it.
- Select any cell in the worksheet. Notice that a colored border now appears around this cell, which makes this the active cell. Type three different words in different cells of the same row. Notice that your typing also appears in the formula bar. Note: If you want to add text to a cell that already has text in it, double-click on the cell and place your cursor where you want to add the new text.
- Select another cell to make it the new active cell. Type three different numbers in different cells of the same column, as shown in the image below:

Perform a Calculation
- Now practice using a spreadsheet function to perform a calculation on the numbers you just entered. With an empty cell selected, select the AutoSum Function icon.
- Notice that a border appears around the cells the worksheet thinks you want to add. You will also see the Sum formula in the empty cell you first selected.
- If the numbers in the range border are not what you want to add, select and drag a selection of the three numbers you want to add. Notice that the Sum formula changes to show those new cells that you want included in the calculation. In the example below, this function would be: =SUM(C3:C5).
- Press Enter on your keyboard to complete the function. This is an important step because the function will continue to add each cell that you select until you press Enter. The worksheet will make the calculation and the sum of the numbers will now appear in the active cell.
- Double-click on a cell that has a number in it. Change the number to see how this affects the cell that contains the SUM function.


Adjust Column Width and Row Height
- Now practice changing the width of the columns in your worksheet and the height of your rows. Hover your cursor over one of the column lines. Your cursor will change into a black line with arrows pointing left and right.
- Select and hold down your mouse button, then drag the line left and right to change the width of the column. Repeat these steps to change the row heights.
Activity 2: Make a Monthly Budget
A monthly budget is a list of planned monthly expenses and income. Many people prepare a monthly budget to plan for their savings and retirement, or to make business decisions.
In this activity, you will learn about spreadsheet tools and functions while creating a monthly budget. A worksheet is a useful tool for a budget because it quickly performs calculations while organizing and storing your data.
Create Column Headings
- Open a spreadsheet application on your computer. A new blank workbook will open.
- From the toolbar, select the Save icon. The first time you save your workbook, you will name your file and choose a location to save it. Save your workbook often as you work.
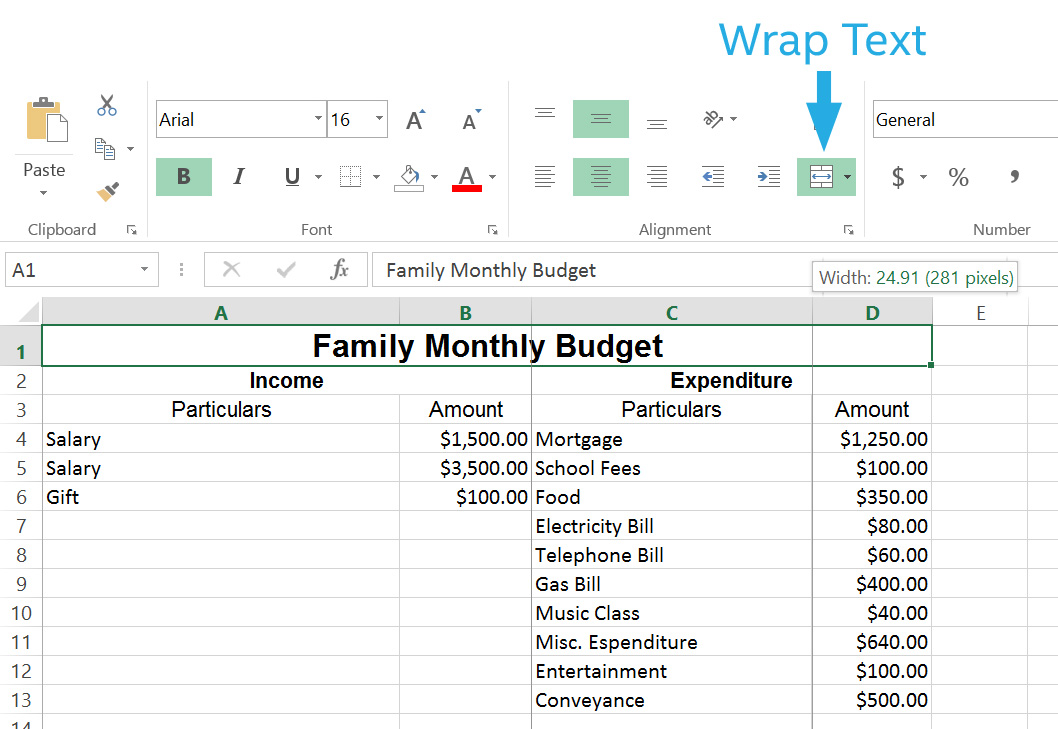
- Select cell A1 and type a title for your budget. For example, “Family Monthly Budget.”
- Find row 2 and select cell A2. Type the column heading, “Income” and press Enter on your keyboard. In cell C2, type the column heading “Expenditure.”
- In the next row (cell A3), type “Particulars” and type “Amount” in cell B3. In cell C3, type “Particulars” and type “Amount” in cell D3. You may need to adjust the width of your columns to fit your column headings. For help with this skill, review the previous activity. Your worksheet will now look similar to this:

Format Cells
- You will want the data you enter in columns B and D to appear as a dollar amount. Select column B by clicking the letter at the top of the column. You will notice that the entire column is now shaded.
- Select the Currency icon. This will display all numbers in column B as U.S. currency. If you wish to use a different currency, click the arrow next to the Currency icon and select a different currency from the drop-down menu. Repeat these steps for column D.
- Change the appearance of your headings by changing the font size, font type, and formatting. For help with these skills, review the previous lesson on word processing.
- Once you are satisfied with the appearance of your headings, use the Cell Alignment icon to center the text in the middle of the cell. Select any cell that contains text. Note: You can click and drag the selection box to include all the text at one time.
- Find the Cell Alignment icon that shows lines centered in the middle of the cell. Select this icon and your text will be automatically centered in the cell.

Merge Cells
- Next we want to merge, or combine, column headings. Select the cell that says “Income.” Click and drag to select both this cell and the cell next to it.
- Select the Merge and Center icon. This will merge the two cells into one. Repeat these steps for the “Expenditure” heading.
Enter Data
- In the cells below the column headings, type in amounts for your income and expenditures. The description (for example, “Salary”) goes under the Particulars heading and the dollar amount (for example, “$1,500”) goes under the Amount heading.
- Remember that you do not need to type a currency sign because your worksheet will automatically enter that for you, based on the currency settings you set up earlier in this activity. You should, however, enter a comma (,) and a decimal (.) when needed.

Adjust Column Width and Wrap Text
- When typing in text for your particulars, you probably noticed that the text you entered is too long to fit in the cell. Change the width of the columns, as needed, to fit your text. Review the previous activity for help with changing column width.
- If your text is still too long, select the cell and select the Wrap Text icon. This will make the extra text wrap down to the next line in the cell. Note: You can apply the Wrap Text command to an entire column or row at the same time.
Finalize Your Budget
- In the row below your income and expenditure items, type “TOTAL.”
- In the row below your totals, type “Savings.”
- The background color of a cell can help organize your data and make your budget easier to understand. To change the background color, select any cell (or group of cells) and click the arrow next to the Fill Color icon.
- Select any color by clicking on it. Choose different colors for your budget title, headings, and savings amount.
Insert Formulas
- Insert formulas in your budget to make your worksheet functional. Select the empty cell next to the “TOTAL” cell and insert a SUM function to calculate the total of your income amounts.
- Press Enter on your keyboard. Check the formula that displays in the formula bar to be sure all of the numbers you would like added together have been included in the formula.
- Insert another SUM function to calculate the total of your expenditures, and press Enter on your keyboard. Review the previous activity for help with the SUM function.
- Next, insert a formula to show your savings. This is the amount of income you have left over after your expenditures have been taken out. Select the empty cell where you want to put the formula.
- Press the Equal Sign key on your keyboard, which tells the spreadsheet application that you want to insert a math formula.
- Now select the cell that shows your total income. Press the Minus key on your keyboard and select the cell that shows your total expenditures.
- Press the enter key to calculate your savings amount, which is your income minus your expenditures.


Activity 3: Analyze Your Monthly Budget with a Chart
You have learned how worksheets can organize data and use math functions to calculate your monthly budget. Another advantage of spreadsheet applications is that they can generate charts based on the worksheet data. In this activity, you will create a chart to help visualize your budget and analyze how you spend your monthly income.
Create a Pie Chart
- Save your workbook if you have not done so recently.
- Select the cells with the information you want to include in your chart. For this example, select your expenditures. Be sure to select both the particulars and the amounts. You do not need to include the headings in your selection.
- With the cells still selected, click the Pie Chart icon. Pick the 2D pie chart option.

Format Your Chart
- If you want your chart to show data labels, such as the percentage amounts, select the Quick Layout icon.
- From the drop-down menu, select a layout that displays the percentage amounts of your monthly expenditures.

Adjust the Data
- One advantage of using a worksheet to create a budget is that you can easily adjust your numbers and the spreadsheet application will update your calculations. For example, if you want your savings percentage to be 20% each month, and currently it is only 15%, which expenditures could you adjust to increase your monthly savings?
- Take some time to adjust your numbers and view how this affects the calculations in your worksheet.
- When you are finished with your worksheet, close and exit the spreadsheet application.
Apply
In this section, you will apply what you have learned about spreadsheets. Select one or more of the following activities to complete on your own.
Use a spreadsheet application to create an address book that will record and manage contact information for friends, family, or business partners.
- Create a budget for an upcoming family trip.
- Create an expenditure budget for your business or a business project. If this is a new business, include start-up costs in your budget sheet.
- Create a worksheet that will manage a project you are currently working on.
- Create a pie chart that shows how you spend your time during a typical 24 hours.
- Create an inventory of items in your home or in your business.
Share & Reflect
In this lesson you learned about many different uses of spreadsheets in daily life. For example, you can use spreadsheets to:
- Create a budget
- Keep track of inventory
- Record and manage contact information
- Calculate business costs
- Manage a project
- View and analyze data in charts
Reflect on what you learned about spreadsheet applications. In a small group, discuss the following questions:
- How do you envision using spreadsheets in your day-to-day life after you complete this course?
- What are some of the benefits of using a spreadsheet application over paper-based methods of data management?
- What skills do you need to continue improving in order to use spreadsheet applications more effectively?
Skills Checklist
Read through the checklist to review what you learned.
- I can enter and edit text and numbers in a worksheet.
- I can format text within a cell.
- I can perform simple calculations and apply a formula.
- I can merge cells and wrap text.
- I can change the height and width of rows and columns.
- I can change the alignment of data in cells.
- I can create a chart from worksheet data.
- I can save a workbook.
Lesson 3: Multimedia Presentations
What are some different ways people communicate with one another? When might you use words to explain something, and when might it be more effective to use pictures or a graphic? In this lesson, you will learn about multimedia and how it can be used to create dynamic presentations.
Learn
Sometimes, words are not enough to express our ideas and thoughts. An engaging presentation with pictures, diagrams, video, and sound can communicate your message more effectively. Multimedia involves using more than one way to communicate or express an idea. Using a multimedia application on your computer, you can develop presentations on any subject, such as a business project you have been working on. You can also use multimedia presentations to deliver information about events and activities to a large group of people.
Before you begin creating multimedia presentations, review some basic terms that you may encounter:
Slide Show
A slide show is a presentation file that contains one or more slides.
Slide
A slide is a single page in a slide show presentation.
Slide Layout
Slide layout describes how the text and other multimedia objects are arranged on the slide.
Placeholder
A placeholder is a space on the slide that holds an object. Placeholders can hold titles, text, and objects such as charts, images, and tables.
Theme
A theme is a design applied to all of the slides in a presentation. The theme controls the styles in a presentation, including the type and size of bullets and fonts, font color, and background design.
Transition
A transition is the visual movement as one slide changes to another.
Animation
An animation is a moving visual effect applied to individual objects on the slide, such as images and text.
Getting Started with Multimedia Presentations
Presentation applications include a number of tools to perform both basic and advanced tasks. When getting started with presentations, it is useful to first explore the toolbars and begin to learn the basic tasks you can accomplish using the toolbar icons.
The icons in your presentation application may be categorized based on their function. You can move between these categories by selecting the different tabs at the top of the screen. First, you will explore the Home tab category and read about each icon. You will have the opportunity to practice using many of these icons, and explore other tab categories, later in the lesson. Note: This lesson uses Microsoft PowerPoint* 2013. Depending on which presentation application you use, your toolbar icons may look slightly different than the ones shown below. In most applications, you can roll over an icon to view its name or function.
Home Tab

Cut/Copy/Paste: allows you to remove or copy content from one slide and move it to another slide
New Slide: inserts a blank slide
Font: changes the font
Font Size: changes the font size
Font Color: changes the font color
Formatting: makes the font bold, italic, or underlined
Text Align: specifies where you would like the text to appear in the text placeholder (left, center, right, or justified)
Common Presentation Views
Within a presentation application, there are different views that are designed for different tasks. To switch between views, select the View icons. Learn about the different views you may encounter when creating a presentation:
Normal View: the main working window in the presentation. You edit slides and add content in this view.
Outline View: shows all the text of all slides, in a list on the left of the screen.
Slide Sorter View: displays thumbnail versions of all slides arranged in horizontal rows. You rearrange and delete slides in this view.

Practice
Activity 1: Explore Presentation Basics
In this activity, you will begin to explore basic skills that you will use when you create a multimedia presentation.
Create a Title Slide
- Open a presentation application on your computer. A new blank presentation will open. Note: You may have to select Blank Presentation to start a new presentation.
- Save your presentation often as you work. From the toolbar, select the Save icon. The first time you save your presentation, you will name your file and choose a location to save it.
- When you create a new presentation, the first slide you will see is the title slide. The layout of a title slide traditionally consists of a large title and a smaller subtitle.
- Select the empty text placeholder for the title. Type a title for your presentation. Repeat these steps for the subtitle.
- Change the appearance of your title and subtitle by changing the font size, font type, and formatting. For help with these skills, review the previous lesson on word processing.
Add New Slides
- When you are satisfied with your title slide, add a new slide to your presentation. Select the New Slide icon and a blank slide will be inserted after your title slide.
- The layout of the new slide consists of a title at the top and one large content placeholder. Select the Layout icon to view a drop-down menu of other slide layout options.
- For this activity, select the Two Content slide layout. Note that the placeholders on the slide change to reflect the new layout.
- Repeat these steps to add another new slide to your presentation (with the Two Content slide layout), for a total of three slides.

Insert Text
- On the left side of your screen, select slide two. Notice that a colored border appears around this slide to indicate which slide you are viewing and editing.
- On the slide, select the title placeholder and type a slide title.
- A content placeholder can be used to insert text, a table, a chart, an image, or a movie into your presentation. Select one of the content placeholders and type a short sentence.
- Change the appearance of your text by changing the font size, alignment, and color. For help with these skills, review the previous lesson on word processing.
Insert an Image
- In the other content placeholder, insert an image. Select the image icon from inside the placeholder.
- In the window that appears, browse the files on your computer to locate the image file you wish to use. Select the file and click the Insert button. Note: If you are using an image that you have downloaded from the Internet, make sure the image is not copyrighted or properly cite the image’s author.
- A border will appear around the edges of your image. Select and drag to resize and reposition your image. For help with these skills, review the previous lesson on word processing.

View Your Presentation
- Repeat the steps above to add a title, text, and an image to slide three.
- Save your presentation if you have not done so recently.
- Select the Play From Beginning icon.
- You are now viewing a full-screen version of your presentation. This view, also known as the Slide Show view, is used to show your presentation to an audience. Note: You cannot make changes to your presentation in this view.
- To advance to the next slide, select anywhere on the current slide. You can also use the arrows at the bottom of the slide to move forward and backward through your slide show.
- To exit your slide show and return to Normal view, press the Esc key on your keyboard.

Activity 2: Create a Presentation to Introduce Yourself
In our day-to-day life, we introduce ourselves with the use of words. In this activity, you will have the opportunity to create a multimedia presentation to introduce yourself.
Create a Title Slide
- Select the File tab and select “New” to begin a new presentation. A new blank presentation will open.
- Save your presentation often as you work. From the toolbar, select the Save icon. The first time you save your presentation, you will name your file and choose a location to save it.
- Type the title “All About Me” on the title slide. Type your name for the subtitle.
- Insert an image in the title slide. From the top of the screen, select the Pictures icon to insert an image saved on your computer. This can be a photo of yourself or an image that represents you.
- Resize and reposition your image as needed.

Design Your Slides
- Many presentation applications come with built-in designs to quickly and easily apply a theme to your presentation, giving it a uniform look throughout. Select the Design tab and browse the themes.
- To preview a theme, hover your cursor over the thumbnail image. Notice that your title slide will automatically change its design to preview the new theme.
- Select a theme for your All About Me presentation. The theme you choose will depend largely in part on your audience. While some themes are professional looking and may best be used in a business setting, others are colorful and fun to convey a casual mood.
- Each theme can be further customized using icons generally found next to the themes. Experiment with changing the colors and fonts to personalize your theme.

Add New Slides and Titles
- When you are finished selecting your theme, add five new slides to your presentation.
- Select slide two and select the slide title placeholder. Type a title for this slide. You can choose a slide title from the list or create your own: My Personal History, Where I Live, My Family, My Hobbies and Interests, My Likes and Dislikes, My Favorite Things, Interesting Facts About Me, A Funny Story, Why I Am Taking This Course
- Select slide three and type a slide title. Repeat for the remaining slides.
Choose a Slide Layout
- When deciding on a layout, it is helpful to first consider the content you wish to put on the slide. For example, if you were creating a slide about where you live, would you like to include text describing your town? Would you like to include an image or movie file?
- Find a layout that fits best. Remember that you can always add content placeholders to an existing layout or move content around the slide.
- Select slide two and select the Layout icon to choose a layout for this slide.
Add Text and Images
- Select a content placeholder and add text to your slide. Notice that the font type and color are automatically formatted based on the slide theme that you have chosen.
- Select another content placeholder or select the Pictures icon to insert an image, if desired.
Insert a Table
- In some cases, you may want to insert a table to organize the information you are presenting. For example, a table would be a useful way to present your likes and dislikes.
- To insert a table, select the Table icon from the content placeholder.
- Specify the number of columns and rows you would like, and click OK.
- Place your cursor in each cell of the table and type your text. Notice that the text automatically wraps to the next line to fit within the size of the cell.
- Select and drag the borders of the table to resize your table, if needed.
- To reposition your table on the slide, hover your cursor over one of the outside borders until you see a four-point arrow. Select and drag the table to your desired location.

Insert a Movie
- To insert a movie in your presentation, select the Movie icon from the content placeholder on the slide.
- In the window that appears, browse the files on your computer to locate the movie file you wish to use. Select the file and click the Insert button. Note: If you are using a movie file that you have downloaded from the Internet, make sure the movie is not copyrighted or properly cite the filmmaker.
- Wait for the movie file to be loaded into your presentation. Depending on the file size, this could take several minutes.
- A border will appear around the edges of your movie. Select and drag to resize and reposition your movie.
- To play your movie in Normal view or Slide Show view, select the Play icon that appears directly below your movie. In Slide Show view, you can select the movie image to play the movie.
- You can also use the forward and backward arrows to go to a specific location in the movie, or select the Volume icon to adjust the noise level.


Insert Audio
- To insert audio in your presentation, select the Audio icon from the top of the screen and select Audio on My PC.
- In the window that appears, browse the files on your computer to locate the sound file you wish to use. Select the file and click the Insert button. Note: If you are using a sound file that you have downloaded from the Internet, make sure the audio is not copyrighted or properly cite the audio file’s author.
- Wait for the audio file to be loaded into your presentation. Depending on the file size, this could take several minutes.
- The sound file now appears as an icon on your slide. A border will appear around the edges of the icon. Select and drag to resize and reposition your sound file.
- To play your audio in Normal view or Slide Show view, select the Play icon that appears directly below your sound file. In Slide Show view, you can select the icon to play the sound.
- You can also use the forward and backward arrows to go to a specific location, or select the Volume icon to adjust the noise level.

Finalize Your Presentation
- Repeat the previous steps to select a slide layout and add text, images, and other content to the remaining slides.
- Insert a concluding slide at the end of your presentation. Typically this is a simple slide that can be used to thank your audience or wrap up your presentation.
- Select the Play From Beginning icon and present your slide show to other participants in the course.
- After presenting, close and exit the application.
Activity 3: Add Animations and Transitions
In this activity, you will learn how to apply built-in animations and transitions to add visual interest and movement to your presentation.
Add Animations
- Animations can be applied to objects in a presentation, for example, an image or a text box. Animations control how an object enters the slide, how it exits the slide, or how it appears when the slide is being presented.
- Open the presentation you previously created. Select one slide from your presentation that contains an object you would like to animate.
- Select the object on the slide. Notice that the selected object has a border around it.
- At the top of the screen, select the Animations tab and locate the built-in entrance effects, emphasis effects, and exit effects. Browse the animations by selecting the arrow on the right.
- To apply an animation to the object, select the animation from the top of the screen. Notice that a small number now appears next to the animated object. This indicates the order in which this animation will play when you are presenting your slide show.
- You can apply multiple animations to one object (for example, Fly In and Dissolve Out) or you can apply animations to more than one object on your slide.
- To specify the duration of an animation, or indicate when you would like the animation to start, select the Timing options, which are generally located next to the animations. Note: You must switch to Slide Show view to preview your animations.
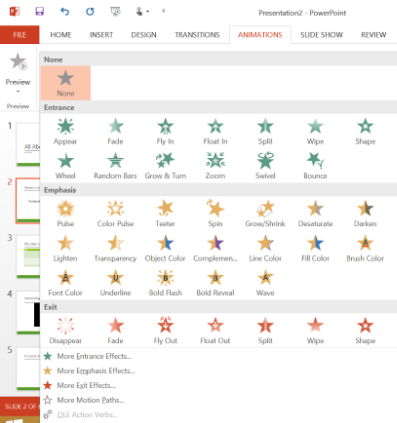
Add Transitions
- Transitions can be applied to control how a slide enters your slide show when you are presenting.
- Select one slide from your presentation.
- At the top of the screen, select the Transitions tab and locate the built-in transition effects. Browse the transitions by selecting the arrow on the right.
- To apply a transition to this slide, select it from the top of the screen. Notice that a small icon now appears on the left side of the screen next to this slide, indicating that a transition to this slide has been applied.
- To apply the same transition to all slides in your presentation, select the Apply to All icon. Note: You must switch to Slide Show view to preview your transitions.

Apply
In this section, you will apply what you have learned about multimedia presentations. Select one or more of the following activities to complete on your own.
- Create a multimedia storybook. Use drawings, photos, and audio to tell a story.
- Create a presentation to share different events organized by your community throughout the year.
- Create a public service announcement presentation that addresses a common concern where you live.
- Create a marketing presentation to promote a business product or service.
Share & Reflect
In this lesson you learned about many different uses of presentations in daily life. For example, you can use presentations for:
- Business reports
- Family functions
- Teaching children
- Awareness programs
Reflect on what you learned about multimedia presentations. In a small group, discuss the following questions:
- How do you envision using presentations in your day-to-day life after you complete this course?
- What are some of the benefits of including multiple forms of media (audio, video, images) in a presentation?
- What skills do you need to continue improving in order to use presentation applications more effectively?
Skills Checklist
Read through the checklist to review what you learned.
- I can create a title slide.
- I can create slides with various layouts.
- I can insert text and images into slides.
- I can apply a design theme to the slides in my presentation.
- I can insert a table in a slide.
- I can insert a movie in a slide.
- I can insert audio in a slide.
- I can add animations to objects in a slide.
- I can add transitions to a slide.
- I can present a slide show.
Module 3: The Internet, Email, and Communicating Online
Overview
Think about a typical day in your life. How do you search for and find information, either for personal or professional business? This could be information about a health condition or treatment, a job vacancy, how to get government services, or you might be looking for entertainment. Traditionally, to seek information you might look through books or ask friends and neighbors. Unfortunately, you might not always find the relevant information that you are seeking.
In today’s global, connected world, you can find the latest information from any corner of the world right at your fingertips. Using computers and the Internet, you can communicate instantly with people from anywhere in the world and easily find information.
Module 3 explores how to use the Internet effectively to search for information, to communicate, and to connect with others around the world. In this module you will:
- Develop Internet skills by conducting an information search.
- Learn how to create an email account and send or reply to emails.
- Explore online communication tools that allow you to connect with family, friends, and professionals through video and instant messaging.
Getting Started
Our world today is connected through technologies that allow for digital communication and electronic information exchange. Knowing how to use these technologies will enable you to communicate with family and friends across the world, or collaborate with the global community in exciting ways. Before you begin learning about the Internet, email, and other online communication tools, it is helpful to understand what these terms mean and how each tool is used.
Internet
A worldwide network of computers, where computers across different locations can communicate with each other.
Potential Use: Locating information, attending free online courses, marketing a business, communicating with people in another region, or selling goods and services online.
Short for “electronic mail.” Email is a modern-day tool to send and receive messages instantly using the Internet.
Potential Use: Staying in touch with family and friends, requesting information or asking a question to someone in another region, communicating with customers or reaching out to business partners.
Online Communication Tools
Internet websites and applications that allow users to share content or communicate through video, audio, and instant messages.
Potential Use: Staying in touch with family and friends, sharing business ideas with colleagues, learning new skills, or researching information on a topic.
Lesson 1: The Internet
Technology allows us to communicate and share information without being limited by our geographic locations. In this lesson, you will learn how the Internet can be used to find information and resources that may not be immediately available in your area.
Learn
The Internet is a worldwide network of computers, where computers across different locations can communicate with each other. Before you begin using the Internet, it is useful to understand some basic terms that you may encounter:
Web
Web/World Wide Web (WWW) is similar to a library. It refers to the collection of information available on the Internet. It consists of millions and millions of pages of text, pictures, sounds, and animation on various topics.
Browser
A browser is a software application on your computer that allows you to search for and view pages on the Web. The most typical examples of web browsers are Microsoft Internet Explorer*, Mozilla Firefox*, Apple Safari*, and Google Chrome*.
Web Address or URL
A web address (URL) refers to the address of the Web page or website on the Internet. It specifies the exact location of the Web page on the Internet, similar to your own detailed address that may include your name, house number, street name, city name, country, and zip code. An example of a web address is www.google.com.
Hyperlink
A hyperlink is a word, picture, or object linked to other information on the Internet. When you point to a hyperlink, the pointer changes to hand. When you select a hyperlink, it takes you to a new Web page.
Bookmarking
While browsing the Web, you may come across a Web page that you find interesting or informative that you would like to visit again. A browser gives you an option to store the location of this page so that you can quickly find it when you want to visit the page again. This method of saving URLs for future viewing is known as bookmarking.
Cloud Computing
Cloud computing is the practice of using the Internet to store, manage, and process data and files. This allows you to access information and personal files from any computing device with an Internet connection. Cloud computing also allows you to use certain software applications online, such as word processing or spreadsheets, without the need to download or purchase software for your personal computer.
Searching for Information
One very useful feature of the Internet is the ability to search for information related to any topic that interests you. When searching for information, it helps to understand how to choose keywords carefully to find the information. Here are some tips:
- Select the most important words. Instead of asking the question, “Who was the first man on the moon?” you can just write the keywords, “first man moon.” In general, avoid short common words like “a,” “the,” “is,” “are,” etc.
- Be specific. Type keywords to describe exactly what you are looking for. For example, type “Saturn” instead of typing “planets.” To search for an exact phrase, type the entire phrase with quotation marks around it.
- Check your spelling. Use the correct spellings of keywords to get the best search results.
- Conduct an advanced search. To locate more specific information, you may find it necessary to use advanced search terms. You can specify your search using special search words such as “AND” and “NOT.” For example, if you want information on a train reservation in a particular country, such as Canada, type “train AND reservation AND Canada.” To narrow your search to find information only for a particular location, for example, type “train AND reservation AND Montreal NOT Toronto.”
Practice
Activity 1: Explore a Web Browser
You need a software program called a web browser to explore the information available on the World Wide Web. A web browser is used to display Web pages on your computer. In this activity we will explore web browsers in detail.
Regardless of which web browser you use, all web browsers have a few elements in common. Take a minute to start your web browser and locate the following items:
- Title bar: tells you the title of the page you are viewing
- Navigation arrows: helps you navigate the Internet by moving forward and backward through Web pages you have recently visited
- Address bar: displays the web address (URL) of the Web page you are currently viewing
- Bookmarks: displays a list of the Web pages that you have bookmarked
- Tabs: allows for multiple Web pages to be open in the browser window at the same time
In this activity, you will explore how a web browser works by using it to explore the Internet.
- Start your web browser by selecting the icon on your desktop.
- Select a new tab at the top of your browser to open a new Web page.
- Place your cursor in the Address or Location bar. Type in a URL. Press the Enter key on your keyboard. Wait as the Web page loads on your computer.
- Read the information and use vertical or horizontal scroll bars to view the text not visible on the screen. Note: Often, blue colored text indicates a hyperlink, or words that are connected to another Web page URL. To go to the linked page, simply select the blue text.
- Select hyperlinks to explore related Web pages.
Bookmark Web Pages
- Bookmark any Web pages that you find interesting and would like to visit again. While viewing the page you would like to save, find the Bookmark icon at the top of the browser window and select it. The following list describes the Bookmark icons you may find in popular web browsers:
- Google Chrome: a star on the right side of the address bar
- Internet Explorer: a star in the upper right corner
- Safari: a plus sign on the left side of the address bar
- Firefox: a star on the right side of the Google search box
- This will save the URL in your personalized Bookmark list. To view this Web page in the future, you can simply select it from your Bookmarks.
- Select the Close icon (the X) at the top-right corner of the browser window to exit.

Activity 2: Use a Search Engine
Search engines are tools used to find information on the Internet. Search engines are similar to Web pages and have to be opened using a web browser. Usually, searches are based on a word or combination of words or topics. These words or phrases are known as keywords.
After you type in keywords, the search results may consist of Web pages, images, videos, advertisements, and other types of files (presentations, documents, spreadsheets, and so forth), which can be opened and viewed in your web browser.
Some popular search engines that are used widely include:
- Google (www.google.com)
- Bing (www.bing.com)
- Yahoo! (www.yahoo.com)
In this activity, you will explore how a search engine works by using it to find information on a specific topic. You will also practice how to use effective search keywords to find the information you are looking for.
Search the Internet
- Start your web browser by selecting the icon on your desktop.
- Some web browsers will allow you to search your keywords by typing them directly into the Address bar. Your facilitator can help you determine if this option works for you. Place your cursor in the Address bar of your web browser.
- Suppose you want to find information about technology education initiatives in your home country. In the Address bar, type the keywords as shown below and press Enter.
- Look at the list of links that are shown as results. You will notice that there will be a short description about each website. The keywords used by you also appear in bold. Reading the descriptions will help you decide whether the Web page is relevant or not.
- Select the most relevant link. This will take you to a new Web page with the information you searched for.

Use a Search Engine Web Page
- If your web browser does not support searching for keywords directly in the Address bar, you will need to open a search engine Web page. Place your cursor in the Address bar and type www.google.com.
- Press the Enter key on your keyboard. Wait as the Web page loads on your computer.
- Locate the search box and the search button on the Web page.
- Place your cursor in the search box and type the words as shown below.
- Select the Search button or press the Enter key on your keyboard.
- Look at the list of links that are shown as results, and read the short descriptions.
- Select the most relevant link. This will take you to a new Web page with the information you searched for.

Conduct Your Own Search
- Place your cursor in the Address bar and type keywords about any information you want to find on the Internet. Alternatively, you can select the Back icon on your browser to return to the search engine Web page you were using.
- Press Enter to search the Internet for your keywords. Experiment with different keyword combinations and see how this affects your search results.
- From your search results list, select the most relevant website address. Note: To open the Web page in a new browser window or a new tab in the same browser window, right-click on the hyperlink and select the options to either open the Web page in a new window or a new tab.
- Read the information on the Web page and evaluate the website. If the website does not contain the information you are looking for, select the Back icon and choose a different link.
- Bookmark any Web pages that you found interesting and would like to visit again. For more information about bookmarking Web pages, review the previous activity.
Apply
In this section, you will apply your Internet browsing and Internet search skills. Select one or more of the following activities to complete on your own.
- Go to www.xe.com and find the exchange rate of 1 British Pound (£) in your local currency.
- Locate a top news story on www.bbc.com and watch a news video that interests you.
- Go to www.wikipedia.com and find an article on a prominent person who was in the news recently. Bookmark one article that you think is especially interesting and relevant.
- Use a search engine to find and download three images.
- Use a search engine to find a new recipe that you would like to try. Bookmark the recipe page.
- Go to www.kids.nationalgeographic.com and find a fun activity that your kids would enjoy.
- Use a search engine to find out which famous people come from your local country or region.
- Use a search engine to search the Internet for “free e-card.” Follow the steps to create and send an electronic card (e-card).
Lesson 2: Email
In our everyday lives, we often send letters to our family members or friends living in another city or abroad. With the Internet, we can send our messages electronically and communicate with others across the globe in seconds.
Learn
An Email is a short form of “electronic mail.” Email is a modern-day tool for sending and receiving messages using the Internet. Email has changed the world of communication. In earlier times, it could take days or even weeks to send a letter; now with email, you can send a message in seconds or minutes. All you need is an email account, an Internet connection, and the email address of the person you are sending the email to.
In addition to communicating with others, email has many other important uses. Many Internet applications and web-based tools require an email address in order to register and use the site. You will also need an email address to join an online community, do online banking, take classes, or shop online. Creating an email account is a useful first step in joining the Internet community.
Before you begin using email, become familiar with a few basic terms that you may encounter:
Mail server
An application that uses the Internet to send and receive email messages. Email services usually do not charge money, and you can create an email account with any service provider by registering your information.
Email address
An email address is like any other address. An email address is unique and two people cannot have the same email address. An email address typically has three main parts: the username (easysteps), the @ sign, and the mail server address (gmail.com). In this example, the email address would look like this: easysteps@gmail.com
Inbox and other folders
An Inbox is the main folder where all incoming emails are stored. The messages are organized in chronological order with details such as the name of the sender, the subject, the date, and the size of the message. Other folders, like Sent and Drafts, will store and sort emails to help you maintain an organized email account.
Getting Started with Email
When you begin using email, you may encounter a number of unfamiliar terms that are related to your email account. Review the following terms and locate them in the diagram:
- Inbox: Shows all the incoming emails with details
- Sent Mail: Stores all emails sent by you
- Drafts: Stores incomplete emails
- Compose Mail: To create a new email
- Sign Out: To sign out from your email account when you are finished
Practice
Activity 1: Create an Email Account
The first step in using email is to set up your own email account. Once you have an account and a unique email ID, you will be able to send and receive emails.
The registration process and the instructions provided for this activity are specific to one mail server and may differ from other mail servers. The website used in this activity, Gmail*, is a suggested site only. You or the facilitator may select another website to use for this activity.
Note: In this activity, you will need to register for an email account. Registration requires you to provide some personal information. Before you set up an email account or register for any website, you must become familiar with some basic rules regarding Internet Safety.
Register for an Email Account
- Start your web browser by double-clicking the icon on your desktop.
- Place your cursor in the Address or Location bar. Type www.gmail.com.
- Press the Enter key on your keyboard and wait for the Web page to load.
- Select “Create an account” to register and create a new email ID. You will be directed to the registration page, which appears like a form.
- Fill in your information in the boxes provided. You will need to provide the following information: First and Last Name, Birthday, Gender, Phone Number, Location
Note: You will notice that some boxes have a drop-down menu, which allows you to select one option from several choices. Just select the down arrow and move your cursor to the option you would like to choose. When it is highlighted, click it.
Select an Email ID and Password
- Choose your desired email ID and type it into the box provided. This is also known as your login or username. You can create any email ID you wish. Your name, your birthday, your favorite place, or a combination of these items can all be used to create your unique email ID. For example, yourname@gmail.com.
- Select Check or Check Availability to see if the email ID you created is available (not already taken by someone else). If the email address you typed already exists, the Web page will provide a few alternative email addresses for you to choose. You can either select one of the suggestions, or type a new email ID. For example, yourname2015@gmail.com.
- In the box provided, type a password for your email ID. You will need to type your password twice. Remember to choose a password that is easy for you to remember but hard for other people to guess. Note: When you type your password, every character in the password will appear as dots. This is to prevent unauthorized users from viewing and misusing your password.

Finalize Your Email Setup
- If required, choose a question in the Security Question box. Or, if you wish, you can type your own question. Then, type an answer to your question. This security question will be used to verify your identity and prevent unauthorized users from accessing your email account.
- Type the characters you see in the box or picture. This is just to confirm that you are human, and not a machine.
- Select the “I Accept” box to agree to follow the terms of service.
- Select “Create My Account.” Your email account is created and you are now registered to send and receive emails on this website.
- Record your email ID and password somewhere safe. Remember that your password should not be shared with anyone.
- When you are finished, select “Sign Out” to exit your email account. This is especially important if you are using a shared or public computer.
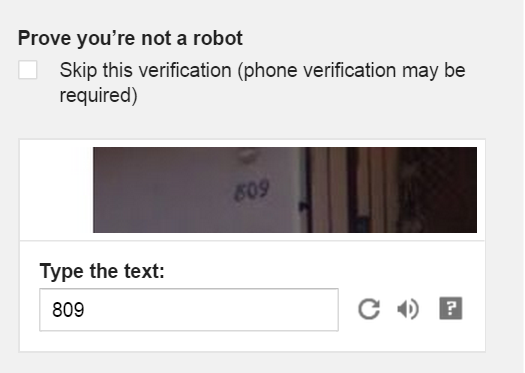
Activity 2: Send an Email
Now that you have registered for an email account and created your email ID, you can begin to write and send emails.
- Sign in to your email account, if you are not already signed in. You will need to type your email ID and your password to sign in.
- Select “Compose Mail.” Depending on which mail server you are using, this may be an icon or it may be a button with text. If you are using Gmail, look for the “Compose” button in the upper left-hand corner.
- Type the email address of the person to whom you would like to send the message in the “To” box. In case you do not have any email addresses with you, use the email address of a friend in this course and send a message to them. Note: If you want to send a message to more than one person, separate their email addresses by inserting a semi-colon. For example: easysteps1@gmail.com; easysteps2@gmail.com.
- Type a short title in the Subject box.
- Type the message you would like to send in the Compose (message) box.
- Select “Send” to send your message.
- When you are finished, select “Sign Out” to exit your email account.

Activity 3: Check and Reply to Emails
You can access your email account from any place and any computer with an Internet connection. In this activity, you will learn how to check and reply to emails that you have received.
Check Your Inbox
- Sign in to your email account, if you are not already signed in. You will need to type your email ID and your password to sign in.
- The email messages that you have received will be displayed, along with the Sender’s name and the Subject of the message. Most mail servers will display your unread messages with bold text, while the messages you have already seen in your Inbox will not be bold. Note: Depending on which mail server you use, you may notice that your Inbox emails are automatically sorted into three categories (Primary, Social, and Promotions) based on the content of the email. You can select each category to view the email messages.
- Select a message to open and read it.

Reply to Messages
- To reply to a message, select the message from your Inbox. Then, select the “Reply” button. Depending on which mail server you are using, this may be an icon or it may be a button with text. If you are using Gmail, look for the arrow in the upper right-hand corner of the message.
- When you select “Reply,” the email address of the person you are replying to will already be filled in automatically. Note: Do not type a new subject in the Subject box, as it is a reply mail for the same subject.
- Type your message in the Compose area. You will notice that the message you are replying to will automatically appear above your response.
- Select “Send” to send your message.
- When you are finished, select “Sign Out” to exit your email account.

Apply
In this section, you will apply what you have learned about communicating through email. Select one or more of the following activities to complete on your own.
- Send an email to your course facilitator, explaining three ways that you plan to use email and the Internet after this course is completed.
- Send an email to yourself, explaining one important task that you would like to accomplish after this course is completed.
- Send an email to your friend or relative.
- Send an email to another participant in the course. Ask them a question, so they can practice responding to your email.
Lesson 3: Online Communications
In today’s world, technology is widely used for social interaction and communication. You have already learned how email can be used as a form of communication to keep in touch with family or friends. In this lesson, you will learn how to use the Internet to connect with others through text, voice, and video.
Learn
As new members of the Internet community, you have a world of access and opportunity at your fingertips. You can communicate with people near and far in an instant with email and instant messaging. You can see and talk to people in regions that you may not otherwise be able to visit.
A growing number of web-based resources can help to connect you to your friends, family, and business associates. Learning how to create user accounts for these resources will give you opportunities to stay in contact with those important to you. Before you begin using these applications, however, become familiar with basic terms related to online communication:
Instant Messaging (IM) or Chatting
Instant messaging or chatting is a form of online communication, where two or more people talk with one another by typing out messages using a chat messenger application. To send instant messages, you need the chat messenger software, a registered user account, and an Internet connection.
Voice Chat
Voice chat is another form of online communication, where two or more people talk with one another through an audio call using the chat messenger application. A voice chat is similar to a telephone call, but it uses an Internet connection to send and receive the audio.
Video Chat
Video chat is a form of online communication, where two or more people talk with one another through both audio and video. It requires video chat software, a registered user account, and an Internet connection. A video chat allows the people communicating to see each other during the call.
Practice
Activity 1: Set Up a Skype Account
Skype* is one of a number of applications that allow instant communication with friends, family, business associates, and co-workers through your computer or mobile device. Skype is a free, downloadable software program that uses your computer for chatting and sharing information over the Internet.
The first step in using Skype is to set up your own account. Once you have an account and a unique user name, you will be able to video chat, voice chat, or send instant messages to other Skype users.
Note: There are many chat messenger applications such as Skype*, Yahoo Messenger*, Google Hangout*, and MSN Live Messenger* among others. The website used in this activity, Skype, is a suggested site only. You or the facilitator may select another website to use for this activity.
Register for a Skype Account
- Locate the Skype icon on your desktop. If the Skype application is not already installed on your computer, you can go to www.skype.com and select “Download Skype” to download the application to your computer.
- Select the Skype icon to open up the Skype start-up screen.
- If you are new to Skype, you will need to create a user account. Select “Create a New Account” on the start-up screen. You will be directed to the registration page, which appears like a form. Fill in your information in the boxes provided. You will need to provide the following information: First and Last Name, Email address (Use the email address you created in the previous activity), Birthday, Gender, Phone Number, Location, Language, How you intend to use Skype (personal or business conversations)
Note: You will notice that some boxes have a drop-down menu, which allows you to select one option from several choices. Just select the down arrow and move your cursor to the option you would like to choose. When it is highlighted, select it.
Select a Skype Name and Password
- Choose your desired Skype name and type it into the box provided. This will also be used as your login or username. You can create any Skype name you wish, as long as someone else has not already taken it. Skype may also offer suggestions if your desired Skype name is already in use.
- In the box provided, type a password for your Skype account. You will need to type your password twice. Remember to choose a password that is easy for you to remember, but hard for other people to guess. Note: When you type your password, every character in the password will appear as dots. This is to prevent unauthorized users from viewing and misusing your password.

Finalize Your Skype Setup
- Type the characters you see in the box or picture. This is just to confirm that you are human, and not a machine.
- Select the “I Agree - Continue” box to agree to follow the terms of service.
- Your Skype account is created and you are now registered to participate in video chat, audio chat, and instant messaging using the Skype application on your computer.
- Record your Skype name and password somewhere safe. Remember that your password should not be shared with anyone.
- When you are finished, select “Sign Out” to exit your Skype account. This is especially important if you are using a shared or public computer.
Activity 2: Find Contacts and Video Chat with Skype
Now that you have registered for a Skype account and created your Skype name, you can begin to create your Contacts list and participate in a video chat.
Add New Contacts to Skype
- Select the Skype icon and sign in to your Skype account, if you are not already signed in. You will need to type your Skype name and your password to sign in.
- When you sign in and launch the application for the first time, Skype will take you through a two-step process of testing your microphone and webcam (for video chat) and selecting a profile picture. You can choose to do these steps now or skip these steps and complete them later.
- In your Skype window, you will see a dial pad that can be used to dial regular phone numbers. Using the phone feature, however, will in most cases require an optional paid subscription. However, contacting other Skype users is completely free. To find other Skype members and add them to your contacts list, select “Contacts” on the left side of the screen
- Select “Add Contact.” You can enter a full name or email address to search for someone. From your search, you will see a list of Skype users that match the information you have entered.
- If you find the person you are looking for, you will need to add them to your Contacts list before you can contact them on Skype. You can add a contact by selecting the green icon to the right of their name. This will generate a contact request, which will be sent to the Skype user. This person can choose to approve or ignore your contact request. If they approve your request, their Skype name and contact information will automatically be added to your Contacts list.
- Repeat these steps to add more contacts.


Accept Contact Requests
- You may also receive Skype contact requests from others. If you accept contact requests, these contacts will be added to your Contacts list. Ask a few participants to send you a contact request and begin building your Contacts list.
- To accept a contact request, in your Skype window, select “Contact Requests.” To view the profile of the person sending the request, select “View Profile.” This will show you the information regarding the person. To add a contact, select the “Add to Contacts” button. You can also choose to select “Ignore” or “Block” to reject the contact request. Note: Do not accept contacts of people whom you do not know. Add only contacts of those people who you know personally or professionally.
Send Instant Messages and Video Chat
- Once you have a list of contacts, you can send instant text messages to any contact using Skype on your computer. Select the name of the person you wish to chat with. A chat window with the person’s name will appear. Note: Before you start a chat conversation, check if the person you wish to chat with is online. Usually, the online status of a contact on your list is indicated by a green check mark next to the contact’s name.
- Place your cursor inside the chat box and type your message. When you are finished, select “Send Message” or press Enter on your keyboard. Your message, along with your contact’s reply to the message, will be shown in the chat window.
- If you wish to video chat with someone in your Contacts list, select the name of the person you wish to chat with. Again, as with instant messaging, the person you wish to video chat with must be online and signed in to their Skype account.
- Select the “Video Call” button. If the contact accepts your video chat request, you will see a video that shows picture and audio as captured by their webcam. Similarly, if your computer has a working webcam, they will see a real-time video of you and hear you talking. You can video chat, much in the same way that you would talk if you were sitting face-to-face in the same room.
- Once you have finished text or video chatting, sign out of your Skype account. This is especially important if you are using a shared or public computer. Note: Signing out of Skype will exit you from your account and you will not be able to communicate with your contacts unless you sign in again.
Activity 3: Use Gmail for Instant Messages and Video Chat
In the previous lesson, you learned how email instantly sends messages using the Internet and a mail server. Some mail servers, such as Gmail, also include tools for instant messaging and video chatting. If you used Gmail to set up your email account in the previous lesson, then you are ready for the following steps. If you do not have a Gmail account, please refer to the previous lesson.
Add New Contacts to Gmail
- Sign in to your email account, if you are not already signed in. You will need to type your email ID and your password to sign in.
- On the left side of your screen, you will see your list of contacts. Note: You will need to add contacts before you can send an instant message or video chat with other Gmail users. To add contacts, select the word Gmail from the upper-left corner and select Contacts from the drop-down menu.
- From the Contacts page, you will see a New Contact button. Your contact must have a valid Gmail address to participate in video chat or instant messaging with you.
- To the left of each contact, you will notice a status button. The color of this button indicates who is available (green), busy (red), idle (yellow), or offline (gray).
Send Instant Messages and Video Chat
- From your contacts list, select the name of a person who is online and available to chat (green status button).
- In the right-hand corner, a small box will appear with the selected contact’s name at the top and an instant message box. Type a message in the box and press Enter to send your message. Note: Typically, instant messaging is used for very brief messages of one or two sentences. Longer messages are best placed in an email message.
- In the same box, find the Video Chat icon that looks like a video camera. Select this icon to launch the video chat application (also called a Google Hangout). An invitation will be sent to your selected contact, asking if they would like to video chat with you.
- If they accept your invitation, the video chat application will use your computer’s webcam and microphone to display your camera’s view on their computer screen. Similarly, you will see and hear the other person on your computer screen. You can video chat, much in the same way that you would talk if you were sitting face-to-face in the same room.
- Once you have finished text or video chatting, sign out of your Gmail account. This is especially important if you are using a shared or public computer. Note: Signing out of Gmail will exit you from your account and you will not be able to communicate with your contacts unless you sign in again.


Apply
- In this section, you will apply what you have learned about online communication tools. Select one or more of the following activities to complete on your own.
- Use Skype or Gmail to send an instant message to your course facilitator. Type a message that explains how you plan to use these tools to connect with family and friends after the course is completed.
- Use Skype to make a voice call to another participant in the course. Change the voice call to a video call during the conversation.
- Use Skype or Gmail to make a video call to another participant in the course. During the video call, change the size and position of the video screen.
Share & Reflect
In this module you learned about many different uses of the Internet in daily life. For example, you can use the Internet to do the following:
- Find information
- Communicate with others
- Shop online
- Take an online class to learn new skills
- Listen to music and watch videos
- View global and local news
Reflect on what you learned about the Internet and online communication tools. In a small group, discuss the following questions:
- How do you envision using the Internet in your day-to-day life after you complete this course?
- Which Internet tool or application are you most excited about using? What skills do you need to continue improving in order to use this tool more effectively?
- In what ways does the Internet change the way you think about communication? What are some things you can do now that would not be possible without the Internet?
- Currently, what is your biggest challenge with using the Internet? How do you think you may overcome this challenge?
Skills Checklist
Read through the checklist to review what you learned.
- I know about the Internet and the World Wide Web.
- I can start a web browser.
- I can browse the Internet using URLs and hyperlinks.
- I am able to search for information on the Web using search engines.
- I know how to bookmark Web pages.
- I know how to create an email account.
- I can sign in and out of my email account.
- I can use my email account to read, send, and reply to messages.
- I understand basic Internet safety guidelines.
- I can search for and add contacts to my Skype account.
- I can send an instant message using Skype.
- I can video chat using Skype.
- I can add contacts to my Gmail account.
- I can send an instant message using Gmail.
- I can video chat using Gmail.
Module 4: Keeping Safe Online
Overview
As new members of the online community, you have a world of information and opportunity right at your fingertips. You can communicate with friends and family near and far in an instant through email, text messaging, and video chatting, and you can share pictures and videos on social media sites. You can conduct online transactions, such as shopping or banking. You can also find information on just about any topic you can imagine with a quick Internet search. But as you interact more online, there comes a growing need to understand how the information you share online is treated once it is out there. There is also a need to evaluate what you encounter online and to recognize misinformation.
Module 4 explores basic information about keeping safe online. In this module, you will:
- Learn how to create a safe, strong password to protect your personal information.
- Explore your digital footprint, or the bits of information you leave behind as you interact with the Web.
- Develop skills in recognizing some common online scams and threats, and learn to prevent identity theft.
- Learn the key steps in evaluating website information.
- Learn how to recognize secure websites for online shopping.
Getting Started
In what ways do you currently use the Internet in your personal and business life? Can you identify some common concerns you have while online? Using connected devices in your daily life requires that you understand how to navigate digital spaces safely and recognize the steps you should take to avoid common threats.
Technology is enhancing the way we interact and perform daily tasks, and technological proficiency is vital for success in today’s global and connected world. At the same time, as technology use grows, so do the number of potentially dangerous online situations for you to navigate. Accessing content, making transactions, and interacting with others on the Internet can put you in a variety of unsafe situations. Learning the basic steps to staying safe online can help minimize the threat to your personal information and safety.
Review some basic online safety steps outlined in the following table. You will learn more about each one of these steps in the lessons that follow.
Steps to Staying Safe Online
Use Strong Passwords: Protecting your personal information begins with using strong passwords. Your password should have a minimum of eight characters and use a combination of uppercase and lowercase letters, numbers, and special characters.
Understand your Digital Footprint: Learn how the Internet collects, stores, and uses small pieces of information you leave behind on the Web. Be intentional about information you choose to share and information you keep private.
Recognize Online Scams: Understand common online scams, and learn how to identify suspicious emails or websites. If you encounter an online scam, take the appropriate steps to protect yourself.
Evaluate a Website: Use critical judgment to evaluate the information you encounter on a website. If the information is not credible or accurate, find another resource.
Shop Safely Online: Look for the indicators of a safe and secure website for online shopping. Understand how to protect your personal information and your privacy rights.
Lesson 1: Strong Passwords
As you begin to interact more with the Internet, you will encounter websites that require you to provide personal information in order to use the full services of the site. How is this information used, and how can you be sure that your information is secure? In this lesson, you will learn how to protect your personal information through the use of strong passwords.
Learn
The first step to staying safe online and protecting your personal information is creating strong passwords. Many of your online interactions, including social media, banking, and shopping, will require that you create a password-protected account. For online transactions, an account makes it easier to keep your information handy without having to re-enter it each time you visit the site. A social media account allows you to create a personal online profile that others can view when they interact with you online.
To protect your account from criminals, and keep your personal information secure online, be sure to create strong passwords. Remember these guidelines:
Password Length: Increasing the length of a password decreases the likelihood of someone stealing your password. Create a password with a minimum length of eight characters, keeping in mind that ten to fifteen characters will create an even stronger password that is harder to steal.
Password Complexity: Create a password that includes a variety of letter types (upper and lowercase), numbers, and symbols (for example, * or !) in a seemingly random pattern to increase password strength. Note: Some websites will require you to create a password with at least one uppercase letter or symbol, while other sites will not allow special characters. Look for a list of password requirements when setting up a new online account.
Remembering your Password: Passwords consisting of three or more unrelated words may be easier to remember. Another possibility is creating a password by combining the first letters of words in a phrase or a sentence that is meaningful to you
Online Password Managers
You should try to use unique passwords for each website where you have an account, so that if one is compromised, the others are safe. Password managers, such as LastPass, can securely store and remember your passwords for an unlimited number of online accounts. This is an effective and secure solution for remembering unique passwords without writing them down in a location where they could be lost or stolen.
When you are logged in, an online password manager will automatically fill in your username and password when you visit any site that has been saved to your account. You can also securely store payment information for online shopping. Many password managers have a password generator tool to create unique passwords for you that follow best security practices.
Practice
Activity 1: Test Your Password Strength
In this activity, you will have the opportunity to explore the strength of your current passwords and explore possible stronger passwords.
- Open your web browser and navigate to How Secure Is My Password? (https://howsecureismypassword.net).
- Type the password you want to test in the box provided.
- Notice that you will receive instant feedback as you type, indicating the strength of your password. The color of the screen will change from red (weak password) to orange (moderately safe password) to green (strong password).
- Review the strategies that appear below your password and consider how you might make your password stronger.
- Practice typing different variations of your current password, using what you have learned about creating strong passwords.
- After you finish exploring, make sure to note any new passwords you created.
- Change your password on any websites where you may have used a weak password to set up your account.
- When you are finished, close your browser window to exit.
Apply
In this section, you will apply what you have learned about creating strong passwords. Select one or more of the following activities to complete on your own:
- Use the password strength finder to create three variations of one password: one that is weak, one that is moderate, and one that is strong. Share your hypothetical passwords with another participant, and ask them to rank your passwords in order of strength.
- Create an account with an online password manager, such as LastPass. Enter the usernames and passwords for any online accounts that you have created in this course.
- Revisit your email account and any other accounts you have set up in this course. Change your password on any websites where you may have used a weak password to set up your account.
Lesson 2: Your Digital Footprint
Are you wondering what happens to all of the information you share on social networking sites, or who owns the photos or videos you post online? Making sure you understand how your data is stored, shared, and found on the Internet is an important part of protecting yourself online. It will also help you make informed decisions about how and what you share.
Learn
Your digital footprint, or the trail of data you leave behind on digital devices, and how it is maintained is an important aspect of your online safety. This trail of data not only builds an online reputation but will also follow you into the future—and even into your offline life. Familiarizing yourself with the information typically saved online, as an active user of the Internet, will help protect your personal data and allow you to feel safe.
In this lesson, you will learn about the following guidelines to help manage your digital footprint:
How to Manage Your Digital Footprint
- Manage your browser’s history settings.
- Specify how your browser collects and save cookies.
- Be intentional about which information you choose to share in your social media profile.
- Be informed of a website’s privacy policy.
- Change the level of your privacy settings on social networking sites.
There are two different types of digital footprints. A passive user footprint is the trail of information you leave behind when you simply browse the Internet or conduct a web search. An active user footprint is the data collected by the Internet when you share content or upload photos and videos.
Each time you interact with computers on the Internet, you leave behind data. Sometimes this digital footprint is helpful. For example, your browser history allows you to easily find websites you have visited previously, and websites collect information that can help make your online experiences more personal. Knowing how to monitor and erase this footprint, however, is important to keeping your information safe online, especially if you interact with public computers and networks.
While Browsing the Web (Passive User Footprint)
Even as a passive user, someone who does not post pictures or videos or share any updates on social networking sites, you can still leave footprints behind as you browse the Web.
Browser History
If you did not know already, your web browser keeps a log, or history, of the websites you have visited. This can be a helpful tool when trying to recall a site you visited before. But it can also be evidence of where and when you have been online. This history is archived in a folder on your computer’s hard drive, and it can also be displayed in an organized window within your browser.

You can clear your browser’s history or change your browser settings to customize when and how long your browser retains your history. You will have an opportunity to explore your own browser’s settings later in the Practice section.
Cookies
Cookies are small files, usually consisting of letters and numbers, which are placed on your computer, tablet, phone, or similar device when you use that device to visit a website. You will not see or notice cookies when you are browsing the Web.
Cookies are widely used by website owners to make their websites operate, work more efficiently, and provide analytic information. Cookies may be used to process online orders, remember your language and other preferences, or for third-party marketing purposes.
You can turn cookies off in your browser’s preferences, or change your browser settings to customize how and when it collects cookies. You will have an opportunity to explore your own browser’s cookie settings later in the Practice section.
While Adding Content to the Web (Active User Footprint)
Active users are those who post and share content, such as status updates, blog posts, images, and videos. By sharing such content, you become a member of social networks and online communities.
Sharing our lives in images, videos, and text online is an exciting part of living in the age of the Internet. As active online users, being aware of what is happening to the information you share is an important step in managing your digital footprint.
Setting Up an Online Profile
While engaging in social media online, many websites will require the creation of an online profile. A profile is a summary of your personal details, which is viewed by other members of the site to learn more about you.
As members of any community or public space, you should be aware of how you present yourself, including on the Internet. Even though it is possible to delete content from online profiles or cancel an account altogether, the data that was shared could be saved by other users or by the service provider.
For this reason, carefully consider what you choose to share when creating an online profile for a social media site. Decide what and how much you would like to divulge about your location, age, education, interests, friends, and contact details. Ask yourself, “How would I like to present myself to others? What information would I like to keep private in order to keep my profile safe from misuse?” Remember, you can choose what information is shared and what is kept private. Note: When setting up an online profile, look for any registration boxes marked with an asterisk (*). Often, the asterisk indicates required fields for information that is needed to complete your registration. If a field is not required, or not marked with an asterisk, you do not need to provide that information.
Privacy Policies
You should read, or at least be aware of, a website or service’s privacy policy. A privacy policy is a legal statement that discloses some or all of the ways a company gathers and uses customer data. The fact that a website even has a privacy policy should alert you to the fact that you are interacting with a service that is managing your information, data, and content.
Generally, once you share, your content is no longer your own. Some services will also provide information about how they collect cookies. Knowing this can help you make more informed decisions about which sites and services you allow to use cookies. Note: Privacy policies can change sometimes without notification. It is a good idea to check back periodically to ensure that your accounts are still private.
Privacy Settings
Many online community websites and services have privacy settings that allow you to manage who is able to search for, view, and comment on the content that you post online. Being informed about the privacy tools and resources available will help you share the content you want others to see, but at the same time keep what is private away from those who might want to take advantage of you. Note: Social networking sites will often set initial privacy settings for new users to weak levels, allowing strangers to view and access personal information. When creating a new account, you should immediately review the privacy settings and set them to a level that makes you comfortable.
Be aware that it is possible in some cases for unauthorized users to access and view the content that you post online, even with strict privacy settings. However, most of the time, privacy settings can be a useful way to help manage your digital footprint.
Practice
Activity 1: Manage Your Browser Preferences
In this activity, you will practice viewing and deleting your browser history and cookies. Erasing stored information will depend on your computer’s operating system, browser type, and version. Note: For this example, we are using Chrome web browser for Windows 8.1. The process will be slightly different in other browsers and operating systems, including smart phones and tablets.
Manage Your Browser History
- To manage your browser preferences, begin with your browser history. Open the web browser you use most often, for example, Chrome or Internet Explorer.
- If using Chrome, select the Control icon in the upper right-hand corner of the browser window.
- Select “History” from the drop-down menu. A list of all the websites you have visited will be displayed along with the date and time you visited each site.
- If you are using a public computer, it is a good idea to delete your browsing history for sites that require a password or other sensitive information, such as a credit card number. Select the box that appears to the left of any website you would like to remove from your history, and select the Remove Selected Items button.
- To delete all information from your browsing history, select the Clear Browsing Data button.
- In Chrome, when you select Clear Browsing Data, you have the option of removing all websites visited in the past hour, the past day, the past week, the last four weeks, or the beginning of time. Select one of these options from the drop-down menu.
- You are also given the option of choosing to delete your download history, cookies, passwords, cached images, and form data (personal information entered into forms) for the sites listed in your history. Select the items that you would like to remove.
- When you are satisfied with your settings, select the Clear Browsing Data button again to confirm the items you wish to remove from your history.
Manage Cookies
- Open your web browser and locate your browser’s preferences. In Chrome, select the Control icon and select Settings from the drop-down menu.
- At the bottom of the Settings page, select the “Show advanced settings…” link.
- Under the Privacy heading, select Content Settings to view your current browser settings for cookies.
- Browse the three options for how you would like your browser to collect and store cookies. Remember, cookies can be useful on trusted sites for remembering your language and site preferences. Many online shopping sites require cookies to process transactions. However, some sites use cookies to sell information about you to third-party advertisers, so it is okay to be cautious. Select one of the cookie options: Allow local data to be set (low privacy), Keep local data only until you quit your browser (medium privacy—a good choice for public computers), Block sites from setting any data (high privacy—may affect the functionality of some sites)
- Select the box next to “Block third-party cookies and site data” if you would like to prevent any advertisers from collecting information about you.
- To manage exceptions to the rules you set above, select the Manage Exceptions button and type the URLs of any websites you wish to specify. Next to the URL, select “Allow,” “Block,” or “Clear on exit” to indicate how you would like cookies to be handled on this specific site.
- To view which sites are collecting cookies from your online activity, select the All Cookies and Site Data button. A list of sites will be shown.
- Select Done to save your settings. Close and exit your web browser.
Activity 2: Analyze a Privacy Policy
In this activity, you will practice analyzing a website privacy policy. Reading every policy of every website you encounter is likely a near impossible endeavor. However, closely analyzing one policy can be an eye-opening exercise.
- Open your web browser and navigate to Skype (www.skype.com), a popular site for video chatting that you may have used in a previous module.
- Scroll down to the blue footer at the bottom of the page. Select the “Privacy and Cookie Policy” link.
- This will open the Skype Privacy Policy in a new tab. Read through it and try to answer as many of the following questions as you can: What information is being collected? Why is the information being collected? Does the website sell or share my information?
- Is the information being collected only when I submit forms, or with more discreet methods such as cookies? What security measures does the website have in place to protect my information? Do I have a choice about how the website collects or uses my information?
- After analyzing the privacy policy, reflect and discuss with other participants in the course. Use the following questions to guide your discussion: Was any content in the Skype privacy policy surprising? Does the Skype privacy policy meet your expectations in terms of keeping your information secure? Did reading the privacy policy change how you will use or interact with Skype? If so, how? Which websites do you frequently use that might have privacy policies that would be worthwhile to explore?
Apply
In this section, you will apply what you learned about managing your digital footprint. Select one or both of the following activities to complete on your own:
- Open a website that you visit frequently and analyze the privacy policy. Write an email to your course facilitator, explaining how this website collects and uses your information.
- Conduct a web search to find three ways that cookies are beneficial to daily Internet use, and three reasons why you should be cautious of how and when cookies are collected.
Lesson 3: Online Scams
What are some common online scams and threats that you might encounter when reading email or searching the Internet? By knowing how to recognize these dangers, you can take steps to protect yourself from crimes like identity theft.
Learn
The Internet is a powerful tool for connecting virtually with the world around you. You can communicate with friends through email, do your shopping, conduct your banking, and research topics of interest simply by using your computer. Unfortunately, scammers, individuals with malicious intent, use the Internet as a platform for easy access to potential victims. Knowing how to recognize and avoid threats from scammers is an important part of protecting yourself online.
How to Recognize an Email Scam
If you use email, you are likely to run into a phishing scam at some point. Phishing scams are attempts to trick you into revealing personal information such as credit card information, bank account information, social security numbers, etc., through the use of fraudulent emails and websites posing as legitimate organizations. While some of these scams are fairly easily to recognize due to their absurdity, others are quite sophisticated. There are, however, ways to help identify a phishing email through some common characteristics.
Strange Sender Address
A strange sender address in an email is the first sign that something is not right. For example, if you are expecting a package from the US postal service and receive an email from them, you should expect to see a sender address like sender@usps.com. If instead you see something like shipping_status_id49@icucnj.com in the message’s sender address, you should be very suspicious.
The domain, or website name, used by the company will appear after the @ symbol and it should match up with their web address. Even if the text before the @ symbol makes sense, it is the domain that is important.
For the USPS, for example, this should be usps.com. A legitimate company will never send official emails from non-company email addresses. It is possible to fake a sender address, however, so you should pay attention for additional clues to scams as well.
Awkward Greetings
A scam email will often use generic greetings, such as “Dear Customer” or “Member” rather than addressing you by name. They may not even attempt to personalize the email, merely saying “Hi” or offering no greeting, indicating this may be a broad email sent to numerous individuals.
The content of a scam email may try to imply that the sender knows you and has sent you a previous email. For example, you may receive an email offering you an impressive job opportunity. Remember, always pay attention to awkward greetings. If the sender knows you well enough to offer you a job, for example, they should certainly know you by name.
Typos and Incorrect Grammar
In addition to strange email addresses and awkward greeting clues, you may also find an email riddled with awkward grammar. Scam emails often have misspelled words and grammatical errors in an attempt to thwart email filters that detect spam code words and phrases. Legitimate companies and organizations generally employ copy editors and would not send out mass email with these mistakes. Multiple errors should be a red flag for a potential scam.
Links to Other Websites
Reading scam emails is not inherently dangerous. What scammers really need is for you to go to their website or download their files in order to steal your information or infect your computer. This means that scam emails often include links to outside websites where you may be asked to “verify your information” or “update your account.” Often when you click on this link, you are sent to a very impressive, fake website where you enter your information or you unknowingly download malicious software to your computer.
Sometimes, you can tell the website link in the email is a fake based on the visible URL, but it is easy to disguise a link. To find the true destination of a link, hover your cursor over the link but do not select it. Your browser window will then display the true link URL, either right there on the page or in the bottom left corner of the browser window.
Compelling or Alarmist Language
Scammers will often try to motivate you to immediate action with language that either indicates that you are about to miss out on something really great, such as lottery winnings, or you need to stop something really terrible, such as unauthorized access to your bank account. For example, you may receive an official-looking email from a bank telling you that your account has been suspended, and you need to update your account information by clicking on a link that will expire in 24 hours.
This is a ploy to force you into action quickly before realizing you are being duped. A legitimate bank will not ask for your information over email, and you should not trust any links included within an email. If you are not sure about the authenticity of an email, the best thing to do is to go directly to what you know to be the real website of the institution, or call a verified phone number for them and ask to speak to a representative.
“Too Good to Be True” Offers
We would all like to earn money quickly and easily, but in most cases we are going to have to work hard for it. If an email claims that you can make a lot of money with very little effort, it should be a red flag that something is not right. Variations of this scam include offering free or extremely discounted products, such as pharmaceuticals or software. Stick to the saying, “If it sounds too good to be true, it probably is.”
How to Recognize a Web Scam
Scammers do not always try to get to you through email. Sometimes just browsing the Internet can make you vulnerable as well. You can protect yourself by becoming aware of some things to be cautious of while browsing online.
Pop-Ups
While many scams originate through email, some criminals target you while you are just browsing the Internet. One method they might use is the pop-up. A pop-up is a window that opens on top of whatever you were doing on the computer. Sometimes, these are innocent advertisements meant to get you to buy a real product. But other times, it is something more malicious.
One popular pop-up based scam is the fake anti-virus alert. A window will appear that tells you that a virus has been detected on your computer, and then instructs you to click on an official-looking button that will take care of it. What actually happens is that when you click on that button, you download malicious software onto your computer. If you see a window like this, close it immediately and do not click on any of the links or buttons. There are variations of this scam, such as asking you to update other software programs. If you want to install updates to any of your software programs, do it directly through the program by launching the program and using the established update process.
Another popular pop-up scam is the contest winner scam. In this scenario, a window opens indicating that you have won some sort of prize, or you have the chance to win a prize. Usually there is a claim link, or you are asked to fill out a short form or survey. This is another trick to get your information. Unfortunately, people do not generally win money or prizes just for browsing the Internet.
The best way to deal with pop-ups is to not get them in the first place. Most Internet browsers have installed pop-up blockers, which stop most pop-ups from even opening. If you do get a suspicious pop-up, however, the next best thing to do is just to close the window and ignore it. A pop-up should have a close or X button in the top right or left corner to close the window.
“Free” Download Sites
Everyone likes free stuff. You may come across websites offering to let you download movies, music, software, or games for free. Be very skeptical of downloading any free files that would cost money on a legitimate website. These downloads could install harmful programs on your computer without you even knowing. Also, remember that anything truly free will not ask for your credit card information. If you are unsure about something, first try a web search with the name of the website to read reviews or see if it is associated with known scams.
Fake Websites
You might select a link online that you think will bring you to the Bank of America website where you can sign up for a low-interest credit card. It looks like their website, and it has their logo and contact information. However, the address bar shows a misspelled web address or even a completely different web address than their official one. Many scammers will create exact copies of very official looking sites to trick you into revealing your login information or more. If the URL shown in your browser is anything other than what you know to be the official website of the institution you think it is, do not enter your information.
How to Protect Yourself
While receiving scam email and browser advertising may be unavoidable if you are an active member of the Internet community, consider the following ways to protect yourself and avoid becoming a victim:
- Install and maintain anti-virus software, firewalls, and email filters. Most computers come with some basic antivirus protections. Familiarize yourself with the process for keeping this software up to date, and run regular updates on it. Firewalls are a part of your computer network that are designed to block unauthorized access. They are another method of keeping your computer safe, and most computers and routers have them. They may not prevent spam in your email box, but they can help protect your computer from sending information back out to scammers. Another method of protection is to install pop-up blockers on your web browsers. You cannot fall victim to a scam you never see. Most email applications and web mail services also include some spam filtering features. Find out what filters your email provider offers, and use them to reduce the amount of email scams you receive.
- Regard all unsolicited email with suspicion. Do not automatically trust an email sent to you, even if it appears legitimate. Look for the signs of scam emails. Never click on an unknown link in an email or open an email attachment unless you are certain that it is safe.
- Use common sense. If an email, website, or pop-up seems to be offering you a deal that is too good to be true, assume that it probably is.
- Never send personal, credit card, or account information by email, or enter it on a site you are not certain is genuine. Most banks and other institutions do not ask for account information over email. If you are unsure, call your institution directly to confirm.
- Always confirm the web address of the site you are expecting to be on. If there are typos in the web address or it does not match up with what you expect, do not trust it. Using browser bookmarks is a good way to be sure you are going to correct websites that you use often.
- Never download any software or files from an unknown site. It is possible for criminals to put malicious programs into a download and infect your computer or steal your information, often without you even noticing. Only download from sites you know and trust.
Note: If you think you may have been the victim of an online scam, immediately change your passwords on any accounts you think might have been compromised. Contact any institutions to which you might have revealed sensitive information directly by phone; do not rely on links or contact information contained in email.
Practice
Activity 1: Identify Scam Emails
Email scams can be quite sophisticated, but there are often warning signs that tell us an email may not be what it seems. In this activity, you will practice identifying the suspicious parts of scam emails.
- Examine the email below. Write down the parts of the email that indicate that it might be a scam.
- Discuss your notes with another course participant. What red flags did you find in this email? What should you do if you are sent an email similar to this one?

Activity 2: Update Your Operating System
One easy way to protect your information when using a computer is to make sure your operating system is up to date. An out-of-date operating system running on your computer could leave it vulnerable to attacks. In this activity, you will check if your operating system is up to date. Note: For this example, we are using Windows 8.1. The process will be slightly different in other operating systems.
- From the start screen of your computer, select the Search icon.
- Type “Windows Update” and select Windows Update from the search results.
- A window will open, indicating the current status of your operating system. You will also be able to find out if there are any updates available. Note: Your computer may be set to automatically install updates. We recommend that you keep this setting.
- Select the links for any updates you wish to install.
- Follow the installation prompts. When the installation is completed, you will be prompted to restart your computer.
Apply
In this section, you will apply what you have learned about recognizing online scams. Select one or more of the following activities to complete on your own:
- Use a word processing application to create a suspicious email, based on what you have learned about scams. Give this email to another course participant and ask them to identify the parts of your email that are red flags for a scam.
- Test your knowledge about recognizing online scams by taking an online quiz. Go tohttps://home.mcafee.com/safetyquiz/quizshopping.aspx and answer each question, then read your results and explore tips on how to protect yourself from online scams.
- Write an email to another course participant, explaining three steps you plan to take to protect yourself from web scams.
Lesson 4: Website Evaluation
The fact that something appears on the Internet does not make it accurate or objective. Because of this, it is important to hold the sources you find online to the same standards you would for print material. In this lesson, you will learn how to evaluate whether the information you find on a website is reputable and trustworthy.
Learn
When you browse the Internet, it becomes quite apparent that every site is different from the next. But why is any one website more reputable than another? How do you know whether or not the website you are visiting is providing legitimate, or even accurate, information?
Not all information found on the Internet is reliable and can be trusted. Online content can be created by anyone with a few basic computer skills, and untrustworthy companies or organizations may create websites that can present misleading, biased, or inaccurate information. Because of this, some guidelines are useful when evaluating a website. The following key areas should always be reviewed:
Authority (Source)
Who is providing the information?
Accuracy: Is the information reliable?
Currency: Is the content up to date?
Objectivity: Is the information free from bias?
Links: Are citations provided? Are there links for further information?
Domain: What type of organization publishes the information?
Authority (Source)
A first look at a web resource should involve determining who is the author, or source, that is providing the information. This might be an individual or an organization or company.
In some cases, the author is clearly listed at the top of the Web page. If the page does not have an obvious author, you may find more information at the bottom of the page by selecting the About link. Here, you can often find more details about who creates and publishes the content on the website. Sometimes, it is not possible to determine an author or publisher of certain content. If that is the case, you might want to try and find another resource.
Accuracy
Determining if website content is accurate can take some work and be time-consuming, but it is an extremely important step in ensuring that the information you find on the Internet is reliable. Any names, dates, or facts can and should be found in another independent location or source.
To check for accuracy, you can copy and paste quotes from the Web page into the search engine of your browser. This will help you determine if there are additional sources to back up the information you found in your original source.
Currency
As you review a web resource, check if the information is recent and up to date. Keep in mind that this may be dependent on the type of information presented. Some information is timeless or historical in nature, and therefore an article from several years ago could still provide accurate information. In fields where knowledge develops rapidly or data is expected to change often, such as the medical field or technology field, currency is more important.
You can often find more information about currency at the bottom of a Web page. Typically, you will find a copyright date or a link to an About section that provides the date it was written.
Objectivity
Objectivity, or being free from emotional or personal bias, is an area of review that requires more investigation. As you look for bias, ask yourself, “Is the author trying to persuade the reader? Do they seem to have an agenda?” A straightforward article that mostly delivers facts that can be verified with a web search is probably objective.
A heavy presence of advertisements can be an indicator for compromised objectivity. You might want to ask yourself why the site has so much space dedicated to paid advertisements. It could be that the organizations paying for ad space have influence over the content being displayed. Keep this in mind while researching and evaluating online resources.
Links
You may come across resources that link to other Web pages via hyperlinks. These links are typically sources referenced to help create the content of the page you are viewing. Following these links can lead you to more resources or help you verify the accuracy of the page you are viewing. A reliable site will provide citations for its information as well as reference links.
Domain
One last area to review during your evaluation, related to the author, is a web source’s domain type. This will help you determine whether the website is linked to a federal agency, a nonprofit organization, an educational institution, or a business.
You can determine the domain type by looking at the last three letters that appear in the URL. Common examples of domain types include:
- .com for commercial use
- .gov for government use
- .org for a non-commercial organization’s use
- .edu for educational use
- .net for general purpose use
Recognizing sites with different domains can give you a sense of the kind of information on the page, and whether it can be trusted or needs to be reviewed more carefully.
Practice
Activity 1: Evaluate a Website
If you are trying to do research on the Internet, a set of guidelines is useful to determine if you have come across a reliable or unreliable source. In this activity, you will practice evaluating websites.
- Open a web browser on your computer.
- Choose one of the following websites and type the URL in your browser’s address bar. CNN, The Onion , National Geographic, Natural News
- Search the Web page and find an article or story.
- Look for the page’s author or source (Authority). Is there a link to an About page that explains the person or organization responsible for the site, and does the source appear legitimate?
- Find some facts or statistics that can be verified using another source (Accuracy). Open a new tab in your browser and type information from the original source into the search bar. Is there another web resource that can verify the accuracy of the information?
- Check to see if the site is up to date (Currency). Is there a date to show when the site was last updated? Is the information on the site expected to change and require frequent updates?
- Determine if the content is overly biased (Objectivity). Is the purpose of the site to sell products or advocate a specific point of view?
- Follow any links or resources provided on the page (Links). Are the sources of information cited when they should be?
- Determine the website’s domain name in the URL (Domain). What type of organization is publishing this information?
- Compile the information you gathered from the previous steps in this activity, and determine if you feel that the information from this website is trustworthy. Share your findings with another course participant.
Activity 2: Evaluate a Web Search
In this activity, you will practice searching the Web and evaluating resources from your search results.
- Open a web browser on your computer.
- In the address bar, type a few keywords to search the Internet for a topic of your choice. For example, you may want to research information on the ivory-billed woodpecker.
- Press Enter on your keyboard to view a list of popular websites offering information on this topic. For more information about conducting a web search, review Module 3: The Internet, Email, and Communicating Online.
- Scroll down the page to find a result that looks interesting. Select a link that looks like it could offer some useful information on your topic.
- Follow the steps outlined in the previous activity to evaluate the website you selected. Review the key questions listed in Activity 1.
- Compile the information you gathered and determine if you feel that the information from this website is trustworthy. If it is not a reliable site, return to your search results and select another resource.
Apply
In this section, you will apply your website evaluation skills. Select one or more of the following activities to complete on your own:
- Locate one reliable and one unreliable web resource on a topic of your choice. Share the two links with another course participant. Ask the other person to identify which of the links is the reliable source, and explain why.
- Locate a web resource on a topic of your choice. Write an email to your course facilitator, explaining why you think this resource is either reliable or unreliable.
Lesson 5: Safe Online Shopping
Learn how to recognize secure websites for taking advantage of one of the many conveniences of modern life: online shopping.
Learn
The Internet makes shopping online accessible and convenient. You can order everything from clothing to groceries, from all regions of the world. However, there is a growing online threat where a person makes unauthorized use of someone else’s name and personal information, such as passwords, usernames, or financial information, to commit theft or other crimes. This is commonly referred to as identity theft.
While these criminals are quite clever in their methods, you can protect yourself by knowing how to recognize secure and reputable shopping websites, and taking simple steps to secure your information.
How to Identify a Trustworthy Shopping Website
If you choose to shop online, there are several signs you should look for on a website to help predict whether it is secure and reputable.
Confirm it is a “Secure” site. Trustworthy online retailers will take multiple steps to show their customers they are secure and reliable. The first thing to look for on any shopping website is the indication that it is a Secured site.To determine if a site is Secured, look in your browser address bar for a web address that begins with “https.” The “s” at the end stands for Secure and means that the website is using what is called the SSL protocol. This site has been granted a digital certificate indicating the business is a trusted party that has been vetted by appropriate authorities. Note: The https indicator may not always be present on the main website page, or even while browsing, but should always be there any time you are asked to enter information. Note that when you attempt to log in to your account on the site, the secure web address appears.
Look for the padlock icon. Additionally, you should notice a small padlock icon to the left of the web address. This is another on-screen indicator that the website is safe and secure. If the padlock is open or missing, treat the site with caution. Also, make sure the icon is in the web address bar and not on the page itself. It is easy to fake an icon on a Web page, but not in the browser bar.
- Look for privacy and return policies. You should also be able to easily find a company’s privacy and return policies on the website. These policies will often be linked on the top, side, or bottom of a website. Sometimes they will be under a general policies page, or other times have individual links. Take the time to read these policies, especially if you have not done business with this company before. Pay particular attention to how the company shares your information with third parties. Your personal and financial information should never be shared with a third party without your knowledge, or without an option to opt out. The return policy should clearly state what your responsibilities are in terms of returning purchased merchandise.
- Confirm contact information. Legitimate retailers will have clearly posted contact information, including an actual physical address (not a PO box) and a phone number. This information is often found in the footer of the Web page or under a Contact Us link. If no contact information is provided, this should be a red flag. Phone numbers and addresses can also be faked, so if this is your first time ordering from this retailer, you might want to do a web search on their address and phone number to confirm it is real.
- Make sure credit cards are accepted. Credit cards are generally the safest payment option when shopping online because there are laws that protect you from responsibility for fraudulent charges (known as the Fair Credit Billing Act). You may not necessarily have these same protections when using a debit card or other method of payment. You should be able to tell if a website accepts credit cards by looking at their ordering information or policies. Even if you plan to use another form of payment, be cautious of a site that does not accept credit cards as a payment option, and never send cash or money orders through the mail.
- Check the type of information collected. During the ordering, checkout, or account set-up process, only necessary information should be collected. This would include things like your name, email address, phone number, billing and shipping addresses, and payment information. You should never be asked to reveal your social security number to an online vendor. Also be cautious of sites that require a lot of details about you, without the option of opting out, such as household income or education status.
- Look for evidence of certification. If you are considering ordering online from a merchant you have not done business with before, you can check to see if the merchant has been certified by the Better Business Bureau. This is a nonprofit organization devoted to connecting consumers to trustworthy businesses. You can do this by searching for the business name on the bureau’s website at www.bbb.org. Some retailers will also show their accreditations with badges on their site. If no certification is present, conduct an online search for reviews of the retailer. Many online shoppers will write reviews and testimonials about a business, which may be a useful indicator of the trustworthiness of a site.

Keeping Safe When Shopping Online
In addition to making sure a website is trustworthy, consider these additional steps you can take to protect yourself while shopping online:
- Keep your device software and hardware up to date. The first step to protecting yourself when doing any type of business online is to keep all of your computing device software and hardware up to date. Most devices have anti-virus, anti-spyware, and firewall protections installed already. Make sure you keep them current by installing updates as they are released. Also be sure you are using the latest web browser and install any updates. When security holes are discovered in browsers, they often issue patches. When your device indicates there is an update to your browser software, install it.
- Use strong passwords. It is often more convenient to create an account on shopping websites you plan to use often. This makes it easier to keep your information handy without having to re-enter it each time you shop. To protect your account from criminals, however, be sure to create strong passwords. For more information, review Lesson 1: Strong Passwords.
- Keep records of your purchases. Be sure to save your order confirmation emails or print out your order confirmation details until you have received your items and are satisfied that they were delivered and charged appropriately.
- Be cautious of emails requesting information. Email is not a secure means of transmitting personal and financial information. Legitimate businesses will not ask you to send information via email. You should only provide information through trusted, secure websites.
- Check your statements. Keep tabs on your bank and credit card activity and report any discrepancies or unrecognized charges immediately.
- Be cautious on public computers and networks. While public Internet service is a wonderful benefit offered at many places, shopping and banking online should be reserved for secure networks and computers. A public network may not be secure. If using a public computer or network is unavoidable, be sure to log out of any accounts immediately after your business is complete. For an extra measure of protection, clear your history and delete any cookies that were collected on a public network.
- Trust your intuition. If you have a bad feeling or something seems “off” about a website, such as the amount of information they are asking for or deals that seem too good to be true, trust your instincts and choose another vendor.
Practice
Activity 1: Evaluate Online Shopping Sites
If there is something you can buy, there is probably an online retailer selling it. In this activity, you will practice evaluating the trustworthiness of online shopping sites.
- Open a web browser on your computer.
- Choose one of the following popular online retailers and type the URL in your browser’s address bar, or choose a shopping website of your own: Amazon, Overstock, Wayfair, 1800Contacts, Zappos
- Look for a secure web address that begins with “https.” Remember, you may have to enter a secure part of the site before you see this.
- Look for the padlock icon in the address bar.
- Locate links to the privacy and return policies.
- Verify the company’s contact information.
- Confirm that the site accepts payments by credit card.
- Check to see that only relevant information is collected when creating an account.
- Check to see if the retailer is accredited by an outside organization, for example, the Better Business Bureau.
- Discuss your findings with another course participant. Would you trust this site for online shopping?
Apply
In this section, you will apply what you have learned about shopping safely online. Select one or both of the following activities to complete on your own:
- Search the Internet for a product that you might like to purchase. Use what you have learned to evaluate the trustworthiness of the online retailer.
- Write an email to another course participant, listing three steps you plan to take before purchasing a product online. Ask this participant to respond to your email and include two additional steps on your list.
Share & Reflect
In this module, you learned about different precautions you should take to protect your information and stay safe while interacting online. Reflect on what you learned about online safety. In a small group, discuss the following questions:
- What types of technology do you currently use in your personal and business life? In what ways do you use these technologies? What are some potential danger areas?
- What steps do you plan to take to ensure that your browsers and computer operating system are up to date?
- What areas of online safety do you see as your strengths, and which areas would you like to know more about?
Skills Checklist
Read through the checklist to review what you learned.
- I can create a strong password.
- I can manage my browser’s history settings.
- I can specify how my browser collects and saves cookies.
- I can analyze a privacy policy.
- I can change the level of my privacy settings on social networking sites.
- I can recognize common characteristics of email scams.
- I can recognize common characteristics of web scams.
- I can update and maintain anti-virus software.
- I can install pop-up blockers on a web browser.
- I can use email filters to help block scam emails.
- I can update my computer’s operating system.
- I can evaluate the content of a website and determine if it is trustworthy.
- I can evaluate an online shopping site and determine if it is trustworthy.
Module 5: Social Media
Overview
Think about a typical day in your life. How do you communicate with friends and family? In what ways do you meet new people who share common interests? How do you voice your opinion? Social interactions are a fundamental part of our daily lives. With the Internet, we have the opportunity to expand our social interactions—even with people across the globe.
The Internet has changed the way we think about sharing and communicating with others. New technologies mean that today’s online experience can be interactive, dynamic, and social. Module 5 explores the social and community-building features of the Internet. In this module, you will:
- Explore the features of social networks and engage in setting up your own online profile.
- Learn about media sharing sites while viewing and uploading videos to the Internet.
- Explore safety guidelines for protecting yourself on social media sites.
Getting Started
Social media is becoming ever ubiquitous in today’s online culture. Social media is a group of Internet-based applications that are used for social interaction and communication. These applications allow people to create and exchange content, share information, and communicate with others in online communities.
Explore the following chart to learn about the different types of social media. Keep in mind that many social media websites may have overlapping features.
Social Network
A website where registered users can set up online profiles and add links to other profiles. Social network users can post photos, videos, and text entries that are viewed by other users in the network.
Potential Use: Keeping in touch with family and friends, finding communities with a common interest, promoting a business, reading global news, and watching news videos
Media Sharing
A website that allows users to upload and share various media, such as photos and videos. Most media sharing sites have additional social features, such as online profiles and commenting.
Potential Use: Learning a new skill or watching educational videos, engaging in a community with common interests, promoting a business, watching news videos, and sharing photos and videos with family and friends
Microblogging
A social media tool that allows users to send and receive frequent published updates, typically of 140 characters or less. Text messages are uploaded to a microblogging service and then distributed to all group members.
Potential Use: Receiving current news updates, following people with common interests, and sharing an opinion on current topics or trends
Social Bookmarking
A method of social networking in which users save and share links to Internet content that they believe may be of interest to others. A user’s list of links may be viewable to the public or shared privately.
Potential Use: Finding relevant and popular websites of interest, bookmarking a link that you want to revisit later, and reading and posting comments on web content
Social News
A website that allows people to post various news items or links to online articles, and then allows users to “vote” on the items. The news stories that get the most votes are displayed the most prominently, and therefore, the online community decides which news items get seen by more people.
Potential Use: Reading popular news stories from around the globe
Forums and Blogs
Online forums and blogs allow members to have a conversation or share their opinion by posting messages, usually in response to a topic or question that has been uploaded by a community member.
Potential Use: Reading reviews about a business or web service, engaging in conversation with people that share a common interest, asking questions, and collaborating with others
Lesson 1: Social Networks and Online Communities
Within your community, you likely have a group of close friends with whom you socialize and share common interests. In this lesson, you will learn how social networks and online communities use the Internet to make both personal and professional connections outside of your community and around the world.
Learn
A social network, like Facebook or LinkedIn, is a website or application that enables users to connect and communicate with each other by sharing information online. Members of a social network can deliver and discuss information in the form of text, images, and videos. While many people use these sites to stay connected with friends and relatives, they can also be used for professional networking and making business connections.
An online community brings together a cohesive group of people centered on a common interest or goal. Similar to a social network, members of an online community use the Internet to share and discuss information. Online communities can be established around personal interests, such as people who enjoy cooking, or professional goals, such as educators seeking ways to infuse more creativity into their teaching practices. An online community can also bring together consumers who wish to share and read reviews on popular products, hotels, restaurants, and services.
Before you get started, review some common social networking terms that you may encounter:
Avatar
An avatar is an image that represents a person online within discussion forums and social networks.
Friend
In a social network, a “friend” is another user who you give permission to view your profile and engage with you online.
Post
A post is a typed message, photo, or video put online by a social network user.
Comment
A comment is a response that is often provided as an answer or reaction to a post on a social network. Comments are a primary form of two-way communication on social networks.
Like
A “Like” is a quick action that can be made by a social network user to show approval. It is often represented by a “thumbs up” icon.
Tag
A tag is a keyword used in social media to help users search for relevant content. In a social network, your name might be tagged when someone identifies you in a photo, video, or comment that they post online.
News Feed
A news feed is a continually updated list of all the latest news stories, comments, and posts made by other users. You can personalize your social network to indicate what content shows up in your news feed.
Practice
Activity 1: Create a Facebook Account
In this activity, you will be using an application called Facebook. Facebook allows you to share information, videos, photos, and other content about yourself and your business with friends and other communities.
Sign Up for a Facebook account
- Open your web browser and type www.facebook.com in the address bar.
- This will take you to the Facebook homepage, where you have the option of logging in with your existing account information or signing up for a new account.
- Select the Sign Up button and create your account by entering the required information in the boxes provided. Note: You will need a valid email address to sign up for an account on Facebook. For help with setting up an email account, review Module 3: The Internet, Email, and Communicating Online. Your email will be used as an alternate means of contact should your Facebook account ever be compromised.
- You will also need to enter your birth date, as Facebook does have an age restriction. Note: You can choose to make this information private once you set up your account.
- Once you have completed all of the required information, select the Sign Up button.
Personalize Your Account
- After you have entered your information, Facebook will walk you through the additional steps for setting up your account.
- In Step 1, you can help Facebook find your friends by allowing it to access your email contacts. You will not, and should not, enter any passwords to do this. Note: This step is optional. You do not have to allow Facebook to access your email contacts in order to use the site. If you do not want Facebook to send email to all of your contacts, then it is recommended you select “Skip this step.”
- In Step 2, you will be asked to upload a profile picture. This is optional, but it will make it easier for others to find you on Facebook. If your computer has a webcam, you can take a picture using that. You can also upload a picture saved on your computer.
- To complete your account setup, you will need to check your email account for a message from Facebook. Select the “Confirm Your Account” button and enter the confirmation code that appears in the email.
Customize Your Privacy Settings
- After you have completed the account setup process, Facebook may offer you a privacy tour to get to know the privacy features and settings on Facebook. It is a good idea to take this tour, especially if you are new to social media.
- If you are not offered a privacy tour, or to customize your account privacy settings at any time, select the Privacy icon found in the top navigation bar.
- Select the down arrow to expand the menu for each privacy question, such as, “Who can see my stuff?” and “Who can contact me?”
- When you select the arrow, an expanded menu will drop down with additional questions and options to choose your privacy settings.
- You can also select Privacy Checkup to go through a guided tour that will make sure you are sharing what you want with the right people.
- Select More Settings or Privacy Basics to read more about Facebook’s privacy features and learn how to protect your information.

Activity 2: Explore Facebook
Now that you have set up your account and customized your privacy settings, take some time to explore and interact on Facebook.
Add Friends and Groups to Your Network
- Log in to your Facebook account with your email address and password.
- Search Facebook for people you know, or groups and organizations you are interested in, to begin building your network. Type your search words in the box that appears at the top of the Facebook page, and press Enter on your keyboard.
- Select a person’s name from your search results to view their profile page. Note: If you are not Facebook friends, you will only be able to see information they choose to share publicly.
- To connect with someone from his or her profile page, send a friend request. They will need to approve you, and once they do, you will be able to see their full profile and send a personal message.
- From your search results, you can also add groups to your network by selecting the “Like” button that appears to the right of each search result. This will allow any posts from the group to appear on your Facebook homepage.


View and Add Comments to Your News Feed
- To go to your news feed, select the small Facebook icon at the top of the page, to the left of the search bar. This is your personal Facebook homepage.
- Scroll down the page to see entries in your news feed from groups you have liked, or people you are Facebook friends with. Entries may include messages, links to news stories, photos, or videos.
- You can “like” and comment on messages posted in your news feed. To like something, select the Like link below a post. Note: If you accidentally like something by mistake, you can select the Unlike link, which is only available on posts you have liked.
- To comment, type in the box that appears below a post and press Enter on your keyboard. Notice that your comment now appears below the post, along with your profile image.
- Return to the top of your news feed page by selecting the small Facebook icon at the top of the page.
Post a Status Message, Photo, or Video
- You can update your status message from your news feed or your profile page. This will send a message out to all the people you are connected to on Facebook, and appear within their news feeds.
- Type your message in the box at the top of the screen and select the Post button.
- To post a photo or video message, select Add Photos/Video.
- Browse your computer to locate the file that you wish to upload, and select Open.
- You can set custom privacy settings on individual messages, as needed, to ensure that your content is only being shared with those you intend to share it with. Select the drop-down arrow menu that appears to the left of the Post button. Note: Your general account privacy settings will be used if you do not indicate custom privacy settings for your message.

View Your Profile Page
- To view your personal profile page, select your name from the top navigation bar.
- From this page, you can add or edit your profile information. Note: It is recommended that you wait until you complete Lesson 3: Safety for Social Media before adding information to your profile. In this lesson you will learn key information about staying safe while sharing personal information online.
- Look in the top navigation bar for additional icons that are important to understand. The small globe icon is your notifications. Notifications may include, for example, if someone has commented on one of your posts or tagged you in a photo. When you have notifications, a small red box will appear here with a number indicating the number of new notifications.
- Locate the small speech bubble icon. This is where you will receive notification of a direct message. A direct message is a private message conversation between you and another network user, and it will not appear on anyone else’s news feed. A small red box will appear when you have a message.
- Locate the small icon of people. This indicates friend requests, or requests from people who want to connect with you. If someone has requested to be your friend, you always have the option to approve or ignore the request. A small red box here indicates that you have pending requests.


Log Out of Facebook
- It is important to log out when you are finished using Facebook to prevent unauthorized use of your account, especially if you are accessing Facebook from a public computer.
- Select the small down arrow in the upper-right corner of any Facebook page.
- Choose Log Out from the drop-down menu. This will log you out of your account and prevent anyone else from gaining access to your information.
Apply
In this section, you will apply your social networking skills. Select one or more of the following activities to complete on your own:
- Explore LinkedIn (www.linkedin.com), a popular networking tool for making business and professional connections. LinkedIn can be used to recommend job candidates, find industry experts, and connect with business partners. Identify the features of this site that might be useful for you in your current occupation. If desired, sign up for an account.
- Explore Pinterest (www.pinterest.com), an online social “pin board” where you can post collections of things that interest you, and follow collections created by people with similar interests. Conduct a search on Pinterest to find interesting and useful pins. Note: You do not need to sign up for an account in order to conduct a search, but you will need an account to pin and save items.
- Explore TripAdvisor (www.tripadvisor.com), an online community where members can post reviews and comments about local restaurants, hotels, shopping, professional services, and much more. Use the site tools to find a local restaurant you would like to try.
- Conduct a web search to find an online community centered around one of your personal interests, for example, cooking. Identify the features of the online community that might make it a good fit for you. If desired, sign up for an account.
Lesson 2: Media Sharing
Imagine that you have an inspiring video interview with a local community member, or eye-catching photos to promote your new business. How can you share these photos and videos with the global community? In this lesson, you will learn about media sharing sites and how they can be used as part of your online social presence.
Learn
Media sharing sites are applications that allow you to upload photos, videos, and audio to a website that can be accessed from anywhere in the world using an Internet connection. You can choose to share your media with the world or just a select group of friends. Most media sharing sites have additional social features, such as online profiles, tagging, and commenting.
Videos
One popular type of media sharing is a video-sharing site, such as YouTube*. Video-sharing sites allow registered members to upload videos that can be viewed by other members. When a video is uploaded, the owner can decide whether the video is shared publicly (anyone can view it) or privately (only selected members can view the video). The videos become a social experience when members comment on the video content or “like” the video. Videos can easily be integrated and shared across popular social networks as well.
Some businesses use video-sharing sites as a way to create interest in their company, by creating a video that people share with their friends. Others use video sites to search for and view videos on just about any topic, both educational and entertaining. Online communities can form around a video series, sometimes called a channel, where members communicate around a common interest. You can also use a video site to upload your own personal videos that can be viewed by family and friends.
Photos
Another type of media sharing is a photo-sharing site, such as Flickr*. Photo-sharing sites allow registered members to upload images, where they can be viewed publicly or privately. Similar to a video-sharing site, the photos can become a social experience when members make comments on or “like” a photo that has been posted. Photos that have been uploaded to a photo-sharing site can easily be shared across social networks and integrated into other social media applications, such as social bookmarking sites.
Photo-sharing sites are useful if you want to store, annotate, or share multiple albums of full-resolution images, rather than posting a single photo to a social network. You can use a photo-sharing site to manage and back up your personal photos, or create an online community around photos that focus on a specific interest you may have.
Practice
Activity 1: Play Videos Using YouTube
In this activity, you will learn about YouTube, a video-sharing site. One advantage of using YouTube is that it has videos that are informative and entertaining on a wide variety of topics. You can use YouTube to find information, much like a web search.
Log in to Your YouTube Account
- Open your web browser and type www.youtube.com in the address bar. Press Enter on your keyboard and wait for the web page to load.
- YouTube is a web service owned by Google, so it uses your Google account to log in. If you created a Gmail account in the previous module, then you already have a Google account. Note: You do not need to be logged in to search and view videos.
- Optional: Sign in to YouTube using the same email ID and password that you created in the previous module. Note: Logging in to your account helps YouTube document your viewing history, create playlists, and allow you to leave comments.
- When you log in to YouTube for the first time, you will be taken through a series of steps to set preferences for your account. Follow the steps on the screen.
Search for Videos
- To search for videos on YouTube, type a search word or phrase in the search box located at the top of the screen. This is similar to how you conducted a web search in the previous module.
- Select the magnifying glass icon or press Enter on your keyboard, and YouTube will search for videos that match the keyword or phrase you entered.
- Your video search results will be displayed in a list consisting of a small video image, the title of the video, and a short description. Use the scroll bar on the right to move down the page and view more search results.

View a Video
- To play a video, select the title or the video image. The video will start playing on your computer. Depending on your Internet connection speed, the video may take some time to load completely.
- You may see an advertisement start playing before the video begins. You will have the option to select “Skip Ad” and proceed to the video after five seconds.
- While playing the video, notice that all the information related to the video is listed below it. This includes who uploaded the video, the date it was uploaded, a description of the video, how many people have viewed the video, and any viewer comments.
- While you are playing videos in YouTube, you will see additional information in icons in the bar directly below the viewing window. Take some time to locate and explore the following icons, as labeled in the image below.
Pause/Play: Allows you to pause and play the video at your convenience
Volume and Mute: Allows you to adjust the volume of the video
Total Time: Shows you the total length of the video and how far you are into it
Watch Later: Adds the video to your account to watch later
Closed Caption: Provides video caption options
Settings: Allows you to adjust the video settings
Full Screen: Enlarges the video to the full size of your display

Activity 2: Upload Videos Using YouTube
In addition to searching and viewing videos using YouTube, you can also upload and share your own videos or photos. This allows you to keep in touch with family and friends that you may not see often. It is also a great way to promote your business or share information with a large global audience.
Upload a Video on Your Computer
- First, you will need to be signed in to your YouTube account to upload videos. Sign in to YouTube using your Google account, as described in the previous activity.
- Uploading a video can be done in one of two ways. The first method is to upload a file that is already saved on your computer. Select the “Upload” button in the upper right-hand corner of the screen.
- Select “Select Files to Upload.” In the window that appears, browse the files on your computer to locate the video file you wish to upload. Select the file and click the “Choose” button.
- You will see a progress bar notifying you of the progress of the video upload. Depending on the speed of your Internet, it may take some time before your video upload is completed.
Capture and Upload a Webcam Video
- Another common upload option is to record something directly from your computer’s camera. To do this, select “Webcam Capture” on the upload screen.
- You will see a blank window with a red button that says, “Start recording,” at the bottom. Select this button to start recording a video.
- Your webcam will now turn on and display the camera’s view. Note: You must have a webcam with a working microphone to capture both video and audio. You may also be required to authorize your web browser to access your camera and audio.
- Record your video. Select “Stop recording” when you are finished.
- If you are happy with your video, select the blue Upload button in the bottom right-hand corner of the window. If you are not satisfied with your video, select Cancel and repeat the steps to record again.
- The video uploading process will now follow the same steps as described in the previous option. Review the steps above to add information about your video and select the privacy settings.
- When you are finished, select Publish to finish uploading your video to YouTube.

Personalize Your Video Settings
- After your upload is finished, you will be directed to a screen that asks for more information about your video. Type the title of your video, a video description, and keywords that describe your video. These keywords will help others search and view your video.
- You can also set privacy settings to control who is able to view the video. Review the settings below and use the drop-down menu to select your privacy setting. Public: Anyone can search and view your video. Unlisted: Your video will not show up in any search results, and only people with the direct video link can view your video (you can send the link via email). Private: You choose which people are allowed to search and view your video by entering their email addresses.
- You can further personalize your video under the Advanced Settings tab. Select Advanced Settings if you want to specify more information, for example, if you want to allow users to make comments on your video. You can also choose a category for your video, such as comedy or education.
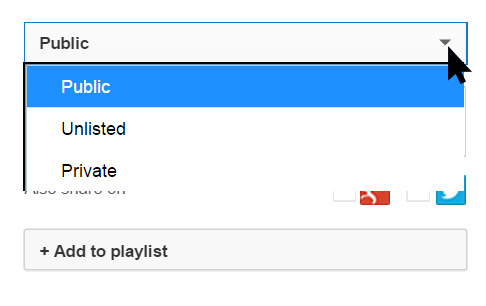
Publish and Share Your Video
- When you are finished with your settings, select “Publish” to upload your video to YouTube.
- You will be directed to a screen that provides a direct link to your video, which you can share with friends, family, or business partners. To share this link, select the URL text. Right-click and select “copy” from the pop-up menu.
- In the message box of an email, right-click again and select “paste.” A link to your video URL will be shown in the email message.
- You can also share your video across many popular social media applications if you are a registered member. Select the Share icon that appears below your video, and select a social media application from the list.
- A new window will open. Follow the onscreen instructions to share your video through the social media application. Remember to set strict privacy settings to control who is able to view your video before sharing it on social media.

Manage Your Videos
- To manage your videos, select your user name at the top of any YouTube page and select Creator Studio.
- Select Video Manager from the menu on the left side of the screen.
- A list of your videos will appear. Select the title or video image to play any of your videos.
- When you are in the Video Manager, you can also easily share any of your videos. Select a video to play it. Below the video, select “Share.” A number of sharing options are located here, including the unique URL (Web address) of your video.
- You can also manage the privacy settings of any of your videos in the Video Manager. Select the Edit button that appears below the video thumbnail.
- In the Edit screen, you can change basic information about your video, including the title, description, and privacy settings.
- Select the Advanced Settings tab to manage the advanced settings for your video, for example, allowing or disabling comments.
- Once you have finished managing your videos, sign out of your YouTube account. Select your user name at the top of the page and select “Sign Out” from the drop-down menu. This is especially important if you are using a shared or public computer.

Apply
In this section, you will apply what you have learned about media sharing sites. Select one or more of the following activities to complete on your own:
- Search YouTube to find a video describing a new skill that you would like to learn.
- Search YouTube to find an informational video about your local region or country.
- Search YouTube to find an educational video about a famous person that you admire.
- Go to Flickr.com and select Explore from the menu at the top of the screen. Explore a few photo albums and become familiar with the user experience. If desired, create your own Flickr account.
Lesson 3: Safety for Social Media
You may be wondering what happens to your personal information and your files when you interact with social media sites. How can you protect yourself from unwanted viewers? How does a social media site use your information? In this lesson, you will learn key information about staying safe while engaging in social media.
Learn
Social media sites are continuously evolving and growing as they gain popularity. Unfortunately, the popularity of social media sites makes them a target for malicious activities. This may include inappropriate comments, fraudulent links, or even identity theft.
The widespread use and impact of social media means that many users will encounter online threats. You can take precautions to promote safe experiences and avoid the adverse effects of using social media. You can also take personal steps to protect your online reputation and behave responsibly when engaging in social media.
- Set your boundaries. It is important to evaluate any social media site before you use it. Ask yourself if it offers the level of control, protection, and overall experience that makes you comfortable. If a site requires you to provide a large amount of personal information, with no option to protect this information through privacy settings, consider choosing a different site.
- Protect your personal information. Do not provide optional information when setting up a social media account. When creating an online profile, you do not need to enter all of the information that is requested. The set-up page usually requires you to fill out basic information, such as your name and email address. Everything else is optional. Do not feel obligated to put your home address, telephone number, or birth date. Note: Some social networking sites are age restricted and will require your birth date to register for an account. You can choose to restrict who can see your birthday in your account settings. Social networks are a great way to stay connected with others, but you should be aware of how much personal information you post after the initial account set-up. The more information you post, the easier it may be for a criminal to use that information to steal your identity, access your data, or threaten your personal safety. Be careful about how much information you choose to share about your current location, age, education, interests, and friends in order to keep your profile safe from misuse.
- Adjust your privacy settings. Learn about and use the privacy and security settings on social media sites. A reputable site will give you control over your account privacy settings, which can help you manage your online experience in a positive way. Do not assume that you have to use a site’s default privacy settings. It is okay to limit how you share information. After setting up an account, visit the settings and privacy sections to see what options you have to limit who and what groups can see various aspects of your personal information. Facebook, for example, gives you control to decide if no one, friends, friends and networks, or everyone can see your basic information, personal information, photos, friends, and postings. To be safe, choose the highest level of privacy in your privacy settings. Usually this is “friends only.” “Friends only” is the strictest level of security; it only allows people that you have accepted as a friend to view information about you. Note: Sites may change their options periodically, so review your security and privacy settings regularly to make sure that your choices are still appropriate.
- Read the privacy policy. Social media sites are typically free to use, which means they may make their money by collecting information about you for the purpose of advertising. Read the privacy policy for a social media site to learn what information is collected, and how it is shared with outside companies and partners. Some sites may share information such as email addresses or user preferences with other companies. This may lead to an increase in spam, or unwanted emails, designed to trick you into taking action online. Explore the account settings on a social media site to determine if you can specify what information is collected about you and how it is shared.
- Be selective about friends. Accepting only people you know and trust is a great way to ensure safety when using social networking sites. Consider adding only people that you or close friends have met in person. Doing this can protect you from people who use social networking sites to commit crimes. Review what your friends write about you. If a friend posts anything sensitive, like private photos or your location, it is okay to ask someone to remove information that you do not want disclosed. You can also remove a tag from a photo or post you do not wish to be tagged in, or block the person who tagged you.
- Think before you post. Before you post anything online, consider two things: it may ultimately be seen by anyone on the Internet and it may be permanent. As a general rule, do not post anything that you would ordinarily say only to a close friend. Even if you remove the information or photos from a site, or delete your account altogether, your information may still be saved online. Some sites let you create separate friend lists (for example, for family, for your sports team, and for your colleagues) so you can manage what you share with each. Remember that what you post online stays online. You can protect your reputation on social media by carefully considering how your post represents you online.
- Protect your account with a strong password. When creating a social media account password, use at least eight characters (longer is better) and include upper- and lowercase letters, numbers, and symbols. Do not share your password with friends or be tricked into entering your password on another site. For more information about creating strong passwords, review Module 4: Keeping Safe Online.
- Defend your computer against Internet threats. Having the latest security software, web browser, and operating system are the best defenses against viruses and other online threats. Install software updates when available so that attackers cannot take advantage of known problems or vulnerabilities. Many operating systems offer automatic updates, which is recommended. For more information, review Module 4: Keeping Safe Online. In addition to installing regular updates, you should also use caution when you receive links in messages from your friends on your social network. Treat links in messages on social media sites as you would treat links in email messages. Do not trust that a message is really from whom it says it is from. Criminals can break into accounts and send messages that look like they are from your friends, but they are not. If you suspect that a message is fraudulent, use an alternative method to contact your friend and find out.
- Report issues. Some online interactions may leave you uncomfortable and looking for ways to avoid or end them. If what a user is doing makes you uncomfortable, you need to trust your instinct and assume it may have harmful intent. Report any negative incidents to the web service, including inappropriate comments or theft of your account.
Remember, no one has the right to threaten or upset you. If someone is harassing or threatening you, remove them from your friends list, block them, and report them to the site administrator.
Practice
Activity 1: Examine Your Profile and Privacy Settings
Even if you have recently set up your account, it is always a good idea to periodically examine your profile and privacy settings to ensure that they are set to a level that makes you comfortable. In this activity you will revisit two social media sites, Facebook and YouTube, to examine your settings.
Choose Your Privacy Settings on Facebook
- Open your web browser and navigate to www.facebook.com.
- Log in to your account using your email address and password.
- From any Facebook page, select the privacy icon that appears in the upper right-hand corner.
- Select Privacy Checkup from the top of the drop-down menu.
- Follow the onscreen instructions to set privacy levels for your posts, your apps, and your personal profile. Remember, setting your privacy levels to the strictest level is the safest option for protecting your personal information and controlling who can view your posts.
- When you have chosen your settings in each category, select the Finish Up! button to save your changes and view a summary of your account.
- Select Close to return to your news feed.
- When you are finished, log out of your account.
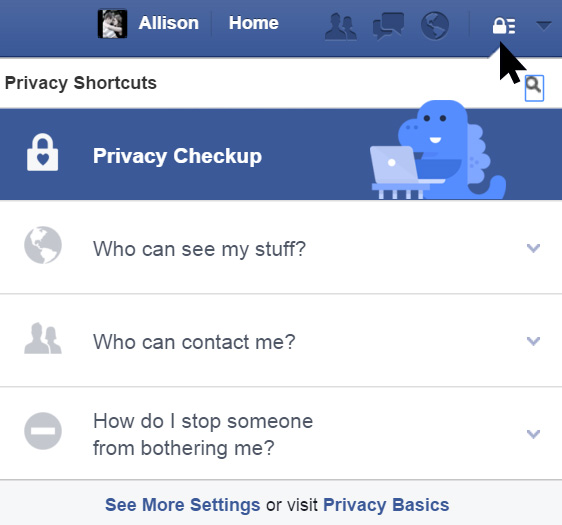
Choose Your Privacy Settings on YouTube
- Open your web browser and navigate to www.youtube.com.
- Log in to your account using your Google email ID and password.
- From any YouTube page, select your user name or avatar that appears in the upper right-hand corner.
- Select the settings icon from the drop-down menu.
- This will take you to an Account Settings page where you can view your online profile information. From the menu on the left side of the screen, select “Privacy.”
- Under Likes and Subscriptions, you can select each box to keep your liked videos, playlists, and subscriptions private (not viewable by any member). Note: Although the default setting may be public, making these items private is the most secure setting and is therefore recommended.
- Select the Save button to save your settings.
- At the bottom of the Privacy page, select the link for Google Ads Settings.
- Follow the onscreen instructions to manage your demographics and interest categories, opt out of interest-based ads, or block certain advertisers, if necessary.
- When you are finished, log out of your Google account and close your web browser.


Activity 2: Examine Social Media Scenarios
Many common social media safety issues can be avoided with preparation and knowing what to do if you encounter an uncomfortable situation. In this activity, you will read about some situations you may come across when interacting on social networking sites.
Read and Discuss Scenarios
- Read through each social media scenario and decide how it might make you feel.
- For each scenario, make a note about how you might respond or what steps you might take.
- With a small group of participants, discuss your responses and decide on the most appropriate actions to take.
Social Media Scenarios
- A Facebook friend you do not know very well suggests that you correct the grammar of your status message.
- A friend tags you in a picture from a personal family vacation. She did not ask your permission before posting the photo.
- You receive an inappropriate message from a stranger you recently accepted as a friend on Facebook.
- A Facebook friend sends you a message stating that she found a website where they are giving away free tablet computers to one hundred people. There is a link to the site in the message.
- You commented on the dullness of a business meeting. Some colleagues have now replied rudely and others are pressuring you to remove your comment.
- You have received a Facebook notification stating a friend has commented on your post. It has a button where you can click to see the comment.
- Your friends have recently started a book club and they have asked you to “Like” the book club page on Facebook and post a comment.
- You have received a comment on a video you posted on YouTube, in which the user makes inappropriate remarks about the way you speak.
- You have been asked by some of your friends to look at a YouTube video. When you watch it, you realize it is very violent and targets a minority community.
- Your keyword search on YouTube inadvertently results in some graphic and inappropriate videos appearing in your search results.
Apply
In this section, you will apply what you have learned about safety for social media. Select one or more of the following activities to complete on your own:
- Revisit other social media sites where you have accounts. Examine your profile and privacy settings, and make changes as needed. Delete any optional personal information you may have entered when you set up your profile.
- Create three scenarios you may encounter on a social media site. Exchange your scenarios with another course participant and discuss how you might respond to each one.
- Create two fictitious posts for a social network, one that is appropriate and one that is not. Ask another course participant to identify which post is inappropriate and explain why (for example, the post identifies personal information about the user).
Share & Reflect
Reflect on what you learned about social media and online communities. In a small group, discuss the following questions:
- How do you envision using social media in your day-to-day life after completing this course?
- In what ways does social media change the way you think about communication? What are some things you can do that would not be possible without social media?
- Currently, what is your biggest challenge with using social media? How do you think you may overcome this challenge?
- What safety issue is most concerning to you? What steps can you take to help keep yourself safe online?
Skills Checklist
Read through the checklist to review what you learned.
- I can set up and personalize my social media profile.
- I can customize my account privacy settings.
- I can add friends to my social network.
- I can view and add comments to my news feed.
- I can post a status message to Facebook.
- I can post a photo or video to Facebook.
- I can search for and play videos on YouTube.
- I can upload a YouTube video from a video file saved on my computer.
- I can use my webcam to capture a video and upload it to YouTube.
- I can protect my personal information on social media sites.
- I can make responsible decisions about what I choose to post online.
- I can protect my social media account with a strong password.
- I can update my browser and security software.
Optional Module: Exploring Entrepreneurship
Overview
Entrepreneurs are an important part of today’s economy. They invent ways to contribute to their communities, often creating a product or service that may not have existed. Entrepreneurs also take existing ideas or concepts and improve upon them, or take an existing product and create services related to that product. An entrepreneur is an original and innovative thinker who has the organizational and interpersonal skills to turn an idea into reality.
You have always wanted to start your own business. You are an ambitious person with skills, ideas, and energy to get a new business going, but how do you get started?
In this module, you will:
- Generate some ideas for your business and think about how your business will meet your goals and help your community.
- Begin to write and organize a business plan that you can use to clarify your thinking and communicate with people who can help you make your business a success.
- Learn how to improve your work by giving and getting feedback on your ideas using a word processing application.
- Even if you do not start or operate a business, these skills can help you present ideas in your personal and professional life.
Getting Started
Maybe you have always had a dream of starting your own business, or maybe you have never even thought of doing it until now. People start new businesses every day. Some are successful, but even those that fail give entrepreneurs ideas about how to make their next idea work. So, get started—it is an exciting journey.
Explore the following chart to learn terms related to developing a business plan.
Business Plan
Your business plan is a document that describes your business objectively and professionally. It explains everything about your business in a way that helps you clarify your own thinking as well as communicate the important facts about your business to others, for example, to financial supporters.
Headings and Subheadings
The main sections of a document will have headings that stand out because they are formatted differently than the regular text. If your document is longer, you might want to divide the content under a heading into subheadings. These are usually titles in bold in the same size font as the rest of the text.
Mind Map
A visual representation of how different concepts relate to each other can help generate new ideas. A mind map uses shapes and connecting lines to expand and organize concepts.
Needs Assessment
A good business idea meets the needs of future customers or clients. Part of planning a business is investigating the needs of the people in your community to think of ways to meet those needs with your business.
Self-Assessment
You can begin thinking about your business by reflecting on your skills, wishes, strengths, and goals. A self-assessment helps plan for your business and professional growth.
Table of Contents
A table of contents is a table at the beginning of a long document that allows a reader to go to different sections throughout the document by selecting a section heading or subheading.
What You Need to Know
The activities in this module draw on the basic skills presented in Module 1: Introduction to Computers as well as on the skills from Module 2: Productivity Tools; Module 3: The Internet, Email, and Communicating Online; and Module 4: Keeping Safe Online. Skills you will need to know for this module are:
- Making changes to fonts color, size, and style in word processing documents
- Creating tables, and adding and deleting columns and rows in word processing documents
- Searching the Internet
Lesson 1: Developing a Business Idea
It is exciting to think of starting your own business—the idea stage can be the most exciting part. At this point, your business has no limitations or problems, just possibilities. Of course, eventually your idea will have to work in the real world, but when you are exploring potential business opportunities, you can let your imagination be your guide.
Learn
Naturally, you want your business to be a success. You probably have some ideas for your business. Maybe it will make your life better or contribute positively to your community. Perhaps it is a new kind of product or service that is not currently available. New needs appear as a community undergoes changes, such as an economic downturn or boom, immigration, or new industries. Maybe you can take advantage of changes in your community by developing something completely new. Often people do not know that they want or need something until they see it.
But you should not limit yourself to new ideas. What about improving a product or service, making it more efficient, more beautiful, more convenient, or less expensive? If you can find a way to create a business that builds on a current idea, you have a built-in market, and you will just have to prove to people that your idea will improve their experience.
Generating Ideas
You may already have an idea for the kind of business you want to start, but it is worth your time to expand your thinking before you make a decision. Coming up with a business idea is an opportunity for you to be creative and use your imagination. Now is not the time to think of the reasons why an idea might not work; it is the time to just come up with ideas. You will evaluate them later.
Creative thinking is both a solitary and a group effort. You can have great ideas all by yourself in the middle of doing something ordinary like working in the garden or cleaning your home, or you can also get ideas from talking with others. Spending time discussing business ideas with friends and family as well as quietly reflecting on your own are both beneficial activities when starting a business.
Remember, in this planning stage, just come up with as many ideas as you can. Try some of the following strategies for thinking of business ideas. In this module, you will use the brainstorming strategy, but you can try the other techniques on your own.
Brainstorming. Brainstorming works well with a group of people contributing ideas and responding to each other, to generate even more ideas. Keep a good record of the group’s ideas, if possible, in ways that are easily categorized, like on sticky notes, business cards, or a digital spreadsheet. The important thing with brainstorming is not to stop to discuss the merits of an idea but just to get ideas down to be examined later.
Role-playing. You may know the kinds of products or services your business should produce, but your community may have very different needs. Pretend to take on another role by thinking about the tasks another person completes in a day, and the kinds of needs and wishes that person has. A business opportunity you have not thought of may arise from the activity.
Walkabout. Take a walk around your community with a notebook to conduct a needs assessment. You might take a friend with you to prompt each other’s thinking. Take notes on what you see, what could be improved, and what is missing. You will also want to stay on top of trends by investigating businesses online or by paying close attention to the products and services being offered in your community, particularly how they change over time.
Interviews. Ask people questions about what they need, or what would make their lives easier, more meaningful, or more fun. Be sure to follow their answers with more questions since their first responses may be relatively superficial. You could get better information by asking them to elaborate.
Whatever strategies you use, you probably will not come up with the perfect idea in one day. Keep a notebook to record ideas. Many people get good ideas as they are drifting off to sleep, so you might keep your notebook beside your bed.
Choosing a Business Idea
How will you know you have a good idea? Choosing the right business is a very important decision, so you need to take your time to get it right.
Here are some questions that can help you think about your business idea:
- Is there a market for my product or service?
- Will it meet my professional and personal goals?
- Is it feasible? Do I have the resources to make it happen?
- Does the idea take advantage of the skills and relationships I already have?
- Does it give me the opportunity to learn new skills and develop new relationships?
- Will it provide me with the life balance that I want? Will it give me time for my family and friends?
- What is the evidence that the business will be successful?
- What kind of income will the business generate? Will it be worth the time and effort?
- How risky is the idea? How much investment in time or money can I afford to lose?
Practice
Making lists is a useful strategy for staying organized in any part of your life, but especially when you are starting a business. Lists can help you manage your busy life and make sure that you are completing all the important tasks for yourself, your family, and your business. When you create a list in a word processing document, you can access it any time and update it easily.
Activity 1: Creating a Self-Assessment
Now that you have learned about the kinds of things you need to consider when starting your own business, you can start making some lists to help organize your self-assessment.
Start Your Bulleted List
- Create a new word processing document and save it with a name such as MyBusinessSelf-Assessment.
- Give your document a title with a larger, bold font than what you would use in the body of the text.
- Create a bolded heading called “Why I Want to Start a Business.”
- Select the Bullets icon and type one of the reasons you want to start a business. Ensure the bold is not applied to the bullets.
- At the end of the first item on your list, select Enter so a bullet appears in the next line, then type another reason. Continue adding to the bulleted list until you are finished.

Creating Another Bulleted List
- When finished, select enter twice to end the bulleted list and go back to the beginning of the line. You can always add another item to your list by putting your cursor at the end of the last item in your list, selecting Enter, and creating a new bullet.
- Create more bulleted lists with subheadings such as “My Skills,” “My Interests,” “Resources,” and “Finances.”
- Select one or more of your lists, and choose from the drop-down menu by the Bullets icon to try out different bullet images for your list.
Creating a Numbered List
Sometimes you need to create a list that needs to be in a specific order, such as a series of steps or a list of ranked ideas.
Start Your Numbered List
- Create a heading in bold called “Skills I Would Like to Learn.”
- Select the Numbers icon in the Home tab, and start a numbered list with the skill that will help you the most in meeting your goals.
- Add other skills in order of importance to your goals.
- Try changing how a skill ranks in your list. Cut and paste the skill where you want it to go, and see how the list automatically re-numbers.

Create Another Numbered List
- When finished, select Enter to end the list and go to the beginning of the line. Then type another heading in bold: “My Resources.”
- Select the Numbers icon and begin a new list with your most useful resource, such as family support, location, or an expert who can help you.
- Add to your list, and cut and paste any items in a different order to re-arrange them until you are satisfied with the order.
- Try selecting the drop-down menu to the right of the Numbers icon to choose a different format, such as “A, B, C” or “a, b, c.”.
- Change one of your bulleted lists to numbers or a numbered list to bullets by selecting the list and choosing the icon you want.
Activity 2: Assessing My Community’s Needs
Sometimes you need something more than a simple list. You need to show how different subtopics relate to each other. A mind map is a visual representation of how different concepts and ideas relate to each other, and an outline can show categories in list form.
Brainstorming with a Mind Map
Meet with a partner or a small group to brainstorm some possible business opportunities in your community. Remember, at this time it is important to generate as many ideas as you can without evaluating them.
Beginning Your Mind Map
- Open a New document in Word and save it as Business-Idea-Mind-Map.
- Go to Insert and select Shapes and then select the rectangle shape.
- Put your cursor in the middle of the page and drag it out to form the rectangle.
- Select the shape and type a category of product or service your community needs, for example, Food Products or Household Services.
- Change the size of the shape by selecting it and dragging the handles.

Expanding Your Mind Map
- Select Shapes again, select the circle, and create a circle on your page.
- Select Shapes and select the line. To connect your rectangle and your circle, select the rectangle, drag the cursor to the circle, and select.
- Shorten, lengthen, or change the direction of a line by selecting it and dragging the handle at the end of the line to where you want it to be.
- Type an example of the product or service in the circle, for example Sandwiches or Beverages.
- Brainstorm as many examples as you can think of in circles and connect them to the rectangle. Remember not to think about whether your idea is a good one at this stage. Just add as many as you can think of.
- Select an oval from the Shapes menu and type an example of an idea from the circle. For example, you might put Tea and Fruit Juice in triangles connected to Beverages.
- As you fill in your mind map, you may need to make shapes smaller or move them around to make room for your new ideas. Or you can start a new mind map with another idea in the center.
Creating an Outlined List
Sometimes you need something more than a simple list. You need to show how different subtopics relate to each other in a list form. You can create simple or complex outlines by using the Outline icon. For example, you might think of different kinds of products and list them in an outline form.

Beginning Your Outline
An outline is another way to generate ideas and keep them organized. For the following activity, you can use the ideas from your mind map or create an outline with a different type of product or service.
- Meet with a partner or a small group to brainstorm some possible business opportunities in your community. Remember, at this time it is important to generate as many ideas as you can without evaluating them.
- Create a document titled “Community-Needs-Assessment,” and then save it.
- Begin a numbered list with the item “New Products” or another idea.
- Now you are going to make a two-level or outlined list. Put your cursor at the end of “1. New Products.” Select Enter and type a new product you might create in your business. To show that it goes under New Products, select Increase Indent in the Home tab. You now have the beginnings of an outline. Add more items to your New Products list.
Adding to Your Outlined List
- When you are finished with New Products, select Enter and type “Improved Products.” You want to make it the same level as New Products, so select Decrease Indent to move this item to the left in your outline. It will now appear as #2 in your list. Then add your ideas for improved products using the Increase Indent icon. Notice that the numbering matches the rest of your outline.
- Follow this same procedure for New Services, Improved Services, and any other categories of ideas you have for your business.
- Try creating more than two levels with your outline. Place your cursor after one of the items you listed under New Services or Improved Services. Select Enter to add another item. Select Increase Indent to add a third level to your outline. Type a thought you have about this business idea, such as a drawback or an advantage. Select Enter to add any more thoughts you have about this specific idea.
- Go to another item on any of your outlined lists and add thoughts about it using the Increase and Decrease Indent icons to move back and forth between levels.
Using Multilevel Lists
- Another way to create an outline is by using the Multilevel List icon.
- When you select the drop-down menu, you see different formats for an outline. Whatever method you use, you will move items to the left or the right in your outline using the Increase and Decrease Indent icons.

Activity 3: Organizing Your Business Ideas
Now that you have reflected on your skills, your community’s wants and needs, and the kinds of products and services you might provide in your business, you can organize your thoughts and start to choose your business idea.
Creating a Table of Your Business Ideas
- Create a table with five columns and five rows. You can add or delete rows if you need them later.
- In the first row, type the following headings in each column: “Business Ideas,” “Skills,” “Interests,” “Resources,” and “Risk.”
- Adjust the width of the columns so that the Business Idea column is the widest. The other columns can be very narrow because they will have just a single digit in them.
- Choose your best ideas and enter them into the first column of your table, putting each idea in a different row.
- To format your table for easy reading, select the entire table, go to the Design tab, and select one of the Table Styles.

Ranking Items in a Table
- After you have set up the formatting of your table, fill in the remaining columns with your ranking of each topic for each idea from 1 to 3. For example, if your first Business Idea matches well with your skill, give it a 3. If you do not currently have the skill for that idea, give it a 1, and so on. Go through each of your ideas and assign ranking values to them in the four remaining columns in your table.
- If you like, add some more columns with other ways of ranking your ideas, such as how much time they would take or how difficult they might be.
Sorting Items in a Table

- Select your entire table, select Layout, and then Sort. Since you have headings on your columns (Business Ideas, Skills, Interests, etc.) make sure that at the bottom of the window My list has Header row is checked.
- To see which of your business ideas is the best match for your skills, sort by Skills. In the first row of drop-down menus, choose Skills from the first drop-down menu, choose Number from the Type drop-down menu, and choose Descending from the last drop-down menu. Now you see that your business ideas are ranked from those that you labeled with a 3 in Skills down to those you labeled with a 1.
- Sort each category by selecting Business Idea, Interest, Resources, or Risk. Notice that when you sort by Business Idea, the second drop-down menu is automatically labeled Alphabetical while the others are Numerical, because your Business Idea is a word but your skill rankings are numbers. You use a similar process for sorting numerical or alphabetical information in a spreadsheet, so this is a skill you can easily transfer.
- The sorting feature can also help you sort within categories. Sort by My Skills in the first row of the Sort window. In the next row titled “Then By,” choose Risk, Numerical, and Ascending in the drop-down menus. Now you can see which of the ideas that use your strongest skills are the most and least risky.
Apply
In this section, you will apply your listing and table formatting skills to help think about your new business.
- Make a bulleted to-do list with the tasks you need to complete to get started on your business idea. When you have a good list of tasks, change the list to a numbered list to help you think about what to do first, second, and so on.
- Make a to-do list with some household or workplace tasks you need to accomplish in the next week.
- Make an outlined list with some long-term personal or professional goals and the steps you need to take to meet those goals.
- Investigate your ideas for a business and record what you learn in a table so you can compare them.
Lesson 2: Developing a Business Plan
Successful businesses do not happen by accident. They require careful planning and strategizing. They also require collaboration and the ability to communicate your message to your potential customers or clients. In this lesson you will learn how to create a business plan that will guide you as you develop your business idea. The process and tools that you use in this lesson can easily be applied to any kind of complex project you are working on in your family or community.
Learn
Now that you have selected an idea for your business, the next step is to create a business plan. Developing a business plan is important for several reasons:
Writing a business plan helps you look at your idea objectively and critically. It helps you harness your emotions and enthusiasm about your future business by setting down the facts that will affect how successful your business will be.
A business plan is a roadmap for developing your business. It helps you think of what you need to do now and what you will need to do later. It can help you anticipate problems and avoid them.
A well-written business plan is an effective tool for working with investors, banks, or other financial institutions. Your plan shows that you have thought carefully about your business and that providing you with the funds you need will be a good investment.
Parts of a Business Plan
Business plans vary in length and complexity. You may even have more than one version of your business plan, depending on whom you will be sharing it with. You can learn more about business plans by searching the Internet, but a basic business plan should have at least the following sections:
Executive Summary
An overview of your business in just a few sentences written after you have completed the rest of the plan
- What are the most important features of your business?
- What do potential investors, clients, or customers need to know?
Vision and/or Mission
What you would like your business to accomplish
- What is its purpose?
- What would you like it to look like in five, ten, or 20 years?
- Why do you think it will be a success?
Business Description
Detailed description of the products or services your business will provide
- What materials or resources do you have, what will you need, and how will you get them?
- What processes will you use to create products or organize services?
Marketing Strategy
A rationale for why your business is needed with a description of the potential market
- How do you know that there is a need for your business?
- How will these products and services differ from those that are currently offered?
- How will people learn about your business?
- What strategies will you use to get and keep customers or clients?
Financing
A detailed explanation of the finances of your business (usually described in a table format)
- How much money will you need to start your business?
- What funding options do you have and what additional financing do you need?
- How will you spend the money?
- What will you charge for your products and/or services?
- How have you determined the charges?
Organization and Management
Description of the structure of your business, including employees and their responsibilities
- Who will be involved in your business?
- Do you have employees? If so, how many?
- What will their responsibilities be?
- How will they be evaluated?
Getting and Giving Feedback
Collaboration is an important skill in any business. Even if you are the only person working in your business, you will want to develop relationships with other small business owners in your community. Fellow business owners can be a great source of advice.
Whatever you create or write, it is always useful to get other opinions and suggestions. Of course, you have the final say about what you produce, but another perspective can help you think of your business in new ways. When you share something you have written, such as your business plan, with another person to get feedback, a few tips can help you get the information you need.
- Ask open-ended questions. A question like, “Do you like this?” only prompts a yes or no answer, which isn’t very useful. But a question like, “Do you think this sentence sounds good here or should it go somewhere else in the plan?” will get you more useful, concrete feedback.
- Be honest. If you are having trouble with a sentence, paragraph, or even a whole section, tell your reviewer. That person can then pay special attention to the part that is giving you trouble and maybe help you.
- Make sure that the reviewer knows you want him or her to do more than just find mistakes. If you know you have trouble with a specific kind of writing skill, such as spelling or sentence structure, ask your reviewer to look for those kinds of errors, but you also want your reviewer to look for bigger issues such as message, organization, and tone.
- Encourage your reviewer to tell you what he or she thinks you are trying to say. You need to know if you are communicating what you intend to communicate.
Remember that the writing is yours. Consider everything a reviewer says, but you have the final say.
Giving feedback is also an important skill. Knowing how to read another person’s work critically and give them useful information about how to improve is a valuable skill that is useful in any kind of environment. When you are asked to review someone else’s work, keep the following tips in mind:
- To give good feedback, read through your colleague’s writing one time without commenting.
- You are playing the role of the audience, so explain what you are thinking as you read. This gives the author a good idea of what the writing is communicating and if it meets the intended objectives.
- If the writer does not give you any ideas about what to look for, ask if there are any specific issues or parts they would especially like feedback on.
- If you see minor issues, like typographical errors or misspelled words, make changes in the text, but avoid making major changes to the author’s work unless requested. If you see a big problem, write a comment that explains what you are seeing and let the writer figure out how to fix it. The writing should sound like the author not the reviewer. If you have an idea of how to improve the text, write it in a comment. The writer can copy and paste it or revise it a bit and put it into the document if they want to.
- Make positive, specific comments, such as “I like how you introduced this topic,” instead of just writing “Good.”
- Be kind.
Practice
Activity 1: Starting Your Business Plan
You have thought about the kind of business you would like to start, so now it is time to begin writing your business plan. In this activity, write two sections of your business plan—the Vision or Mission Statement and the Business Description—and share them with a colleague to get feedback.
Getting Feedback on Your Business Plan
- Search the Internet for vision and mission statements of different companies to get some ideas of what this section will look like.
- Write a Vision and/or Mission Statement and a Business Description for your business plan.
- Select the Review tab.
- Go through your writing and look for places where you would like specific feedback. Select a specific spot where you need another point of view and select New Comment. Write your question or concern in the comment space.
- If you have general questions or comments for your reviewer, put your cursor anywhere and select New Comment and type your comment.
- Share your business plan digitally with your colleague, through email or by sending a link to an online document.
Giving Feedback to a Colleague
- Select the Track Changes icon in the Review tab to turn Track Changes on.
- Find the places where your colleague asked specific questions, select a word or phrase, and create a new comment for your thoughts. You can select the same section that the author selected for your comment.
- As you read through your colleague’s business plan, look for minor errors, such as typographical errors or missed punctuation, and make the necessary changes. Note that your changes are marked as changes, so the author can see what you have done.
- Add positive comments and constructive questions and comments throughout the business plan.
- Save the document as a new file by adding your name or initials to the file name and return it digitally to the writer.
Viewing Your Feedback
- Resave your reviewed file with a new name, such as v2 for Version 2 added to the file name.
- Find the three drop-down menus in the Review tab, to the right of to the Track Changes icon.
- In the top drop-down menu next to the Track Changes icon, choose the way you look at the feedback you got on your business plan. Select All Markup to see your original text with lines through it and what the reviewer added or deleted underlined and in a different color font. If you choose Simple Markup, you will see the changes that were made to your document marked with a vertical line in the left margin showing where they were made. If you choose No Markup, you will see how the document looks with all the changes the reviewer made. If you choose Original, you will see your document without any of the reviewer’s changes.
- In the Show Markup drop-down menu, choose the feedback you want to see by selecting Comments and Insertions and Deletions. Unselect all other items in the drop-down menu if they have checkmarks. If more than one person is reviewing your document, choose whose feedback you want to see in the Select People drop-down menu.
- Select Reviewing Pane and choose Reviewing Pane Vertical to see what the reviewer has done in a column on the left side of your document or Reviewing Pane Horizontal to see the reviewer’s comments and changes at the bottom of your document. Select Reviewing Pane again to hide the pane.

Revising Your Business Plan

- Select the Track Changes icon to turn it off. You may need to enlarge the window to see the Track Changes icon or select the Tracking icon to see it.
- To respond to your reviewer’s changes, place your cursor at the beginning of your document and select Next in the Review tab. Your cursor will go to the first place in your document where the reviewer made changes. If you agree with the change, select the Accept icon, and the new wording will look like the rest of the business plan. If you do not want to make the change, select Reject, and the text will go back to its original wording.
- Read each of the reviewer’s comments. Decide whether to address the reviewer’s comments or ignore them and make changes if you want to. After you have dealt with the comment, select Delete. Also delete any comments you made yourself for the reviewer.
- Note that if you did not turn off the Track Changes icon, your revisions will be marked as changes, and you will have to accept your changes the same way that you accepted your reviewer’s changes.
Activity 2: Creating a Table of Contents

Your business plan could get fairly long as you add sections and describe your business in more detail. When you share your business plan, investors and others may be more interested in some sections than in others, so they will need a way to quickly go to the part of your plan that they want to read. Fortunately, you can create a table of contents automatically that will link readers to the different sections of your business plan.
Creating Headings
Using Headings to create a document allows you to create a table of contents automatically.
- You have created two sections of your business plan: a Vision or Mission Statement and a Business Description. Decide what you want these section headings to look like. You will probably want them to be bold and maybe in a slightly larger font, or even a different color. Keep the look simple and businesslike, though, because you want your plan to reflect your seriousness and competence.
- Review the suggested parts of a business plan described at the beginning of this lesson and write drafts of one or two more sections. If you have time, share your plan with a colleague for feedback and make revisions.
- Select a section heading and then go to the References tab, select Add Text, and select Level 1. Repeat this with each section heading that you want to appear in your Table of Contents. If you want to show more than one level of headings, select Level 2 for subheadings.
Making a Table of Contents
Your word processing application uses the headings you have identified to automatically create a table of contents.
- When you have selected all the headings that you want to appear in your table of contents, put your cursor at the beginning of your document where you want the table of contents to go.
- Select Table of Contents in the References tab and select one of the Automatic Tables to create your table of contents.
- Select a page number in your Table of Contents to see how easily it takes you to a specific section of your business plan.
- As you add to your business plan, your Table of Contents will need to change. If you need to update your table of contents, select the table and the Update Field icon next to the Table of Contents icon. Then choose either Update page numbers only or Update entire field, depending on what you have changed. It is easiest to update the entire field every time to modify your business plan.

Troubleshooting Your Table of Contents
- Sometimes when you see your Table of Contents, there are phrases included in it that should not be there. This happens when you have accidentally applied Headings incorrectly. If text is in your Table of Contents that should not be there, select the page number to find the text that does not belong and select the text. Then go to the Home tab and select Normal from the Styles section. This will remove the Heading from that text. Then select Update Field, and Update the entire field to correct your Table of Contents.
- You may also see that something is missing from your Table of Contents that should be there. If this happens, you have just forgotten to apply the correct Heading to that text. Just select Update Field and update entire field to make the correction.

Apply
In this section, you will apply your skills at creating a business plan, giving and getting feedback, and creating a Table of Contents. Select one or more of the following activities to complete on your own:
- Continue to develop your business plan by writing new sections and adding more detail to the parts you have already written.
- Share your work with a colleague to get feedback.
- Update your Table of Contents.
- Use the collection of lists from Lesson 1 of this module, or consider another document that would benefit from peer review or from being organized with a Table of Contents.
Share & Reflect
You have thought about an idea you have for a business and started to make a plan to turn your idea into reality. You have learned how to use the features of a word processing application to organize your thinking and communicate your business idea.
- Discuss the process of feedback and revision. What was difficult about it? What kinds of feedback were most helpful? How might you structure feedback requests in the future so that you can get the most benefit?
- Where do you plan to go next with your business plan? Who are some people who might help you? What resources do you need? Where will you get them?
- What other uses do you see for the technology skills you learned in this module?
Skills Checklist
Read through the checklist to review what you learned. Mark the areas where you feel confident about your skills.
- I can generate ideas for creating a small business that will meet my goals and help my community.
- I can create simple bulleted and numbered lists.
- I can create outlined lists with two or more levels.
- I can change the formatting of a table to help organize my ideas.
- I can sort alphabetic or numerical information in a table by column.
- I can create a business plan.
- I can give and get good feedback on my writing and make revisions that improve my work.
- I can use Styles to create Headings and to make a Table of Contents.
Optional Module: Market Your Business
Overview
If you start a new business, what steps will you take to attract customers and inform them about your products and services? Your business has to have marketing materials that will help define the products and services offered, and that differentiates them from other businesses that may be offering similar products.
In this module, you will develop your marketing materials and then use digital communication strategies to communicate your message to others. Specifically, you will:
- Use word processing templates to create a logo and brand for your business.
- Use presentation software to create materials for face-to-face and online marketing.
- Use online forms for getting customer feedback.
- Even if you do not start or operate a business, these skills can help you present ideas in your personal and professional life.
Getting Started
If you are running a business, what are some of the methods you will use to promote your business and market your products and services? In business, different types of marketing materials help establish the look and feel of your business and inform potential customers about your products and services. Before you begin, consider the following marketing elements and how each is used in different ways.
Business Plan
Your business plan states your goals and some kind of documentation that shows why you believe they can be met, and your plan for how you will meet them. It usually also includes some background information about your business, and the people who are working on meeting your goals. Business plans are often used to communicate with banks or other investors, or to bring partners into the business.
Marketing Plan
A marketing plan defines your goals for marketing and the steps you will take to achieve those goals. While defining a marketing plan, you will need to consider how you will highlight the qualities and benefits of your business and the pricing of your product, how you want to make the product available to customers, and how you want to promote and advertise the product.
Sales Presentation
A sales presentation essentially introduces the products and services to the customers in a persuasive manner. It includes information about your products and services and highlights the benefits that the customers will have in buying the products. It also provides information on how the customers can locate and contact you to buy the products and services.
What You Need to Know
The activities in this module draw on the basic skills presented in Module 1: Computers and Operating Systems; Module 2: Productivity Tools; Module 3: The Internet, Email, and Communicating Online; and Module 4: Keeping Safe Online. Skills you will need to know for this module are:
- Inserting images and adjusting image size and location in a word processing document.
- Making changes to font color, size, and style using a word processing application.
- Searching the Internet for specific images and locating specific URLs.
- Downloading and legally using images from the Internet.
- Creating digital slide show presentations.
- Setting up a (free) Google Drive account.
Lesson 1: Business Image Development
Marketing your business begins with creating a brand—a set of visual elements that communicate the feeling you would like people to associate with your goods and services. A brand is typically created through a combination of factors including the business name and logo. A brand identity is often used for other marketing materials like packaging, advertisements, brochures, and business stationery.
Learn
The most important part of developing your brand will be creating a logo. A logo is usually a pictorial design, like a sign or symbol, that stands for and represents your business. A logo can include the name of your business. A logo is an integral part of business image and branding.
Look at the following logos and consider what the visual image communicates even if you may not know what the business is selling. What kind of feeling does each logo project? What makes each one feel so different?


Sometimes, a tagline or slogan is included as a part of the logo. Your tagline or slogan will use a small amount of text to express something about your business. Sometimes the tagline explains the goods that you sell, or sometimes it is just used to express a feeling or a call to action. Look at the taglines on these logos and consider how they make you feel about the business. Would you feel differently about the logo if there were no tagline? Consider some businesses you know where the tagline or slogan is so well known, that when you hear it, you may picture the product or logo.


After you develop your logo, you will use it on all of the pieces that you use to identify your business. That may include a sign or banner on the front of your shop, or on the packaging you use for delivering the product. Here are some typical uses for your logo:
Letterhead
When you use your logo to customize your stationery, it is called letterhead. Using customized business letterhead not only makes a good impression, but also helps establish brand identity with customers.
Business Cards
Business cards are small cards that contain contact information for a person or a company. They are easy to carry at all times, and they are a quick way to connect with a potential customer. Customers can store them in their wallets and have easy access to them, when required. A business card typically has the business name and logo, the name and designation of the person to contact, and the contact details of the business or the person, such as address, telephone number, email, and Web address.
Brochure
A brochure is small leaflet or booklet containing information about the business, as well as its products and services. Brochures are used to introduce and advertise products or services to potential customers. A brochure usually contains the business name, logo, location, and contact information along with information about the products and services. This information is organized in an attractive way to get the attention of a target audience. Images are included to enhance the look of the brochure.
Sales Catalog
A sales catalog is a list of products or services offered by the business for sale. The product or services are organized with descriptions and other details such as price, quantity, size and other important information. Sales catalogs also include information on how the customers can order or purchase the products or services. The catalogs are designed in an attractive way and are distributed, mailed, or emailed to potential customers.
Creating some of these materials can be made easier by using templates, or pre-made documents that you can customize. Starting from a template saves time because it contains several elements already planned out. Some of the elements you may find in templates include the following:
Header
Headers are the space across the top of the page where you can insert information and it will appear automatically on all the pages in the document. Or you may make the header on your first page have one look and then all the headers on the following pages could be different. This is often how letterhead is devised, with the full logo and header on the front page, and then a smaller or simpler version on following pages.
Footer
Footers are similar to headers, except they are located at the bottom of the page. By including a footer on the first page, it will automatically repeat on all subsequent pages. This may be something as simple as page numbers, but you may also use part of your letterhead look. Letterhead footers are often designed with the tagline, or the business address and other contact information.
Theme
In Module 3, you saw how presentation software has themes that are pre-made packages of fonts, colors, and styles that go well together. Similar themed templates are available in word processing applications that help you get started.
Practice
Activity 1: Create a Logo
Developing a Design
- Designing your logo will begin with deciding the look and feel that you want your brand to communicate. Write down a list of five words that describe how you want people to think about your business.
- Consider your potential customers—are they young or old? Professionals or students? Do you have a wide audience to broadcast to, or just a small niche, or very specific type of person? Write some notes about your target audience
- Consider whether you will include your company name in your logo or not. If your name is unusual or will communicate something helpful to potential customers, it may be useful to include it.
- Decide if you will have a tagline in your logo or not; it must be very short. A good guideline is to consider if it can be printed on the side of a pencil or pen. If not, it is too long.
- Consider what colors and style you would like to use. Is your business formal? Casual? Friendly? Do you want to communicate flexibility or dependability? Review the five words you wrote down and think about the colors or styles you may want to put in your logo. Browse the Internet and look at other logos and designs for ideas. Note that you will not want to copy other logos too closely because it could confuse your customers. But, you can use other logos for inspiration and ideas.
Creating the Design
- Now that you have some ideas, you will need some artwork. You may want to use a photo or some other graphic element. If you use anything from the Internet, be sure that you have the legal permission to use it.
- Open a word processing document and insert your artwork ideas. You can resize elements and move them around until you have a look that you like.
- If you have a tagline, try using different fonts and colors for the text.
- Try making two to three different versions of your logo. Share the versions with some friends or colleagues to see if they react to your branding the way you expected or hoped. Make revisions until you are happy with the result.
Activity 2: Design the Letterhead
Now that you have created your logo, you can apply it to many other items to develop your brand identity.

- Search the Internet and look at samples of letterheads. Examine the headers and footers and consider what you like or do not like about their style.
- Open your word processing software. Note that when you first open the software you will usually be given a choice of types of templates, and there will also be a search box that will show you additional templates if you have an Internet connection. Select one of the offered templates, or type the word “letterhead” in the search box and select one of those options. (If your word processing software is already open, select the File tab and then choose New, and type “letterhead” in the search box.)
- Select a template that you like and save it as MyLetterhead.
- Insert your logo into the template. Would you like it at the top or the bottom? Would you like to use the logo alone, the tagline alone, or use both?
- Select the Design tab. Under the Theme icon on the left, you will see several different themes, which pair up pre-selected fonts with colors that you can apply to the document. Alternatively, under the Color icon, you can change the style and color of the text manually for more choices.
- On the right side of the toolbar, you will see icons for Page Color (which changes the background of the whole page) and for Page Border (which will let you insert a border for the whole sheet).
- Save your work. You have now created your own template for all future letters. Each time you need to write a letter, you can open this document and save it as a new name. For example, you could reopen the template, save it as LetterThankYouMiller, and then just begin typing.
- Note that most stationery templates also have a corresponding envelope template you can customize so that it matches your letterhead. If you have access to a printer that will print envelopes, you can design your envelope to match.
Activity 3: Create a Business Card
You will want your business card and letterhead to look similar, so refer to your letterhead as you complete this activity. Business card templates are made so that the size of the cards is standard to a sheet of paper or card stock. Once you complete your cards, they will be easy to print. Search the Internet and look at samples of business cards.
- Using your word processing software, find a template for a business card that you like and that works well with your letterhead. Note, as with your letterhead, there are many free templates online that you may want to download to use instead of those already on your computer.
- Insert your logo on the card, and add all of your contact information.
- Customize the text and colors on the card.
- If you are using a printer that will print on both sides of the business card, consider putting something on the back, such as your tagline or a small map of your location.
Apply
In this section, you will apply your branding skills to other materials you may use in your business. Select one or more of these activities to complete on your own:
- Design a package. Consider how you will label or package your goods for sale. Will there be tags? Or do they need to be delivered in a package? Design the label or other packaging that you will use for your business.
- Create a brochure describing your business plan to potential investors. You could do this using a pre-made template or by creating one that is completely new. Remember to include your business goals and your plans for achieving those goals.
- Make a promotional flyer for your business. Include some of the items you will sell and the prices. You may want to use a brochure template or experiment with other templates you find in your word processing software or on the Internet.
- Make and send a newsletter. Informative newsletters can be a way to keep customers thinking about you and your business, even when they are not currently planning on buying something. Newsletters may include information about new employees or products, or general news about your industry. For example, if you sell tea, you may want to tell customers about a new variety, or about a weather event that has affected the tea crop in your country or abroad. Design a newsletter template for your business, and consider how you might use the same template to send a newsletter on a regular basis. You could include elements such as a column where you write a letter to your customers, or a special section that profiles an employee or one of your products. Use and modify an existing template or create one on your own.
Lesson 2: Business Image Presentation
Getting your business noticed is an important part of your future success. While it is important to reach out to customers face-to-face, today more and more sales are being made through digital media strategies. Digital media includes the presentations to be used in person or online, as well as other online elements such as social media, Web pages, and email. This lesson focuses on several digital media strategies you can use to get noticed by potential customers.
Learn
Whether you are a businessperson, a professional, or an individual who wants to reach out to other people, creating a presence is very important. That includes your face-to-face interactions and those you develop online. When you are presenting your business—whether face-to-face or online—there are a number of items to keep in mind. Use the checklist as you plan your presentation content, which includes helpful guidelines whether you use them for a face-to-face presentation, to post on a website, or share through social media.
- I have decided on a goal and stated it clearly.
- All of the information I am presenting is there for a specific purpose, leading to my goal.
- I have considered my audience and customized this information with them in mind.
- I have developed a logical flow to the information.
- I begin the information with something that will get their attention.
- I have checked all the materials more than once, looking for spelling or punctuation errors, or broken Internet links.
If you will be making a live presentation, consider these points as well:
- I use each slide to only make one point, not group ideas together onto slides.
- I have developed talking points that complement the material in the presentation.
- I have planned how long the presentation will take, including allowing time for questions.
- I have written and printed my notes.
- I have inserted some blank slides or slides with just my logo to use when I am going to talk for a bit without a slide distracting from what I am saying.
- I have rehearsed my presentation more than once and I am prepared to speak extemporaneously from my notes without reading from the slides.
Practice
Activity 1: Make a Business Presentation
Now that you have created your branding, you can make a presentation about your business. This might be to illustrate your business plan for a potential partner, or to show your products to a potential buyer. This Activity references skills that were developed in Module 2: Productivity Tools.
Getting Started
- Decide the topic and the audience for your presentation.
- Open your presentation software and select a theme that works well with your branding. Consider the colors and borders and choose some that you feel work with the five words you wrote down earlier. You will want to make sure to use a similar theme to any other existing marketing materials, including letterhead and business cards.
- Create as many slides as you need to present your information. Since you will be talking while the person is looking at the slides, you do not need to put all the information on the slides, but can make them shorter expressions by using bullet points. These may come up as a default on your slide. If they do not automatically appear, select the bullet point icon on the home tab.
Make Your Presentation More Compelling
You can animate (make move) the graphics or text on a slide. You can use Entrance effects (how the element appears), Exit effects (how the element disappears from view), Emphasis effects (to call attention to something on the slide) or Motion effects (making elements move around on the slide).

Apply an animation using the following steps:
- After you add the graphic or text that you want to animate, select that element.
- On the Animations tab, select Add Animation, and pick an animation effect.
- Decide how you want to time the effect and how long it will last. Use the drop-down menus and buttons to make your settings.
- You can apply more than one animation to text or graphics; for example, the text can “fly” in and get bigger at the same time.
Now that your presentation is complete, you can insert your notes into the slides. You will be able to see your notes during your presentation but your audience will not.

- To open the notes pane, at the bottom left of the window, select Notes.
- Insert your cursor inside the Notes pane below the slide, and begin typing your notes.
- Once you are done, rehearse your presentation so you can refer to the Notes on each slide and still keep eye contact with your audience.
Print Your Notes
You should always have a hardcopy (printed) version of your notes. That way even if you cannot use your slides for some reason, you can give the presentation.
- On the File tab, select Print.
- Under Printer, choose the printer that you want to use.
- Under Settings, next to Full Page Slides, select the down arrow.
- Under Print Layout, select Notes Pages.
- Select Print.

Give Your Presentation
Using Presenter View has many advantages: you can see thumbnails of each slide so you know what is coming next; your speaker notes will be in large type; you will have a virtual highlighter that will let you draw on or point to the slide; and you can darken or lighten the screen if you want to shift the focus away from the screen while you respond to questions or take other breaks from your slides.
If you are presenting with a projector or onto another monitor, such as a flat screen, you will automatically see the Presenter View (with your notes) on one monitor, and your full screen slides will show on the other. To assign each view to the correct computer:
- On the Slide Show tab, in the Monitors group, select Use Presenter View. Dialogue box choose the monitor.
- In the menu box, select the monitor on which you would like the slideshow displayed.
- If you would like to present to people who are not where you are, you can share your slide show over the Internet using the Office Presentation Service
Activity 2: Collect Customer Feedback
Hearing from your customers can help you plan your next steps. Using an online poll allows you to get feedback quickly.
Creating an Online Survey or Poll
Go to Google Drive at drive.google.com. (Note that step-by-step instructions for setting up a free account at Google is in Module 3: The Internet, Email, and Communicating Online.)
- Be sure you have the most up-to-date version of Google Drive.
- Select New, hover over More, and choose Google Forms.
- In the form template that opens, you can add any questions you would like.
- If you would like those who complete your form to see a progress bar indicating how much of your form they have completed, check the box labeled “Show progress bar at the bottom of form pages.”

Adding Questions

- To add a question to your form, select the arrow next to the Add Item button and select from the following question types: Text (people respond with short answers); Paragraph text (people to respond with longer answers); Multiple choice (you provide two or more answers and they pick one); Checkboxes (you provide two or more answers and people pick as many as they like); Choose from a list (you provide multiple answers and people pick from a menu); Scale (people rank or rate something along a scale of numbers, such as from 1 to 5); Date (people choose from a calendar); and Time (people select a time, either a time of day or an amount of time).
- Once you have added a question, you can change the type by selecting from the Question Type Menu.
- If your questions are not free response, you will have to fill in the possible response fields to your question. If you want to provide more information, add it into the Help text field.
- If you want to prevent people from leaving a question blank, check the Required Question box, which makes sure users answer a question before submitting your form.
- Note that when a form is filled out, the names and email addresses of those responding are not automatically gathered. You may want to highlight that feature so people know they will be anonymous. However, if you want to collect this information, you must add a text field in your form for people to fill in their name or email address.
- You can send the URL of your survey to people, or you can embed it as a link on your website or social media pages.
Viewing Responses

- Open your form.
- Select Choose response destination in the toolbar.
- To see your responses in a new spreadsheet, select New Spreadsheet and name the spreadsheet whatever you want. To see your responses in an existing spreadsheet, select New Sheet in an Existing Spreadsheet and choose from one of your spreadsheets.
- Select Create.
- Once you have chosen to store form responses in a spreadsheet, the Choose Response Destination button in the toolbar will turn into a View Responses button. Select this to see your spreadsheet. You can also find the spreadsheet in your Drive account.
Apply
In this section, you will apply your business communication skills to other items you may use in your business. Select one or more of these activities to complete on your own.
- Work with a group of classmates or colleagues and share your business presentation. After each of you is done, give each other feedback for how to make it stronger.
- Would you like to reach your customers online? Create a website for your business.
- Another way to reach customers online is through social media. In this activity, you can consider how you present your business differently than your personal social media accounts.
- Networking with people is a good way to meet potential customers to find a job. Join LinkedIn to network with people online—it is a free online service. https://www.linkedin.com
Share & Reflect
You’ve explored a number of ways to present your business image to the public. Working with your classmates or colleagues:
- Show your logo to two to three people who have never seen it and ask them to give you five to ten words that it elicits. Do they align with the five words you picked before designing your logo?
- Discuss some new ways to use your branding through digital media strategies.
- Consider how your personal online identity might be different from or similar to your business identity. What are the pros and cons of each?
- Make a list of the other types of items you might need (or want) to be branded for your business.
Skills Checklist
Read through the checklist to review what you learned.
- I have a logo that reflects my business and brand.
- I can make stationery for my business.
- I can make business cards.
- I can add animations inside a slide in a presentation.
- I can prepare and present my business and ideas face-to-face.
- I can present my business brand online.
- I can create an online survey or poll to learn more about my customers.
- I can manage and view the responses to my surveys.
Optional Module: Money Management
Overview
Have you ever thought about how much money you will need to start a business? How much money can your family spend based on your current income? How will you keep track of your revenue (the money you take in) and your expenses (the money you have to pay out), and whether you are saving or making money? Careful planning and management of your money is an integral part of operating a successful business or managing a family budget.
This module will help you:
- Learn how to use data validation lists.
- Track your income and expenses.
- Develop a cash flow spreadsheet to track your sales.
Getting Started
Businesses use many types of tracking documents to plan and track their money management. These tracking documents are designed to help plan your expenses, predict your income, and achieve your financial goals. Even if you do not start or operate a business, proficiency with tracking documents can help you manage your personal or family finances.
Lesson 1: Creating a Cash Flow Spreadsheet
Knowing how much you have sold, whether or not payment has been received, or if your products have shipped are all elements of a successful business. As you balance the money coming in against the money flowing out, you will want to know how much the products are costing you to buy or make, how much your customers are paying for your products, and how many of each type of item you are selling.
The activities in this module are based on an imaginary business called Excellent Futon Enterprises (EFE). This business buys futons from a factory about 25 miles away and then re-sells them in a small shop in the city. There are three sizes of futons: small, medium, and large.
Your goal in this module is to develop and analyze a cash flow sales spreadsheet to track how much money the business is making. While the business in this model is imaginary, you could use the same process to track cash flow in a real-life business.
What You Need to Know
You can use spreadsheets to help manage this process and to provide up-to-date information on your business. The activities in this module draw on the basic spreadsheet skills presented in Module 2: Productivity Tools. Before you begin this module, you should be able to use spreadsheet software to:
- Create formulas inside cells, including adding amounts across columns and rows.
- Apply formatting in worksheets.
- Manage rows and columns in worksheets.
- Create multiple worksheets in a workbook.
For reference to fundamental skills needed in this activity, refer to Module 2: Productivity Tools, Lesson 2: Worksheets.
Learn
Tracking cash flow for your company’s sales includes tracking materials on hand, items that have been sold and delivered, money spent, and money you have received.
Before you begin, review some basic terms:
Inventory
Inventory is the raw material or product that you have on hand, ready to sell.
Cost of Goods Sold
Cost of Goods Sold is expenses you incur in order to sell an item or service. This will include the actual expense of purchasing or making the item, associated expenses of paying your wages or others’ wages to purchase or make the item or provide the service, shipping costs, storage costs, and any other costs that go into selling that specific item.
Revenue
Revenue is the money that you earn by selling products or services.
Net Revenue
Net revenue is the money that you have left after paying for the cost of the products or services you are selling. This is sometimes also referred to as “profit.”
Practice
Activity 1: Establishing Data Validation
At the end of each month, quarter, or year, it is usually fairly easy to see whether you are netting more than you are spending. However, ongoing and regular tracking of how much money has come in relative to how much money has gone out can be a bit more complex. Using data validation (ensuring that all data is correct) and adding dependencies (if/then statements) to your spreadsheet can make this much easier and allow you to track your earnings and spending at the same time.
Build a Master Worksheet
- Open a new spreadsheet workbook. Name the first worksheet “Master Sheet.”
- Make headings for columns as listed here:
- List ten names of people (real or imagined) in Column 1, Rows 2–10. Note that you will leave cell A11 without a name inserted at this time. This will allow you to add names later, which will be explained later in this Lesson.
- Your worksheet should look like this:


Create a Validation List
One key reason to use lists for data rather than entering by hand is that it will ensure that the data in cells is always consistent. For example, if you were entering the data by hand for the size of the futon, you might enter “Small,” “SM,” or even just an “s.” While this would not matter if you were writing the list by hand, when you are writing a dependent formula (using an if/then statement), you need to be sure that the information in these cells is exactly consistent. Otherwise, the software application will not calculate the information. This consistency is created by linking the data from a validation list (a finite list of terms) to the cells in a worksheet.
- Create a new worksheet in your workbook. Name the worksheet “Validation Data.”
- Fill in the Validation Data worksheet with the following information (Note that the Xs in the cells at the end of each column are purposeful; they are placeholders for data you may want to add in the future):
- The column headings here match columns B, C and D in your Master Sheet. Creating a table with validation data will allow you to auto-fill information on your Master Sheet, saving time and reducing errors.
- Save your work.

Linking Your Validation Data
- Return to your Master Worksheet. Select cells B2 through B11.
- On the toolbar, select the Data tab, and then select the Data Validation button from the list of Data Tools.
- In the Settings tab of the Data Validation pop-up window, select the List option in the Allow drop-down menu. Check the boxes for Ignore Blank and for In-Cell Dropdown.
- A dialogue box will appear with a blank labeled Source. Select the Source button, which will take you back to the worksheet.
- Without clicking anywhere else on the worksheet, select the tab for the Validation Data worksheet. Click and drag on A2 through A6 (selecting the cells for small, medium, large, xx, and xx).
- Hit the Enter key on your keyboard once, or select OK in the Validation Data pop-up window.
- You will be returned to your Master Sheet automatically.
- Save your work.
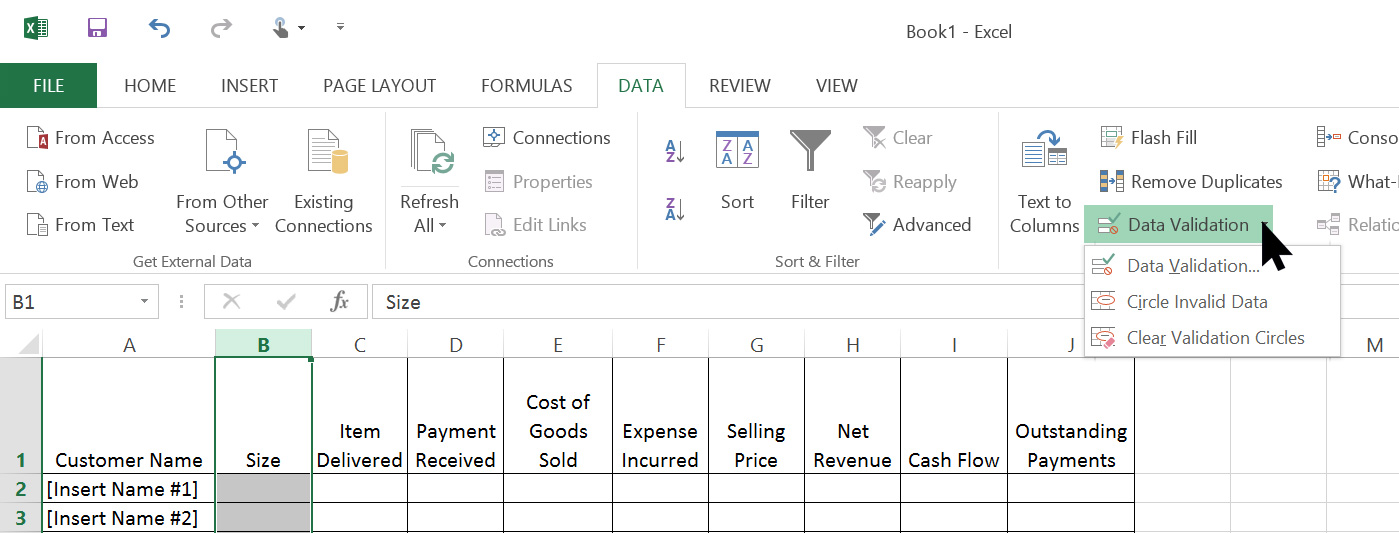


Working with Validation Data
- Select each cell in Column B (one at a time) and notice that a small arrow appears on the right side of each cell.
- Select the arrow in cell B2 and you will see the items on your list in the Validation Data worksheet: small, medium, large, xx, and xx. You will now be able to use this drop-down menu every time you need to enter another sale, rather than typing the same information repeatedly.
- Repeat the steps above to link your Columns for Item Delivered and Payment Received from your Validation Sheet to your Master Sheet.
- Check your work by rolling over the cells in Columns B, C, and D on the Master Sheet.
- Using the information below, fill in all the cells in Columns B, C, and D, rows 2–11, with sizes of futons sold, whether the items have been delivered and whether the payment has been received. Note that now that you have linked these cells to your Validation Table, you will not be able to type freely in those cells. The data validation has limited your options to the choices in the lists you created.
- Save your work.
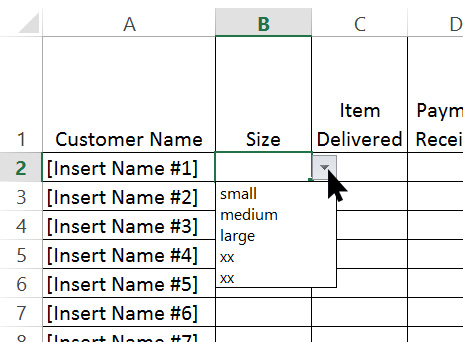

Activity 2: Working with Validation Data
This activity continues with the example from our imaginary business: Excellent Futon Enterprises. This example will help you consider the data you would like to include for your own business when using data validation in a spreadsheet. The cost of goods sold for the three sizes of futon (small, medium, and large) are as follows:
Size | Cost of Goods |
Small | 75 |
Medium | 125 |
Large | 150 |
On your Master Worksheet, you will now insert formulas that will allow the worksheet to auto-fill that data, so you do not have to enter it every time. This will save you time and will also reduce the potential for errors.
Entering Cost of Goods Sold Data with the Fill Down Command
- Label columns L, M, and N respectively as “Cost of Goods: Small,” “Cost of Goods: Medium,” and “Cost of Goods: Large.”
- Enter the cost of goods as 75 in cell L2; enter 125 in M2; enter 150 in N2.
- Click and drag from cells L2, M2, and N2 through cells L11, M11, and N11.
- While holding down the Control key, tap the “D” key. This will fill down the data in your table, populating all selected cells with the information that is in the top cell you have selected.
- Save your work, it should look like this:


Writing Dependent Formulas
Sometimes you will want your spreadsheet to auto-fill a value only in certain circumstances. For example, if you sell a small size futon, you would want the small size cost to appear in your cost of goods sold. A dependent formula is a good tool to use in this situation.
Using dependencies can usually be identified by a formula that has the word “if” in it, such as SUMIF, or IF.
- In cell E2, enter the following formula: =IF(B2=“small”,L2,IF(B2=“medium”,M2,IF(B2=“large”,N2))) Note that there are no spaces between any symbols or numbers, that the placement of the commas is very important, and that there is no period at the end of the formula.
- Read aloud, this formula means: “If the data in cell B2 = the word ‘small,’ then auto-fill the amount in L2; if the data in cell B2 = the word ‘medium,’ then auto-fill the amount in cell M2; if the data in cell B2 = the word ‘large,’ then auto-fill the amount in cell N2.” Note that if you had entered an inconsistent word in column B (instead of the exact word “small” from your data list) then the software would not be able to read the data in that cell, because it is looking for the word “small.”
- Click and drag from cell E2 through cell E11.
- Hold the Control key and tap the “D” key to fill down this equation into all the selected cells. Note that all selected cells will now fill in with the cost of the size of futon named in Column B.
- In cell F1 enter the following formula: =SUMIF(C2,“yes”,E2)
- Read aloud this formula means: “If the data in cell C2 = “yes,” then auto-fill this cell with the data in cell E2.”
- Fill down Column F from rows 2 through 11 with this formula. You will see that anywhere you had indicated in Column C that the item had been delivered, that Column F is now indicating that you have incurred an expense (the cost of that product). Your table will now look like this:
- Note that if you go to Column B and change the size of the item (click on the cell and use the drop-down menu), the cost of goods sold and the expense incurred will change. Similarly, if you change the information in Columns C or D, it changes the linked data in Columns E and F.
- Save your work.
- What if you have sold nine futons and then the company you are buying from increases the price, increasing your cost of goods sold? Change the cost of goods sold in cell M11, and see how it auto-fills the new, correct number in cell E11, and shows that you are now making less profit on that sale. (Return the value in M11 to 125.)
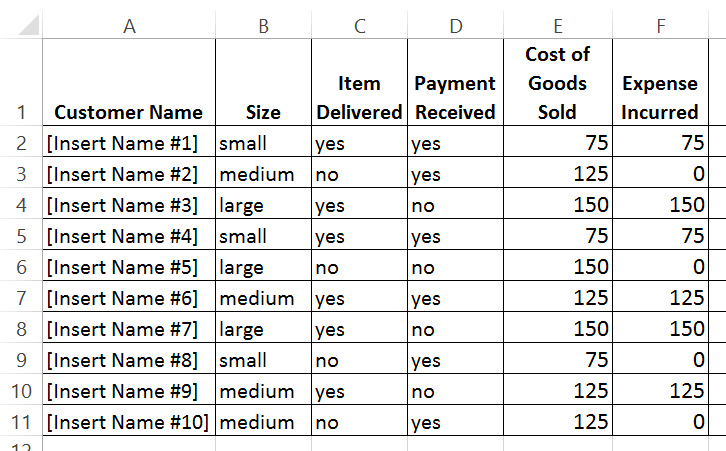
Activity 3: Calculating Cash Flow
The cost of creating and selling your product will usually be fairly consistent, but the selling price for your product may not always be the same. You may give some customers discounts, or you may have a promotional sale. For this reason, you will usually want to use Column G to fill in the actual price of each sale, rather than use any kind of auto-fill on that data. Before you begin this activity, fill in the selling price numbers as noted below:
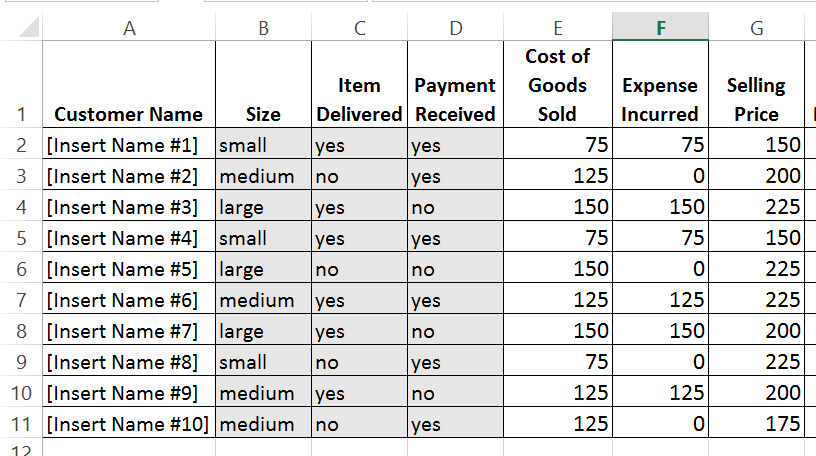
- Create a formula in Column H that will show how much money you received relative to the amount it cost you (net revenue): =G2-E2
- Fill down to place that formula in all of column H.
- Create a formula in Column I to calculate your cash flow: =SUMIF(D2,“yes”,G2)
- Read aloud, this formula means: “If the data in cell D2 = the word “yes”, then auto-fill the data in cell G2”.
- Since Column I is tracking the payments you have received, it is reporting how much revenue you have actually collected.
- In Column J enter the formula: =SUMIF(D2,“no”,G2)
- Read aloud, this formula means, “If the data in cell D2 is the word “no”, then auto-fill the data that is in cell G2.” This column is now calculating the amounts due to you for products you have delivered but for which you have not yet been paid.
Linking Your Totals
- Create a new worksheet in your workbook and title it “Totals.”
- In the Totals worksheet, Label cell A2 as “Income Received to Date.” Label A3 as “Expenses to Date.” Label A4 as “Outstanding Payments.”
- In Cell B3, enter an equal sign and then without clicking elsewhere on the worksheet, click the tab for your Master Worksheet. Click and drag to select all the data in column H (similar to making a SUM equation within a worksheet). Select Enter and you will be automatically returned to your Totals sheet, and you will see the total of column H reflected in cell B3.
- Repeat these steps to capture the expenses from your Master Sheet column F into cell B4 on your Totals sheet.
- Repeat these steps to capture the outstanding payments from your Master Sheet column F into cell B5 on your Totals sheet.
Your completed Cash Flow Worksheet will look like this:

Updating Your Worksheet
This worksheet will get you started in managing your cash flow. You can add to or change the cost of goods sold, add other columns to calculate additional information, or customize the worksheet in any way you like.
- When you add more customer names, be sure that your formulas are capturing any new rows that you add. This is why you did not use the line for Customer 10 through this activity.
- Insert a row between rows 10 and 11. Note that the Validation Data is automatically added into this new row because you inserted this row before your final row.
- Note that your other formulas are not automatically added in. Use Fill Down to copy the formulas into those cells.
- Note that your inserted rows are being reflected automatically in your Totals worksheet, because you inserted the row above the final cell named in your SUM equations.
- Always keep one blank row in your sheet and insert as many rows above it as needed to keep adding customers.
Apply
In this section, you will apply your worksheet and formula skills. Select one or more of the following activities to complete on your own.
- Use a worksheet to create a schedule to track a project. Use dates as your cell data, and enter formulas in successive cells to add days. For example, if step 1 is on January 15, use a formula that adds data in that cell for the number of days to the next step. Here is an example:
- Create a cash flow worksheet for your business or household expenses. Consider your business model and which columns you may need to adjust or change. Would you like to also use this sheet to track customer contact information? Do you incur your expenses before you make the sale? (In which case, you may not want that column to auto-fill.) What items do you want to track in your Data Validation sheet that will save you time and reduce entry errors in cells?

Share & Reflect
Reflect on what you learned about managing sales cash flow with a spreadsheet. Use the following questions to guide a discussion with your peers:
- What happens to your cash flow when you have delivered a lot of product but have not yet received payment?
- What kinds of processes would you use to keep your cash flow workbook up to date?
- What other columns would you need to add to your cash flow workbook based on your business model?
Skills Checklist
Read through the checklist to review what you learned.
- I can make a validation data list.
- I can link my validation data list to other columns or rows.
- I can write formulas that use dependencies.
- I understand how the cost of goods affects my cash flow.
- I understand the importance of tracking the timing of the cash received relative to the cost of the goods sold.
Terms of Use and License
Terms of Use
These resources provided by the Intel are 'open' and are available for educational use. Many hold Creative Commons licenses that allow them to be repurposed, modified and adapted for a diverse array of local contexts.
Each resource has one of three conditions of use labels. These at-a-glance labels can help you quickly distinguish whether a resource can be changed or shared without further permission required. In addition, you can find the specific license or terms of permitted use for each resource.
- Remix and Share.Your remixing, redistributing, or making derivatives works comes with some restrictions, including how it is shared. Includes Creative Commons Attribution Share Alike (CC BY-SA), Creative Commons Attribution NonCommercial Share Alike (CC BY-NC-SA), Creative Commons Attribution NonCommercial (CC BY-NC), GNU Free Documentation License (GFDL);
- Share Only. Your redistributing comes with some restrictions. Do not remix or make derivative works. Includes Creative Commons No Derivatives (CC ND).
- Read the Fine Print. Everything else. All Rights Reserved. US-based educators have certain permissions under Fair Use and the TEACH Act. Includes educational and personal uses of copyrighted materials, custom licenses and terms, permission to print only, unknown restrictions, and any other redistribution restrictions of the DMCA and of your own country.
License
All Intel Content is protected under U.S. and international copyrights. Intel owns and retains all rights, title and interest, including all rights under copyright, in and to all Intel Content. Your rights to use, share and adapt Intel Content under the Creative Commons (“CC”) License are merely those of a non-exclusive licensee, and you do not acquire copyright ownership with respect to any Intel Content.
Except as expressly otherwise noted, all Intel Content (including Intel Curriculum Material) is made available to Users in accordance with the Creative Commons Attribution-Noncommercial 3.0 Unported (CC BY-NC) License (http://creativecommons.org/licenses/by-nc/3.0/), as amended and updated by Creative Commons from time to time (the “CC BY-NC License”), which is incorporated herein by this reference.
The CC BY-NC License allows you to freely share and adapt Intel Content, provided that:
- You give proper attribution to Intel in the manner specified by Intel, but not in any way that suggests that Intel endorse you or your use;
- You may not use, copy, reproduce, perform, display, distribute, transmit, disseminate, modify, adapt, create derivative works from, or otherwise exploit Intel Content for commercial purposes, including for commercial advantage or private monetary compensation;
- For any reuse or distribution of Intel Content, you must make clear to others the CC BY-NC License terms (the best way to do this is with a link to http://creativecommons.org/licenses/by-nc/3.0/); and,
- You comply with all other requirements as may be specified in the CC BY-NC License. The CC BY-NC license supersedes and replaces any Creative Commons license previously adopted by Intel for Intel Content.
NOTE: Notwithstanding the above, the CC BY-NC License does not apply to photos, images and other materials contained in Intel Content which have been licensed by Intel from Shutterstock.com and/or other commercial stock photo/image agencies (you can easily identify such a photo or image by looking at the credit embedded within or associated with the photo or image) (each, a “Licensed Stock Photo”). You are allowed to retain a copy of a Licensed Stock Photo for your own personal, non-commercial use only, BUT (i) you may not modify, alter, adapt, or otherwise create any derivative work from a Licensed Stock Photo and (ii) you may not distribute, transmit or disseminate a Licensed Stock Photo or any copy or derivative work thereof, to any third party, whether by itself, as part of Intel Content, as part of your Curriculum Contributions, or otherwise.
If you wish to use Intel Content for commercial purposes, you must contact Intel to enter into a separate license agreement governing commercial use of Intel Content.
If you do not agree to the terms of the CC BY-NC License, please refrain from using Intel Content in any manner, including downloading, copying, reproducing, printing, editing, modifying, distributing or transmitting such content, in any media or by any means, whether now known or hereafter developed. If you accept the terms of the CC BY-NC License and proceed to use any Intel Content, then any breach or violation by you of the CC BY-NC License will automatically constitute a violation of the TOU and may subject you to liability to Intel for copyright infringement. Also, to the extent you have violated the CC BY-NC License and made modifications or improvements to, or have prepared derivative works based upon, Intel Content or have otherwise incorporated Intel Content into your own content for commercial purposes, your violation of the CC BY-NC License will automatically subject such modifications, improvements or derivative works by you, or your own content that is mixed with Intel Content, to a perpetual, royalty-free, worldwide license to Intel, and Intel may, in its sole discretion, elect to exercise the foregoing license in addition to or without prejudice to any other remedies available.
2018 Based on materials originally developed by IntelⓇ Corporation
*Other brands and names may be claimed as the property of others.