Introduction to Google Classroom
Overview
During this lesson you will the ins and outs of using Google Classroom. This lesson is meant to be an introductory lesson for someone that has never used Google Classroom. If you have already started using Google Classroom this lesson might not be for you.
Getting Logged In
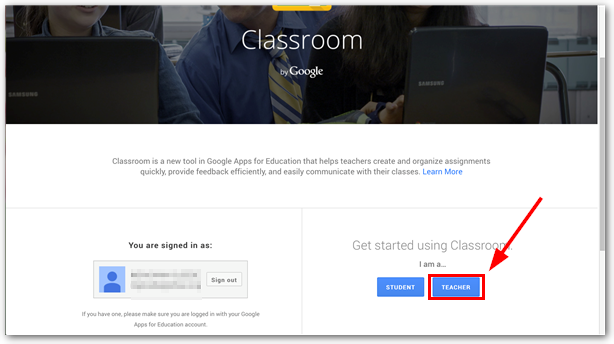
This step is crucial. When you go to Google Classroom for the first time the teachers in training need to select teachers. Our teachers that are not "Techy" might have messed this up. They may have had to join Google Classroom at a PD and assumed that since they were joining a class they should have select student. If you are in a Face to Face setting you will know if it is set up wrong because they will not have the option to create a class when we get to that step. If this is the case they will need to have their account reset. If you don't know how to fix this your teacher librarian should be able to handle it for you.
This step is crucial. When you go to Google Classroom for the first time you have to select "Teacher". Even if the first time you used it you were joining a class, you are a teacher. If you messed up with this before you will need to contact our Teacher Librarian to get your account fixed.
The Dashboard
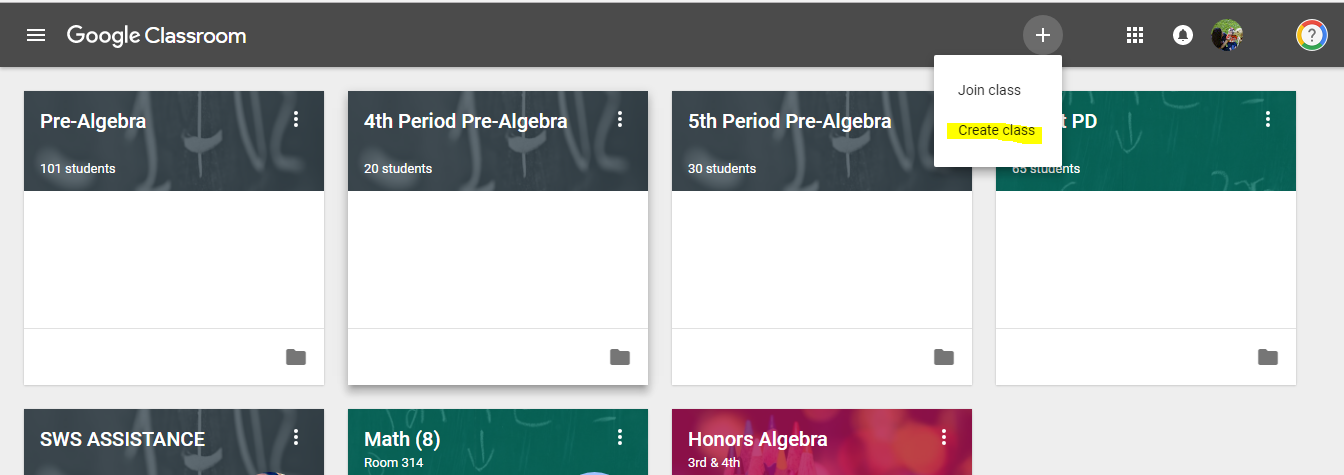
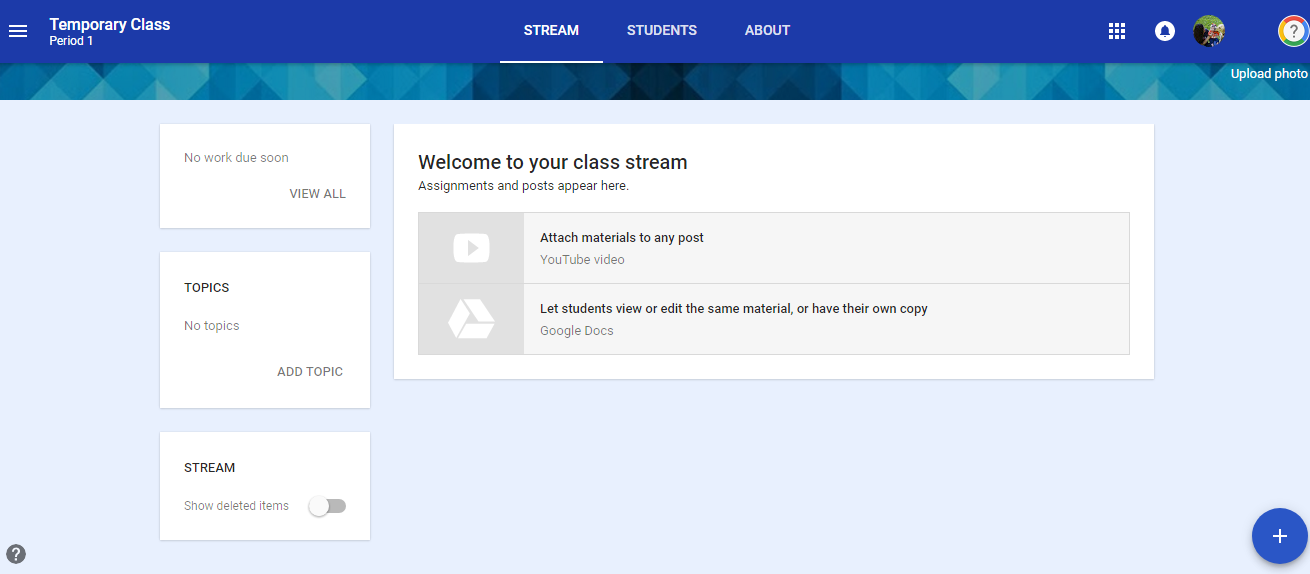
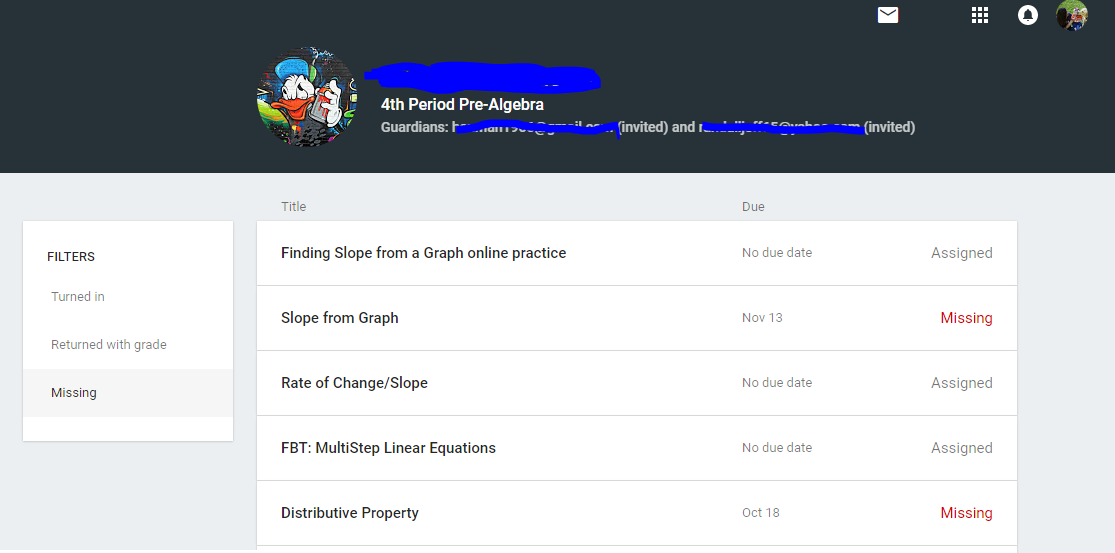
The dashboard is where teachers can view and create their classes.
The dashboard is where you will start everytime you go to Google Classroom.
- To create or join a class you will push the plus sign on the top right
- If you do not see a create a class your account has been registered as a student and you need to contact our teacher librarian to get your account fixed.
- You can drag the classes around on this sceen just by clicking on the title of the class and dragging it in the best order for you.
Before Creating Your First Class
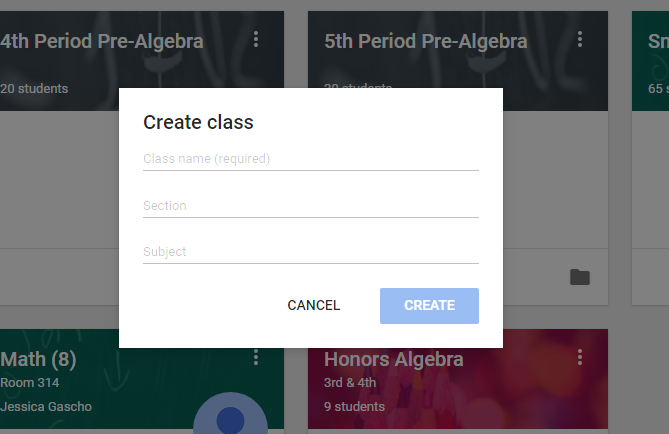
To create classes the teacher need to just push the plus sign to create the class and fill out the necessary info.
Before you create your first class you have some options to make.
- How many classes do you need?
- 1 class for all of your sections (this is nice if you teach all of the same class)
- Benefit:
- You only have to post things once
- All of your assignments are in one location (they will be in alphabetical order though, and not by period)
- You can use topics to organize by content
- Cons:
- When you grade any assignments it will not be sorted by class period. (More of a problem for secondary than elementary)
- For elementary all of your subjects will be mixed together and it might be confusing for student
- Benefit:
- Multiple Classes
- In secondary you could have 1 class for each class period/prep, and in elemenary you could have 1 class for each subject.
- Benefit:
- When grading everything is a much more organized and in the same order as your grade book
- You can use a classroom feature that allows you to post the same thing to multiple sections
- You can use the topic section to tag post by standard/chapter/section.
- Cons:
- You have to remember to post to all of your classes
- Benefit:
- In secondary you could have 1 class for each class period/prep, and in elemenary you could have 1 class for each subject.
- 1 class for all of your sections (this is nice if you teach all of the same class)
Create Your First Class
Once you push the create your class button a window will pop up about information for you class.
Once you push the create your class button a window will pop up about information for you class. Fill it out and push create. When naming your class make sure you make it helpful for your students as well. Including a period in the title if you are using more than 1 class, or your name in the title will help them.
Parts of Google Classroom
First Glance
- Stream:
- This is where all of your post will appear to the students. Their view will look slightly different but essentially the same.
- Students:
- You can get the code for students to join your class
- You can see all the members of your class
- The place where you can change settings for students being able to post in classroom
- About:
- This is a location where you can put stuff about your class, or resources that they may use all year long.
- You can also invite Co-teachers in this section.
The Stream
Types of Post
You will need to be in the stream to start posting items for your students. To add a post you select the plus sign on the bottom right. There are 4 options to choose from:
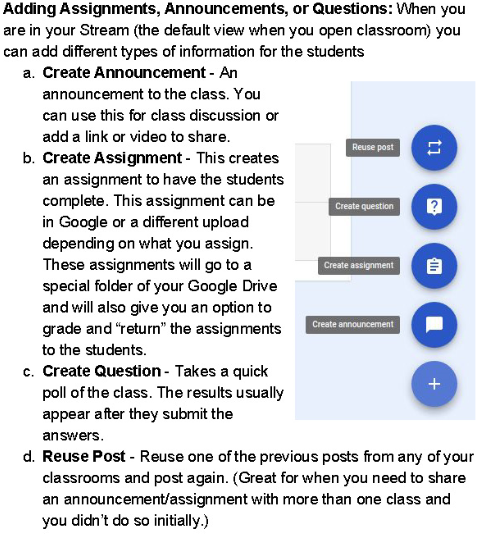
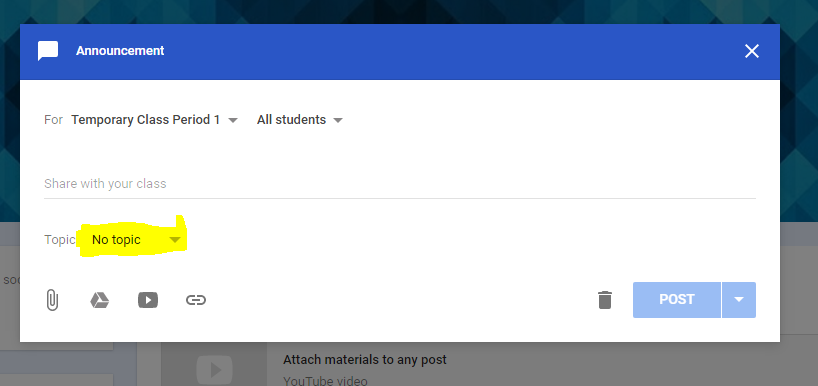
When you create any post there is a topic section. You can assign each post to a different topic. It could be a chapter/topic/standard. This topic will come up on the side of the stream and students can look at their class this way.
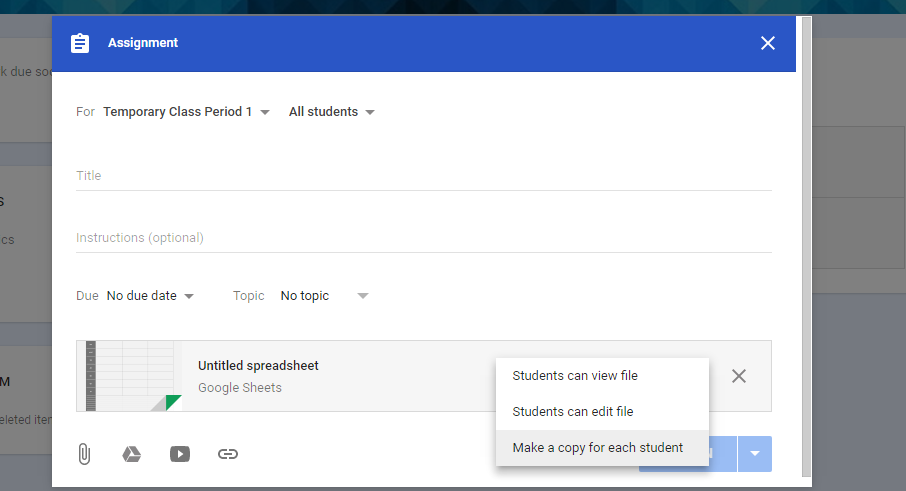
Attaching Items: When you create any post in classroom you have the option of attaching items from your computer (paperclip), drive (triangle), Youtube Video (Play button), or a link(chainlink).
- When you are creating assignments and attach something it also give you some additional options.
- Can View Files (You just want the student to see this item)
- Can Edit Files (be careful with this one, it will create 1 copy for all students to write on)
- Make a copy for each student (this one will make a copy for each students, rename it with their name in the title, and share it back with you immediately)
Student Section
What in the student part
This section gives you information about the members of your class.
- Who has joined your class
- The capability of inviting their parents/gaurdians
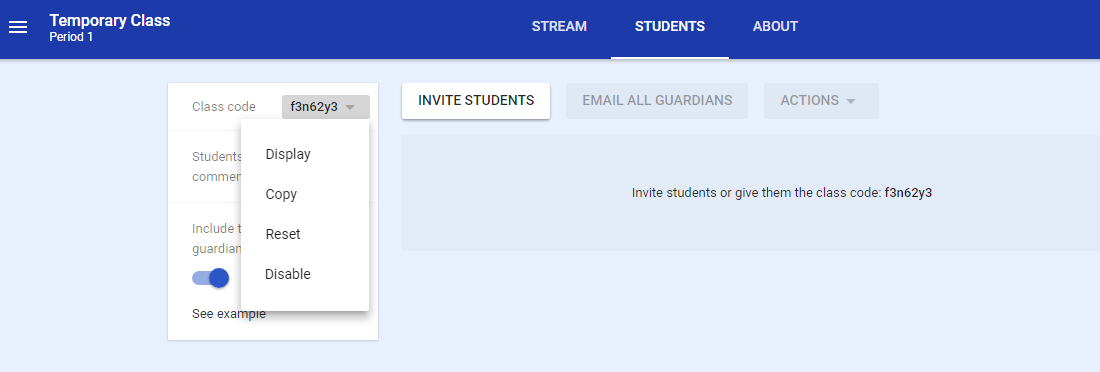
- View Class Code to get students to join the class
- Reset-create a new code
- If you don't want anyone else to join your class
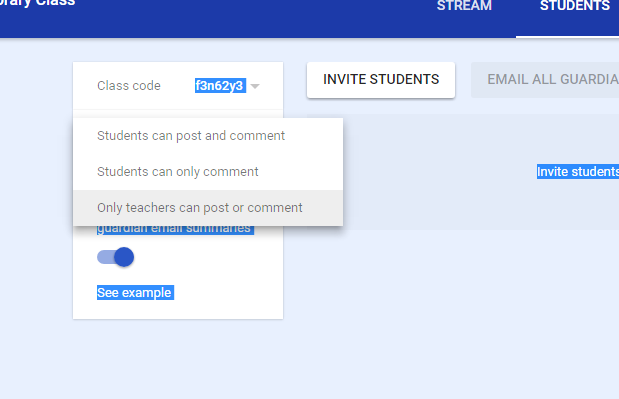
- Change Post Settings
- Without changing this setting students have the access to add content to your classroom.
About Section
Year Long resources
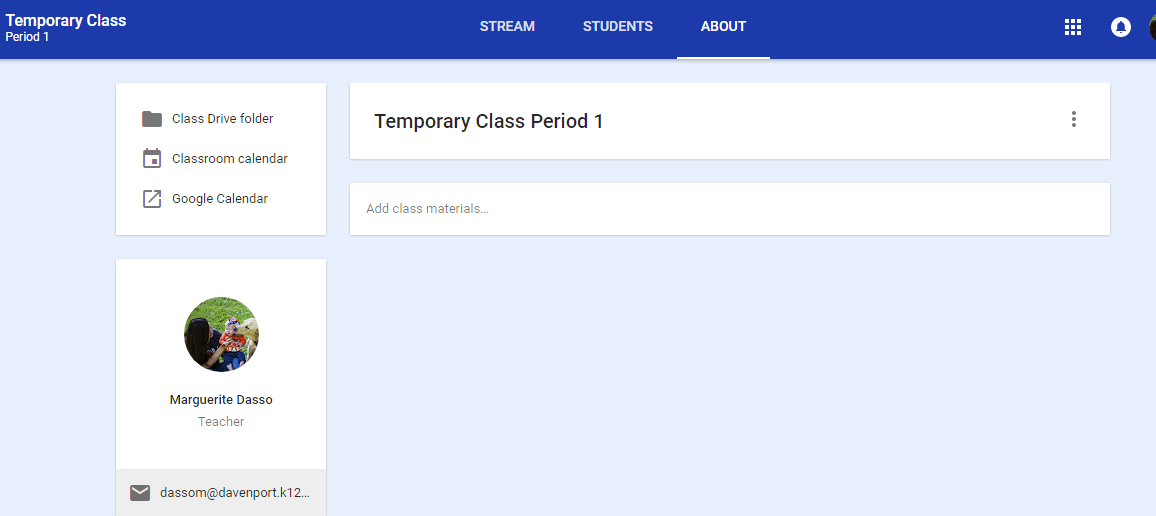
In the About section you can put resources students might need access to all year long. This page could act like a website where it's just a place to store resources.
- Store Class Resource
- View Class Calendar
- Invite CoTeacher
- Rename your Classroom
Grading/Collecting Work
Students have done assignment
Once a student has completed the assignment you will want them to turn it in.
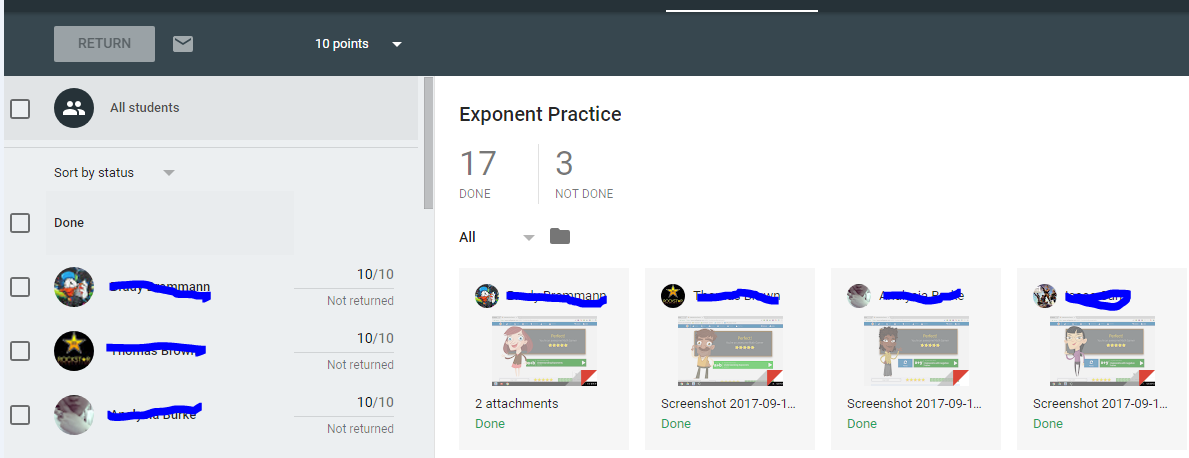
Grading an assignment:
When you select the assignment from the stream it will bring you to another page where all turned in assignments are. You can view them just by click on them and assigning them a grade. Another cool feature is that you can view any assignments that have been started if you used the "create a copy for each student" function.
You also can view all the work for one particular student. When you click on their assignment you will need to select their name. It will bring up a list of all of their work for your class.
Some Advanced Features
Incase you aren't on mind overload
If you are still wanting to learn more check out the video below for some more advanced features.
Task 11: Apply Your Learning
In this task the teacher will be creating their own class to practice. They will post announcments, assignments, change settings, and post information for students to use throughout the year.
Now it's your chance to create a classroom. (I want to practice the process of doing these steps. Please don't spend time creating a pretend lesson to post)
Create a pretend class and provide your class code to me and invite me through email.
Include the following in your class:
- In the student section turn off commenting to students.
- Create an announcement with a welcome message to your class.
- Create an assignment
- Include a document that will "make a copy for each student"
- Include a video over the "lesson"
- Include another attachment that you just want to be a view only document
- In the About section post a few resources that would be useful to your students throughout the year.