
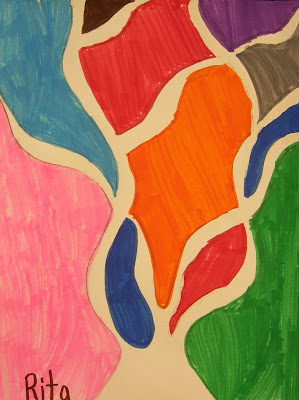
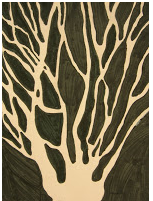
Negative Space Tree Drawing
Negative Space Tree Drawing
A Copyrighted Activity Re-Posted with Permission from Cheryl Trowbridge www.teachkidsart.net
Objectives:
The participants will:
1. Use the art elements of line, color and negative and positive space to create art
2. Use nature as the inspiration for their art
Audience:
Cheryl works with children and they were the focus for her in creating this lesson but this activity could be used with all ages. This is a perfect project for winter or early spring before trees have budded and leafed out.
Learning Opportunity:
Negative space is the space between an object or around an object, but is not part of the actual object itself. It is the opposite of an identifiable object which can at the same time be used to help define the boundaries of positive images. A good artist realizes that the space surrounding an object is just as important as that object itself. Negative space helps define a subject and brings balance to a composition. Typically negative space should not distract from the main subject unless the negative space IS the subject.
Source: www.tutorial9.net/articles/design/enhancing-your-art-with-negative-space/
Negative Space Tree Drawings
Everyone loves any excuse to get out of the classroom or house, so if you can, take your class outside to find their inspiration in nature. In this lesson, the subject matter for the art will be trees without leaves. If you can’t take your class outside, or you don’t have any good trees nearby, some good reference photos will do.
- Supplies/Materials:
- Art paper
- Pencils
- Erasers
- Sharpies
- Colored markers, paints, brushes, oil pastels, colored pencils, crayons, etc.
- Images of bare trees
Class Instruction:
1. Start by talking about positive and negative space. In this case, the positive space is the tree trunk and branches and the negative space is the area between the branches and around the tree.
2. Use a viewfinder to select the part of the tree you want to draw. You can make a viewfinder using two “L” shaped pieces of paper or you can even use your fingers. Close one eye as you look through your viewfinder, moving it around to find the most interesting composition.
Step 2
3. Now do a contour drawing (edges only — no detail or shading), cropping it (have it go off the page) to add interest. Pay attention to the shapes created by your negative spaces. This will help you draw the positive spaces around them.
4. Remind students to press lightly as they draw so they can erase as needed without leaving a “shadow” of the lines they don’t want.
5. Trace over your pencil lines with a black Ultra Fine Sharpie, then erase any pencil lines still showing.
6. Use markers (or other art supplies) to color the negative spaces. You can choose one color for the whole drawing or several colors to give the drawing a “stained glass” look. Be careful to color all one direction!
To see this lesson in its entirety, visit www.teachkidsart.net/negative-space-tree-drawings/ .