
Name Tangles
Name Tangles
A Copyrighted Activity Re-Posted with Permission from Cheryl Trowbridge
Zentangle® is an art form developed by Maria Thomas and Rick Roberts. Zentangle®, per their website, www.zentangle.com, is “an easy to learn method for creating beautiful images from repetitive patterns. Zentangles® are miniature pieces of unplanned, abstract, black and white art created through structured patterns. Creating a Zentangle® is known as tangling and a tangle is a single pattern. Visit Pinterest to see how to create a wide variety of patterns or consider purchasing one of several books available on the subject: Pattern Play: A Zentangle® Creativity Boost by Cris Letourneau, Zen Doodle: Tons of Tangles by Tonia Jenny, Drawing: Drawing Art for Beginners: Doodle Patterns and Shapes by Meredith Graham, Design Originals, Joy of Zentangle® by Marie Browning, and The Art of Zentangle®: 50 Inspiring Ideas for the Meditative Artist by Bremner, Brunell, and Raile.
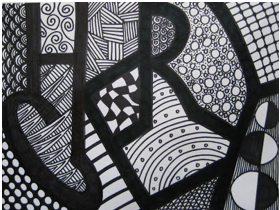
Example
Objectives:
The participants will:
1. Learn about the “doodling with purpose” art form known as Zentangle®
2. Incorporate the art elements of line, pattern, color and positive and negative space in creating art
Audiences:
This activity is suitable for any age. Zentangles® are an enjoyable and relaxation tool for everyone.
Name Tangles
“Name Tangles” are a fun way to create a cool design using your name or another word of your choice. Try adapting this idea for a unique greeting card design.
Supplies/Materials:
- 9x12 white construction paper
- Pencil and eraser
- Black markers, sharpies and pens, fine and broad point
Class Instruction:
1. Use large stick letters to write your name, beginning with the first letter touching both the bottom and left side of your paper.
2. Draw your next stick letter so that it touches both the first letter and the top edge of your paper.
3. Draw the next letter in the same way, this time touching the 2nd letter and the bottom edge of your paper.
4. Repeat this process, alternating with touching the top and bottom edges, finishing with your last letter also touching the right side of your paper.
5. Now draw an outline around each stick letter and fill it in with black marker, so the letters are nice and thick.
6. Finally, use your fine point marker to fill in the negative spaces inside and around your letters with line patterns or fill with solid colors for a “stained glass” effect. To see this lesson in its entirety, please visit http://www.teachkidsart.net/name-tangles/ .
Plan in Action:
Retha Knapp (Team Leader and Peer Support Specialist) and her colleagues at CenterPointe of Lincoln, NE adapted this plan for use with their clientele. The mission of CenterPointe (www.CenterPointe.org ) is to “help provide pivotal treatment and services for people experiencing homelessness, mental illness and addition.” Retha shares: “This project was well-received and enjoyed by the consumers. Those who feel they do not have an artistic talent have appreciated the ideas.”