
Memory Frame
Memory Frame
A Lesson Developed and Contributed by Christine Hennig, MA, LMHP, ATR
Objectives:
1. To reminisce about pleasant memories
2. To create a beautiful image that reminds you of a pleasant memory
3. To increase feelings of competence and usefulness by creating something beautiful
4. To create feelings of enjoyment through exploration and combining attractive materials
Audiences:
Students and Adults of all ages
Note to Facilitator:
I usually tie this project in with a holiday because it provides a focus for gathering pictures and materials, though you don’t have to do it that way. It would be ideal if you could use the artists’ own pictures for the project, but that often is not possible. I gather my pictures from Google images, searching for pictures from the 1970’s through the 2000’s of people engaged in pleasant activities (usually I do the project in December and collect pictures of Christmas celebrations and winter fun.) You can use the cardboard piece that comes in the center of the frame to size the picture. If using the artist’s own pictures, you can photocopy or scan them into a computer, and this will allow you to size them properly and allow the artist to use a copy for the project, rather than the original photograph, which the artist may want to preserve.
Supplies/Materials:
- Square wooden picture frame with a small hole in the center for the picture—these can be purchased at Michael’s or Walmart for $1 each. Look for them in the woodcraft section.
- Pencil or Sharpie pen in a dark color (Hint: Sharpie pens are good for tracing with people who have vision impairments.)
- Scrapbooking paper in assorted colors/patterns (if using a theme, such as a holiday, select papers that fit the theme)
- Tacky glue and/or glue guns
- Assorted stickers, scrapbooking embellishments, and other items for decoration, such as buttons, ribbons, or flat jewels (try to, expenses permitting, make these be good quality and have a wide assortment of them)
- Scissors
- Foam brushes
Prior to Class:
- Gather and size the pictures you will have the participants choose from. Use the cardboard piece from the center of one of the frames to figure out what size to make the pictures. Size them on a computer or photocopier. Google Images is a good source for finding pictures. Another good picture source is magazines.
- Create a sample from one of your own memories to give participants an idea of what the finished product will be like.
- I usually like to un-wrap supplies from their packaging before the group session begins, but for this project, it’s better to keep the frames wrapped until the participants start creating. This will allow you to keep track of the cardboard pieces from the center and the sticks for standing up the frames.

Sample frame
Class Instruction:
1. Begin the class with greetings and friendship. If necessary, introduce (or reintroduce) yourself to your group, putting everyone at ease.
2. Show an example of the art to be created during the session—a Memory Frame.
3. Pass around the pictures and ask each participant to choose a picture that reminds him or her of a pleasant memory.
4. Ask the participants to un-wrap their frames and set aside the wooden dowel that comes with the frame so they can find it later. Also have them bend down the tabs that hold the cardboard piece in the center of the frame and remove the piece, setting it aside for later. Point out that on the back of each frame, there is a hole that can be used to put the dowel in so you can stand up the frame on the table. If they want to be able to stand up their finished frames, they need to make sure the frame is positioned so that this hole is at the bottom of the frame. This is easy to overlook, since the frames are square and can be positioned in any way.
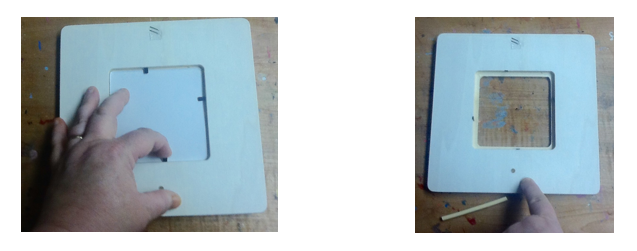
Set-up
5. Have each participant choose a sheet of scrapbooking paper to cover the frame with. On the back of the paper, have them trace around the outside of the frame, using a pencil or Sharpie pen, and also trace the inside square opening in the center. Then have them cut out the frame shape, and also poke the scissors through the center and cut out the square in the middle. They should end up with a piece of scrapbooking paper that is the exact shape and size of the frame.
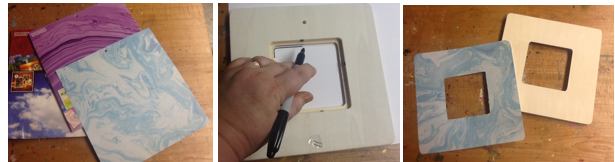
Scrapbooking paper
6. Have each participant apply tacky glue all over the front of the frame, then take a foam brush and spread it so that there is an even coat of glue all over the front of the frame. Then they will position the scrapbooking paper they just cut out so it matches the frame; press it down.
7. Now comes the fun part—decorating the frame! Have the participants decorate the frame in a way that goes with the memory that their picture evokes. Explain that some embellishments are self-sticking while others will need to be glued on.
8. After finishing the frame, have each participant insert the picture they selected. The cardboard piece works well as a stabilizer behind the picture. Also show the participants how they can put the dowel into the hole in the frame, so it can stand up.
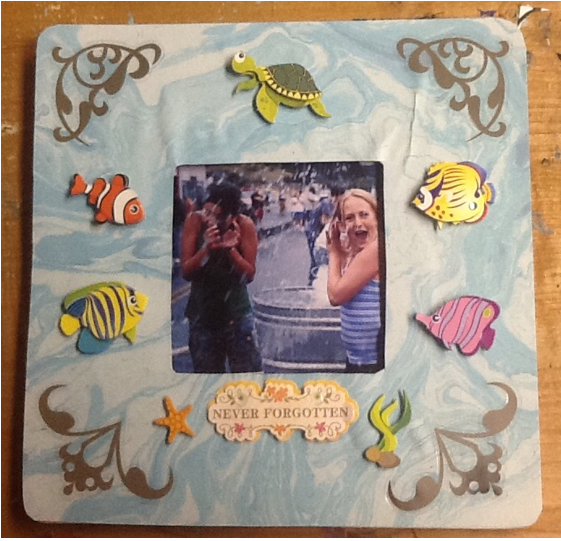
Completed frame
9. When group members have finished their frames, have them each tell the story of the memory that the picture evokes.
10. These frames make a lovely display, especially in a windowsill. Add labels that identify the artist and have each artist think up a title for the piece that references the memory corresponding to their art.