
Kitchen Art Ideas
Kitchen Art Ideas
With Lessons Inspired by the Teachings of
Jean Martin
Objectives:
The participants will “think outside the box” to:
- Search for materials found in the kitchen than can be used in the art process
- Create art using “unconventional” kitchen equipment, tools and materials
Audiences:
These activities can be enjoyed by all age groups. All that is required is a little imagination.
Blow Painting
This lesson comes from the files of artist and teacher Jean Martin.
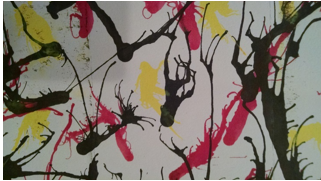
Blow Painting Example
Supplies/Materials:
- Drinking straws
- Construction paper (any color), 9x13” or other desired sizes
- Tempra Paint
- Matting to finish the art work
- Old shirts to cover clothing and drop clothes/newspaper to protect surfaces.
Class Instructions:
- Put a small “dab” of paint on the piece of construction paper.
- Take the straw and position it next to the “dab” of paint.
- Gently blow through the straw and move the paint in the direction you want it to go.
- Repeat this process with additional dabs of paint until you have the desired design.
- Let your creation dry flat.
- Matte your Blow Painting and hang it
Finger Painting with Chocolate Pudding
This activity also came from the files of Jean Martin. By adding enough water to package of instant chocolate pudding to give it the consistency of finger paint, any budding artist has an interesting (and tasty!) new medium to create art. Use whatever you have on hand to work with the “paint” to create interesting designs. The texture of the pudding leaves a 3-dimensional effect when applied to paper. This is a great activity for any age.
Pudding Painting Example
Modeling Clay
Air-Hardening Clay
- 2 cups baking soda
- 1 cup cornstarch
- 1 ½ cups cold water
Place ingredients in a pan and stir until smooth. Set the pan over a medium heat and stir until boiling. Break up any lumps and cook until it is the consistency of mashed potatoes. Turn out onto a plate and cover with a damp, well-wrung kitchen towel—let the mixture cool. Dust a work surface with cornstarch an knead until pliable—then you are ready to create! You can add food coloring to the clay or leave it white and paint it after it dries.
No-Cook Playdough
- 2 cups all-purpose flour
- 1 cup salt
- 1 cup cold water
- 1 T vegetable oil (can use baby oil)
Drop all the ingredients into a plastic bag and seal. Knead the ingredients together inside the bag then tip it out for modeling fun.
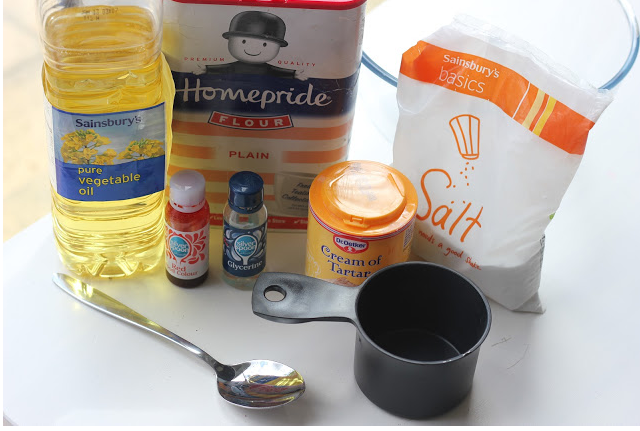
Playdough ingredients
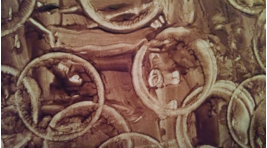
Condensed Milk Paint
If you have a can of condensed milk and some food coloring in the pantry, you have the making of a great “paint” that doesn’t drip and dries with a shiny finish. Distribute the condensed milk into small containers—you can use muffin tins if you’re already in the kitchen! Add about five drops of food coloring (a different color for each container). Add extra food coloring for more vibrant colors. Give each container of “paint” a good stir to mix the color and you’re ready to create!

Condensed Milk Example
Source: www.mamapapabubba.com/2013/01/08/shiny-condensed-milk-paint/
Painting “Tools” You Can Find in the Kitchen
Look through the drawers and cupboards in your kitchen to come up with some great tools to create art.
- Sponges can be cut into various shapes and sizes to help create art.
- Knives can be used to create straight lines and spread paint.
- Squeeze bottles are helpful in painting narrow lines and/or experimenting with different textures.
- Rags and paper towels are great for spreading paint and blending.
- A few drops of paint in a salad spinner can be a creative (but messy!) painting method.
- Cooked spaghetti with some paint added can be sensory and be used to create art.
- Rolling pins can be used to spread paint colors over paper or a canvas.
- Potato mashers and slotted spatulas can be used with paint to make prints.
- Plastic wrap can be used to create unique textures.
- Aluminum foil can be the basis for sculptures.
- Coffee filters can be used to make snowflakes, flowers, and a multitude of other crafts.
Fresh Produce combined with paper and paint can also be used to create art prints:
- Apples and pears—cut lengthwise in half
- Bananas--cut in half
- Oranges and lemons--cut crosswise in half
- Corn—cut in half with a stick inserted in the end to make a handle
- Bell Peppers—sliced crosswise in half with the seeds removed
- Broccoli and cauliflower—separated into individual florets
- Mushrooms—sliced button or any round mushrooms lengthwise in half
- Potatoes and carrots—sliced into quarters, wedges or cut into specific shapes such as a flower or star