
Art Lesson Plans for a Joan Miro Drawing
Art Lesson Plans for a Joan Miro Drawing
Objectives:
- To introduce a famous Italian artist to the students.
- To teach the art element of “Line”
- To teach the art element of “Balance”
- To practice using these elements in creating a work of art
Audiences:
Marilyn Stadler and Donna Williams co-taught this lesson during an “Art from the Heart Session” at The Legacy Retirement Community in Lincoln; however, the activity would be suitable for ages elementary to senior citizens.
Supplies/Materials:
- 8 ½” x 11” piece of drawing paper (or smaller)
- Pencils for drawing; Sharpies for outlining; crayons, markers, etc. for filling in spaces
- A copy of the directions for drawing
- Dice: one per student
Learning Opportunity:
Joan Miro (1893-1983) was a painter, sculptor and ceramist who was born in Barcelona and raised in Majorca, Spain. His parents worked as a goldsmith and watchmaker. His art has been described as surrealistic and whimsical—childlike—a sandbox for the subconscious mind. Inspired by Vincent Van Gogh and Paul Cezanne, Miro combined abstract art with surrealistic fantasy. His art evolved from tensions between his fanciful poetic impulse and his vision of the harshness of life. He worked extensively with lithography and produced numerous murals, tapestries and sculptures for public spaces. (Source: www.joan-miro.net )
Images of Miro’s work found in public domain:
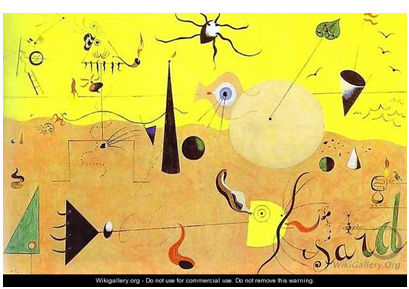
Miro Image 1
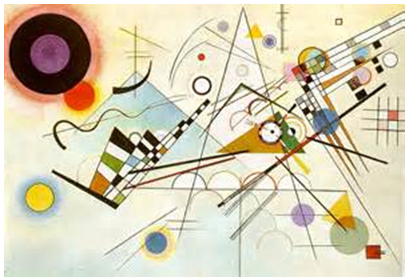
Miro Image 2
Miro employed the art elements of line and balance into his artwork:
Art Element of Line
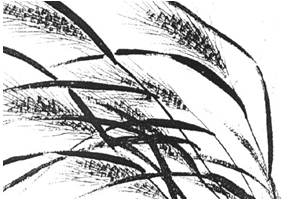
The variety of Line used in art is endless. Some examples can include thick, thin, curved, angular, or broken. A variety in Line thickness creates interest. You can be expressive and suggestive with the use of Line. In nature, Line is seen in grasses, tree branches, cracks in rocks, flower stems, etc. Contour Lines indicate edges or forms. Gestural drawing uses Lines to indicate movement—these quick drawings show action using swirling lines. A Rembrandt drawing showing an example of gesture drawing With implied Lines, our eyes read edges of objects (as in looking at the shape of a lemon).To vary Lines, use the side or tip of your pencil or marker.
Element of line
Gestural drawing uses Lines to indicate movement—these quick drawings show action using swirling lines.
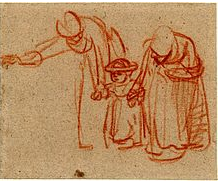
Rembrandt Gesture
With implied Lines, our eyes read edges of objects (as in looking at the shape of a lemon).
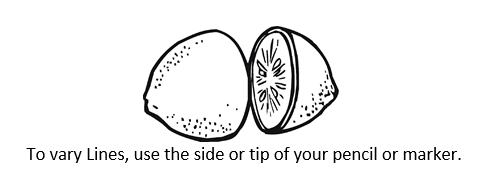
Implied Lines
Art Element of Balance
Balance is the distribution of weight in art. “Symmetrical” Balance is created when both sides seem to be equal in shape, weight, value, color. “Asymmetrical” Balance involves two sides that are different but yet visually seem balanced (informal).
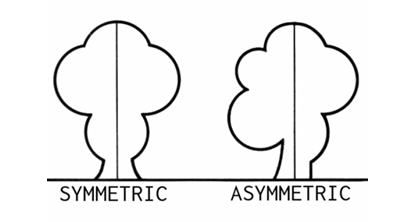
Element of Balance
In addition, larger shape with neutral colors can be balanced by smaller shapes with intense colors. Note to Facilitator: For more information, please refer to the book Elements and Principles of
Design (Crystal Productions of Glenview, IL) available for purchase at http://www.dickblick.com/products/crystal-productions-elements-and-principles-of-design/ .
Class Instruction:
1. After talking about and showing examples of Joan Miro’s art and teaching the art elements of Line and Balance, explain the lesson to the students.
2. Students are to create a drawing using the handout and rolling the die. (Here is an example of an instruction sheet but you can make up your own)
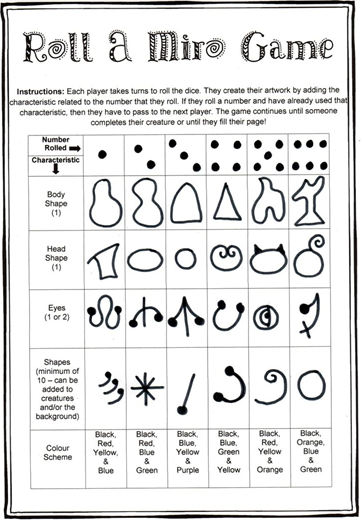
Handout
3. Students are to draw the shape for each part of their image that corresponds with the number on their die. The first lines are for the head. Follow the shapes indicated on the handout. If they roll a “1”, the participant draws the shape in the first row for #1, or if it’s a 3, they draw that form. They proceed to draw the eyes, nose, mouth, etc., drawing the shape indicated on the paper that corresponds with the number rolled on their die. The last two categories are for placing other lines or forms around their figure for a background. The participants are to roll at least 3 more times to place lines and forms around their figure and can include additional forms if they want. They can also draw a body with arms and legs, etc. if they wish.

Student Example
4. When finished drawing, the participants should outline their creations with a sharpie, using various thickness of lines. Next, they can color in the parts of their image and add other shapes and lines to fill in the background space to create a well-balanced piece.
5. Encourage students to be creative and even “whimsical” if they wish, and to use what they’ve learned about line and balance in their drawing. They could even come up with a title for their piece or a theme.
6. When finished, they could do a gallery walk and view each other’s drawings or each could hold theirs up for others to see.
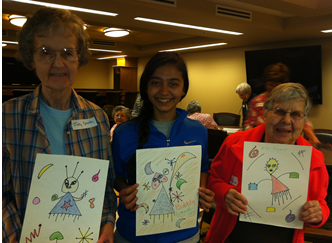
Student Gallery Walk
At the Conclusion of the Class:
- Art can be displayed in a visible location.
- Students could be encouraged to write a story telling about their creation to be shared at the beginning of the next lesson.
Extensions and Adaptations:
Crazy Critters!
You can make up your own template or visit www.expressivemonkey.com to download the complete template with instructions and then create “Crazy Critters” using the Joan Miro dice game method. Once the drawing is completed, the students can add embellishments and decorations to the page.
Please visit http://talesfromthetravellingartteacher.blogspot.com/2013/12/joan-miro-monsters-with-3rd-grade.html for another activity for creating art employing Joan Miro’s art style.