
Home Town Map
Home Town Map
(art + social studies)
As basic as it seems, young children need to be taught to be observant and aware of their surroundings. This lesson plan helps children in grades K–3 pay more attention to the world around them as they travel back and forth between their homes and their schools. As they create maps of their route, they’ll learn about distance, signs, symbols, landmarks and other things that will reinforce the quickest — and safest — way for them to get to school and back home again. As their classroom teacher or art teacher, you can help your students identify familiar landmarks and create images that reinforce what they already know about their daily journey.
Older students can build more details into their maps, such as weather maps or treasure maps, as well as more complex legends, keys and measurements. Whatever the age of your students, you can help them make this exercise fun!
Both groups of students can take advantage of free city maps and state maps provided by the Department of Transportation and state agencies. Phone books also often include city maps and historical maps. Students will learn that map-making and map-reading can be fun as they trace rivers, parks and the world outside their home and school.
Grade Levels K-6
Note: instructions and materials based on a class of 25 students. Adjust as needed.
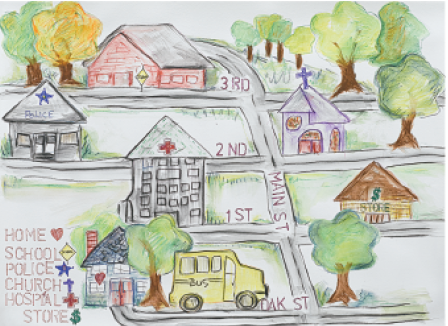
Sample Image
Materials
Stencil Set package of 15 (61719-1003); share two sets across classroom
Watersoluble Crayons, 8-color set (20106-1009); share three sets across classroom
Watercolor Pencils, set of 24 (20589-0249); share two sets across classroom
Nylon Brushes, 144- piece School Pack (06004-2001); share one set across classroom
Student Watercolor Paper, 15" x 22" sheets (10028-2152); need one sheet per student
Plastic Letter Stencils (55464-1020); share six sets across classroom
Ultra-Fine Point permanent Markers, 12-color set (21315-0129); share two sets across classroom
Ribbon Rainbow (61498-1009); share one bag across classroom
Process
1. The stencils that will be most useful for this lesson are the boy, girl, house, tree, car, cat and dog. The plane can also be used to designate an airport, and the train for a train station or railroad crossing. The barn and farm animal stencils may be appropriate for children who live in rural areas.
2. Have students begin tracing and cutting out images to place on their maps. The size of the images may need to be made smaller to fit on the map by trimming the shapes with scissors. As your students are working on tracing and cutting out the landmarks, animals and other images to place on their maps, talk to them about the images they’ve chosen A good way to start might be, “Not every tree looks like this tree. But when we see it, we think ‘tree.’” Or, “This house stencil has windows, a roof, chimney and walls, but not everyone’s house looks like this. This is just an example.” Students should draw additional symbols using watercolor pencils, as needed.
3. Prior to class, you should make three to four patterns on individual pieces of watercolor paper, depending on the specifics of the neighborhood in which the school resides and the areas your students travel from to get there. These patterns can be traced from a master that you have created. Students should choose the one that matches most closely with their route. These master patterns should include symbols to denote the school, police station, fire station and other landmarks that you know lie along their routes. Discuss these symbols with your students while they’re working on their own images.
4. Have your students place the images they have created on the map in the appropriate places. Encourage them to incorporate street names into their maps, to reinforce knowing the names of the streets they travel between their homes and school.
5. Have students fill in grass, water and other large spaces of their maps with watersoluble crayons, then use a brush and water to blend the colors.
6. Have them draw small symbols for the map’s legend or key. The key should be placed in the lower left-hand corner of their maps, with labels like “home,” “school” and others, using a list or box format. Explain to your students that the symbols need to be generic enough so that others can read their maps and understand their symbols. They can use fine-line markers and the letter and number stencils to create the words on their legends.
7. When completed, hang the maps up to dry by displaying them in the classroom. When dry, they can be rolled, labeled and tied with ribbon. Your students’ parents will appreciate knowing their children are becoming more aware of their surroundings as they travel back and forth to school!
National Standards
Content Standard #2 — Using knowledge of structures and functions
K-4 Students use visual structures and functions of art to communicate ideas
5-8 Students employ organizational structures and analyze what makes them effective or not effective in the communication of ideas
Content Standard #3 — Choosing and evaluating a range of subject matter, symbols, and ideas
K-4 Students select and use subject matter, symbols, and ideas to communicate meaning
5-8 Students use subjects, themes, and symbols that demonstrate knowledge of contexts, values, and aesthetics that communicate intended meaning in artworks