
Holiday Arts!
Holiday Arts!
Learning Opportunities:
In the USA one thing is certain—Americans love to celebrate their holidays! Decorating homes and communities, serving tables laden with holiday food and enjoying family/community activities all play a big role in celebrating the traditions, cultures and heritages that make up this great country. Federal Holidays when many government offices are closed include the following:
- New Year’s Day on January 1 marks the beginning of a new and hopefully prosperous year. Many also celebrate New Year’s Eve (December 31) to welcome in the New Year in style.
- Martin Luther King, Jr. Day is celebrated on the third Monday in January to recognize the efforts of Dr. King to bring civil rights to all people through nonviolent means.
- President’s Day is observed the third Monday of February to honor the first President of the United States, George Washington, and the legacy of all presidents who have served our country.
- Memorial Day is observed the last Monday of May and was originally intended to honor those killed in the American Civil War. Today, Memorial Day is set aside to honor all American Military Members who have given their lives in the service and defense of their country.
- Independence Day is on July 4 th and is the anniversary of the signing of the Declaration of Independence (July 4, 1776). The holiday is celebrated with picnics, parades, concerts and fireworks.
- Labor Day falls on the first Monday of September and is a holiday set aside to honor our nation’s working people.
- Columbus Day is observed on the second Monday in October. President Franklin D. Roosevelt proclaimed Columbus Day a national holiday to commemorate Christopher Columbus landing in the New World (October 12, 1492).
- Veteran’s Day is celebrated on November 11. Originally called Armistice Day, the holiday was established to honor Americans who had served in World War I but now honors veterans of all wars in which the U.S. has fought. Traditionally, the President of the U.S. places a wreath on the Tomb of the Unknown Soldier at Arlington National Cemetery in Virginia.
- Thanksgiving Day is celebrated on the fourth Thursday in November to commemorate the fall of 1621 when the Pilgrims held a three-day feast with their Native American neighbors to celebrate a bountiful harvest.
- Christmas Day is December 25 and marks the Christian holiday celebrating the birth of the Christ Child.
Some of the most popular American celebrations and observances that occur every year include:
- Groundhog Day lands on February 2. It has been celebrated since 1887 and features the appearance of Punxsutawney Phil predicts spring or six more weeks of winter based upon seeing his shadow.
- Valentine’s Day is celebrated on February 14. Named after the early Christian martyr, St. Valentine, the holiday is a day to share gifts of love, including Valentine cards which were first sold in the 1840’s.
- Earth Day is observed on April 22 and has been celebrated since 1970. Its purpose is to promote ecology, fight pollution and encourage respect for the earth and all life upon it.
- Arbor Day falls on the last Friday in April. Originally, the observance began in 1872 when Nebraska settlers and homesteaders were urged to plant trees on the plains. President Richard Nixon proclaimed National Arbor Day in 1970.
- Mother’s Day is the second Sunday of May. The holiday began in 1914 with President Woodrow Wilson’s proclamation asking Americans to give public expressions of reverence to mothers.
- Flag Day is celebrated on June 14 and has been observed since 1916. Americans are encouraged to display the flag outside of homes and businesses to honor the national history and heritage the American flag represents.
- Father’s Day is celebrated the third Sunday of June and began in 1909 in Spokane, Washington. A daughter requested a special day to honor her father, a Civil War veteran, who raised his children after his wife died. In 1966 President Lyndon Johnson issued the proclamation to set aside the day to honor fathers.
- Patriot Day, also known as 9-11, was a defining moment in American history when terrorist hijacked four commercial airliners to strike targets in the United States. Nearly 3,000 individuals lost their lives as a result of the attack and these victims and their families are remembered on this day.
- Halloween is celebrated on October 31. In addition to undertaking a multitude of decorations and activities, children traditionally dress up in costumes and “trick or treat” in their neighborhoods.
- Pearl Harbor Day is December 7. In 1994, Congress designated the national observance to honor the more than 2,400 military service personnel who died on this date in 1941 during a surprise attack on Pearl Harbor, Hawaii by Japanese forces which caused the U.S. to enter World War II. With the melting pot that makes up the U.S., various ethnic and religious groups celebrate days with special meaning; among them are Easter, Kwanza, Yo Kippur, and Ramadan. Then you can add St. Patrick’s Day, Cinco de Mayo, Mardi Gras (and Fat Tuesday) and you get the idea that we love to celebrate and love our holidays!
Source: http://www.usa.gov/citizens/holidays.shtml
Holiday Arts and Crafts
Objectives:
1. To introduce the participants to a number of creative and enriching activities to create art and crafts for various holidays.
2. To help elderly participants bring back memories of holidays past
Audiences:
These activities were “piloted” at Legacy Retirement Homes of Lincoln during “Art From the Heart” sessions but could be suitable for all ages to enjoy.
Activity One: Decorating Pumpkins
The fall months are a time for colorful decorating—brightly colored pumpkins, dried cornstalks, hay bales, autumn leaves, colored corn and gourds, and scarecrows can be found in stores and homes throughout the community. Halloween Jack-O-Lanterns and decorated pumpkins have become another traditional symbol for decorating in anticipation of Trick-or-Treaters. Painted pumpkins are a great alternative to carving pumpkins. No sharp knives are involved and a painted pumpkin will last much longer than one that is carved.
Supplies/Materials:
- Various sized pumpkins (ones without too many lumps, bumps, wormholes, soft spots or blemishes) that are easy to handle and have been gently cleaned with a damp cloth
- Pencil and paper
- Acrylic paint, brushes and art sponges
- Spray paint (metallic is fun)
- Templates and patterns (bats, witches, moons, leaves, etc.)
- Permanent markers
- Straight pins
- Glue gun
- Embellishments (feathers, sequins, glitter, ribbon, fabric, yarn, “fake” hair, hats, pipe cleaners, etc.)
- Sealer or Varnish to coat the finished pumpkin (optional)
Prior to Class:
Set up stations for participants with:
- Covering for the table surfaces
- A pumpkin (or two) for each participant
- Basic supplies to decorate the pumpkin
- A table of embellishments for the participants to use
Class Instruction:
1. Show the participants examples of painted and decorated pumpkins you have created in advance.
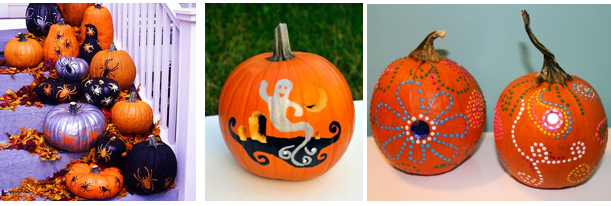
Painted Pumpkins examples
2. Give the students the option of maintaining the original color of the pumpkin for the background or painting the entire pumpkin a new color—there are no rules. Metallic spray paint can make for an attractive pumpkin.
3. Have the participants sketch out or plan the design they wish to paint onto the pumpkin, keeping in mind the design will not be placed on a flat surface but on a fat pumpkin.
4. Participants can “freelance” their design or use their sketch and templates to lightly mark the pumpkin to create an outline for their images.
5. Turn the participants loose, encouraging them to use their imaginations and have fun. Encourage them to decorate all sides of the pumpkin and to step away and look at different angles of the pumpkin to see that they have decorated all areas they desire.
6. Look for characteristics of the pumpkin you might be able to use in your design—for instance, a well-placed knob or bump on the pumpkin could make a great nose!
7. When they are finished with the painting, you can add a layer of sealer or varnish to protect the painted pumpkin (prior to adding any other embellishment). Spray-on varnish is a good option at this point but it should be applied outside in a well-ventilated area.
8. Add any other embellishment using straight pins to secure them to the pumpkin.
At the Conclusion of the Class:
Have a show and tell where participants share the pumpkin art they created. Plan a display of all the pumpkins created and enjoy hot cider, pumpkin bars and candy corn to add to the festivities.
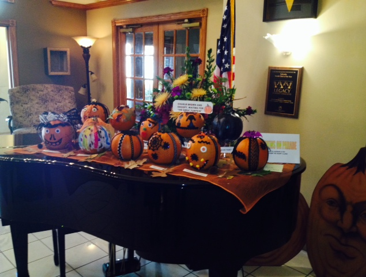
Finished Pumpkin Display
Activity Two: Making Felt Christmas Stockings
Learning Opportunity:
As the story goes, good old St. Nicholas heard about a man who was so deeply in debt that, in an act of desperation, he considered selling his family into slavery. St. Nick was so moved by the plight of the family that he tossed a bag of gold through the window during the night to keep his identity hidden (other stories claim the bag of gold was tossed down the chimney). Legend has it that the bag of coins landed in one of the children’s stockings that had been hung by the chimney to dry. The gold given by the mysterious benefactor saved the family from ruin and thus began the tradition of hanging a stocking by the fireplace to be filled by St. Nick when he makes his rounds on Christmas Eve.
Source: https://www.softspoken.com/2012/12/a-history-of-decorating-traditions-2/
Note to Facilitator:
You have several options for the basic Christmas stocking your class will be decorating and embellishing. The easiest option is to purchase ready-made, unadorned Christmas stockings at a craft store or discount star for a minimal cost. A second option is to create the stockings by using a template to cut out the felt stocking pieces and then put the stocking together either using a glue gun or needle and thread. If you go with the second option, you also need to decide if you are going to make the stockings yourself in advance of class or if you’re going to ask your class to make them. Your decision will depend upon the time you have available for the class session and the dexterity of your participants. In some cases, your participants may attach some of their decorations/embellishments prior to putting the stockings together. Others will wait until the stocking is assembled—whatever works!
Supplies/Materials:
- Heavy-weight felt
- Fabric scissors
- Fabric glue
- Needles with decorative thread (needle “threaders”—optional)
- Embellishments (sequins, cotton balls, felt/fabric scraps, ribbons, pompoms, holiday patterns/templates, bells, beads, garland, etc.)
- Tacky fabric glue
- Hot glue gun and sticks
- Stocking template on cardstock
- Templates/patterns for holiday symbols: Christmas trees, wreaths, bells, candles, Santa, etc.
- Straight pins
Prior to Class:
If you will be making the Christmas stockings from scratch, use the stocking template to cut out felt stocking pieces (two sides per participant). Set up stations for each participant with necessary supplies/materials. Arrange a table with additional embellishments for the participants to use.
Class Instruction:
1. To cut out a Christmas stocking:
A. Put together two pieces of felt on top of each other that are larger than the size of the template.
B. Place the template on top of the stacked felt and secure it in place with straight pins.
C. Cut along the outside of the template through both pieces of felt using fabric scissors.
D. Save scraps of felt for embellishments
E. Detach the template from the felt stocking pieces and stow away the straight pins.
2. To create the stocking from the pieces using glue:
A. Separate the two stocking pieces and place one piece on a flat surface protected by newspaper or other covering.
B. Using a hot glue gun, place glue around the edges of one half of the first stocking, making sure not to glue the top.
C. While the glue is still hot and pliable, carefully place the second felt stocking piece on top of the first and press into place.
D. When the glue is set, fold back the top felt piece and apply glue to remainder of the bottom stocking piece, again making sure not to glue the top.
E. Smooth down the remainder of the top piece of felt onto the bottom to secure it.
F. You can attach a loop of ribbon or other material using a glue gun to the back of the stocking so it will be easy to hang.
3. To create the stockings using needle and thread:
A. Match up the stocking pieces and use a decorative stitch around the sides of the stocking, making sure to leave the top open.
B. Let the participants experiment with the stitches they’d like to use from their past sewing experiences.
C. Add a loop of ribbon so the stocking can be hung.
4. Now invite your participants to embellish their stocking any way they’d like with the materials that are provided.
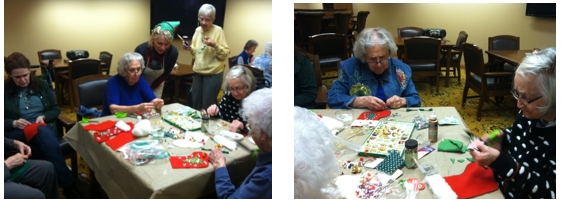
Making stockings
At the Conclusion of the Class:
Ask the participants to show their creations to the other class members. Ask the class to share memories of Christmases past and family traditions. For fun, serve eggnog and cutout Christmas cookies. You can display the stockings as a group or each participant can take home their stockings for their own decorations.
Activity Three: Card Making
Learning Opportunity:
The custom of sending greeting cards can be traced back to the ancient Chinese who exchanged messages of good will to celebrate the New Year. The early Egyptians also conveyed their greetings on papyrus scrolls. Valentine’s Day cards actually date back to the Middle Ages. The oldest Valentine in existence is on display at the British Museum and dates back to the 1400’s. Paper Valentines were very popular in England and in the early 1800’s factories began assembling cards in mass. With the exception of Christmas, Americans exchange more cards on Valentine’s Day than any other time of the year. The custom of sending Christmas cards was started in the United Kingdom in 1843 by Sir Henry Cole. He enlisted the help of an artist friend and together they designed and printed about 1,000 copies of the first, three-paneled Christmas card. It sold for about eight cents and with the advent of the “Penny Post” it was possible for “ordinary” people to afford to send these wonderful cards. Louis Prang, a German immigrant who started a small lithograph business near Boston in 1856 is generally credited with the start of the greeting card industry in America. In the early 1900’s a number greeting card publishers began creating cards and are still in business today. By the 1950’s the studio card—a long card with a short punch line—appeared to add humor to greeting cards. In the 1990’s with the growth of electronic technology, electronic greeting cards (or E-Cards) have become a new medium for card sending. But at the end of the day, nothing can replace that precious paper card and the message it delivers.
Source: www.whychristmas.com, www.eomtionscards.com , www.greetingcard.org
Supplies/Materials:
- Blank cards and envelopes (available at your craft store) or A5/A4 cardstock
- Straight edges, rulers, scissors, paper punch, etc.
- Pencils, paper, erasers (for designing the cards)
- Glue guns, glue sticks, adhesives
- Pens, pencils, markers, colored pencils, water color paints and brushes, ink pads and stamps
- Embellishments (fabric, felt, ribbon, bric-a-brac, buttons, colored/patterned paper, stickers, templates, glitter, pipe cleaners, etc.)
Class Instruction:
1. Show the class examples of cards they could make……
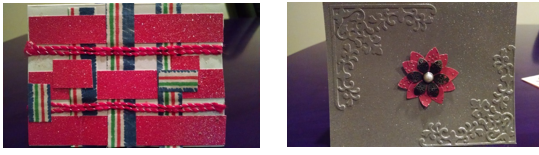
Holiday Card Examples 1
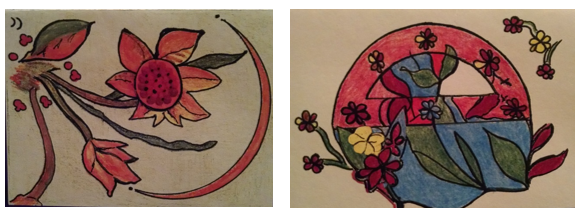
Holiday Card Examples 2
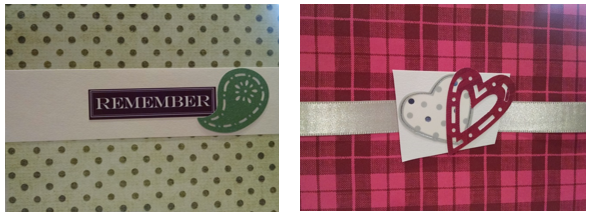
Holiday Card Examples 3
…..Cards using ribbon, yard, colored papers and stickers…..
…..Cards created by using art supplies…..
…..Cards created by using finger prints with ink pads, colored papers and markers…..
2. Ask participants to think about a layout and theme for the card before beginning creating and possibly sketch some ideas on scrap paper before beginning.
3. Encourage the participants to explore the many mediums they can use to create a unique card.
4. Turn the participants loose and let them enjoy the process.
At the Conclusion of the Class:
Ask the participants to show their creations to the entire class. Encourage them to use the cards to send to family and friends. Alternatively, the cards could be sold in a local gift shop to raise money for a favorite charity.
Adaptation and Extensions:
Using the same format for creating cards, consider making decorative gift bags. Simply use lunch bags, paper shopping bags or other unadorned paper bags (you can find a variety in craft or discount stores) and add your own embellishments and decorations. These are perfect for gift giving to tuck in a jar of jam, a candle or any special treat you wish to pass on to family and friends.