
Father’s Day Ties
Father’s Day Ties
Objectives:
The participants will:
1) Learn about the history of Father’s Day
2) Use the elements of color, line, symmetry and negative and positive spaces to create art
Audience:
This lesson is perfect for school children who wish to honor their fathers.
Learning Opportunity:
Father’s Day is officially celebrated the third Sunday of June. To learn of the holiday’s origins, you need to look back to 1909 in Spokane, Washington. Sonora Smart Dodd was one of six children raised by her widower father, a Civil War veteran, whose wife had died during child birth. While listening to a sermon at church on Mother’s Day, Sonora thought about all her father had done for her and her siblings and decided fathers should have a day, too. To honor her father, she wanted to establish an official day to recognize fathers that would be the equivalent of Mother’s Day. She gained support by working with churches, the YMCA, businesses and government officials who embraced her idea. Washington State celebrated the first state-wide Father’s Day on July 19, 1910. The holiday slowly spread across the nation. In 1924, President Calvin Coolidge made Father’s Day a national even to “establish more intimate relations between fathers and their children and to impress upon fathers the full measure of their obligations”. In 1966 President Lyndon Johnson issued the proclamation to honor fathers, officially establishing Father’s Day in June, the birth month of Sonora Smart Dodd’s father. In 1972, President Richard Nixon signed the public law that made the holiday permanent.
Sources: www.history.com/topics/holidays/fathers-day
www.usa.gov/citizens/holidays.shtml
www.loc.gov/wiseguide/jun01/father.html
Father’s Day Tie Cards
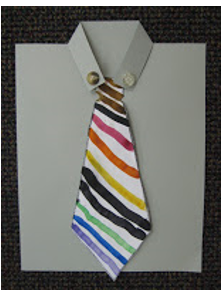
Sample image
Are these the cutest Father’s Day cards, or what??! Children’s art projects often include a bit of prep and this one is no exception, but it’s pretty quick and totally worth it!! These ties are done in watercolor and the effects are fabulous.…any one of these designs would make a great tie for real! Only the “knot” of the tie is glued down, so when you lift the tie, it says, “Happy Father’s Day! Love, _____”.
Supplies/Materials:
- 9x12” white, gray and colored construction paper
- Scissors
- Pencils
- Tie template
- Q-tips
- Water colors and brushes
- White glue (glue gun with glue sticks optional)
- Buttons
- Black sharpies
Class Instruction:
1. Start with a piece of 9x12 construction paper in the color of your choice.… we used gray since it makes a nice background for most any color tie.
2. Cut a slit across the top, 1–1/4″ down and 2–1/4″ in on both sides. Then fold these two flaps in toward the center and down at a slight angle so the corners meet to form the “collar”. The “shirt” is done!
3. Now give each student a piece of white construction paper with the tie outline traced or photocopied onto it. (To make your tie symmetrical, you can make a template by folding a piece of 9x12-inch paper in half. Then use a ruler to draw your diagonal lines, and cut the tie shape on the fold.)
4. This is a great opportunity to demonstrate some watercolor techniques painting lines for stripes, making dots, swirls, and flowers and some wet on wet painting for soft, fuzzy edges. Then let them create!
5. When the ties are dry, let the kids practice using their scissors to cut them out (resist the urge to do this for them!) and glue the knot only under the collar, leaving the rest of the tie unglued.
6. Now fold the tie up at the base of the knot and have students write “Happy Father’s Day! Love, (their name)”.
7. Finally, use some white glue and a Q-tip or cheap paint brush to glue some buttons on the collar and under the tie. A glue gun will also work.
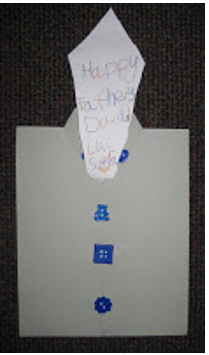
Sample Images with text
Part of the charm of kids’ artwork is in the authenticity of it, so resist the urge to “fix things” and just let it be fully their work!!
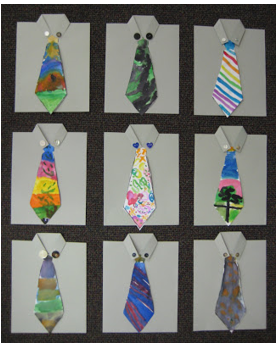
Finished Project Examples
Special thanks to Cheryl Trowbridge for sharing a wealth of
information and resources and ideas on her excellent website www.teachkidsart.net ! Cheryl
has her art education credentials and has been teaching art to kids for over 20
years. She is inspired by watching
children of all ages discover their ability to be creative. Her passion is to make successful art lessons
accessible to help share the joy of art with all the kids in our lives.