
Communicating in A Big Way - Digital Design Using Wide Format Printing
Lesson Topic:
Digital Design: Creating Large Format Monthly Calendars
Lesson Description:
Communication is key in our daily lives. We need to have access to what is on our calendar – the school calendar. And yes, it’s great to have it electronically, but when there is a large group of people checking dates for an event it’s nice to have a large format for at-a-glance information. In this lesson, students will learn to create a large format 18” x 24” calendar file that could be printed and posted in a classroom to use for reference to upcoming events for the month. In our small community it has also become a public relations tool for our school and several are posted in businesses throughout our school district. Using the picture file format of the design, the calendar is also shared electronically each month for smaller print format and online access.
Learning Goals/Outcomes:
- Become familiar with terminology
associated with desktop publishing
- Create a custom size file in a publishing software.
- Learn the difference between Normal View and Master Page view
- Switch between Normal View and Master page view
- Locate and insert a Building Block calendar
- Customize the dates of a Building Block calendar
- Use sizing handles to adjust the cells of the calendar table
- Locate and use group and ungroup
- Locate and use Kerning and Leading for font and line spacing adjustment within a given area.
- Communicate calendar events in as few words as possible but still include who, what, where, why, when, and how
- Download and install fonts
- Use an online text generator to vary the font and style for emphasis on the project
- Search for copyright-free images that are appropriate to the calendar activities
Nebraska Standards:
CIS. HS. 1.
11 Identify project's message and
mission
CIS. HS. 1. 11. a Evaluate project
proposal ideas and determine intended audience's needs.
CIS. HS. 1. 11. b Describe how to
visually communicate the project's message and mission.
CIS. HS. 1. 12 Design graphics, text, and/or presentations
to clearly express one's views for the intended audience.
CIS. HS. 1. 12. a Prepare a
production schedule (e.g., creating and using a work plan, establishing
milestones and deliverables).
CIS. HS. 1. 15 Demonstrate design principles and concepts.
CIS. HS. 1. 15. a Demonstrate
knowledge in topography (font face, font styles, effects).
CIS. HS. 1. 15. b Apply color
theory principles.
CIS. HS. 1. 15. d Apply text layout
principles (e.g., leading, kerning, alignment)
.CIS. HS. 1. 15. e Demonstrate
knowledge in page layout (e.g.,negative space, alignment, symmetrical,
asymmetrical).
Teacher Planning:
Equipment/Materials/Software Needed:
Lab computer or 1:1 assigned device
Microsoft Publisher or other Desktop Publishing software
Large paper (18 x 24 Super C) for a large format printer
Access to large format printer
Internet access to school district online calendar
Time Required for Lesson:
- 45 minutes (one class period) for introduction of project and demonstration of software use
- 90 minutes (two class periods) for group production time to create skeleton calendar - may take longer depending on the number of scheduled events
- Additional time as needed to include any events added from the time the beginning calendar is established and the production deadline date
Diagram/Setup:
NA
Technology Use:
Software:
Desktop Publishing software that allows for custom large format design (Ex: Microsoft Publisher, Adobe InDesign, Canva)
Hardware:
- Computer capable of running the desktop publishing software;
- Computer connected to large format printer
- Computer connected to classroom projection system to use for step-by-step demonstration of project.
Instructional Plan:
Anticipatory Set/Pre-Activity:
When all students have arrived tell them you are going to give them an event that is happening at our school in the next month. Set a timer and see how long it takes for students to locate the event on-line and what time it begins.
Discuss why a hard copy “go-to” calendar on the wall in every classroom and in key locations throughout a school building is a good public relations tool for the school and community. Show examples of a large format calendar that the students will be designing.
Benefits/Explanation/Real-World Connection:
By having students complete this project they will be developing advanced skills to plan, design, and create interactive projects using elements of texts, graphics, and digital imaging by a set deadline. These skills will prepare students for entry-level positions in the digital design field. Students will demonstrate proper use of copyright throughout the project. Students see their work in the real-world because what they have created could be hanging in every classroom in the district or be posted on the school district’s web page or community web page.
Activities (i.e. instructions, warm-up, lesson, cool-down):
1. After completing the Pre-Activity, show students sample calendars that could be used to create a communication piece for the school each month. (Attach a sample: ) Note: (This project does not have to be for a school calendar. It could be specific to a group, team, or club or for a business in the community.)
2. Demonstrate how to access Microsoft Publisher and create a custom template in a 24” wide x 18” size (or whatever size you are wanting to use for classroom calendars)
3. During the demonstration, explain the different views in a publishing software and show the differences between “Normal” view and “Master” view Define these terms for your students.
4. Demonstrate how to switch to “Master” view
5. Demonstrate how to insert a calendar building block and customize the dates for the current month and year.
6. Demonstrate how to make changes to the size of the calendar cells in the table.
7. Review the terms “Group” and “Ungroup” and ask students of examples of when it is advisable to group several objects together.
8. Demonstrate how to ungroup the Building Block to be able to select a single part of the calendar such as the heading.
9. Discuss the difference between using a text box or a Word Art option in Microsoft Publisher and demonstrate the effects of resizing in each type of object.
10. Advanced students may use online text generators (ie. Cooltext.com) to create the month and year headline and then download as .jpg files and insert as a picture onto the calendar file
11. Demonstrate how to Grow the font size of the calendar numbers to they can be read from a distance when hanging on the wall of a classroom or office. Experiment with different fonts showing which numbers are easier to read at different font sizes and have the class vote on which is easiest to read.
12. Define what leading is and demonstrate how to adjust the leading to remove space above the numbers in each table cell so the date can be as close to the top of the calendar cell as possible.
13. Included on our school’s printed calendars is a text box disclaimer telling that “All dates and times are subject to change. For a more information please access the online calendar at www.dcstigers.org or follow us on Twitter or Facebook.”
14. All elements that will not change during the production of the calendar will be placed on the Master View.
15. Show students how to switch to Normal view to begin added the activities on each date.
16. Instruct students that the fewest words possible should be used when adding events on the calendar and consistency is key for the entire month of activities. Example BBB might mean Boys Basketball game or GBB would indicate Girls Basketball Game. To help the calendar remain uncluttered each entry should be a brief as possible.
17. To allow more information to fit in each day’s cell, demonstrate how to use leading and kerning to adjust the font spacing to fit in the cell.
18. Demonstrate how to use the Insert “Online Pictures” area of Microsoft Publisher to search for and find images under the “Creative Commons” copyright free images area of the Internet.
19. Demonstrate using the Picture Tools Format Tab to edit any of the clipart that is used whether that be cropping, recoloring, or setting a color to transparent to remove the background from the image.
20. Review with students the relevance and meaning of colors. Discuss what colors would be appropriate for different holidays or activities that are taking place during a particular month of the year. Demonstrate how to use the color picker to have a consistent color scheme throughout the calendar.
21. Instruct students to save their project in the native software that is being used such a Publisher. To have a smaller version for rough drafts, they should save the file as a .jpg or .png file to print as a letter size file before it is printed on the larger format paper.
22. When the demonstration is complete, with guided practice have students work in pairs to create a calendar for their assigned month. Review how to tile the computer screen to have the Publisher file open on one side of the computer and the school web page calendar open in an internet browser on the other side of the screen.
23. When all activities and artwork has been added to the calendar, students should print a small image (8.5 x 11) of their calendar for peer review.
24. After another group has reviewed the calendar and it has been deemed “wall-hanging” worthy the finished calendar should be submitted in the native format and photo file format to the teacher through the LMS assignment portal.
25. When the teacher approves the file, then the printing production can begin. Demonstrate how to navigate to the calendar file on the computer that is connected to the wide format printer and guide students how to properly insert the paper into the printer. Demonstrate how to match the file size to the paper size in the printer settings for the printer.
Note: For our school district, we print 60 large format 18 x 24 calendars each month for classrooms and businesses in our communities and it is shared electronically for others to print letter size calendars. It is also printed in our community’s monthly newsletter.
26. Once the demonstration lesson and guided practice for creating the skeleton of the assigned month is complete, then students are on their own to be sure they have a completed calendar by the deadline for their month. Students will work on the project when they have some down time in between other projects during this class period or may need to come in outside of class to have the project complete by the assigned deadline.
Closure:
Discuss the importance of time management and the consequences of not meeting a deadline. Ask students what challenges or roadblocks there were to creating the calendar for their month – ex: too many activities for one cell; clipart images were limited, etc.
Ask what other things could be printed in large format to be used throughout the school district. Examples: Sports schedules and team posters; Club membership and activities posters; Class schedules.
Assessment :
Formative – Were students able to locate each of the publishing features demonstrated? Is an additional guided practice needed?
Summative – The printed monthly calendar compared to the district’s online calendar is accurate and complete and ready for distribution by the deadline and follows the formatting guidelines.
Supplemental Information:
Modifications:
Students might create a personal calendar instead of a school activities calendar and in a letter size format rather than the large format printing option.
Advanced students may design their own images to include on the calendar and add icons that repeat with each type of activity.
Safety Precautions:
Know how to operate a large format printer and be able to load single sheets vs. roll paper. Know how to change the ink cartridges.
Comments (adaptations for various grades/ages, teaching styles, etc.)
NA
Resources:
Sample calendar from our school - 2018-08 August DCS Activities Calendar.jpg
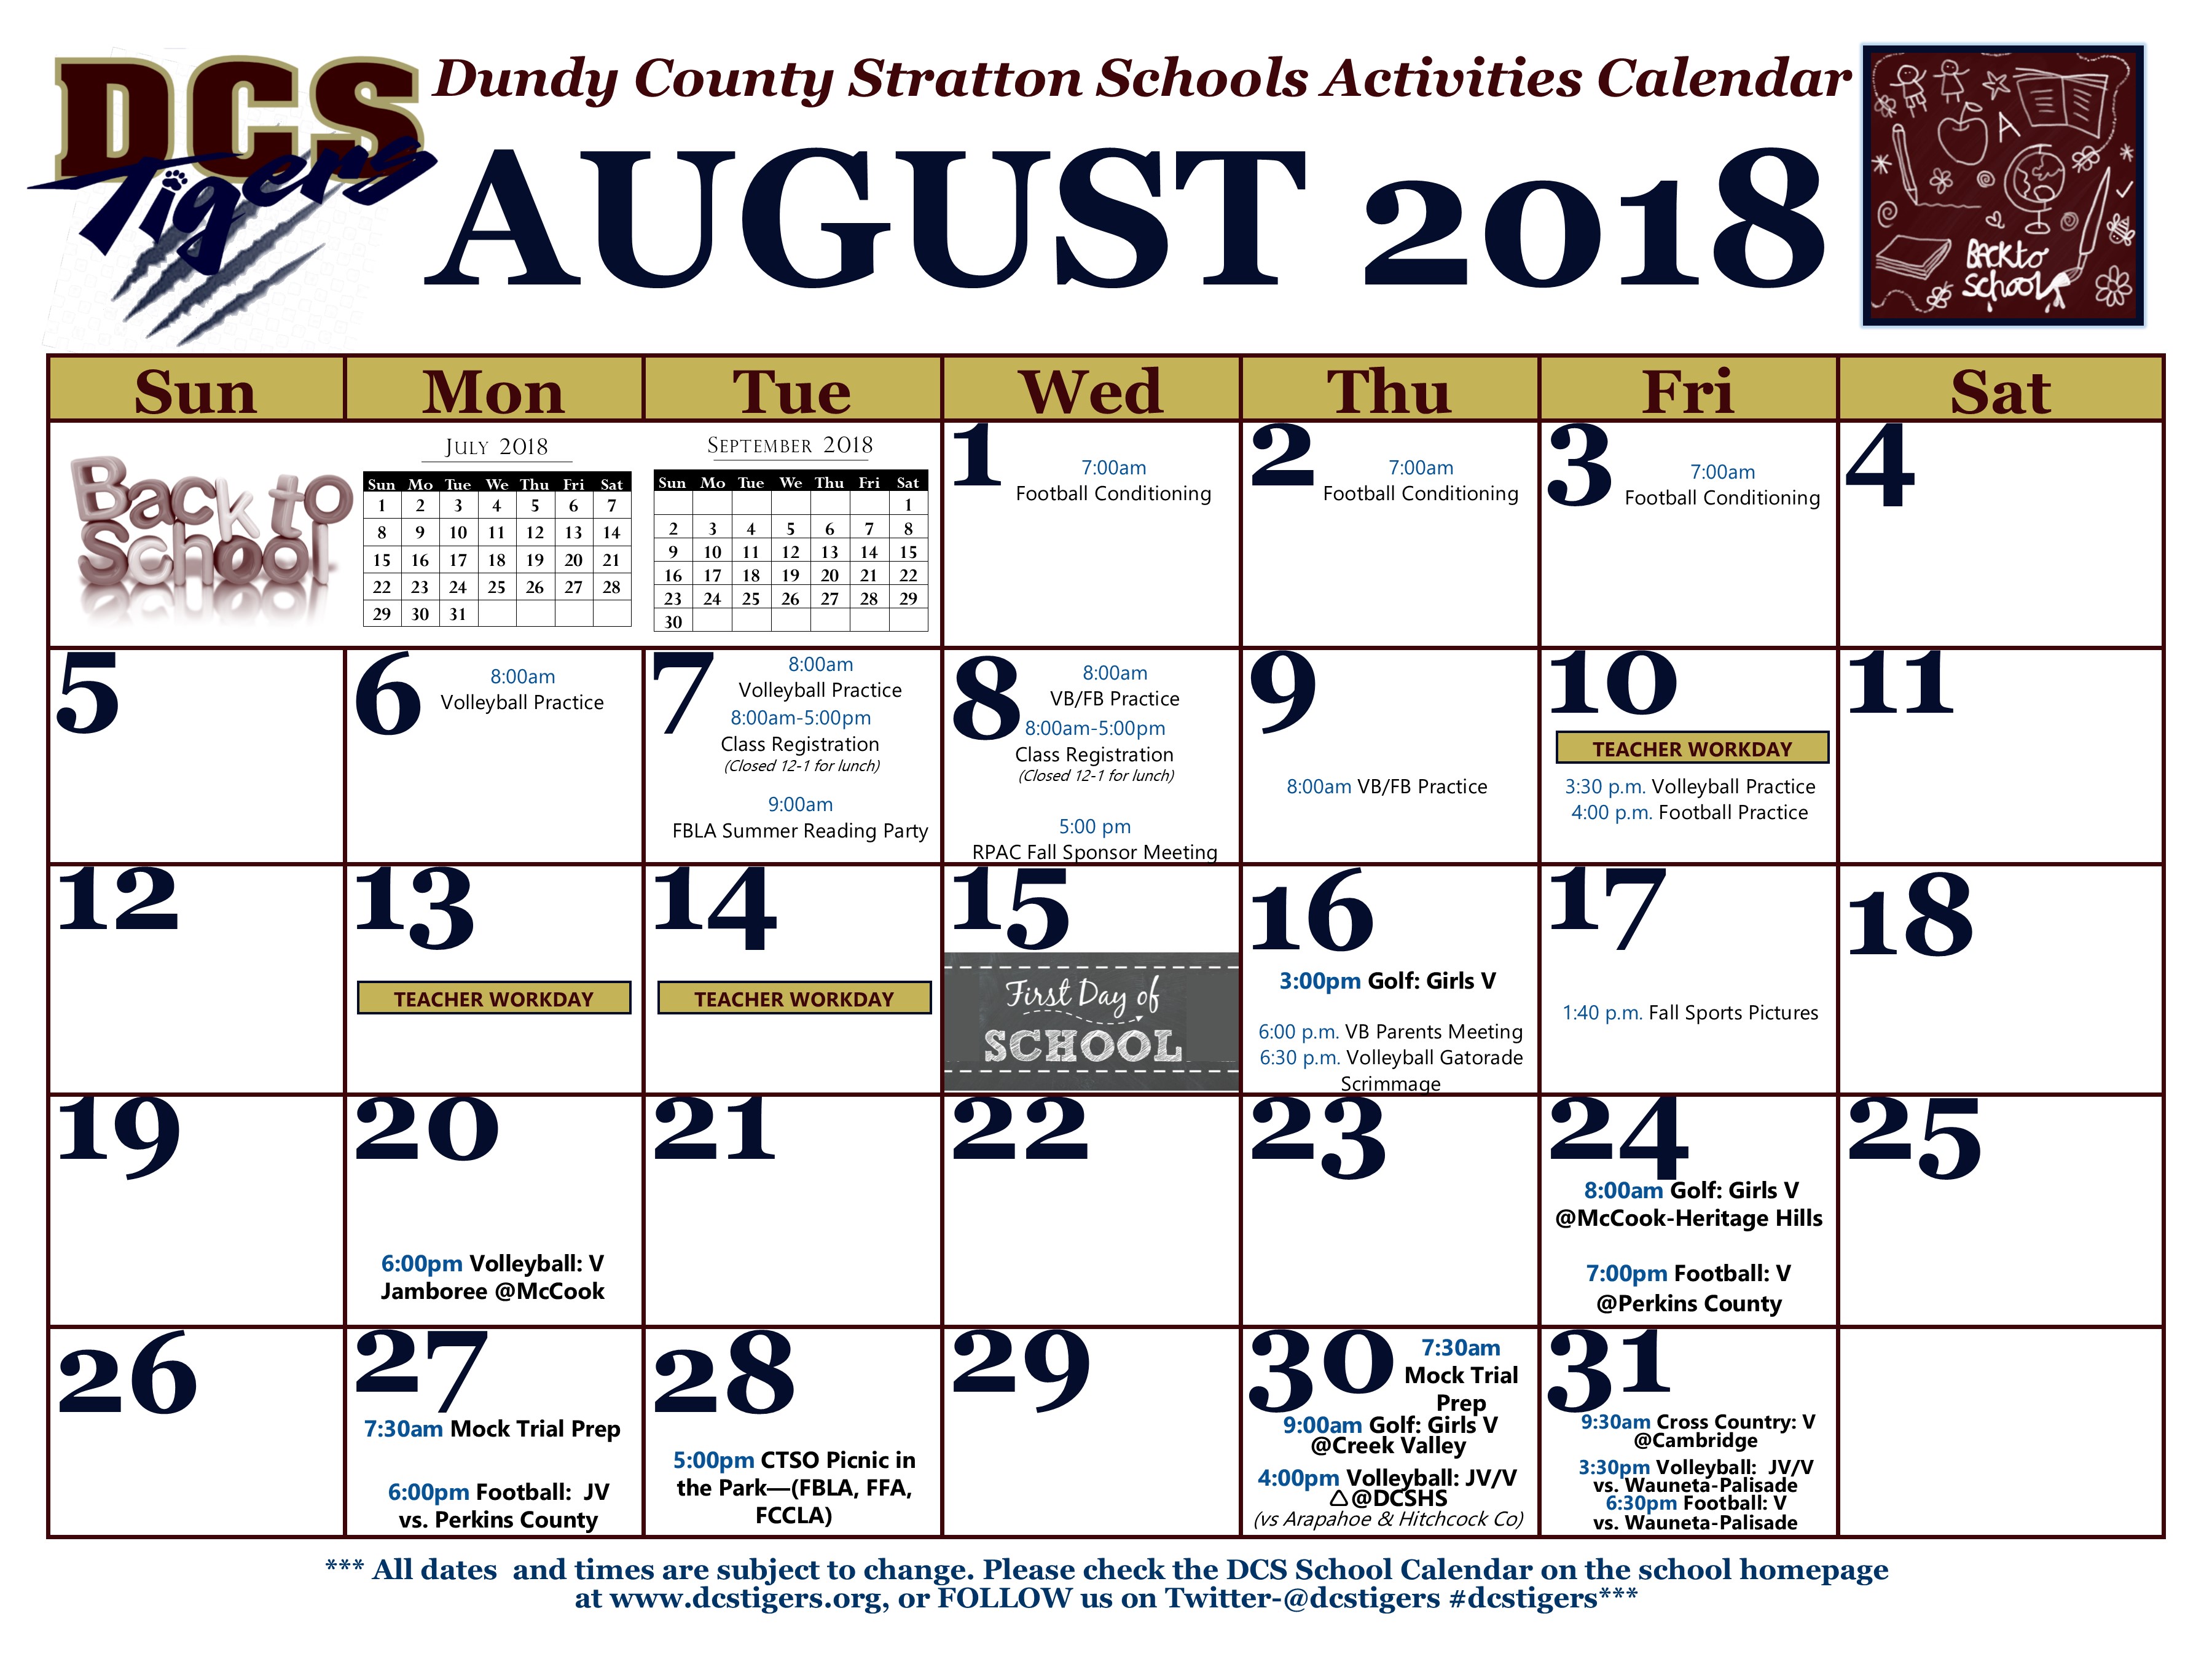
Sample Monthly Activities Calendar Project
Cool Text Graphics Generator - Cooltext.com
1001 Free Fonts - https://www.1001freefonts.com/