Electromagnetism
Summary
Students will learn how an electrical current creates a magnetic field and will construct electromagnets.
Prerequisite Knowledge
Students will know the basic concepts of electricity and electrical circuits.
Students will know the basic concepts of magnets and magnetism.
Material - Potential Sources
• Small Ceramic Magnets (rectangular or round) – Craft Store
• Box of standard-sized paperclips – Office Supply Store
• Magnetic Wire (between 32 AWG and 18 AWG) – Amazon
• Long Steel Nails (between 3” and 5”) – Hardware Store
• Fine Sandpaper – Hardware Store
• AAA, AA, C, or D-cell battery (see note below) – Office Supply Store
• Battery Holder (see note below)
• 1.5V Miniature Light Bulbs (preferred) or Light Emitting Diodes – Educational Innovations, Inc. or School Specialty, Inc.
• Jumper Wires with Alligator Clips - Educational Innovations, Inc. or School Specialty, Inc.
Battery Holder – If you use 1.5 Volt miniature lightbulbs, you will only need one battery. Choose a single battery holder for the size battery you have. If you use LEDs, you will need two batteries and will need dual battery holders of the appropriate size.
Procedure
1) If needed, review the basic concepts of electricity and electrical circuits by visiting the following websites:
digital.scetv.org/knowitall/nasa/electricity/electricity.html
digital.scetv.org/knowitall/nasa/electricity/circuits.html
2) Distribute permanent magnets and boxes of paperclips to each group and allow students time to play with the magnets and paperclips. Students should observe the magnets attract the paperclips. Students should also observe that the magnets repel or attract each other, depending on what side of the magnets are facing each other.
3) Determine if the students have any pre-knowledge about electromagnets by asking them “How are electricity and magnetism alike and different?”
4) Distribute magnet wire (one 72” strand per group), jumper wire, batteries, battery holders, 1.5 volt light bulbs (or LEDs) and nails.
5) Demonstrate that the magnet wire conducts electricity by having the students construct an electrical circuit consisting of the battery, battery holder, light bulb, magnet wire, and jumper wires. Sand the lacquer off each end of the wire (sand approximately one inch). The magnet wire should be connected to the negative end of the battery and one lead of the light bulb. Verify that current is flowing by touching the second lead of the light bulb to the positive end of the battery.
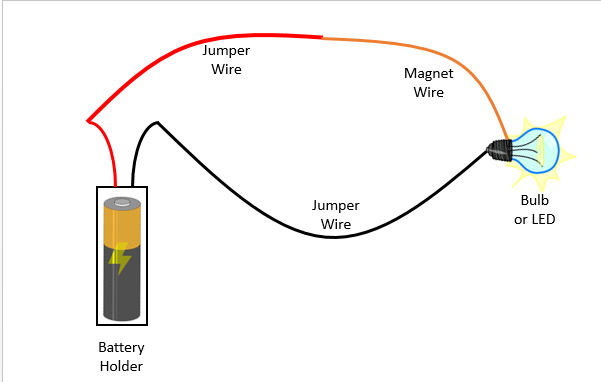
Simple Electrical Circuit
6) Students disconnect the wire from the battery and then construct the electromagnet by wrapping the magnet wire around the nail as many times as possible, leaving 4” to 6” of wire extending from each end. Note: the wire should wrapped in only one direction (clockwise or counter-clockwise) and should be pushed to as close to the head of the nail as possible. Caution: use only one battery for the electromagnet. Too high a voltage could result in the wire getting too hot.
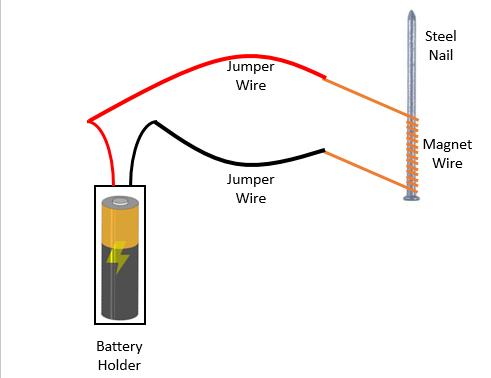
Simple Electromagnet
7) Observe that the nail now attracts the paper clips in a manner that is similar to the permanent magnet. Also observe that the electro-magnet has poles by attracting and repelling opposite sides of a ceramic magnet.
8) Have students discuss their observations.