Garden Science: Papas Fritas
Summary
In this 6th grade science lesson, students learn about the prevalence of potatoes while also preparing, roasting, and eating garden potatoes from the wood-burning oven.
Objectives
After this lesson, students will be able to:
- Identify potatoes as tubers
- Recall harvesting and eating potatoes from the garden
Assessments
During this lesson, students will:
- Recognize the edible part of the potato plant as a tuber.
- Explain where the potatoes were harvested from before cooking, seasoning, and eating potatoes.
Materials
- Visual aid
Ingredients for the Papas Fritas
- Potatoes (9 pounds per class)
- Olive oil
- Salt
- Pepper
For the Papas Fritas Station
- 2 Tables
- Cups
- Napkins
- Water pitchers
- Tablecloths
- Knives
- Cutting boards (one for each student)
- Tongs
- Metal mixing bowls
- Spatula
- Serving spoons
- Sheet pan
- Hot mitts
- Firewood
- Bucket of soapy water (for hand washing)
- Towels
Before You Begin
- Create the visual aid
- Collect all the materials
- Light a fire in the oven (1 hour prior to class)
- Create the papas fritas station by setting up the cooking tools on a table close to the oven
- Set another table nearby for eating
Procedures
At the Opening Circle
- Welcome students and introduce papas fritas as a delicious way to prepare, cook and eat potatoes that were harvested from the garden in a previous class.
- Divide the class into groups for garden jobs. Rotate each group through the papas fritas station during garden work time.
At the Papas Fritas Station
- Have students wash their hands and observe the heat radiating from the fire as they walk over to the prepping table.
- Each student should stand in front of a cutting board at the table.
- Hold up an example of a potato and ask students if they know what part of the potato plant you are holding.
- Explain that the potato is a tuber, which grows off of the roots underground and stores energy for the plant.
- Ask students how they think potatoes are reproduced.
- Explain that all potatoes have little dimples called eyes and that if placed under ground, from the eye a potato plant will sprout and grow.
- Prompt students to think about how many potato plants one could grow from a single potato.
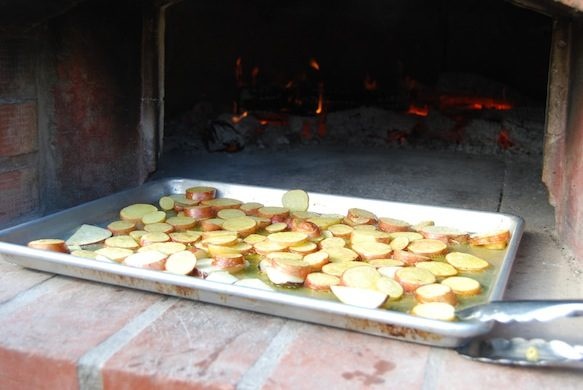
- Demonstrate cutting the potatoes so that each slice is the same width, this helps the potatoes cook evenly.
- Pass out knives and potatoes to each student and have students cut the potatoes into ¼ inch slices, placing their cut potatoes into a large mixing bowl at the center of the table.
- Have students season the potatoes with olive oil and salt in a large mixing bowl and then spread the potatoes onto a baking sheet.
- Put the potatoes into the wood-fired oven.
- While the potatoes are cooking, discuss the potato facts on the visual aid, stopping occasionally to observe the smells and sounds coming from the oven.
- Walk students to harvest herbs as garnish for their potatoes
- When the papas fritas are ready, distribute napkins, water, fresh herbs and potatoes to students at the table.
- Invite students to share sensory words describing the potatoes.
At the Closing Circle
Have students give an appreciation to another student for something that happened during their 8-week rotation in the garden.