Learn: Technology and Entrepreneurship Learner Version
Learn: Technology and Entrepreneurship Learner Version
Session 1: Overview
Welcome to the Learn Program! The Learn Program has brought the future within reach for millions of young people such as you in communities and the world where there is limited access to technology in homes and schools.
Through your participation in the Learn Program, you will learn skills necessary to work and compete in the Twenty-First Century. These skills include technology literacy, critical thinking and collaboration.
Technology Literacy
Technology literacy involves being able to use technology such as computers to communicate, solve problems, and collect, organize and share information.
- What are some things you have used the computer to do?
- What are some things that you would like to learn to do on a computer?
- Have you used the Internet before? What have you used it for?
- What other types of digital technology have you used? What can you do with those technologies?
The Learn Program will provide you with hands-on opportunities to explore and discover how to do many things on a computer. Not only will you have a chance to use the computer to find information on the Internet, but you will also use the computer to paint and draw pictures, to write, to solve mathematical problems, to create presentations and use Web 2.0 tools.
Critical Thinking
Critical Thinking involves problem-solving. There are many ways in which problems can be solved.
- What are some problems that you have experienced before?
- What are some of the ways you went about solving those problems?
The Learn Program will introduce you to many processes that will help you develop and demonstrate problem-solving and critical-thinking skills. For example, as a part of every activity and project that you complete, you will be asked to plan, review and share.
Collaboration
Collaboration involves teamwork – working with one or more people to complete a task.
- What are some instances when you have worked with one or more people?
- What was your job to do, and what was the job of the other person or persons?
- Why can it be easier to work with others rather than working alone?
The Learn Program will promote collaboration in many ways. Not only will you share course materials such as this one with another learner, but you will also share a computer as you complete activities together. This means that you will enjoy the benefit of having another person to help you learn, solve problems and create.
About Technology and Entrepreneurship
The theme of this course is Technology and Entrepreneurship. Through this course, you will learn basic concepts and process of entrepreneurship, and discover how technology can be used to advance a business idea. Do you know?
- What is Entrepreneurship?
- What are the elements of a business plan?
- What is required to set up and start a business?
You will explore and answer these and other questions during the Technology and Entrepreneurship course. The course consists of 16 sessions, each approximately 2.5 hours long. During the first 14 sessions, you will use your technology and thinking skills to complete activities related to the theme of entrepreneurship and develop the elements of a business plan. You will choose a business idea of your own and build upon it in the activities that follow. You will learn and do activities related to developing your business idea, market research, financial planning, marketing, and business operations. And in the end, you will put together a business plan presentation, which you will showcase to others.
Find Someone Who...
Now is the time to meet your classmates in the Learn Program. You will start by reflecting on your interests, skills, and goals, and then, find classmates with whom you have some of those things in common. Remember that your classmates will be a valuable resource to you.
To start, you’ll do a Self-Assessment of your interests, skills, and goals. Self-assessment is a process by which you can learn more about yourself. Engaging in this type of reflection can also assist you in identifying your strengths and areas where you need improvement. This self-knowledge can be beneficial to you and your classmates.
Before you begin the self-assessment, it is important to first understand the difference between interests, skills, and goals.
- Interests are things that you like, that you would like to learn more about, or that you would like to become skilled at doing; for example, painting, photography or playing cricket.
- Skills are things that you are competent in, that you have an ability to do. Often interests can become skills.
- Goals are the hopes, desires, or results that you make an effort to achieve. Goals can be personal as well as professional. Developing an interest in learning a new skill can become a goal. For example, you may have an interest in cricket, a skill for batting, and a goal of becoming a professional cricketer.
Now it is your turn to complete a self-assessment to share with your classmates. You will use the table that follows as an example.
My Interests | Classmates’ Signatures | My Skills | Classmates’ Signatures | My Goals | Classmates’ Signatures |
Factsheet A
- Take a sheet of paper and write your name at the top.
- Prepare a similar table for yourself that includes six columns and at least four rows. Be certain to include Factsheet A as the title of the table.
- Copy the column headings as pictured in the example.
- Add at least three of your own interests, skills, and goals. You can add more rows as needed.
- When instructed by your staff member to begin, spend 15 minutes moving around the room to find classmates who share similar interests, skills, and goals. Once you find a match, ask the classmate to sign his or her name in the cell next to the interest, skill, or goal that you have in common. Your goal is to find as many matches and to collect as many signatures as possible.
- At the end of the 15 minutes, you will be asked to share one fact about one of your interests, skills or goals, and then introduce at least one classmate who shares that interest, skill, or goal.
Entrepreneurship
You will now get to start exploring the theme of Entrepreneurship.
Activity: Read the following brief story and discuss the questions as instructed by your staff member:
Part 1- The Ideas pour in
The teacher was asking the students about their assignments when principal Sharma walked into the class. The children really liked and respected principal Sharma and greeted him with enthusiasm.
“Good Morning, students,” principal Sharma said, “I have some exciting news for you. The school has decided to come up with an interesting project for you all. This project will give you an opportunity to do something important for the school and to make some money.” The children were very excited when they heard this.
“Who will give us the money?” one child asked.
“What do we have to do to get the money?” another asked.
“That’s the interesting part,” principal Sharma continued, “The decision of how you will make the money and how much you will make is entirely up to you. You will have to come up with business ideas. There is only one condition; your idea has to provide something of value to the school community. Think about the ideas and discuss them with your teacher. Good Luck!”
As soon as principal Sharma left, the children started discussing about the ideas. The teacher asked them to give it some thought and to come up with the ideas by the next day. Many students submitted their ideas to the teacher the next day.
Some of the ideas submitted to the teacher:
Raju and John’s idea: We will start a lemonade stand and sell lemonade. There is no lemonade stand in the school right now. This will be popular and fill a need.
Rajni’s idea: I am good at gardening, the school has a playground, but no garden, so I will offer my services to create a garden space and maintain it for a fee.
Gopi’s idea: There is no stationery shop close to our school. I will buy stationery from my local bookshop and sell it in the school.
Sheela’s idea: I am good at making charts and maps. I will make these and sell them to the students. Students can hang them in the classrooms and their study rooms.
When the teacher took these ideas to principal Sharma, he smiled and said “Well, well, looks like we have identified some entrepreneurs in our school.” The teacher smiled and agreed with what he said.
Think about the following questions:
- What do you think of the ideas that have been listed?
- Which ideas seem more interesting to you? Why?
- What do you understand by the word entrepreneur? Why do you think the principal called the children who submitted their ideas as entrepreneurs?
Let us look into the definition of entrepreneurship:
The dictionary defines an entrepreneur as a person who organizes and manages any enterprise, especially a business, usually with a lot of enthusiasm, initiative and risk.
When most people think of an entrepreneur, they think of someone who started a business that offers a valuable product or service, often carving out a niche in the market that may not have existed. Entrepreneurs tend to be innovative thinkers and risk-takers who identify a community need and a business opportunity and use this opportunity to bring about changes in the chosen market. They act as the leaders and motivators for change and for improvement in their communities through their chosen area of business.
As you can see from the ideas of children in the above example, entrepreneurs need not be just people who have formed big enterprises, but also small business owners in your community who offer valuable services and products.
- Can you think of any entrepreneurs in your community?
- Can you name any globally-known entrepreneur that you have learned about?
Activity: Review Appendix 1– Qualities of an Entrepreneur to know about some of the characteristics of an entrepreneur. List the names of some entrepreneurs you know or heard of and list the characteristics that you believe have made them successful. Use the table below as an example.
Name of Entrepreneur | Name of the Business | Characteristics that have made them successful |
1. | ||
2. | ||
3. |
Entrepreneur Worksheet
- Form groups as instructed by your staff member.
- In your group, choose a person as note-taker and another person as a presenter.
- When instructed by the staff member, the note-taker will take a sheet of paper and write down the names of your group members on the top.
- The note-taker will prepare a similar table as shown in the example for your group. The table should include four columns and at least four rows. Be certain to include Entrepreneur Worksheet as the title of the table.
- The note-taker will copy the column headings as pictured in the example.
- Spend a few minutes discussing entrepreneurs you know with your group members - they can be entrepreneurs from your local community or globally known entrepreneurs. Decide on two to three entrepreneurs that you want to list. The note-taker will list the names of the entrepreneurs decided by the group in the first column.
- In the second column note down the names of the businesses of these entrepreneurs.
- Discuss among your group the characteristics that you believe makes these people successful in their business. Refer to Appendix 1 – Qualities of An Entrepreneur, if required. The note-taker will list down the characteristics agreed by the group in the third column.
- When instructed by your staff member, the presenter will read out the information in the Entrepreneur Worksheet for your group.
- Listen to other group presentations and make note of the other entrepreneur names that are mentioned and the reasons why the other groups chose those entrepreneurs.
- When instructed by your staff member, as a larger group, spend a few minutes discussing, the qualities of entrepreneurs, what makes entrepreneurs successful and how they inspire others.
Activity: Now, that you know some of the characteristics of an entrepreneur, can you recollect if you have displayed these qualities before? Use the following table as a template and identify when you have demonstrated some of these qualities.
Have you demonstrated characteristics of an entrepreneur?
Qualities | At home | At school |
Showed leadership skills | ||
Were enthusiastic | ||
Were creative | ||
Shown initiative | ||
Were courageous | ||
Showed determination |
My Qualities Worksheet
- When instructed by the staff member, take a sheet of paper and write down your name.
- Copy the table shown in the example.
- In column 2, briefly describe how you have demonstrated this quality at school.
- In column 3, briefly describe how you have demonstrated this quality at home.
- When instructed by your staff member, read out the information that you have noted down.
- Listen to other presentations.
- When instructed by your staff member, as a larger group, spend a few minutes discussing how each one you can demonstrate these qualities and how they help you succeed.
Business Plan
Every new business starts with the development of a Business Plan
Activity: Read the following brief story. Help Raju and John in setting up their business.
Part 2 - The Lemonade Stand
Raju and John were very excited about the idea that they had presented for the school project and thought they should implement it. So, they went to principal Sharma and asked him for permission to sell lemonade in the school.
The principal listened to their idea and said “I will allow you to sell lemonade in the school, but first, you will have to answer a few questions.” He made a list of questions and gave it Raju and John.
Questions asked by the principal:
- Why do you want to do implement this business idea?
- From which location would you sell? Why do you think you will be successful?
- Who will buy lemonade from you? How do you know they will buy lemonade?
- The school cafeteria also sells drinks and beverages. How will you compete with them?
- How will you let people know about your lemonade stand? What will be special about your lemonade drink?
- How will you provide the lemonade to the customers?
- What are the items required for making lemonade? Where will you buy these items?
- How much money or resources will you need to start the lemonade stand?
- Who will give you the money required?
- What will be the price of the lemonade drink?
- How much lemonade do you plan to sell in a week? How much profit will you make?
- How will you prepare the lemonade?
- How many people will you require to run the lemonade stand?
- If I give you permission, when can you start the lemonade stand?
When Raju and John saw the questions, they realized that they did not have answers to many of the questions. They told the principal that they will come back with the answers to the questions.
Raju and John went back and did their research in the next few days and prepared the answers to all the questions posed by the principal. They have one problem; the answers got mixed up while they were writing them down. Can you help Raju and John match the questions with the correct answers? Discuss in your group and rearrange the answers correctly. Use the following template to write down your answers. Share your answers with the staff member when prompted.
Question | 1 | 2 | 3 | 4 | 5 | 6 | 7 | 8 | 9 | 10 | 11 | 12 | 13 | 14 |
Answer |
Answer Grid
Answers provided by Raju and John:
- The teachers and students will buy lemonade. In the last two days, we asked some 30 students and 5 teachers. They said they will buy lemonade if it is made available. We also know that the recipe we will be using is very popular in the school.
- The items required to make about 100 glasses of lemonade will cost us about Rs. 50. We will also require jar to keep the lemonade, a table to keep the jar, a chair, and paper cups. The total amount required for these will be Rs. 150.
- We want to start the lemonade stand because we have some time to spare and we feel we can make extra money, and it will provide to the school community.
- The lemonade will be prepared fresh at the stand, as and when we receive the order. We will keep the ingredients ready and mix them up to save time.
- We will need lemons, water, sugar and salt and some special spices. We will get the lemons from the Raju’s garden. We will buy sugar, salt and other items from our local vendor. We have spoken to the person who fills the water cooler and he has agreed to give us water for a small amount of money.
- We are planning to borrow some of these items from home. We have saved pocket money of about Rs. 100. Our parents are willing to give us the rest of the money if we work hard.
- We will have the lemonade stand at the entrance of the cafeteria near the water cooler. This is because students and teachers can see us as they enter the cafeteria or when they come to drink the water.
- The school cafeteria only sells bottled drinks. Our lemonade will be freshly made. Our lemonade will also be cheaper than the drinks available in the cafeteria.
- We plan to put up information on the notice board to announce the opening of our stand. We will also give out handwritten flyers in each class. Our lemonade will be made using John’s mom’s special recipe, which is quite popular with the school children. We will make sure to mention this on the notice board and flyers.
- The lemonade stand will need only one person who will handle both making the lemonade and maintaining the cash. We will take care of the stand ourselves in alternate shifts.
- If you give us permission, we will require 3 days to arrange for the things that we require to start selling the lemonade.
- We have estimated that it will cost us around Rs. 200 to make 100 glasses of lemonade. We hope to make Rs. 25 profit on the money spent. So, one glass of lemonade will cost Rs. 2.25
- We will be giving the lemonade in paper cups with lids so that it easy for them to carry.
- We hope to sell at least 20 glasses per day. Since there is no school on Saturday and Sunday, we hope to sell around 100 glasses of lemonade in a week. So, we hope to make a profit of Rs. 25 by the end of the week.
What Raju and John have done by answering these questions and thinking through the steps of starting and operating their business is prepare a plan, which will help them in setting up the lemonade stand.
Similar to the plan prepared by Raju and John, many good enterprises and businesses begin with a plan. A business plan is an outline which summarises the goals of a business enterprise, background information about the enterprise, details about the product or service being offered, and the ways to achieve the business goals.
A business plan has many components. A business plan is basically a detailed summary of a business idea, the steps to implement the business idea and set up the business. The typical components of a business plan are:
- Summary of the Business
- Business Description
- Market Research
- Marketing Strategy
- Operational Plan
- Organizational Structure
- Financial Plan
- Conclusion
We will learn about each of these components in detail in the later sessions of this course. Go through the Business Plan Example provided in Session 15 – Developing the Business Plan and spend a few minutes with your group discussing the different components of the business plan.
Using the Technology and Entrepreneurship Materials
All the activities and the business plan can be found as part of the Technology and Entrepreneurship materials that you received. For every activity you do, you will follow a four-step process: Plan It, Do It, Review It, and Share It.
Plan It
Step 1 is Plan It. The icon, or picture symbol, for Plan It shows a pencil. A pencil is shown because planning typically is done with a pencil and paper. A pencil is better than a pen because pencils often have erasers, so you can change your plans if needed.
You begin Plan It by learning what you are being asked to do or solve. Then, you discuss and answer questions that help you decide what you are interested in doing and how you are going to do it. Often, a helpful approach is to write your answers and draw a quick picture on a sheet of paper detailing your plan. Plan It ends when you have shared your plan with a staff member and the staff member approves your plan.
Do It
Step 2 is Do It. The icon for Do It shows a computer mouse. A computer mouse is shown because doing typically is done with a mouse, along with a keyboard and a computer.
During Do It, you follow your plan and complete what you have been asked to do or solve. Your ideas should be different from the ideas shown in the examples in this curriculum. As part of doing, you carefully read and follow the numbered directions. In the directions, you will find helpful suggestions and new challenges. You may find that you want to change your original plans as you do your work. Do It ends when you have completed all of the numbered directions. You might also have tried one or more of the challenges.
Review It
Step 3 is Review It. The icon for Review It shows a magnifying glass. A magnifying glass is shown because a magnifying glass is often used when we want to see something more clearly and in greater detail.
During Review It, you go back and closely look over the activity end product that you created. You check to see if you have followed your plan and the directions. You also make sure that your end product has all the required elements. If an element is missing or if you would like to change an element, you can add or change it to suit your requirements. Review It ends when you have saved your work, checked it, and decided that no more changes are needed.
Share It
Step 4 is Share It. The icon for Share It shows an open hand. An open hand is shown because we often use our hands when we share our work with others.
During Share It, you begin by showing others the work you have done on the computer. As a part of sharing, you might tell others about your work and answer any questions they might have. You should also read the questions appearing on the page and discuss your answers. Share It ends after you share your answers with the class.
Creating a Course Folder
During this course, you will be creating the elements of a plan for your own business idea. To help keep organized, you will save and keep the elements of your plan on the computer in what are known as course folders.
Activity: Create a course folder where you and your partner will save all the activities that you complete in an organized manner. This will allow you to store and retrieve your work in a logical and efficient manner. As you complete subsequent sessions, you will be creating subfolders within this Course Folder. Refer to Appendix 2 – Creating a Course Folder to know more about how to create the Course folder.
Like Raju and John, you will also explore, analyze and expand on a business idea of your own, which will eventually become your business plan.
Every end product that you create at the completion of each of the activities can either become a component of the business plan or a supporting document for it. When you create the business plan, you will decide which end products to include in the presentation and you will select those end products from the subfolders.
Digital Citizenship
During the next several class sessions, you will be learning about entrepreneurship and the process of starting a new business. In the process, you will learn how to use different types of computer software, including graphics, word processing, spreadsheets, and multimedia programs, to complete different types of activities. You will also learn how to use the Internet and other forms of digital technology, such as e-mail, wikis, and blogs, to conduct research that can help you plan your new business idea and to share information about your business with others.
People who know how to use digital technology appropriately are called digital citizens. Throughout this book, you will have several opportunities to learn about digital citizenship.
Digital Citizenship Elements
Digital citizenship has nine different parts, or elements. These elements can be organized into three related groups – proper use and behavior, personal safety and protection, and online searching, shopping, and downloading. Please read the section below silently to yourself to learn more about how digital citizens use technology appropriately.
Proper Use and Behavior
- Digital Access: Digital citizens understand that everyone has the right to use digital technology, including computers, the Internet, and email. People who are unable to purchase their own computers or pay for Internet service should have access to digital technology at school or work, at a library, at a community centre, or another public place.
- Digital Communication: Digital citizens use many different forms of digital communication. They know that any public posts on blogs, forums, and social media websites can be seen by anybody, including friends, family members, teachers, and potential employers and customers. They also are aware that the email, text messages, and instant messages that they send to individuals are not private because the information can easily be forwarded to other people. Digital citizens know that there are usually permanent records of any digital communication, even after a message or e-mail is deleted. Therefore, to avoid any problems, digital citizens avoid sending or posting messages that might offend or upset other people.
- Digital Etiquette: Digital citizens are considerate in their use of digital technology and try hard to avoid disturbing or upsetting people around them. For example, digital citizens would never use a smartphone in a movie theatre or answer a telephone call in the middle of a meeting. They understand that people have different understandings about what level of digital technology use is appropriate, and if they are not sure, they ask for permission. Digital citizens are always courteous and respectful when they interact online with others. For example, they never respond with rude emails or messages even if they disagree with someone. Digital citizens also do not share any information that might embarrass or hurt others and compromise their privacy.
Personal Safety and Protection
- Digital Rights and Responsibilities: Digital citizens understand that when they use digital technology to share information with others, they should be honest and truthful, especially if the information is intended to be factual. Even though digital citizen always try to be honest and truthful, they know that other people might not be trustworthy, and they can recognize situations that might be problematic or unsafe.
- Digital Health and Wellness: Digital citizens know that playing video games, visiting social media sites, or surfing the Internet for long periods of time can cause physical problems including headaches, eye strain and blurry vision, and neck, shoulder, and hand pain. They also know that it is possible to become addicted to digital technology, which can result in emotional problems such as depression and withdrawal, and other health problems due to a lack of exercise and weight gain.
- Digital Security: Digital citizens think twice before providing any personal information online, including their full name, date of birth, address, and credit card or bank account information. To keep viruses off their computer, they do not open messages or files from people they do not know. They also install security software to protect their computers, and any other devices on a shared network at home, school, or work, from hackers and others individuals who may try to break in and gather personal information for illegal purposes, such as identity theft.
Online Searching, Shopping, and Downloading
- Digital Literacy: Digital citizens know which type of digital technology (including the Internet, email, instant messaging, text messaging, social media, and public forums and chatrooms) is most appropriate for communicating different types of information. Digital citizens also know how to use keywords to find information on the Internet, and they can evaluate that information to determine if it is trustworthy or not.
- Digital Commerce: Digital citizens are honest when selling products and services online, and they are always careful when shopping online. They know how to find the product or service they need at a fair price. They also know how to determine if a company or seller might not be trustworthy.
- Digital Law: Digital citizens understand that some documents, pictures, music, and videos that they find on the Internet can be downloaded and used for personal projects, such as school work if they provide information about the source, including the name of the website and the URL. However, digital citizens also know that sometimes they must pay for Internet content and do not try to access that content without paying. When using text, pictures, music, and videos for business purposes or other situations that involve making money or widespread distribution of that content, digital citizens always request permission from the individual who created or maintains the legal right to reproduce the content.
Consider the questions below and be prepared to share your answers with your classmates:
- Which digital citizenship elements are of particular interest to you? Which do you think would be most important to entrepreneurs who are looking to start a new business? Why?
- Have you had personal experiences with any of these digital citizenship elements? What additional information can you share?
Digital Citizenship Scenarios
Digital technology provides many benefits to users. However, it can be difficult to know how to use digital technology properly, and those who use digital technology improperly can find themselves in some unpleasant or embarrassing situations. With your partner, read the following short stories, or scenarios, about some young entrepreneurs and the challenges they face with digital technology. Answer the questions, and be prepared to share your ideas during a group discussion.
Scenario 1:
Meera is designing a Website for her planned tutoring business. She has written all of the information and has coded all of the pages. But now she needs some photos. She does not have any students yet, so she performs an Internet search to find images of students working with tutors. She finds some images that she can use for business purposes, but she has to pay for them. So she looks some more and finds some photos that she can download for free, but for personal use only.
- Is it okay for Meera to download and use the photos for her business Website? Why or why not?
- What might happen if Meera uses the free photos in her business Website?
- What can Meera do to avoid any potential problems?
Scenario 2:
Ms. Wahi sells T-shirts to customers all over the world, so she often gets email from people she does not know. She understands that computer viruses are a real threat, so she has installed software to protect all of the computers on the network at her small start-up company. The security program is supposed to block all suspicious email, but one day Ms. Wahi received a mysterious email with an attached file. The email said that an important order form was attached, but the name of the attached file looked strange so she began to wonder.
- Should Ms. Wahi open the attached file? Why or why not?
- What might happen if Ms. Wahi opens the attached file?
- What can Ms. Wahi do to make sure the attached file is a real T-shirt order form?
Scenario 3:
Mr. Lalit is attending an important business meeting with a potential new customer. However, he is also expecting an urgent email from one of his biggest customers. A few times during the meeting, Mr. Lalit takes out his smartphone to check his email. The other people in the meeting notice, and their expressions show that they do not think Mr. Lalit’s behaviour is appropriate. They become more annoyed every time Mr. Lalit checks his phone.
- Is Mr. Lalit’s use of digital technology appropriate? Why or why not?
- How do you think this story might end?
- What could Mr. Lalit have done to avoid any problems with his potential new customer and his current customer?
Scenario 4:
Anita is an entrepreneur who has opened a new Internet café in her neighbourhood. Arun, a direct business competitor, runs another Internet café nearby. Arun likes to use social media to advertise his business, and as a result, he has lots of customers. Anita wants some of Arun’s customers to come to her Internet café instead. She goes on the social media page for Arun’s Internet café and posts a message saying that his computers are slow and the Internet service goes out a lot. People should go to Anita’s Internet café instead.
- Why is it wrong for Anita to have posted the message about Arun’s Internet café on his social media site?
- What do you think will happen when Arun’s customers see Anita’s posting? Do you think some of them will go to her Internet café instead? Why or why not?
- What do you think Arun should do and why?
Scenario 5:
Naina is a very hard worker. Every day, she gets to the office early, eats lunch at her desk, and is the last person to go home. She never takes breaks, and she rarely speaks to her co-workers. When Naina gets home, she is too tired to do anything but go online and watch Internet videos. Recently she started getting headaches, and her eyes are dry and red. She has also started to gain weight and does not have as much energy as she used to.
- What is happening with Naina? Why is she having so many health problems?
- What can people who use a computer all day do to avoid physical and emotional problems?
- What should Naina do outside of work to live a healthier lifestyle?
Scenario 6:
Suman wants to start her own graphic design business so she can design logos, brochures, and Websites for neighbourhood businesses. Her older brother gave her his old computer, but now she needs to purchase the graphic design software, which is very expensive. After searching the Internet, Suman has found a company in another country that offers the software at a significant discount. She has never heard of the software vendor and the Website seems a little unprofessional, but she is relieved to find what she needs at such a cheap price. So, she enters her personal information and credit card number and prepares to place the order.
- Should Suman place the order and submit her personal information and credit card number? Why or why not?
- What do you think will happen after Suman places the order?
- What could Suman do to determine if the software vendor is a trustworthy company that sells the software she needs?
As you work on various activities throughout this Technology and Entrepreneurship program, refer to Appendix 3 – Digital Citizenship Checklist to help you think about how the nine Digital Citizenship Elements help you use technology more appropriately. What are some of the behaviours you and other young entrepreneurs might change to become better digital citizens.
Next you will learn about some tools that will help you and your partner as you work.
Bookmarking and Tagging
As you visit may Websites you are likely to find useful information that you might like to visit another time.
- How do you remember the name of the Website?
- How do you remember the exact address for the link?
When you are reading a book, and want to remember the number of the page you last read, you usually keep a bookmark, so that you can go to the exact page next time you pick up the book.
Similarly, there is a provision to “bookmark” the Web pages you like on the Internet.
Bookmarking tells your computer to make note of your favorite Web pages, which allows you to easily go back and open that Web page whenever you need it, without reentering the Web address each time. You can either bookmark a Web page locally on your computer or on a social bookmarking Website. Note that a locally bookmarked Web page can be accessed only on the computer on which it was bookmarked.
You may have saved many bookmarks on your computer. When you need to search for a particular Web page, sometimes it becomes a tiresome task to go through each Web page that you have bookmarked to find the Web page that you want to revisit.
- How do you make the search easier?
- How do you make the Web pages more easily accessible?
You can also “group” the bookmarks based on the content or the theme of the Web page. The method of grouping or sorting is called tagging. By adding a tag to a bookmark, you are linking a keyword to the Web page. A Web page can have more than one tag. For example – www.entrepreneur.com - this Web page can be tagged by typing the keywords entrepreneurship, resource, starting a business, and so forth.
- Go back to the Web search engine Home page by clicking the Back button on the toolbar.
- Type the keywords you decided with your partner on the theme of entrepreneurship.
- Press the Enter key, or click the Go button, and wait as the Web page loads on your computer.
- Decide with your partner the Website you might consider using as you work on activities, projects or presentations in the future.
- Click the link to go to the page.
Important: If you come across any Websites on your search which may require registration or your personal information before you view the Website, please refer to the nine elements listed in the Digital Citizenship activity as well as the information in Appendix 3 – Digital Citizenship Checklist. To register on any Website, you may need to first set up an active email account. Please consult with the staff member on how to set up an email account. (Refer to Appendix 4– Create an Email Account). Also, remember that while it is fine to provide personal information to create an email account or register for any other online account, the same details should not be shared freely elsewhere on the internet such as on business websites, discussion forums, and online communities.
Activity: Bookmark and tag the page. Decide with your partner the words you want to type as tags for that Website. Choose the tags wisely as they assist you to quickly look through the Web pages. (Refer to Appendix 5 – Bookmarking and Tagging Web Pages on Your Computer to learn how to bookmark Web pages, tag them and categorize them on your computer.)
You can also bookmark your pages on what is called a “social bookmarking” Website. This allows you to access your favorite Websites from any computer and from any location, at your convenience. A social bookmarking Website is like having a folder on the Internet which will store all your favorite Web pages in one place. With many social bookmarking sites, there is also a feature that allows you to highlight and add notes on the Web pages that you have saved as your favorites. Through social bookmarking, you can also share information with your friends or in your group.
Activity: Bookmark and tag the Websites you decided with your partner on a social bookmarking site. Highlight and add notes to sections of pages that interest you. Once you have bookmarked the Web pages, go to another computer in the room, log into the bookmarking website on that computer, and view your bookmarked Web pages on that system. (Refer to Appendix 6 – Bookmarking and Tagging Web Pages on a Social Bookmarking Website to learn how to bookmark Web pages and tag them on a social bookmarking Website.)
Reflection Journal
At the end of each session, you will have a reflection activity which will help you review and summarize what you have learned in that session and also think about the next session.
You will maintain a journal through the duration of this course in the form of a course blog, a word document or in your personal notebook. A journal is a record of the activities that you will update on a daily/regular basis.
You will write about what you learned in the session, about the activities and also your thoughts and feedback on the session. You will reflect on ideas related to the next session. You can also seek feedback from your classmates and the staff member on your journal entries.
Activity: Create your Reflection Journal. If you are recording your journal as a word document, refer to Option A – Create and save your Reflection Journal in Appendix 7– Create Your Reflection Journal. If you recording your journal as a blog, refer to Option B – How to Post a Blog in Appendix 7 – Create Your Reflection Journal.
NOTE: If you are using Option B, be sure choose a username and password that nobody will know or be able to guess, and do not share that information with anyone. Also, set the controls so that the blog can be seen only by the other learners taking this course with you, and the staff member. No one else should be allowed to see or have access to your blog page. A blog is an online application which will allow you to write down your thoughts. You can also view the blogs of other course mates and give them feedback in the form of comments.
- Reflect on the activities that you have completed. Record your answers to the following questions in your Reflection Journal.
- What did you find most challenging in the internet search and bookmarking activity? How did you overcome the challenge?
- You learned about some business ideas suggested by the children in this session including Raju’s and John’s Lemonade stand idea. You identified your skills, interests and goals as a part of your self assessment. You also reflected on the reasons you may choose to become an entrepreneur. Can you think of some business ideas based on your skills and interests that you would like to develop?
Session 2: Generating Business Ideas
In the previous session, you were introduced to the theme of entrepreneurship and the concept of a business plan. The first step in developing a business plan is to come up with ideas for a business. A business idea is a concept that can be used for commercial purposes - typically providing a product or service for which people are willing to pay money.
- You may already have an idea for a business or you may have to think of one. What are some business ideas you can think of? The following are a few different sources that will help you think of possible business ideas. These are just for reference and you are free to use other ways to come up with your business ideas.
- Business Ideas based on Skills: One of the sources of business ideas could be your skills. What are your skills? Refer to Factsheet A from Session 1 - Getting Started to view the skills that you have listed for yourself. What are the possible business ideas where you can use your skills? For example, your skill might be teaching. Using ‘Teaching’ as a keyword, think of some possible business ideas. Examples could be to offer tutorial or coaching classes, or teaching vocational courses.
- Business Ideas based on Interests: Another source of business ideas could be your interests. What are your interests? Refer to Factsheet A from Session 1 - Getting Started to view the interests that you have listed for yourself. What are the possible business ideas where you can use your interests? For example, your interest might be gardening. Using ‘Gardening’ as a keyword, think of some possible business ideas. Examples could be to offer gardening services, or selling plants and plant related products.
- Business Ideas based on Motivation: The next source might be motivation or the reasons you want to start the business. Motivations are the reasons that drive you to achieve something. Refer to Factsheet A from Session 1 - Getting Started to view the goals that you have listed for yourself and to Appendix 8 – Reasons for Becoming an Entrepreneur to identify some of the reasons you might want to become an entrepreneur. For example, your reason could be to bring out a new or innovative service or product. Using ‘Innovative Service/Product’ as the keywords, think of some of the business ideas. An example could be starting an innovative online service such as an Internet library, which will help the community in borrowing books online.
- Business Ideas based on Needs of Community: Another source of generating business ideas is to consider the needs of the community in which you live. Are there any needs in your community that can be fulfilled? Using ’Needs of Community’ as the key phrase, think of some business ideas. Examples could be a recreational centre, providing babysitting services and so forth.
- Business ideas based on different Industries: Another source of ideas could be to think of various types of industries and businesses that are in demand in your community. Consider different industries or types of business sectors like Food and Beverages, Technology, or Health Services and so forth. Using different Industries as the keywords think of some business ideas. For example, in thinking about the food and beverages sector you may consider starting a unique restaurant or a catering service as good business ideas.
- Business ideas derived from other sources: What are the other sources from which you can derive ideas? Can you get ideas from the Internet, or ideas suggested by friends? List the business ideas obtained from these sources. For example, a friend of yours may suggest a business idea of selling toys. NOTE: You should use the business ideas from other sources as information to help you develop your own unique business idea. Do not present somebody else’s business idea as your own.
Now that you have thought of some of the sources which will help you generate business ideas, the next step would be to organize them. There are different ways of thinking and listing ideas. One popular way is to use a mind map. A mind map is a drawing to show ideas and information that are linked around a main idea or word. A mind map is a tool for brainstorming and coming up with ideas and a way to visually represent those ideas. The end result of a mind map should represent a spider’s web like structure of the ideas. You can keep adding your thoughts as links or branches around the central idea. A mind map makes information easy to understand and communicate. It helps in organizing your thoughts and brainstorming for new ideas.
Plan It
Activity A: Create a mind map to generate business ideas. Look at the following example:

Business Ideas Mind Map Example
Think of the following questions and discuss your ideas with your partner.
- What are some sources that you will use for generating business ideas?
- What are the ideas that would be generated from the sources?
- How will you list all the business ideas that you have thought of?
Do It
- Start the multimedia software, and open a new, blank presentation.
- Insert a slide with space for a title only. In the text box, type a slide title “Mind Map for Business Ideas’’. Change the look of the words if you wish.
- To start your mind map, draw a text box in the empty space at the center of the slide. Inside this text box, type “Business Ideas”. This will be the central topic of your mind map. Make the text box bigger or smaller. Then, change the look of the words as you wish.
- Draw another text box. Inside this text box, type a word or few words that describe a source for generating a business idea you decided with your partner during planning time. Draw a line connecting this source textbox to the central topic textbox.
- Next to this text box where you typed the source for a business idea, draw another text box. Then, type a keyword or keywords in the text box that associate with the source you typed in earlier. Draw as many text boxes as the number of keywords you associate with this source. Make the boxes bigger or smaller as needed. Branch out the boxes by drawing and connecting lines to the source text box.
- Next, you will show the possible business ideas that are generated from the keywords listed. Draw a text box and inside this text box, type the business idea that you had decided with your partner during planning time. Draw as many text boxes as the number of business ideas that can be generated from the keywords listed earlier. Branch out these boxes with the text boxes that you drew in step 5 by drawing and connecting lines.
- Make the text boxes bigger or smaller as needed. You can also change the alignment and look of words inside the boxes. Move and rotate the shapes as you think fit.
- Add color to the text boxes and lines. Maintain the same color for each of the main topics and its branches. You may want to choose a lighter or darker color shade for the text boxes as they branch out. (For help, see the mind map example as reference.)
- To make your presentation more attractive, add pictures next to the text boxes to represent your ideas. Make sure you resize and move each picture as needed.
- Repeat steps 5 – 10 for the remaining sources, keywords and business ideas that you had identified and listed while planning with your partner. (NOTE: You can draw or copy and paste the text boxes and lines around the empty space on the page. If you choose to copy and paste the text boxes, just select the existing text in the text boxes and replace with new information.)
- Double-click your Course folder on your desktop.
- Right-click inside the folder to display a shortcut menu. Point to New, and then click Folder. Rename the new folder as “market_research”.
- Double-click the market_research folder. Right-click inside the folder to display a shortcut menu. Point to New, and then click Folder. Rename the new folder as “session_2_ generating_business_ideas”.
- Save your work in the session_2_generating_business_ideas folder.
You may have listed a number of interesting ideas using the mind map. But, you will be developing only one of these ideas into a business plan. How do you choose one idea from so many options? The selection becomes easier if you review your business ideas and identify a few business ideas which you would like to analyze further. There are many ways to choose a few ideas from the ones you have listed. As a part of this session, you will be using a ranking chart. You will rank the ideas based on criteria chosen by you and provide justification for your ranking. This will help you decide on a few ideas from all the business ideas that you generate in the mind map. This process will also help you develop your own unique business idea from the information and research that you previously conducted.
For an example of ranking, consider that you have an option of going to school by bicycle, by walking, traveling by bus, or sharing a ride with a friend. Think of the factors you will consider that will help you in deciding the best option for you. In this case, some of those factors might include the cost, the convenience, and the time it would take to travel using each option. You would analyze which travel options satisfies the most factors. If the option of riding a bicycle satisfies the most factors, then you rank it first. Similarly you will continue ranking other options. You may find that the option of walk may be last in your ranking, because, although it satisfies the factor of low cost, it takes the most time, and time is important to you.
Similar to ranking the best options for traveling to school, you can rank your business ideas against factors which you decide are important to you.
Activity B: Create a ranking chart to evaluate the business ideas listed in your mind map, and narrow the list to choose your top two business ideas.

Ranking Chart Example
Think of the following questions and discuss your ideas with your partner.
- What factors would help you in choosing the top 2 business ideas from the ideas you have generated?
- How will you show the ranking of your business ideas?
Do It
- Open the Mind Map presentation you had prepared in Activity A.
- Add a new slide with space for a title only. In the text box, type a slide title “Ranking Chart for Business Ideas”. Change the look of the words if you wish.
- In the empty space to the left of the slide, add a text box. Inside this text box, type “Ideas”. Make the text box bigger or smaller. Then, change the look of the words as you wish.
- Below this text box, add another text box. Inside this text box, type a business idea you thought of while creating your mind map. (For help, see previous slide on mind map for business ideas.)
- Repeat step 4 till all the business ideas are listed out.
- In the empty space to the right of the slide, add a text box. Inside this text box, type “Factors”. Make the text box bigger or smaller. Then, change the look of the words as you wish.
- Below this text box, add another text box. Inside this text box, type a factor that you had decided with your partner during planning time, that will help you rank the success of your business ideas.
- Repeat step 7 till all the factors are listed out.
- Look over a business idea and the factors you listed out.
- Against the business idea, link it to the factor that would most likely make it successful.
- Draw as many arrows to connect the factors to the business idea.
- Add color to the text boxes and lines. Maintain the same color for linking each idea to a factor.
- Repeat steps 9 – 12 till all the business ideas have been linked to the factors.
- Review the ideas list and count the number of factors that are linked to each business idea.
- Move the business idea to the top of the list that has the maximum number of factors connected to it.
- Rank the ideas in descending order, from the maximum number of factors linked to a business idea, on the top, to the least number of factors at the bottom of the list.
- When moving ideas to a new position on the list, ensure that the correct factors are linked to the idea. (For help, follow the same color code for each of the business ideas and factors that you had decided earlier.)
- Once the ideas are ranked, explain your reason for ranking the idea using the comment boxes, wherever applicable.
- Double-click your Course folder on your desktop. Locate the folder “market_research”.
- Double-click the marketing_research folder. Locate the folder “session_2_ generating_business_ideas”.
- Save your work in the session_2_generating_business_ideas folder.
Review It
Look over your presentation. Make sure it has the following elements:
- A slide containing the mind map with appropriate title for the slide.
- A slide containing the ranking chart with appropriate title for the slide.
- Different sources for generating business ideas have been identified, and the ideas connected to these sources have been listed in the mind map.
- Ideas from the same source have been linked by a common color in the mind map.
- The business ideas and factors are listed in the ranking chart.
- The business ideas are connected to appropriate factors and ranked in proper order.
- Comments have been added to explain the reasons for the position of the business ideas.
- Text boxes with fill colors have been used where applicable.
If any of these elements are missing, add them now. Also, you should refer to Appendix 3 – Digital Citizenship Checklist and review your work against the nine digital citizenship elements. Make any necessary or desired changes. Remember to save your work when you are finished.
Share It
Be prepared to discuss your answers to the following questions during sharing time:
- How did the mind map help you in generating and organizing ideas?
- What is your favorite part of the mind map you designed? Why?
- How did the ranking chart help you to identify a few business ideas that you would like to analyze further?
- What are your top two ideas? Why did you rank these ideas as the top two?
- What is unique or different about your business ideas?
- What did you enjoy the most in this activity? Why?
Reflection Journal
Reflect on the activity that you just completed. Record your answers to the following questions in your Reflection Journal. Keep in mind that any information that you post may be seen by other people, so avoid writing anything that might upset or embarrass yourself, your partner, or anyone else.
- What was the biggest challenge in creating a mind map and the ranking chart, and how did you overcome that challenge?
- Reflect on the top two ideas you have ranked. Briefly describe the concept of the final two ideas and how you plan to develop them. If you were to discuss these two ideas with your family, friends and community, what are some of the questions that you would ask them to help you decide which of your ideas would be most successful?
Session 3: Collecting Feedback
In the previous session, you created a mind map and generated several business ideas. You considered some of the questions you would ask the community to decide which of your chosen ideas will be more successful. You also used a ranking chart to identify two business ideas, which you would like to develop further. You considered some of the questions you would ask the community to decide which of your chosen ideas will be more successful.
In the next few sessions, you will be doing activities related to market research to assess and analyze your chosen business idea. Market research is the process of systematic gathering, recording, and analyzing data about customers, competitors, and the market conditions. It is very important to know if there is a need in the market for the business you are planning to start and if people are willing to buy your product or service. One way to gather such information from a large number of people is through a survey questionnaire. A survey questionnaire is a market research method of collecting information by asking a series of questions and giving options from which the answers should be chosen. Persons who respond or answer the questionnaire are called respondents.
A questionnaire can have both closed-ended and open-ended questions. Closed-ended questions are those where the respondents choose from among the answer choices given in the questionnaire. An open-ended question will allow the respondents to write their own thoughts, rather than select from the given answers. The respondents might be your peers, your mentors, your family, or even a group of people who might be the intended customers of your proposed business. The intended customers of your business are known as target market.
Plan It
Create a survey questionnaire that to collect feedback about your business ideas and decide which of your two ideas has a higher possibility of success. Look at the following example:

Survey Questionnaire Page 1

Survey Questionnaire Page 2
Think of the following questions and discuss your ideas with your partner. Remember that the information that you gather should be useful for further analysis of your business idea. It might be helpful to write your ideas on a sheet of paper.
- Who are the intended respondents for this questionnaire? What information do you wish to obtain about the respondents?
- What information do you wish to share about your business idea?
- What questions will you ask to know if the business idea fulfills the needs of the respondents and if they will be interested in buying your product or service?
- What sort of demographic information might you want to gather about your respondents to better understand your target audience? What types of personal information are appropriate to request?
- What suggestions and feedback would you like from the respondents to help you improve your business idea?
- Which questions should be closed-ended and which should be open-ended?
- For any closed-ended questions that require people to select their choices, what kind of decision choices might you use?
Do It
- Start the word processing software, and open a new, blank document.
- Since the first page will be a business idea description page, insert a WordArt title at the top of the page. Type “Business Idea Survey” as the title for your survey. Change the look of the WordArt title as you wish.
- Below the WordArt title, type a title “Respondent Information”. (NOTE: To protect the privacy of the respondents who participate, very little personal information is usually gathered when conducting surveys. To understand target audience, you only need to know about their age and gender. Some surveys may also ask about a person’s job or student status.)
- Show the Forms toolbar or Forms Control toolbar and if you do not see the rulers, show them also.
- Below the title box, type “Date”. Then, add a text form field where people can type the date.
- On the line below, type “Gender”. Add a checkbox form field, and label it “Female”. Then on that same line, add another check box form field and label it “Male”.
- On the line below, type “Age”. Then, add a text form field where people can type their age.
- Change the look of words. To line up the answer fields, set a left-aligned tab for all three lines. Make sure you look at the ruler to pick a good measurement number to use as the tab stop position. Then on each line, use the Tab key to line up all of the answer fields.
- Below the Age line, draw a straight line across the page to separate the top information from the ones you are about to add below. Change the look of the line any way you wish.
- Below the line, type a subtitle “Business Idea 1- Description”.
- Below that, draw a text box that runs the width of the page. In the text box, give a brief description of a business idea you decided upon while planning with your partner.
- Move the cursor below the text box. Then, type a subtitle “Business Idea 2- Description”. Below that, draw a text box that runs the width of the page. In the text box, give a brief description of another business idea you decided upon while planning with your partner.
- Change the look of words in the text boxes to make the information stand out. You might even want to make a bulleted list of items.
- Move the cursor below the text box and insert a page break.
- Type a title “Survey Questionnaire”. Change its alignment and look as you wish.
- Below the title, draw a text box. Type information that explains how to answer the survey questions.
- Below the text box, insert a table with four columns and rows according to the number of questions you decided upon while planning with your partner. Remember to add an additional row for the column headings.
- In the first row, type “Q. No.” in the first cell, “Question” in the second cell, “ Business Idea 1” in the third cell and “Business Idea 2” in the fourth cell.
- In the cells below the first column heading, type the numbers according to the number of survey questions you decided upon while planning with your partner.
- In the cells below the second column heading, type the closed-ended survey questions you decided upon while planning with your partner.
- In the cells below the third column heading, add the form fields you decided upon while planning with your partner.
- Copy the form fields and paste it on the cells under the fourth column heading.
- In the cells below the closed-ended questions, type the open-ended survey questions you decided upon while planning with your partner.
- In the empty cells on the third and fourth columns, add a text form field where people can type their responses.
- To make the table look nice and even, change the table properties as needed so all of the rows are the same height and all of the columns are the same width. Then, change the placement or alignment of the words within the cells so they all look the same. If you wish to make the information in the table stand out even more, fill those cells in the first row with a light shade of color. Make the headings bold. Change the line style, color and width of the text box border.
- If you are using Microsoft Word, protect the form. If you are using OpenOffice.org Writer*, turn the Design Mode off. Notice that now the answer fields work when you click them.
- Double-click your Course folder on your desktop. Locate the folder “market_research”.
- Double-click the market_research folder. Right-click inside the folder to display a shortcut menu. Point to New, and then click Folder.
- Rename the new folder as “session_3_collecting_feedback”.
- Save the survey questionnaire as a template in the session_3_collecting_feedback folder.
Review It
Look over your survey questionnaire. Make sure it has the following elements:
- Business idea descriptions that are provided clearly in text boxes.
- Details about the product or service such as its features, pricing, and usefulness to the customer.
- Fields where people can enter general information about themselves without sacrificing their privacy.
- Questions which help you to obtain information about what would be important to the intended customers.
- Questions follow a proper sequence and/or are categorized properly.
- Questions that help in understanding and identifying the right business opportunity.
- Proper directions to complete the questionnaire.
If any of these elements are missing, add them now. Also, you should refer to Appendix 3 – Digital Citizenship Checklist and review your work against the nine digital citizenship elements. Make any necessary or desired changes. Remember to save your work when you are finished. (NOTE: When your survey questionnaire is ready, and as instructed by your staff member, invite some of your classmates to fill out a copy of your survey questionnaire on your computer. Make sure to save each completed survey with a different name. You should try to conduct the survey with intended respondents in the community before the next session. If possible, this should include community members who are the target market for your new business, and others who you believe can give trusted feedback on your business idea.)
Share It
Be prepared to discuss your answers to the following questions during sharing time:
- What is the purpose of the survey that you have designed? How might this survey questionnaire help you in deciding on a business idea?
- What are the important elements of a survey? What are some other possible uses for a survey questionnaire?
- How did you determine whether to use closed-ended or open-ended questions?
- What did you like best about using the Forms toolbar to create your questionnaire?
- How might you use digital technology to make this survey available to your target audience?
Reflection Journal
Reflect on the activity that you just completed. Record your answers to the following questions in your Reflection Journal. Remember that any information that you post may not be private, so avoid writing anything that might upset or embarrass yourself or others.
- What were the challenges you faced while creating the survey? How did you deal with those challenges?
- Once you have collected information about two of your business ideas using the survey, how will you use (analyze) this information to choose the business idea you should develop?
Session 4: Survey Data Analysis
In the previous session, you prepared a survey questionnaire to gather feedback about your business ideas. You might have also conducted the survey in your community to obtain the required feedback. Now you will need to use the information obtained from the survey forms to analyze your business ideas. Since you have obtained information for two ideas, the analysis will also help you in finalizing one of the two chosen business ideas.
How do you think the information obtained in a survey can be organized? How would you analyze the data? Generally, there are two types of data:
Quantitative: Quantitative data is data that can be measured on a numerical scale. The answers or responses to closed-ended questions are either numerical or can usually be scored as numerical data. Quantitative data is analyzed through mathematical methods. Charts may also be used to display the results.
Qualitative: Qualitative data is data that is not numerical, but is still informative. The answers to open-ended questions are usually provided as text responses. How would you organize information collected through open-ended questions? Some of the ways of organizing qualitative data are by reading the data and identifying categories, and then by grouping similar information together and listing them under the categories identified.
One way by which survey data can be organized and analyzed is by using spreadsheets. Once the data is organized into the spreadsheet, the data and charts can be used in the analysis and comparison of the business ideas. For this activity, you will only be analyzing the quantitative data which will help in comparison of the two ideas. The qualitative data will help you in supporting the quantitative data analysis.
Plan It
Arrange the survey results in a spreadsheet and use this data to create a chart to assist with the analysis and finalization of the business idea. Look at the following examples:
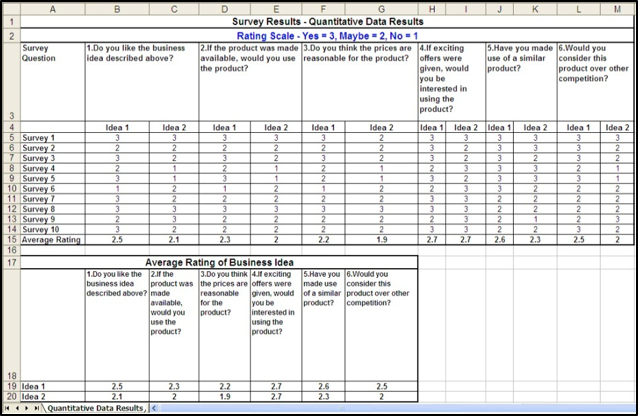
Survey Results – Quantitative Data Results Worksheet Sample

Survey Results – Qualitative Data Results Worksheet Sample

Quantitative Data Analysis Chart Sample
Think of the following questions and discuss your ideas with your partner. Use the completed survey forms as you write your plan on a piece of paper.
- How best can you put together the data in the spreadsheet to represent all the information obtained in the survey?
- How would you organize and analyze the data to understand the feedback and compare the responses for the two business ideas?
- How would you decide on a numerical rating scale for the closed-ended questions that have decision choices (such as - yes, no, or maybe)?
- How would you analyze data for closed- ended questions?
- How would you organize the data for open-ended questions?
- What kind of a chart would you need to represent the data collated?
Do It
- Start the spreadsheets software, and open a new, blank spreadsheet. If one of the completed survey questionnaire forms is not open already, open one now. (NOTE: You might want to make each window smaller and move them around so you can see as much of both documents as possible.)
- Rename Sheet 1 as “Quantitative Data Results”.
- In cell A1, type a title for your worksheet. Change the look of the title as you wish.
- In cell A2, type information that explains the rating scale that you decided on during your planning time.
- In cell A3, type “Survey Question” as that column’s label. Change the text wrapping so it fits in the cell.
- In cell B3, type the first closed-ended survey question found on the completed survey questionnaire form. To make the cells with the questions big enough to fit all of the words, change the text wrapping and merge the cells so the information fits in two columns.
- In cell B4, type “Idea 1” and type “Idea 2” in cell C4 as labels.
- Repeat steps 6 and 7 in the corresponding cells to the right, for the remaining closed-ended survey questions on the completed survey questionnaire form.
- In cells A5 and the corresponding cells below it, type “Survey 1” followed by the number for each of respondents who completed the survey questionnaire forms. (For example, if you have ten respondents, you will label the cells as “Survey 1”, “Survey 2” and so on.)
- In the column cells below the labels “Idea 1” and “Idea 2”, type the number rating answers for each closed-ended question from the completed survey questionnaire form Close that survey form when you are done.
- One at a time, open each completed survey questionnaire form you have saved on your computer or have in hard copy from respondents. Then in the cells below each label “Idea 1”and “Idea 2”, type the number rating answers from that survey questionnaire form.
- In column A, in the cell below the last survey respondent number type “Average Rating”. Then in the cell next to it in the same row, insert an Average function. (NOTE: Make sure that all of the rating numbers from that row are included in the formula.) Then, fill the Average function into the cells beside it so there is an average rating for each survey question.
- Leave a row below, and type a title “Average Rating of Business Idea”.
- In the row below, leave the first cell blank. Then, type the survey questions from row 3.
- In the row below type “Idea 1”. In the cell below it, type “Idea 2”.
- In the column cells below the survey questions, type the average rating answers for each question. (You can also copy paste the information from the cells above.)
- In the row where you typed the title ‘Average Rating of Business Idea’, change the text wrapping and merge the cells so the information fits in all columns as the survey questions below.
- Change the look of your survey questions in row 3 so they stand out. You can also change the look of the information in the rows below the labels so it all looks the same.
- You might also make the information in rows 1 and 2 stand out by merging the cells and adding cell borders or filling the cells with color.
- Select the cells with the survey questions. Then, hold down the Control key and select the column cells with the calculated averages.
- Make a column chart with the series or data series in columns. Use the title on your worksheet as the title for your chart. Also, use your column A label (in cell A3) as the X axis title and the average column label (Average Rating) as the Y axis title. Save the chart as a new sheet, and delete the legend since it is not needed.
- Change the look of the charts background area and the bars by picking different colors and adding a fill effect. You can also change the look of the main chart title and the two axis titles.
- Make sure one of your completed survey questionnaire forms is still open. Insert a new worksheet and rename it as “Qualitative Data Results”.
- In cell A1, type a title for your worksheet. Change the look of the title as you wish.
- In cell A2, type “Survey Question” as that column’s label. Change the text wrapping so it fits in the cell.
- In cell B2, type the first open-ended survey question found on the completed survey questionnaire form. To make the cells with the questions big enough to fit all of the words, change the text wrapping and merge the cells so the information fits in two columns.
- In cell B3, type “Idea 1” and type “Idea 2” in cell C3 as labels.
- Repeat steps 26 and 27 in the corresponding cells to the right, for the remaining open-ended survey questions on the completed survey questionnaire form.
- In the column cells below the labels “Idea 1” and “Idea 2”, type the answers for each open-ended question from the completed survey questionnaire form. Close that survey form when you are done.
- One at a time, open each completed survey questionnaire form you have saved on your computer Then in the cells below each label “Idea 1” and “Idea 2”, type answers from that survey questionnaire form. Be certain to close each document before you open the next.
- Rename all of your worksheet and chart tabs, and delete any unused worksheets.
- Put all of the tabs in order so the quantitative data results is first, the column chart is second, and the qualitative data results is third.
- Double-click your Course folder on your desktop. Locate the folder “market_research”.
- Double-click the market_research folder. Right-click inside the folder to display a shortcut menu. Point to New, and then click Folder.
- Rename the new folder as “session_4_ survey_data_results”.
- Save your work in the session_4_survey_data_results folder.
Review It
Look over the spreadsheet and chart. Make sure it has the following elements:
- Worksheets with the completed survey information entered and organized.
- Necessary data calculations are completed.
- A column chart with the survey results.
- Worksheets tabs have been renamed appropriately.
If any of these elements are missing, add them now. Also, you should refer to Appendix 3 – Digital Citizenship Checklist and review your work against the nine digital citizenship elements. Make any necessary or desired changes. Remember to save your work when you are finished.
Share It
Be prepared to discuss your answers to the following questions during sharing time:
- How did the organized information in the spreadsheet and the chart help you in assessing your business ideas? What did you learn about the business ideas?
- How did the analysis help you to compare the two business ideas?
- Based on the survey analysis results, which business idea would you like to finalize and why?
- Why is analysis of survey data important?
Reflection Journal
Reflect on the activity that you just completed. Record your answers to the following questions in your Reflection Journal. Avoid writing anything that might embarrass or upset yourself or others, and be certain that your information is accurate and factual based on the survey data you collected.
- What was the biggest challenge in doing the survey data analysis, and how did you overcome that challenge?
- Based on the responses in your survey about competitors and your products or services, who are some of the competitors for the final business idea chosen by you? What information do you think you should gather about your competitors?
Session 5: Analyzing your Business Idea
You completed an analysis of the survey and have decided on the business idea that you will develop. You also reflected about your competition and identified some of your competitors for the chosen business idea. Now, you will analyze your competition and then identify the strengths and weaknesses, opportunities and threats of your business idea.
How can you identify the strengths and weakness of your proposed business? One way is to use a SWOT Analysis. SWOT stands for Strengths, Weaknesses, Opportunities, and Threats.
Strengths: What are the main strengths of your business? What are the advantages you have over other similar businesses? What can you do to keep customers coming back?
Weaknesses: What are the biggest challenges of your business? In what areas do you need improvement?
Opportunities: In what areas can you expand your business? Which new customer needs can you address? Do you have ways to make your business more efficient and profitable?
Threats: What external factors could threaten the success of your business? Are competitors about to introduce new products or services, or new pricing that could be a threat to your sales? Are there other new businesses about to open that could compete with your business?
As you can see from the questions above, some of the information that you should be aware of before you start your SWOT Analysis is your business idea, the market conditions, the customer needs and the competition. You should research and gather data regarding these before you start the SWOT Analysis.
You will find that there are other businesses who offer the same products or services as your business. These other businesses are your competitors. Knowing your competition will help you define your strengths, weaknesses, opportunities and threats. Just as you want your business to grow and be successful, your competitors also strive for success. Competition can be either direct or indirect. Direct competitors are those whose businesses are very similar to yours. Indirect competitors are those whose businesses may not be similar, but can be an alternative to your product or service. For example, if you are selling apples, another person selling apples is your direct competitor, but someone selling oranges is your indirect competitor. It is necessary to understand your competitors, so that the information you gather will help you in decision making and planning your business goals and strategies.
Competitor Analysis will help you to compare your business with the identified competition on various factors. Using this data, you can modify the SWOT Analysis.
How would you identify your competition? Some of the sources might be your Survey, where respondents would have mentioned businesses selling similar products or services; the regional telephone directory listings for similar businesses; the Internet and other similar sources. You should record relevant information such as their locations, prices of products and services, financial information, and business goals. What are some of the sources to obtain competitor information? Competitor data can be obtained from the following sources:
- Recorded sources such as annual reports, press releases, newspapers and Internet articles, presentations, speeches and government reports.
- Observable data such as price lists, advertisements, promotional material, tenders, competitor Websites and directory listings.
- Data obtained from other opportunities such as trade shows, meetings with suppliers, seminars and conferences, ex-employees and other social contacts of competitors.
Plan It
Activity A: Use a spreadsheet to create a Competitor Analysis to show the differences between your business and potential competitors. Look at the following example. If your business idea is a service or has multiple products/services, refer to Appendix 17 for examples for these scenarios.
Competitor Analysis Example
Think of the following questions and discuss your ideas with your partner. It might be helpful to write your ideas on a sheet of paper.
- Who are your competitors? How many competitors do you wish to include in the analysis?
- How would you describe your business and your competitors?
- What factors would you use to compare your business with the competitors?
- How might you rate your business against the competitors and display results of the analysis?
Do It
- Start the spreadsheets software, and open a new, blank spreadsheet.
- Rename the sheet as “Competitor Analysis”.
- In cell A1, type a title for your worksheet. Change the look of the title as you wish.
- In cell A2, type information that explains the rating scale that you decided on during your planning time.
- Type “Features” in the empty cell in column A, “My Business” in the empty cell in column B, “Competitor1” in the empty cell in column C, “Competitor2” in the empty cell in column D and “Competitor3” in the empty cell in column E, as column labels.
- In cell A4, type “Description” as that column’s label.
- In cells B4 through E4, type a sentence that describes each of the column headings.
- In the first empty cell in column A, type a feature you decided while planning that you can include in the Competitor Analysis to compare with your business. Type the remaining features in the cells below.
- In the empty column B through column E cells, type the number rating for each feature that you decided with your partner during planning time.
- In the first empty cell below the last feature information in column A, type “Total Rating”.
- In the cell next to it in the same row, insert a Sum function that adds all the item totals in that column. Insert the Sum function in the rest of the cells beside it.
- In the first empty cell below the total rating information in column A, type “Average”.
- In the cell next to it, in the same row, insert an Average function. Then, fill the Average function into the cells beside it so there is an average rating for your business and your competitors.
- In rows 1 and 2, change the text wrapping and merge the cells so it fits in all columns as the information below. You might also make the information in the cells stand out by adding cell borders or filling the cells with color.
- Double-click your Course folder on your desktop. Locate the folder “market_research”.
- Double-click the market_research folder. Right-click inside the folder to display a shortcut menu. Point to New, and then click Folder.
- Rename the new folder as “session_5_ business_analysis”.
- Save your work in the session_5_business_analysis folder.
Plan It
Activity B: Use a spreadsheet to create a SWOT Analysis worksheet and a SWOT diagram. Look at the following examples. If your business idea is a service or has multiple products/services, refer to Appendix 17 for examples for these scenarios.

SWOT Analysis Example

SWOT Diagram Example
Think of the following questions and discuss your ideas with your partner. It might be helpful to write your ideas on a sheet of paper.
- What are the strengths, weaknesses, opportunities and threats of your business? How will you identify them?
- Refer to the Competitor Analysis you have completed. What are the strengths, weaknesses, opportunities and threats that you understand from this analysis?
- What needs of the customer will your business idea satisfy?
- How will you organize the information related to strengths, weaknesses, opportunities and threats visually?
Do It
- Open the Competitor Analysis spreadsheet you had prepared in Activity A.
- Go to another worksheet. Rename the sheet as “SWOT Analysis”.
- In cell A1, type a worksheet title “Questions for SWOT (Strengths, Weaknesses, Opportunities, Threats) Analysis”. Change the look of the words as you wish.
- Change the text wrapping for rows 1and 2 and merge the cells so the information fits in two columns.
- In cell A3, type “Strengths” as that column’s label. Change the text wrapping and merge the cells so the information fits in two columns.
- In the first empty cell in column A, type a question you want to ask about the strengths of your business that you and your partner listed during your planning time. Type the remaining questions in the cells below.
- In the first empty cell below the last question in column A, type “Weaknesses” as that column’s label. Change the text wrapping and merge the cells so the information fits in two columns.
- In the first empty cell in column A, type a question you want to ask about the weaknesses of your business that you and your partner listed during your planning time. Type the remaining questions in the cells below.
- In the first empty cell below the last question in column A, type “Opportunities” as that column’s label. Change the text wrapping and merge the cells so the information fits in two columns.
- In the first empty cell in column A, type a question you want to ask about the opportunities of your business that you and your partner listed during your planning time. Type the remaining questions in the cells below.
- In the first empty cell below the last question in column A, type “Threats” as that column’s label. Change the text wrapping and merge the cells so the information fits in two columns.
- In the first empty cell in column A, type a question you want to ask about the threats of your business that you and your partner listed during your planning time. Type the remaining questions in the cells below.
- In the empty cells in column B, type the answers to the questions you had decided upon with your partner during planning time.
- Go to another worksheet. Here you will put together the SWOT Analysis in the form of a diagram.
- Rename the sheet as “SWOT Diagram”.
- In cell A2, type “Internal Attributes of the Organization” and in cell A3, type “External Attributes of the Environment” as label headings.
- In cell B1, type “Helpful in Achieving the Objectives” and in cell C1, type “Harmful in Achieving the Objectives” as the column headings.
- In cell B2, type “Strengths” as the cell heading. Then type the points you had filled in from the previous sheet.
- In cell C2, type “Weaknesses” as the cell heading. Then type the points you had filled in from the previous sheet.
- In cell B3, type “Opportunities” as the cell heading. Then type the points you had filled in from the previous sheet.
- In cell C3, type “Threats” as the cell heading. Then type the points you had filled in from the previous sheet.
- Change the look of the words. You might also change the column width, the position or alignment of the information within the cells, or add color to the cells.
- Save your work in the session_5_business_analysis folder.
Review It
Look over the spreadsheet and chart that you created. Does it have the following elements?
- Competitor Analysis which clearly shows how your business might rate against the competitors.
- The questions for the SWOT Analysis along with the answers.
- The SWOT diagram filled with appropriate strengths, weaknesses, opportunities and threats for your business.
If any of these elements are missing, add them now. Also, you should refer to Appendix 3 – Digital Citizenship Checklist and review your work against the nine digital citizenship elements. Make any necessary or desired changes. Remember to save your work when you are finished.
Share It
Be prepared to discuss your answers to the following questions during sharing time:
- How did you identify and choose your competitors? Are they direct competitors or indirect competitors?
- How did you carry out the comparison between your business and your competitors?
- What impact would it have on your business planning if one of your competitors came out scoring higher or having an advantage in some areas that you identified as important? How will you respond to the higher score of your competitor?
- How did rating your business against your competitors and asking the relevant questions help you in understanding your business better and in identifying your strengths, weaknesses, opportunities and threats?
- How is the SWOT diagram a good visual representation for organizing the positive and negative factors of your business?
Reflection Journal
Reflect on the activity that you just completed. Record your answers to the following questions in your Reflection Journal. Remember that your journal may be seen by others, so avoid writing anything that might cause problems. Also, because this information will be used by yourself and others later, it is important to be accurate and truthful.
- What was the most challenging part of the competitor analysis and SWOT analysis activity? Give your reasons and also explain how you overcame the challenge.
- In the last few sessions, you have analyzed the business idea chosen by you using various methods. What are the important factors you have learned from these analyses about your business idea? How will you summarize the information? How will they help in setting goals for your business?
Session 6: Finalizing your Business Idea
In the past few sessions, you completed activities related to market research to assess and finalize your business idea. From the survey questionnaire, you have gathered information about your business idea, about the competition and the target market. In the previous session, you identified the competitors for the business idea that you chose and completed the SWOT analysis. Now, you will summarize the information that you have obtained through all the analyzes and prepare a presentation for the finalized business idea. It is important that this business idea should reflect your own thoughts and ideas and accurately reflect the product or service that you intend to provide.
A presentation of a business idea will typically include:
- Your business idea as the title slide.
- Brief descriptions about your product or service, your target market, your competitors and location.
- Summary of the survey analysis results.
- The SWOT diagram.
- The Competitor Analysis results.
- Business goals.
You should have already identified much of this information in the previous sessions. You will now need to identify your business goals (what you hope to achieve) to complete the presentation. What are your business goals and how do you hope to make your business successful? See the example in this section for ideas. You should consider your business goals now and include them in the presentation described below.
Plan It
Create a presentation that showcases your business idea. Look at the following example. If your business idea is a service or has multiple products/services, refer to Appendix 18 for examples for these scenarios.

Business Idea Presentation Example
Think of the following questions and discuss your ideas with your partner. It might be helpful to write your ideas on a sheet of paper.
- What are the points you would like to mention while introducing your business?
- Where will your business be located? Why?
- Who would be using your product or service?
- How would you summarize the results of all the analyzes you have completed to assess the business idea?
- What information would you like to include about the strengths and weaknesses of your business and your competitors?
- What are your business goals? How would you describe them?
Do It
- Start the multimedia software, and open a new, blank presentation.
- Insert a title slide, and type the business idea that you decided with your partner during your planning time. Then in the box below, type your name and that of your partner.
- Add a picture that describes your business idea. You can insert clip art or a picture from the gallery, or you can start the graphics program, create a picture you want, and save it to your computer before inserting it into the slide. You can even use the drawing tools to make a picture on the slide.
- Resize and move the text boxes and the picture.
- Add a new slide with space for a title and a bulleted list. In the top text box, type a slide title “Business Description”. In the text box below, type a few sentences that you decided with your partner during your planning time about what you would like to mention introducing your business.
- Add a picture that shows what you wrote in your sentence.
- Add a new slide with space for a title and a bulleted list. In the top text box, type a slide title “Location and Target”. In the text box below, type a few sentences that you decided with your partner during your planning time about your business location and who your customers will be.
- Repeat Step 6.
- Add a new slide with space for a title and a bulleted list. In the top text box, type a slide title “Business Goals”. In the text box below, type a few sentences that you decided with your partner during your planning time about your business goals.
- Repeat Step 6.
- Add a new slide with space for a title and a bulleted list. In the top text box, type a slide title “Market Survey”. In the text box below, type a few sentences about the analyzes for the business idea and a summary of the survey results.
- Repeat step 6.
- Insert a new title slide and type “Competitor Analysis”. Then, in the box below, type a sentence or two about the Competitor Analysis.
- Take a screenshot of the Competitor Analysis. Save the picture for use in an electronic presentation. Then, exit the graphics paint software. Also, close the Competitor Analysis file, and exit the spreadsheets software.
- Insert the picture in the slide. Move and resize the picture and the text boxes as needed. Add a border around the picture if you wish.
- Insert a new title slide and type ”SWOT Analysis”.
- Open the Competitor Analysis file that you finished earlier. Take a screenshot of the SWOT diagram.Save the picture for use in an electronic presentation.
- Repeat Step 15.
- Now that all of the slides have been added, go to the Slide Master.
- To make all of the words in your slides look the same, change the look of the title text style in the top box and the other text styles in the large box below. Then, pick a color scheme to use for all the slides in your presentation. (NOTE: Later, check to see if the Competitor Analysis and the SWOT Analysis objects blend in with the new slide background color. If they do, add a white fill color to both.)
- Play your presentation to make sure everything works properly. Make any necessary changes.
- Double-click your Course folder on your desktop.
- Right-click inside the folder to display a shortcut menu. Point to New, and then click Folder. Rename the new folder as “business_description”.
- Double-click the business_description folder. Right-click inside the folder to display a shortcut menu. Point to New, and then click Folder.
- Rename the new folder as “session_6_finalizing_business_idea”.
- Save your work in the session_6_finalizing_business_idea folder.
Review It
Look over your presentation. Did you include the following elements?
- Your business idea as the title slide.
- Brief yet accurate descriptions about your unique product or service idea, your target market, your competitors, location and business goals.
- The Survey Analysis results.
- The Competitor Analysis results.
- The SWOT diagram.
If any of these elements are missing, consider adding them now. Also, you should refer to Appendix 3– Digital Citizenship Checklist and review your work against the nine digital citizenship elements. Make any necessary or desired changes. Remember to save your work when you are finished.
Share It
Be prepared to discuss your answers to the following questions during sharing time:
- What is the purpose of this presentation?
- How did the Survey Analysis, Competitor Analysis and SWOT Analysis help you in analyzing your business idea?
- How did you set the goals for your business?
- How will this presentation help you in explaining the business idea and the chances of its success to an audience?
Reflection Journal
Reflect on the activity that you just completed. Record your answers to the following questions in your Reflection Journal. Keep in mind that your posts may not be private, so think carefully about what you write. The information about your business should be accurate and truthful.
- What were the challenges you faced while creating the business idea presentation? How did you deal with those challenges?
- In this session, you have expanded and described your business idea. How much will you need to spend to move from the idea stage to startup state? What are some of the things you will require to start your business? How will you estimate the costs?
Session 7: Estimating Startup Costs
In the previous sessions you generated business ideas and decided on a business opportunity. You will now identify all that is necessary to successfully develop your chosen business idea. Among the many things you will consider is the cost involved in starting and operating your business. You need to determine how much money you will have to spend to start your business. These costs are called Startup Costs. What are some of the things that you will require to start your business? How much do you think these items will cost?
Almost every business has to spend some money to set up the business, before it can start to make money. In some small businesses, the startup expenses can be quite small. However, if your business will need a place to operate, or if you need equipment or need to hire employees, you will probably need to meet expenses in areas such as equipment, salaries to the staff, furniture and rent for the office premises. Refer to Appendix 10- Description of Costs to understand the different types of costs that many new businesses have to face. Once you have identified all the types of costs, the best way to identify the actual cost is to specify how much money you will spend on each item you need and simply add the amounts to establish a final estimate. How might computers assist you in your task of recording and organizing valuable financial information?
Plan It
Create worksheets to estimate the cost for each item you need to start up your business idea, the total startup costs and a chart to identify the percentage of each cost. Look at the following examples. If your business idea is a service or has multiple products/services, refer to Appendix 19 for examples for these scenarios.

Startup Costs Breakup Worksheet Example
Startup Costs Summary Worksheet Example

Startup Costs Chart Example
Think of the following questions and discuss your ideas with your partner. It might be helpful to write your ideas on a sheet of paper.
- What are some of the items that you require for setting up your business idea? Refer to Appendix 10- Description of Costs to identify some costs. Be sure to identify and include the costs that are specific to your unique business idea.
- How will you estimate how much you need to spend on each item? Refer to Appendix 11- Estimating Costs to identify some methods.
- How will you show the breakup of the startup costs?
- How much cash do you need to have available at the very start of your business?
- How can you use a computer to help you with your calculations?
Do It
- Start the spreadsheets software, and open a new, blank spreadsheet.
- In cell A1, type a worksheet title “Startup Costs Breakup”.
- In cell A2, type “One Time Expenses” as the cost description heading.
- Change the text wrapping for each of the rows 1 and 2 and merge the cells so the information fits in four columns.
- In the first empty cell in column A, type a category title that you and your partner identified as one time expenses during your planning time. Change the text wrapping and merge the cells so the information fits in four columns.
- Type “Item” in the empty cell in column A, “Units” in the empty cell in column B, “Amount Per Unit” in the empty cell in column C and “Total Cost” in the empty cell in column D as column labels.
- Enter the Item, Units, and Amount Per Unit information in columns A through C that you decided with your partner during planning time. Make sure you type the information in the correct columns. Change the column widths as needed.
- Then, in the first empty cell under the column heading ‘Total Cost’, type a formula that multiplies the units with the amount per unit.
- Apply the formula down the column to calculate this cost for the other items.
- In the first empty cell below the last total cost information in column D, insert a Sum function that adds all the item totals in that column. If needed, change the number format of that cell to currency. And in the empty column A cell to the left, type “Total Expense” as the label for that new sum amount.
- Format the numbers in columns C and D so they look like money or currency. (NOTE: Rupees appears in Excel as "INR" for the "Indian Rupee".)
- Change the look of the words and numbers so important cells stand out, such as the column labels and the total expense information at the bottom. You might also change the column width, the position or alignment of the information within the cells, or add color to the cells.
- Repeat steps 5-12 for the remaining categories under one time expenses.
- In the first empty cell below the last total cost information in column D, insert a Sum function that adds all the total expenses of the categories in that column. If needed, change the number format of that cell to currency. And in the empty column A cell to the left, type “Total One Time Expenses” as the label for that new sum amount.
- In the first empty cell below the last total expense information in column A, type “Ongoing/Recurring Expenses” as the cost description heading. Merge the cells so the information fits in four columns.
- In the first empty cell in column A, type a category title that you and your partner identified as ongoing/recurring expenses during your planning time. Change the text wrapping and merge the cells so the information fits in three columns.
- Type “Item” in the empty cell in column A, “Amount Per Month” in the empty cell in column B, and “Total Cost Per Year” in the empty cell in column C as column labels. (NOTE: You might want to change the item label according to the category title. For example, you can type “job position” in place of “item” for the category “salaries”.)
- Enter the Item and Amount Per Month information in columns A and B that you decided with your partner during planning time. Make sure you type the information in the correct columns. Change the column widths as needed.
- Then, in the first empty cell under the column heading ‘Total Cost Per Year’, type a formula that multiplies the amount per month by the total number of months in a year.
- Apply the formula down the column to calculate this cost for the other items.
- Format the numbers in columns B and C so they look like money or currency. (NOTE: Rupees appears in Excel as "INR" for the "Indian Rupee".)
- In the first empty cell below the last total cost per year information in column C, insert a Sum function that adds all the item totals in that column. If needed, change the number format of that cell to currency. And in the empty column A cell to the left, type “Total Expense” as the label for that new sum amount.
- Change the look of the words and numbers. Repeat step 12.
- Repeat steps 16-22 for the remaining categories under ongoing/recurring expenses.
- In the first empty cell below the last total expense information in column A, type any notes that need to be added for reference, as decided with your partner during planning time. Merge the cells so the information fits in three columns.
- Type “Total Ongoing/Recurring” in the empty cell in column A.
- Then, in the empty cell in column B, type a formula that adds up the total costs for each expense. Format the numbers in column B so they look like money or currency. (NOTE: Rupees appears in Excel as "INR" for the "Indian Rupee".)
- In the first empty cell below the information in column B, insert a Sum function that adds all the totals of one time and recurring expenses. If needed, change the number format of that cell to currency. And in the empty column A cell to the left, type “Grand Total of Startup Costs” as the label for that new sum amount.
- Give the worksheet tab a new name that describes the information, such as “Startup Costs Breakup”.
- Go to another worksheet. Here you will put together the summary of the cost descriptions.
- In cell A1, type a worksheet title. Change the text wrapping and merge the cells so the information fits in two columns.
- Type “Item” in the empty cell in column A and “Cost in Year 1” in the empty cell in column B as column labels.
- Enter the Item and Cost in Year 1 information in columns A and B from the previous sheet. Make sure you type the information in the correct columns. Change the column widths as needed. (NOTE: Type the category headings in the empty cells under the “Item” column.)
- In the first empty cell below the information in column B, insert a Sum function that adds all the item totals in that column. If needed, change the number format of that cell to currency. And in the empty column A cell to the left, type “Total Costs” as the label for that new sum amount.
- Change the look of the information as you wish. For example, you might change the position or alignment of the information inside the cells, or change the look of the words. You might also make the column labels in row 2 and the grand total information at the bottom of the worksheet stand out by adding cell borders or filling the cells with color.
- Use the information in column A and B to make a pie chart that shows both the values and the corresponding percentages of each item to the total cost. Make sure you title your chart. Change the look of the words and numbers in the pie chart as you wish. You can also add different fill colors or fill effects to the pieces of the pie. Challenge: Select a different option when picking a Chart sub-type to display the information. You might want to pick an Exploded Pie or a Pie with a 3-D visual effect.
- Save the chart on a new sheet.
- Rename your worksheet and chart tabs, and delete any unused worksheets. If needed, change the order of the tabs so the worksheet comes before the chart.
- Double-click your Course folder on your desktop.
- Right-click inside the folder to display a shortcut menu. Point to New, and then click Folder. Rename the new folder as “financial_plan”.
- Double-click the financial_plan folder. Right-click inside the folder to display a shortcut menu. Point to New, and then click Folder.
- Rename the new folder as “session_7_startup_costs”.
- Save your work in the session_7_startup_costs folder.
Review It
Look over your Startup Costs Worksheets. Make sure they have the following elements:
- List of the items you need for your business.
- A sum formula that calculates the startup costs for each item on which you spend.
- A list of the startup costs for your business.
- Formulas that calculate the total cost of units per amount of unit.
- Formulas that calculate the total cost of units per year.
- A sum formula that calculates total startup costs.
- A pie chart that shows the percentage of each item’s cost in relation to the total startup cost amount.
- Titles and tab names for the Worksheets that explain the information recorded.
If any of these elements are missing, add them now. Also, you should refer to Appendix 3 – Digital Citizenship Checklist and review your work against the nine digital citizenship elements. Make any necessary or desired changes. Remember to save your work when you are finished.
Share It
Be prepared to discuss your answers to the following questions during sharing time:
- What are your main startup costs? How did you estimate the total amount you would need to start your business?
- How will you arrange for the amount you need to start your business? Refer to Appendix 12- Sources of Funds to learn about some of the sources from which you can get the money.
- What are some of the ways of reducing startup costs? Can you think of ways to obtain the items you need at cheaper rates and thus reduce the amount spent as startup costs?
- Why is it important to accurately estimate startup costs as a part of your business plan?How will you arrange for the amount you need to start your business? Refer to Appendix 12- Sources of Funds to learn about some of the sources from which you can get the money. What are some of the sources of fund you would like to use? Why?
Reflection Journal
Reflect on the activity that you just completed. Record your answers to the following questions in your Reflection Journal. Be sure to think about the accuracy of your responses before you post because this information may be seen and used by others.
- How did spreadsheets help you in estimating the startup costs? What was the most challenging part of the activity and how did you overcome it?
- You have estimated the costs for starting your business. Knowing the start-up costs, what do you think should be the price of your product or service? What factors would you consider the most important for calculating the price of your product or service?
Session 8: Pricing
In the previous session, you estimated the startup costs for the business. Now you have to determine the price for your product or service, which is the amount that you will charge customers for your product or service. In any business, the challenge for the business owner is that you have to achieve a balance. You need to make sure that you charge a reasonable price for your product or service yet at the same time are able to earn more than what you are spending on operating the business.
One of the important factors in pricing is to understand what a Unit is for your business. A unit is single quantity of your product or service. For example, suppose that you make and sell candles. One unit for your business is one candle. If you are in a business of buying and selling pencils, your one unit of sale is one pencil. However if you were selling a service, say gardening services, which focuses on spending time doing the work in the garden, then your one unit of sale would be one hour of your work. Every hour you spend on providing the service will be one unit for sale.
As stated earlier, ideally the price of a unit of your product or service should be such that you are able to recover what you spent on providing the product or service. To establish such a price, you need to first identify how much you have spent on making each unit of the product or service available to the customer. This cost for each unit is known as the Cost Price of the product or service. Taking the above examples, Cost Price is the amount you would have spent to make one candle, buy one pencil from the manufacturer or spend one hour offering the gardening service. Remember to include all the expenses that went into making the product or service available to the customer.
The amount you charge the customer for each unit of your product or service is the Selling Price. Usually, to determine the Selling Price, a certain amount of money is added to the Cost Price. This difference between the Selling Price and the Cost Price is called the Profit. Profit is the amount that you are able to earn through your business. It is the amount that is left after your costs have been recovered. How much profit do you wish to make? The profit you desire to earn is usually expressed as a percentage by which you want to exceed your costs or Cost Price. A 20% desired profit (the Selling Price is 20% more than the Cost Price) is typical of many businesses.
Plan It
Create a spreadsheet for calculating an appropriate Selling Price per Unit, for your product or service. To do this, you will have to determine the expected Cost Price, the number of units you expect to sell, the desired Profit, and then calculate an appropriate Selling Price. You may refer to the spreadsheet on startup costs that you prepared in the previous session to help you identify your costs. Look at the following example. If your business idea is a service or has multiple products/services, refer to Appendix 20 for examples for these scenarios. Keep in mind that this information is provided for reference only. You will need to determine your own figures based on your specific business idea and your prior research.

Pricing Worksheet Example
Think of the following questions and discuss your ideas with your partner. It might be helpful to write your ideas on a sheet of paper.
- What are all the costs that go into making the product or service available to the customer?
- What is your desired profit? How will you calculate your profit?
- What is one unit of your product or service? How many units of product or service do you think you will sell in a year?
- How will you organize your information to include all relevant details that affect price?
Do It
- Start the spreadsheets software, and open a new, blank spreadsheet.
- Rename Sheet 1 as “Pricing”.
- In cell A1, type “Total Costs” as the label heading. Merge cells A1 and B1 so the information fits in two columns. Change the look of words if you wish. You may also change the row height.
- Type “Items” in the first empty cell in column A and “Amount (INR)” in the empty cell in column B as column headings. You may also change the column width to provide enough space for the text.
- In the empty cell below the Column B heading, type “Total Costs in Year 1”.
- Enter the Item and Amount information in columns A and B that you decided with your partner during planning time and as stated in your Startup Costs Sheet. Make sure you type the information in the correct columns. Change the column widths as needed.
- Format the numbers in column B so they look like money or currency. (NOTE: Rupees appears in Excel as "INR" for the "Indian Rupee".)
- In the first empty cell below the last cost amount in column B, insert a Sum function that adds all the amounts in that column. In the empty column A cell to the left, type “Total Cost” as the label for that new sum amount.
- In cell C1, type “Selling Price per Unit” as the label heading. Merge cells C1 and D1 so the information fits in two columns. Change the look of words if you wish.
- Type “Total Cost” in the first empty cell in column C. In the cell below, type “Desired Profit” and also mention the percentage that you wish to earn as profit.
- In the empty cell in column D fill in the amount. Change the number format of that cell to currency.
- In the cell below, type a formula to calculate the desired profit. (NOTE: You will need to multiply the desired profit percentage decided upon with your partner during planning time with the total cost.) Change the number format of that cell to currency.
- In the first empty cell below the amount of the desired profit in column D, insert a Sum function that adds the amounts in that column. If needed, change the number format of that cell to currency. In the empty column C cell to the left, type “Cost Plus Profit” as the label for that sum amount.
- In the cell below, type “Total Units Expected to be Sold” and in the empty cell in Column D type the number of units that will be sold over the year.
- In the empty cell in Column C, type “Selling Price Per Unit” and in the empty cell in Column D type a formula that divides “Cost Plus Profit” by the “Total Units Expected to be Sold”. Change the number format of that cell to currency.
- Change the look of the words and numbers so important cells stand out, such as the column labels, the total cost information and the selling price per unit. You might also change the column width, the position or alignment of the information within the cells, or add colour to the cells.
- Remember to write relevant details related to Units Sold and Price calculations in your Working Notes.
- Hide the gridlines on your worksheet.
- Double-click your Course folder on your desktop. Locate the folder “financial_plan”.
- Double-click the financial_plan folder. Right-click inside the folder to display a shortcut menu. Point to New, and then click Folder.
- Rename the new folder as “session_8_pricing”.
- Save your work in the session_8_pricing folder.
Challenge: In the spreadsheet, you have calculated the price for your product or service for a certain profit percentage. Increase and decrease the profit percentage in additional columns to see how this affects the selling price. See the following Challenge example.

Review It
Look at the worksheet that you have prepared on Pricing. Make sure you have taken care to include the following elements:
- All relevant costs related to your product or service.
- The estimated number of units sold per year.
- The desired profit.
- Formula for calculating the price.
If any of these elements are missing, add them now. Also, you should refer to Appendix 3 – Digital Citizenship Checklist and review your work against the nine digital citizenship elements. Make any necessary or desired changes. Remember to save your work when you are finished.
Share It
Be prepared to discuss your answers to the following questions during sharing time:
- Does the price you have calculated match the price you had earlier suggested in the survey questionnaire in Session 3?
- Is your pricing at par with the competitors’ pricing? Why is it important to compare pricing with your competitors?
- How will your pricing affect the sales of your product or service?
Reflection Journal
Reflect on the activity that you just completed. Record your answers to the following questions in your Reflection Journal. Remember not to write anything that is dishonest, misleading, or that might upset others.
- Which part of the pricing activity did you enjoy the most? Why? How can you use your pricing spreadsheet to determine whether the price of your product will change for each of the different scenarios listed below? What happens if you lower your costs? What happens if you change the desired profit (increasing and decreasing)? What happens if you change the unit sales (increasing and decreasing)? What happens if you increase the sales with a lesser profit percentage?
- You have estimated your costs, your sales, and have even decided on the price of your product or service. How will you use all this information to plan your expenses and estimate your earnings for the year? Keeping in mind your total estimated sales, can you guess how your sales will progress through the year?
Session 9: Preparing Your Budget
In the previous sessions you calculated the startup costs to establish your business. You also determined the price at which you should sell your product or service to recover your costs and make the desired profit. An essential task for every business is to plan expenses in a manner that allows it to continue making the desired profit. To do this you need to create a budget and operate within the financial limits set by it.
A budget is a financial tool that provides an estimate of the amount of expected earnings for each period based on sales forecasts, the amount of expected expenses for each period, and the difference between the two (which are called Net Earnings). The budget will help you to understand whether you need to limit expenses or increase sales in order to increase your Net Earnings.
Your main source of earning is your sales. Therefore, to estimate your earnings for your budget you need to first predict your sales. To do this you will have to prepare a sales forecast. A sales forecast involves predicting how many units of your products or services can be sold over a period of time. Knowing how many units you can sell at the price you have determined will help you to calculate how much you earn.
Once you calculate your earnings, you can prepare your budget by taking into account the expenses you have incurred in running the business and calculating the difference between your earnings and expenses. You may find that in the beginning of your business, until the sales grow, your earnings may be less than your expenses in any given period. However, if you find that your earnings are forecast to be constantly less than your expenses, then you will either have to reduce your expenses or find a way to increase your earnings.
Plan It
Create a budget spreadsheet containing a sales forecast worksheet and a budget. Look at the following example. If your business idea is a service or has multiple products/services, refer to Appendix 21 for examples for these scenarios. Remember that this information is for reference only. You will need to develop your own budget based on your unique business idea.


Budget Worksheet Example
Think of the following questions and discuss your ideas with your partner. It might be helpful to write your ideas on a sheet of paper.
- Assuming that sales increase as your business grows, how will you forecast your sales so that it shows gradual increase?
- What are your total earnings and expenses?
- Which of the costs (expenses) can or will vary? Which of these are fixed costs? (You may refer to the spreadsheet on startup costs that you prepared to help you identify different types of costs.)
- Are your earnings more than your expenses? What is the difference between your earnings and expenses?
Do It
- Start the spreadsheets software, and open a new, blank spreadsheet.
- Rename Sheet 1 as “Sales Forecast”.
- In cell A1, type “Annual Sales Forecast” as the label heading. To make the cell with the heading big enough to fit all of the words, merge the cells so the information fits in six columns. Change the look of words if you wish. You may also change the row height.
- Type “Q1” in the empty cell in column B, “Q2” in the empty cell in column C, “Q3” in the empty cell in column D, “Q4” in the empty cell in Column E and “Year 1-Forecast” in the empty cell in column F as column labels.
- In cell A3, type “Units sold”, followed by “Unit price” and “Total Earnings” in cells A4 and A5.
- In row 3 enter the information on the ‘Units sold’, for all the quarters, according to the forecast that you decided with your partner during planning time. Make sure you type the information in the correct columns. Change the column widths as needed.
- In the empty cell in column F, insert a Sum function that adds all the amounts in that row.
- In row 4 enter the information on ‘Unit price’, for all the quarters, that you decided with your partner during planning time. Enter the same price in cell F4. Change the number format of the cells in the row to currency.
- In the row below, in Columns B through F, type a formula to calculate the Total Earnings. (NOTE: You will need to multiply the Units sold in each quarter with the Unit Price for that quarter.) Change the number format of the cells to currency.
- Remember to write relevant details related to Units Sold and Unit Price in your Working Notes.
- Go to another worksheet. Here you will put together the information needed to make your quarterly budget.
- Rename Sheet 2 as “Budget-Quarterly”.
- In cell A1, type “Budget (Year 1)” as the label heading. Change the column width as needed.
- In cell B1, type “Quarterly Amount (INR)” as the label heading. To make the cell with the heading big enough to fit all of the words merge the cells so the information fits in five columns. Change the look of words if you wish.
- Type “Item” in the empty cell in column A, “Q1” in the empty cell in column B, “Q2” in the empty cell in column C, “Q3” in the empty cell in Column D, “Q4” in the empty cell in Column E and “Total” in the empty cell in column F as column labels.
- In the empty cell in Column A, type “Expected Earnings” as the heading.
- In the empty cells below the heading, type each of the items from which your business will make money. Make sure you type each item in its own cell.
- In the first empty cell below the last item of expected earnings, type “Total Earnings”.
- In the cell below, type “Expected Expenses” as a heading and in the empty cells below the heading, type the items on which your business will spend money.
- In the first empty cell, below the last item of expected expenses, type “Total Expenses”.
- In the cell below, type “Net Earnings”.
- In the empty cells in Column B, enter the amounts for Quarter 1 that you decided with your partner during planning time as your earnings from the items mentioned in Column A.
- In the cell in column B where Total Earnings have to be mentioned, insert a Sum function to add up all the amounts of the earnings in the cells above.
- In the empty cells in column B, enter the amounts for Quarter 1 that you decided with your partner during planning time as your expenses on the items mentioned in Column A.
- In the cell in column B where Total Expenses have to be mentioned, insert a Sum function to add up all the amounts of the expenses in the cells above.
- In the cell in column B where Net Earnings have to be mentioned, type a formula to calculate the difference between Total Earnings and Total Expenses.
- Repeat Steps 23-27 for the remaining Quarters.
- In the empty cells in Column F, insert a Sum function in each cell to add the amounts mentioned in each row.
- Format the numbers in column B through F so they look like money or currency. (NOTE: Rupees appears in Excel as "INR" for the "Indian Rupee".)
- Change the look of the words and numbers so important cells stand out, such as the column labels, the total cost information and the selling price per unit. You might also change the column width, the position or alignment of the information within the cells, or add color to the cells.
- Remember to write relevant details related to the data used for the budget in your Working Notes.
- Hide the gridlines on your worksheets.
- Double-click your Course folder on your desktop. Locate the folder “financial_plan”.
- Double-click the financial_plan folder. Right-click inside the folder to display a shortcut menu. Point to New, and then click Folder.
- Rename the new folder as “session_9_budget”.
- Save your work in the session_9_budget folder.
Challenge: Create a chart for the total sales for your Sales Forecast. See the Challenge example.

Sales Forecast Chart Worksheet Challenge Example
Review It
Look at the worksheets that you have prepared for your sales forecast and your budget. Make sure you have included the following elements:
- Forecast of number of units sold per quarter.
- Formula for calculating the total sales per quarter.
- All the formulas are correct.
- Net Earnings calculated on a quarterly basis.
- Title and tab names for your Worksheets that explain the information recorded.
If any of these elements are missing, add them now. Also, you should refer to Appendix 3 – Digital Citizenship Checklist and review your work against the nine digital citizenship elements. Make any necessary or desired changes. Remember to save your work when you are finished.
Share It
Be prepared to discuss your answers to the following questions during sharing time:
- How did the sales forecast help you to estimate your earnings?
- How does the budget help you in planning your expenses and calculate your earnings?
- What do negative Net Earnings in your budget show? Is it acceptable to have negative Net Earnings at the initial phase of your business?
- How did the spreadsheet help you in your calculations?
Reflection Journal
Reflect on the activity that you just completed. Record your answers to the following questions in your Reflection Journal. Be certain the information is factual and accurate, and that your ideas do not potentially upset or offend anyone who might read your post.
- What was the biggest challenge in creating a budget spreadsheet and how did you overcome that challenge?
- One way to increase your earnings is to build awareness of your product or service, and sell more units. How much of your budgeted costs is being used for this purpose? What methods can you use to promote awareness of your product or service among customers?
Session 10: Developing a Marketing Strategy
In the previous session you prepared a budget where a certain amount of money was allocated for the marketing and promotion of your business. You also reflected on the important decisions to be taken for marketing your product and using promotional methods. One way to do this is to develop a marketing strategy for your business.
A marketing strategy defines your goals for marketing and the steps you will take to achieve those goals. As part of this process, you will consider the 4Ps of marketing:
Product (Service) Positioning: How do you want your product or service to be known to your potential customers? When customers think of your business, what will they think of, and how will they consider it in comparison to other similar businesses? What kind of image or identity will it have? How will it be different or better than other similar businesses?
Price: How will your selling price compare with other similar businesses? What will you be able to say about your selling price when compared to others?
Place (Distribution): How will customers get your product or service? Where will they have access? How will you make access easy for your customers? Will you have a place where the customers come to you, or will you go to them to sell your product or service?
Promotion: How will you advertise or promote your product or service? How will potential customers (your target market) hear about it, and how will they know how to get it? What will make the product or service attractive to them, and make them want it?
Plan It
Create a marketing strategy presentation for your business. Look at the following example. If your business idea is a service or has multiple products/services, refer to Appendix 22 for examples for these scenarios. Keep in mind that the marketing strategy presentation that you prepare will need to contain your own ideas and information about your business idea.

Marketing Strategy Presentation Example
Think of the following questions and discuss your ideas with your partner. It might be helpful to write your ideas on a sheet of paper.
- How do you want to position your product or service? What will be the qualities that people will identify with it?
- What are the unique characteristics (unique selling proposition) of your product or service that you wish to highlight?
- Is your pricing above, below or at par with your competition, and how do you plan to market that factor?
- Where will your customers buy your product or service from?
- What advertising and promotion methods do you wish to use? Which of the methods do you think will be most effective in helping you sell your product or service? Refer to Appendix 13- Advertising and Promotion Methods to identify the different marketing methods.
- How do you plan to spend the allocated marketing budget?
Do It
- Start the multimedia software, and open a new, blank presentation.
- Insert a title slide, and type the name of your business. Then in the box below, type “Marketing Strategy”. You should also type your name and that of your partner.
- Resize and move the text boxes.
- Add a new slide with space for a title and a bulleted list. In the top text box, type a slide title “Product Positioning”. In the text box below, type a few sentences that you decided with your partner during your planning time about how you want to position your business and the unique characteristics (unique selling proposition) of your product or service that you wish to highlight.
- Add pictures that show what you wrote in your sentence.
- Resize and move the text boxes and the pictures.
- Add a new slide with space for a title and a bulleted list. In the top text box, type a slide title “Pricing”. In the text box below, type a few sentences that you decided with your partner during your planning time about the pricing factor of your product or service and how you plan to market it.
- Repeat step 5 and 6
- Add a new slide with space for a title and a bulleted list. In the top text box, type a slide title “Place (Distribution)”. In the text box below, type a few sentences that you decided with your partner during your planning time about how your product or service will be made available to the customers and how conveniently they can get it.
- Repeat step 5 and 6.
- Add a new slide with space for a title and a bulleted list. In the top text box, type a slide title “Promotion”. In the text box below, type a few sentences that you decided with your partner during your planning time about the promotion and advertising methods you wish to employ for your product or service and what will most effectively reach the customers.
- Repeat step 5 and 6.
- Add a new slide with space for a title and a bulleted list. In the top text box, type a slide title “Promotion Budget and Launch Strategy”. In the text box below, type a few sentences that you decided with your partner during your planning time about how you plan to spend the marketing budget and the most effective ways to spend money to promote your product or service.
- Repeat step 5 and 6.
- When you are done adding all of the information in your slides, pick a color scheme or design template to add to your slides. (NOTE: Later, check to see if you need to add a fill color, such as white, to the objects in your slides. The background of the object might blend in with the new background of the slides.)
- You might also go to the Slide Master and change the look of the title and other written information so all of your words look the same from slide to slide.
- Set up the slideshow to play as whatever type you want, and pick the way you want to move from one slide to another.
- Play your presentation to make sure everything works the way it should. Make any desired changes.
- Double-click your Course folder on your desktop.
- Right-click inside the folder to display a shortcut menu. Point to New, and then click Folder. Rename the new folder as “marketing_strategy”.
- Double-click the marketing_strategy folder. Right-click inside the folder to display a shortcut menu. Point to New, and then click Folder.
- Rename the new folder as “session_10_ marketing_strategy”.
- Save your work in the session_10_marketing_strategy folder.
Challenge: Add transitions, animation, sound, and video effects to your slides as you wish. Be sure you set the timing for animation and other effect on each slide, and try not to add too many different types of effects.
Review It
Look over your presentation. Make sure it has the following elements:
- The title slide.
- The description slides containing marketing details about the 4 Ps – Product (Service) Positioning, Place, Price and Promotion.
- Slide with details of how you will spend the marketing budget.
If any of these elements are missing, add them now. Also, you should refer to Appendix 3 – Digital Citizenship Checklist and review your work against the nine digital citizenship elements. Make any necessary or desired changes. Remember to save your work when you are finished.
Share It
Be prepared to discuss your answers to the following questions during sharing time:
- How did describing the 4 Ps help you in developing your marketing strategy? Why are the 4 Ps important for your marketing strategy?
- Which advertising and promotion methods did you choose? Why?
- How have you distributed your marketing budget for the promotional activities? Why?
- Why is defining your marketing strategy a very important factor for your business plan?
Reflection Journal
Reflect on the activity that you just completed. Record your answers to the following questions in your Reflection Journal. Remember that your post may not be private, so be certain not to write anything that could cause potential problems.
- Which part of developing the marketing strategy presentation was the most challenging? How did you overcome the challenge?
- Review a few advertisements in newspapers and magazines and make a list of what you think are the most important elements of an advertisement. If you had to create an advertisement for your product or service, what elements would you include in it?
Session 11: Branding and Advertising Your Business
In the previous session you identified the promotion and advertising methods, and also determined how you will position and showcase your product or service in the market. Now, based on the defined marketing strategy, you will decide on the branding, which is creating an identity or reputation for your business and its product or service. You will also learn how to use branding for advertising your products or services.
Impressive branding and effective advertising play a very important role in generating awareness among your potential customers. The main goal in creating a brand is to generate a positive impression or feeling among customers for your product or service by emphasizing on the qualities that make it special or unique. You create an impression or identity for your business through a combination of factors, including the name and logo of the business and how it is promoted.
When starting a new business, it is very important to have a good business name and logo. The name is very important, as it can help convey a message about your product or service, and also create curiosity and association with it. For example, if you name a restaurant “Yummy World”, the name itself helps send a message to the customer about the quality of the food and the experience they will have in your restaurant. Similarly, a logo is a picture or symbol that stands for and represents your business. Some logos also have tag lines, which are typically a few words that are added that help in association and recollection of the product or service offered by your business. Can you remember some tag lines you would have seen on television or in advertisements? The name, logo, and the tagline - all these elements combined help form your brand identity. Once you create a brand identity, you should consistently extend this identity to all the marketing material including packaging, advertisements, brochures and business stationery.
Advertisements are created to let people know of the product or service offered by your business. One of the important times to advertise is when a business is new, or when introducing a new product or service in the market. The way that you advertise helps in developing a positive and successful brand image. While there are many elements to advertising and promotion, it is important to understand the essentials of advertising. Which advertisements can you recall seeing recently that caught your attention? What are the basic elements of a good advertisement? What message do you want to give through your advertisement?
An advertisement will usually have the following elements:
- A catchy headline or image that will catch your potential customer’s attention.
- A few key messages to communicate to the target market about your product or service and why the customer should want to purchase it. (NOTE: Entrepreneurs have the responsibility to provide accurate information about their products and services. They also have the responsibility to not say inaccurate or unethical things about their competitors’ products or services.)
- An illustration or image (such as name, logo, and tagline) that shows the identity of your product or service, accompanying the message.
- How the customer can take advantage of your product or service - this can include the place of availability, the pricing, the contact information and any promotions that you may have.
- It is important that the visual elements and design of your advertisement match together with the branding and the positioning of your product or service.
Plan It
Create a logo and an advertisement (which can serve as a flyer, a print advertisement, or a direct mailer) for your business. Look at the following examples. If your business idea is a service or has multiple products/services, refer to Appendix 23 for examples for these scenarios. Remember that the logo and advertisement are provided as examples only. You will need to create your own unique logo and advertisement that best represents your business idea.

Logo Example

Advertisement Example
Think of the following questions and discuss your ideas with your partner. It might be helpful to write your ideas on a sheet of paper.
- What do you want to convey through the name of your business?
- How would you like to describe the logo that you wish to create? How will you incorporate the name of your business in the logo?
- What are the designs and images you can think of that would convey a positive identity to your target customers?
- What might be an appropriate tagline?
- What message do you want to convey through your advertisement?
- What information about your product or service do you want to give in the advertisement along with the message?
- What do you want the headline of the advertisement to be?
- Do you want to include any promotions or special offers?
- What images do you want to use in the advertisement?
Do It
- Start the word processing software, and open a new, blank document.
- To help you size and position objects on the page, show the rulers and the document’s grid. To help you move and size objects with greater precision, make sure that the snap to grid option is turned off.
- Use the shape tools on the Drawing toolbar to draw a basic shape for your logo.
- Change the color of the shape as you wish. You might even want to add a fill effect.
- Draw a text box, and type the name of your business. You may make it artful using WordArt or a Fontwork that fits around the outside or along one of the sides of the shape.
- Add a picture to your logo. There are two ways you can do this: 1. You can start graphics paint software and make your own picture. Save your finished painting on your computer and insert it into your logo. 2. You can add a picture from the clip art gallery.
- Change the picture’s text wrapping, and move and resize it as needed.
- Draw a text box in an empty space in the shape. Type the tagline for your product or service you decided with your partner during planning time. Remove any borders and fill colors from the text box. (NOTE: When entering information about your business, you should not include your personal address, telephone number, or email. Use only the email you have created for business purposes and the address and telephone number of your office)
- Align and distribute objects so they are all lined up and spaced apart evenly. (NOTE: This skill may not be possible in all word processing software. If your word processing software does not have this capability, skip this step.)
- Select and group all the objects in your logo. Then, copy the logo design.
- Open a new graphics paint canvas. Paste your logo.
- Make the canvas bigger or smaller as needed so it is just about the same size as the pasted logo design. Save the logo as two files – one to use for printed projects, and another to use for Websites or electronic presentations. Then exit the graphics paint software, and close the logo file in the word processing software.
- Double-click your Course folder on your desktop. Locate the folder “marketing_strategy”.
- Double-click the marketing_strategy folder. Right-click inside the folder to display a shortcut menu. Point to New, and then click Folder.
- Rename the new folder as “session_11_branding_and_advertising”.
- Save your logo in the session_11_branding_and_advertising folder.
- Open a new blank word processing document. Here you will create the advertisement.
- To help you size and position objects on the page, show the rulers and the document’s grid. To help you move and size objects with greater precision make sure that the snap grid option is turned off.
- Make a text box, and type a catchy headline which is an attention-getting phrase about your business that you decided on during your planning time. Change the look of the heading. You might want to make the heading bigger and change its style and colour so it stands out.
- A text box below the heading might be a good place to put some information about your new business and the inaugural offers. Type a few sentences about the business and what you are providing or whatever else you would like to write about to grab the attention of the customers.
- Insert more text boxes for the other pieces of information you want to type. You may include information on the attractive prices at which you are offering your product or service as a part of your inaugural offer. Make the boxes bigger or smaller as needed, and use the rulers to help you put each box in a place that looks good. You can also change the look of the words in each box.
- Make an attractive background for your advertisement by turning a picture into a watermark on your document. If the watermark picture is too light or hard to see, try adding more contrast. If there are lots of colors in the watermark picture, you might turn it into a grayscale.
- Remove the border and fill color from the text boxes so you can see the watermark behind them.
- Add pictures of your business, product or service with the information if you want. You may move and resize pictures as needed.
- Insert the saved logo file, and change its text wrapping. Then, change its size and position as you wish. (NOTE: You might want to look at the logo you designed earlier.)
- Draw a text box in the empty space on the square .Type important business information such as the address, telephone number, email address and website address (NOTE: You might want to add the office timings or write about your business and how it can benefit customers to induce them to come and visit you. Remember to use only the email you have created for business purposes and the address and telephone number of your office. Do not include your personal address, telephone number, or email).
- Add a colorful page border, if you wish. You can use either one of the border art options and change the color, or you can make a brand new border on your own.
- Add special effects such as making certain words shimmer, shine, or sparkle. (NOTE: This skill may not be possible in all word processing software. If your word processing software does not support this feature, skip this step.)
- Save your advertisement in the folder named session_11_branding_and_advertising.
Review It
Look over your logo. Make sure it has the following elements.
- The name of your product or service, if you chose to include it in your logo design..
- A unique visual element or image that you chose for the logo.
- A unique tagline, if you chose to include it in your logo design.
- Any other information that you would like to include in branding your product or service.
Look over your advertisement. Make sure it has the following elements.
- An interesting headline and information which conveys the intended message.
- Interesting visuals which add value to your message.
- Your business name and logo.
- Product or service information.
- Pricing information.
- Place of availability.
- Contact information and address.
If any of these elements are missing, add them now. Also, you should refer to Appendix 3 – Digital Citizenship Checklist and review your work against the nine digital citizenship elements. Make any necessary or desired changes. Remember to save your work when you are finished.
Share It
Be prepared to discuss your answers to the following questions during sharing time:
- Why did you choose this particular name and logo for your business? How will the name and logo help you in establishing a positive image of your brand?
- Why did you choose the tagline? How will it add value to your product or service identity?
- What is the message given by your advertisement? How does your headline and supporting information help you in delivering that message?
- How do the color theme, layout and visuals chosen enhance the message?
- How does your advertisement match with the positioning and the branding of your product or service?
- How will you use your branding elements in other marketing materials?
- Why are branding and advertising important in business and market planning?
Reflection Journal
Reflect on the activity that you just completed. Record your answers to the following questions in your Reflection Journal. Remember that this information may not be private, and therefore, you should think carefully before you post your thoughts.
- What was the biggest challenge in creating a logo and an advertisement, and how did you overcome that challenge?
- Can you think of other marketing and promotion tools you can use to promote your business? How can a Website help you in promoting your business?
Session 12: Creating a Website for Your Business
In the previous marketing sessions you defined your marketing strategy, designed the branding and explained the positioning of your product or service, and also created an advertisement. Now, you will create a Website for your business.
A Website is made of many Web pages that can be accessed through the Internet A business typically requires a Website, as there will be a lot of information that you will want to include regarding the business and the product or service.
As more and more people use the Internet to get information, it has become very important to have a Website for your business. The Website is also a continuous way of promoting your business, and a medium to advertise the product or service.
Before you begin this activity, think of any business Websites you have seen recently. If you haven’t seen one recently, go to the Internet and find one that you like and go through the kind of information that is provided on the Website. A business Website should chiefly contain information about the business, the product or service offered, the contact and location information. You can also include pages which add value to your Website, such as photographs of your product or service, promotions and press releases.
Plan It
Create a Website for your business. Look at the following example. If your business idea is a service or has multiple products/services, refer to Appendix 24 for examples for these scenarios. You will need to create your own Website that effectively shows your products or services.

Website Homepage Example

Website Services Page Example

Website Gallery Page Example

Website Contact Us Page Example
Think of the following questions and discuss your ideas with your partner. It might be helpful to write your ideas on a sheet of paper.
- What information do you wish to provide on your Website? How will you organize the information? How will you make this information interesting?
- What will you do to make your Website attractive and easy to use for customers?
- What are the different pages that you will include in your Website?
- Where will you get the information and images required for your Website?
- What information would you consider using from your branding and the advertisement activities you created earlier?
Do It
- Start the word processing software, and start a new Web page. If there is a Web page Wizard in the word processing software you are using, you may choose to use the wizard to create your Web page and skip Steps 2 through 8. (NOTE: This skill may not be possible in all word processing software.) If you are creating a Website manually, be sure to format a table to create a column layout.
- The first Web page you create will be the Homepage of your Website. Add a background color to your Web page.
- Create a table of contents for your Website in the left-hand column you created in Step 1. (NOTE: This skill may not be possible in all word processing software.)
- Add headlines, headings, and subheadings, text, text boxes and pictures to your Web page that inform your audience about the business. You can use much of the same information that you created in the branding and advertising activity for your Website. To protect your own personal privacy and security, you should not add your own personal address, telephone number, or email address to your Website. Add only the email you have created for business purposes and the address and telephone number of your office.
- Double-click the marketing_strategy folder in your Course folder. Right-click inside the folder to display a shortcut menu. Point to New, and then click Folder.
- Rename the new folder as “session_12_ website”.
- Save the Home page in the session_12_website folder.
- Create at least three more Web pages using the same table of contents format as the Home page but feel free to choose different pictures, and other features. Save these three new pages in the same place as your Homepage.
- Locate your Homepage. Right-click the file and choose Open With. Then, choose the word processing software you are using. In the table of content, add links to the other Web pages you created. Save your Home page.
- Open each of the other Web pages you made in Step 8. Add links on these pages to the Home page and to each other. Save the pages. (NOTE: When editing any of the Web pages, you must right-click the file and choose Open With. Then, choose the word processing software you are using.)
- Open the branding or advertisement file you previously completed. Copy the tagline, address, telephone number, URL, and e-mail address. Then, paste the information in the appropriate page of the Website.
- Next, insert the logo you created in the branding activity into the Home page. If possible, change the text wrapping of the logo and then size and position it as needed.
- Change the look and position of the words on the page any way you like. (NOTE: Because this is a Web page, you can leave any hyperlink that might show up on its own when you type a URL or e-mail address.)
- Click the link for the second page in your Website (you may need to choose the Open With command, and then choose the word processing software you are using to edit the page). Then, copy the words and pictures from the matching section of the advertising activity, and paste them into this Web page. Add any additional information or pictures. If possible, change the wrapping. Then change the size and position of any pictures, and change the look and position of the information so it matches the color and font of the navigation links already on the page. (NOTE: This skill may not be possible in all word processing software.)
- Click the links for the other pages in your Website (you may need to choose the Open With command, and then choose the word processing software you are using to edit the page). Then, add information and pictures into the Web pages. (NOTE: Remember that to avoid misleading customers, business owners have the responsibility to present accurate and factual information, including text and pictures, of their products and services. They must also not say anything inaccurate or dishonest about their competitors’ products and services.) Change the wrapping, size, and position of any pictures, and change the look and position of the information so it matches the color and font of the navigation links already on the page.
- Save your work in the session_12_website folder.
- Start a web browser, and open the Website’s Homepage. Test out the links to make sure they work as they should.
Challenge: Create an additional page for special promotions and link the page to your Website. The special promotions Web page should contain any discounts and other offers that you may wish to have for your product or service.
Review It
Look over your Website. Make sure it has the following elements:
- A Home page which gives information about your business.
- A Table of Contents that can be seen on each page, and will direct the reader to the other pages on your site.
- A Web page for your product or service.
- A Web page for the contact and location information of your business.
- All supporting visuals.
- All the Web pages linked properly.
If any of these elements are missing, add them now. Also, you should refer to Appendix 3 – Digital Citizenship Checklist and review your work against the nine digital citizenship elements. Make any necessary or desired changes. Remember to save your work when you are finished.
Share It
Be prepared to discuss your answers to the following questions during sharing time:
- How many pages do you have in your Website? What information does each Web page contain?
- How have you made the information written on the Website interesting to potential customers?
- Why did you choose the particular layout, color theme and visuals for the Web page?
- Why is a Website an important element of your product or service marketing? How have you used the Website to market your product or service?
- What are the other ways in which you can use the Internet to market your product or service?
Reflection Journal
Reflect on the activity that you just completed. Record your answers to the following questions in your Reflection Journal. Remember to think carefully before you post your thoughts and not to write anything that might be seen as offensive or embarrassing.
- What challenges did you face in creating the Website for your business? How did you deal with the challenges?
- What are some of the important steps that you have to perform in creating and delivering the product or service to the customer?
Session 13: Understanding Core Business Operations
In the previous sessions, you developed marketing techniques to attract customers. In the next two sessions, you will be learning the basics of business operations. Business operations are those functions and tasks which help in running the business smoothly and efficiently.
If your teacher asks you to describe your routine for getting ready to school, you will list out all the important activities that you do before reaching school. Similarly in a business, there are many tasks that need to be done on a regular basis to deliver the product or service to the customers and smoothly run the business. To make a product or service available to customers at the right place and at the right time, every business has to understand these tasks and manage its business operations.
The core operations of a business are those essential functions that have to be performed to provide the product or service to the customers in a timely and efficient way. Production and delivery of the product or service are the key functions of core operation. These functions directly impact the delivery of the product or service to the customer. There are also many support functions that also have to be performed to operate your business. It is important to note that core operations are different from the one-time tasks that need to be done for setting up your business such as buying equipment required for the business, setting up the utilities and so forth. In this session, you will consider the core operations that are essential in your business.
There are many ways to list and describe the core operations. One way to show the core operations is through a Flow chart. Flow charts provide a visual representation of all the steps your business must take to obtain, manufacture or provide the product or service that you will sell to the customer. A flow chart helps you understand the steps in the operation of your business. Once you have decided on the steps, you can then identify the people you need to perform these steps. These people may be from within or from outside the organization.
Whether a task is done by someone in your organisation or outside your organization, the time that it takes to complete each key task will affect the time it takes to deliver your product or service. For example, suppose that you are in the business of making warm jackets that you sell to people in your community. To make the jackets, you may have to obtain the raw materials (cloth, buttons, zippers, and thread.) from others before you can create the jacket. You are dependent on people outside your business, called vendors, to provide you with the raw materials. While vendors are not a part of your organization, they are required for the process of you being able to deliver your product or service. In considering the flow of business operations, you need to know how long it takes the vendors to deliver the materials to you after you place an order with them, when you need to pay them, etc.
Plan It
Create an Operational Flow Chart that you can use to identify your core operations. Look at the following example. If your business idea is a service or has multiple products/services, refer to Appendix 25 for examples for these scenarios. You will need to prepare your own flow chart that represents your core business operations.
Operational Flow Chart Example
Think of the following questions, and discuss your ideas with your partner. It might be helpful to write your ideas on a sheet of paper.
- What are the materials that are required to provide your product or service to the customer?
- Who will provide you with the materials required to make your product or provide your service? At what stage in your process will you require these materials?
- Who is the intended recipient of your product or service? How is the order for the product or service received?
- What are the steps to be taken for the delivery of the product or service once an order is received? How is the payment made for the product or service?
- How will you use a flow chart to present the sequence of your operations?
Do It
- Start the word processing software, and open a new, blank document.
- Make the page margins or the empty spaces along the edges of the page smaller so you have more room for your information.
- To help you size and position objects on the page, show the rulers and the document’s grid. To help you move and size objects with greater precision, make sure that the snap to grid option is turned off.
- Draw a text box in the empty space to the left of the page. Inside the text box, type a title for your flow chart. Change the look of the title if you wish.
- In the empty space to the right of the page, draw an oval or terminator shape. (See Appendix 15 for basic flowchart shapes.)
- Inside this shape, type “Start” to indicate the starting point of the operational flow chart process.
- Make the shape bigger or smaller. Then, change the look of the words as you wish.
- Below this shape, draw a one-way arrow or a connector. (See Appendix 15 for basic flowchart shapes.)Below this arrow, draw a rectangle. (See Appendix 15 for basic flowchart shapes.)
- Inside this rectangle, type words to describe a process, task, action or operation as the first step to get your product or service ready for the customer.
- Continue adding individual steps as rectangles connected by one-way arrows, till the product or service is delivered.
- From the information you decided on with your partner during planning time, when your operational process reaches a decision point, draw a diamond shape or decision box. (See Appendix 15 for basic flowchart shapes.)
- Inside this shape, type the decision in the form of a question.
- Answer the question by drawing two paths emerging out of the diamond shape. Draw text boxes and type a possible answer for each path. (NOTE: Each path must re-enter the process or exit the decision point.)
- Repeat steps 11 – 14 till you reach the last step in the process.
- Draw an oval or terminator shape. (See Appendix 15 for basic flowchart shapes.)
- Inside this shape, type “End” to indicate the end point of the operational flow chart process.
- Double-click your Course folder on your desktop.
- Right-click inside the folder to display a shortcut menu. Point to New, and then click Folder. Rename the new folder as “operational_plan”.
- Double-click the operational_plan folder. Right-click inside the folder to display a shortcut menu. Point to New, and then click Folder.
- Rename the new folder as “session_14_ operational_flow_chart”.
- Save your work in the session_13_operational_flow_chart folder.
Review It
Look at the flowchart that you have prepared on business operations. Make sure you have taken care to include the following elements:
- Different tasks in the core operations have been identified.
- Steps are sequentially arranged.
- The correct flow chart shapes (boxes and connectors) have been used.
- The flow of information from one box/branch to another is clear.
If any of these elements are missing, add them now. Also, you should refer to Appendix 3 – Digital Citizenship Checklist and review your work against the nine digital citizenship elements. Make any necessary or desired changes. Remember to save your work when you are finished.
Share It
Be prepared to discuss your answers to the following questions during sharing time:
- How did the flow chart help in providing an overview of your core operations?
- What are some other ways that you can think of to represent process steps in your business operations?
- Which of the computer skills that you learned today might you use again?
Reflection Journal
Reflect on the activity that you just completed. Record your answers to the following questions in your Reflection Journal. Because this information may be used later to inform important decisions, be sure that the information in your post is honest and accurate.
- What was the biggest challenge in creating your operational flow chart, and how did you overcome that challenge?
- Review your flow chart. Can you think of any other functions or supporting tasks that will be necessary to run your business? For example, what happens to the payments that are collected from the customers? Who manages the money? Who pays the vendors, and when does that happen? Who takes care of the employees? What does the business owner do?
Session 14: Organizational Structure
In the previous session you learned that business operations include both core operations and support functions. You also created an operational flow chart to identify the core operations of your business and reflected on some of the other functions that are necessary to run the business. To ensure that your business operations are performed efficiently, you will have to hire or appoint people not only for your core operations but also for the supporting tasks. In this session, you will identify all the key people required to do the different core tasks for operating your business smoothly, and define their roles.
For instance, in Session 13, in the operational flow chart for Yummy World Restaurant, one of the key tasks identified was “Kitchen prepares the dishes as per the customer’s order”. If you were starting the Yummy World Restaurant, how many people will you need to work in the kitchen? What will be their various tasks or functions? Who will be in charge? Similarly, for the business idea that you have created, you will need to think about the core operations and other support functions that you have identified, and determine what kinds of jobs you will need to fill, and how those jobs will relate to one another.
In many businesses, some of the high level functions of the core-operations are:
Creating the product or service or Production: This function will include all the tasks that will help in the actual creation of the product of service. Some of the tasks include obtaining the raw materials, manufacturing the product or providing the service, packaging the product or service and storage of the product.
Taking care of the customers or Customer Service: This function will include all tasks related to interaction with customers. Some of the tasks include attending to the customers, taking orders from the customers, sales of the product or service, delivering the product or service to the customer and attending to the customer’s queries and problems.
Some of the high level support functions are:
Overall Management: This function entails the overall supervision of the business and is usually done by the business owner.
Marketing: This function includes tasks such as devising promotion and advertising strategies and interacting with the vendors and media for marketing related activities.
Managing Money or Finance: This function includes all tasks related to managing finances of the organization such as recording the income and expenses of the company, preparing bills and invoices, making required payments and paying taxes.
Managing people and other resources or Administration: This function includes all the tasks related to the general administration of the organization. Some of the tasks that come under this function are recruiting employees, management of employees and other resources and calculating salaries and wages.
To ensure that these operations are performed efficiently, you will have to decide who will perform these tasks, how many people are required to perform these tasks and how can you group or split these tasks. Usually in small organizations, many of these tasks are performed by the owners themselves with the assistance from a few different people, whereas in medium to large organizations, these functions are organized as different departments, with a large number of people working in each department. While grouping the tasks and deciding on the people to perform the tasks, it is important to consider the size of your organization and the budget allocated for the resources.
Some of the roles may have higher authority than the others.
Once you identify the tasks and assign them to different people, you will also have to think about the reporting structure; i.e. who will report to whom. Who will have a higher authority? What will be their titles or designation? Some of the roles may have higher authority than the others. For example, the principal of your school will have a higher authority than the teachers. The teachers report to the principal. You can organize the different designations and show the reporting structure using an Organizational Chart.
An organizational chart is a diagram that shows the structure of an organization, listing the people with designations and clearly showing the hierarchy and the reporting relationships. It gives a complete picture of the human resources of an organization at one glance.
Plan It
Create a multimedia presentation containing the following elements:
- Tables which show the responsibilities of various designations
- An Organizational Chart
Look at the following example. If your business idea is a service or has multiple products/services, refer to Appendix 26 for examples for these scenarios. The Task Distribution Table and Organizational Chart that you prepare should look different and reflect your unique business idea.

Organizational Structure Presentation Example
Think of the following questions, and discuss your ideas with your partner. It might be helpful to write your ideas on a sheet of paper.
- Using the data from the previous session (Operational Flow Chart), what are the various tasks of your core operations?
- What are the various tasks that you can list for your key support functions?
- How will you group these tasks? How many people will you need to do those tasks?
- Who will supervise these tasks? What would be the reporting relationships?
Do It
- Start the multimedia software, and open a new, blank presentation.
- Insert a title slide, and type the title of your presentation “Organizational Structure”. Then in the box below, type the name of your business.
- Insert a title and table slide. Click the title text box at the top of the slide. Type “Task Distribution Table” as the slide title. In the box below add a table with three columns and as many rows as the designations in your business that you decided with your partner during planning time.
- In the first column type “Designation/Number” as that column heading. Type “Tasks/Responsibilities” in the second column and “Reporting Structure” in the third column as column headings.
- In the empty cells below the first column heading, type the designations that will be assigned to the people who will fulfill the responsibilities in each department. Mention the number of people for each designation.
- In the empty cells below the second column heading type a few words or a sentence describing the tasks that have to be performed by the person(s).
- In the empty cells below the third column heading, type a few words describing who has to report to whom.
- If the text overflows in one slide, repeat steps 3-7 till all the information is accommodated.
- Change the look of the words in both the top title text box and the table.
- Change the appearance of information in your table.
- Insert a title and diagram or organizational chart slide. Click the title text box at the top of the slide. Type “Organizational Chart” as the slide title. In the box below, add an organizational chart. Fill in the boxes with the designations specified in your table in the previous slides. (NOTE: Start with the highest designation and accordingly fill in the designations specified in your table. The lowest row will contain those designations which do not have staff under them.) You can add as many boxes as the number of designations in your organization.
- To help the presentation flow smoothly from one slide to the next, add transitions between all of the slides.
- Return to Slide 1 and apply a standard or custom color scheme to change the color of the text and background of all your slides. (NOTE: If you are using OpenOffice.org Impress, access the Master Pages in the right Tasks pane and select from the Available for Use template options.)
- Double-click your Course folder on your desktop.
- Right-click inside the folder to display a shortcut menu. Point to New, and then click Folder. Rename the new folder as “organizational_structure”.
- Double-click the organizational_structure folder. Right-click inside the folder to display a shortcut menu. Point to New, and then click Folder.
- Rename the new folder as “session_14_ organizational_structure”.
- Save your work in the session_14_organizational_structure folder.
Review It
Look over your presentation. Make sure it has the following elements:
- A title slide that introduces the presentation.
- A slide with the tables outlining the people required, their designations, their responsibilities and the reporting details for your business operations.
- A slide with the diagrammatic representation of the organizational structure.
- Appropriate titles for each slide.
- The same color scheme and transition effect on all slides.
If any of these elements are missing, add them now. Also, you should refer to Appendix 3 – Digital Citizenship Checklist and review your work against the nine digital citizenship elements. Make any necessary or desired changes. Remember to save your work when you are finished.
Share It
Be prepared to discuss your answers to the following questions during sharing time:
- How did the operational flow chart help you identify the various tasks in your organization?
- How did you identify the number of people you require to run the operations?
- How did the organizational chart help you to organize the various designations in your organization and identify the reporting structure?
- In your organizational structure. What are the designations where decision making authority will be least and where it will be most?
- Why is it important to include an organizational chart as a part of your business plan?
Reflection Journal
Reflect on the activity that you just completed. Record your answers to the following questions in your Reflection Journal. Remember that your post may be read by others.
- What was the biggest challenge in creating an organizational structure presentation, and how did you overcome that challenge?
- Consider all the activities that you have completed so far in this course. In what way do you believe these activities might be useful to you in putting together a business plan for your business idea?
Sessions 15 - 16: Developing the Business Plan
As a part of this course, you have generated business ideas and chosen one business idea for which you have performed market research analyzes, and developed financial, marketing, operational and organizational plans. Now, you will use the end products from those activities to prepare a business plan presentation for your business idea.
A business plan is an outline which summarizes the goals of a business enterprise, background information about the enterprise, details about the product or service being offered, and the ways to achieve the business goals. It offers information on the business idea, the steps to implement the idea and set up the business.
A business plan is very helpful when you are setting up your business as it will help you go through the steps of setting up a business in an organized and efficient way. It is also of great use to investors and other stakeholders as it helps them to understand your business concept and the implementation of your idea. The components of a business plan typically are:
- Summary of the Business: A Business plan usually has a summary of business at the beginning of the presentation. This includes information such as the name of the business, industry, funding and reasons for starting the business.
- Business Description: After a brief summary of the business, it helps to talk about the business a little more in detail. This section can contain information such as description of your business, location, target market and business goals.
- Market Research: This section has information about the market research that has been done as part of the business planning. Research can include Surveys, Competitor Analysis, and SWOT Analysis.
- Marketing Strategy: This section will explain the marketing strategy for the business. Generally this section will include the information regarding the 4 Ps and any related topics such as marketing budget.
- Operational Plan: This section will provide information about the operational plan for the business. Typically this section will have the operational flow chart and associated explanations.
- Organizational Structure: This section will contain information about the organizational structure. The organizational chart and related information are included here.
- Financial Plan: This section will explain the financial plan for the business in detail. This section, generally, includes information about Startup costs, Sales Forecast, Budget and any other finance spreadsheet.
- Conclusion: You can include a few words about your next plan of action for your business idea in this section.
Beginning today and continuing through the next session, you will create a 15-minute presentation on the various components of your business plan using the end products of the activities that you have completed in the previous sessions.
Similar to the process you used to complete the activities in the earlier sessions, you will plan, do, review and share as you complete your business plan presentation. This Technology and Entrepreneurship course will conclude with a showcase, which will be a separate event after you complete these two sessions, when you will present your business plan to an audience that may include other students, family members, community leaders and invited guests. Presenting your business plan to an audience will help you gain a new point of view, as they may provide fresh inputs and suggestions about your business idea. You will also get to watch and listen to other teams’ presentations.
Plan It
Create a business plan presentation using the completed end products from all the previous sessions.
Look at the Business Plan Example given in this Session. Try to limit the presentation time to last no more than 15 minutes as it has to be presented to an audience. So, choose the information which you think is important and would like to share with the audience while you plan and create the presentation. The information that is most important for your business may be different from what you see in the example.


Business Plan Example
- Review the Business Plan Example and discuss the following questions with your partner. It might be helpful to write your ideas on a sheet of paper.
- What are the sections you will have in your business plan presentation? How do you plan to organize your business plan? From where will you get the required information for the slides? Consider the various activities that you completed and documents you prepared in the previous sessions and saved in folders corresponding to the business plan components. This will help you identify and organize the information that you need.
- Which of the activity end products that you have created will go into the business plan?
- Would you like to add a summary of your business in the business plan? If so? What points will you include in the summary? (NOTE: If you wish to include the funding information as given in the Business Plan Example, refer to Appendix 12- Sources of Funds and decide on how you will arrange the amount for your business.)
- What information do you want to include in the title slide of the presentation?
- Do you plan to have a Table of Contents that will show the various sections in your presentation?
- Do you require title slides for each section?
- How do you plan to include any spreadsheet and other documents in the presentation?
- Would you like to use your brand logo in your presentation?
Review your presentation plan. If any questions have not been answered, answer them now. Make any other desired changes as well.
Before you start working on your presentation, you must share your plan with a staff member who will want to hear your answers to the above questions. Be prepared for the staff member to ask you additional questions as well. You might even be directed to do more planning and to share your revised plan before approval is given.
Do It
Now that you and your partner have put together a plan and have received approval from a staff member, it is time to start creating your presentation. Remember that you have very limited time to create this presentation, so it is important to use your time wisely.
Remember the following suggestions:
- Create the slides as per your presentation plan. Look at the Business Plan Example to see how a presentation might look when completed.
- Go through each session folder and gather all the information you require. Determine which activities you want to include as is, which activities you want to summarize and any activities which you want to leave out. Once you have gathered and compiled all the information you require for your business plan, include appropriate title slides for each section. Feel free to add any other relevant detail that you consider important for your business plan to each of the sections. Make sure that your business plan presentation accurately and clearly explains your business idea.
- Make any changes to headings of the slides, include any additional elements or images and type any additional information, as required.
- Embed any associated documents to the slides.
- Add or check the links to the slides, as required. Ensure that the linked documents are in the same computer where your presentation will be made.
- Verify that the design of the slides, the colors, the fonts and other visual elements are uniform throughout the presentation.
- Add any animations and transitions that you wish to include in the presentation.
- Double-click your Course folder on your desktop.
- Right-click inside the folder to display a shortcut menu. Point to New, and then click Folder. Rename the new folder as “business_plan”.
- Double-click the business_plan folder. Right-click inside the folder to display a shortcut menu. Point to New, and then click Folder.
- Rename the new folder as “session_15-16_business_plan”.
- Save your work in the session_15_16_business_plan folder.
Review It
Now that you have completed your business plan presentation, you need to review your presentation and make any changes required. Look over your presentation and make sure it has the following elements:
- All the sections of the business plan as mentioned in the introduction to this session
- A title slide and appropriate section titles.
- All the animations and transition and links included in the presentation are working properly.
- Similar fonts, colors and visual elements in all the slides that make the presentation seem uniform and well put-together.
If any of these elements are missing, add them now. Also, you should refer to Appendix 3 – Digital Citizenship Checklist and review your work against the nine digital citizenship elements. Make any necessary or desired changes. Remember to save your work when you are finished.
It is highly recommended that you share your presentation with a staff member and make changes based on the feedback.
You also need to practice your presentation. The goal is to present all the information in 15 minutes or less. Make sure that you and your partner know which parts each of you are presenting.
- Practice your presentation from start to finish. Make sure that it can be completed in 15 minutes. If you feel that you have too much information, review your presentation and identify the key areas where you need to spend most of your time. Other slides can be explained quickly, in order to save time.
- Make sure that each of you speak slowly and clearly so that the audience understands you.
- Make sure your presentation and any associated links, transitions, animation and sounds work properly on the presentation computer.
- Role-play and pose questions to each other as the audience would and prepare your answers.
- Print any materials that you might require for the presentation.
Share It
On the day of the showcase, which will be announced by your staff member, you will present your business plan to a select audience. You will also get a chance to watch and listen to the presentation of your classmates.
Remember the following points during your presentation:
- When it is your turn, remember to speak slowly and make your points clearly so that the audience understands what you are saying.
- Go through the slides of your business plan and tell the audience about your business idea.
- When you are finished, allow members of the audience to ask questions.
- As other teams present their business plans, watch and listen quietly.
- Make note of things they have done similarly and things that they have done differently from your team.
- Pay attention to the different business ideas presented. Try to understand the business ideas and how you would have prepared the business plan for those ideas.
Reflection Journal
You have now reached the end of the course. Reflect on the course and record your answers to the following questions in your Reflection Journal.
- How did participating in the Technology and Entrepreneurship course benefit you?
- What technology skills did you learn through this course?
- How has the course developed an interest for entrepreneurship in you? How do you plan to further develop your entrepreneurial skills?
- If this presentation had to be made to potential investors, what changes would you make to the presentation? What additional information would you include?
Appendix 1: Qualities of an Entrepreneur
Enthusiasm: Entrepreneurs are enthusiastic about their business ideas and must believe in the product or service that is being sold.
Innovation and Creativity: Innovation is something new or different; creativity is thinking differently rather than the traditional way. Entrepreneurs must be innovative and creative and think differently to come up with solutions and ideas.
Commitment: Entrepreneurs must be committed to their business and determined to succeed even in the face of difficulties.
Courage: Entrepreneurs must show courage. They must be prepared to face big challenges and overcome obstacles.
Ability to Set Goals: Entrepreneurs must be able to set goals for the future and work towards achieving the goals.
Ability to Make Decisions: Entrepreneurs must know how to prioritize and make decisions quickly.
Flexibility/Openness to Change: Entrepreneurs must be open to change and new methods and must be able to adapt to different situations easily.
Independence and Initiative: Entrepreneurs must be able to think and work independently and take initiative. They should be ready to take control and take responsibility to be successful.
Leadership Skills: Entrepreneurs must possess good leadership skills. They should be able to lead and inspire people and recognize talent.
Hard Work and Determination: Entrepreneurs must never give up and should be prepared to work long hours. They should have a positive outlook about things and be determined to succeed.
Motivated and Energetic: Entrepreneurs must be energetic and be self-motivated. They should also be able to motivate the team and bring out the best.
Self-Confidence: Entrepreneurs must believe in themselves. Self-confidence inspires belief from others.
Drive to Succeed: Entrepreneurs must work to succeed. Even the occasional failure should be taken as an opportunity to learn and a stepping stone to success.
Taking Risks: Entrepreneurs must be able to take calculated risks and make sacrifices to succeed.
Appendix 2: Creating a Course Folder
Create a Course folder with subfolders where you will save any supporting material relating to entrepreneurship.
- Close the windows to any open programs and return to your desktop.
- Make certain that nothing on your desktop is selected (folders and programs are not highlighted).
- Using the right mouse button, click once in the middle of the desktop to display a shortcut menu. Note: Use the right mouse button (called “right-clicking”) for accessing shortcut menus. The rest of the time, use the left mouse button.
- On the shortcut menu, point to New, and then click Folder.
- A new folder appears on your desktop.
- Rename the folder by typing your first name followed by an underscore, and then your partner’s first name (for example, anushka_bimla). Press Enter. If the New Folder text is not selected, right-click the folder, and then click Rename. Note: This folder will be referred to as your Course folder throughout this course.
- Double-click your Course folder.
- Right-click inside the folder to display a shortcut menu. Point to New, and then click Folder.Rename the new folder as “support_documents”.
- Double-click the support_documents folder. Right-click inside the folder to display a shortcut menu. Point to New, and then click Folder. Rename the new folder as “session_1_research”.
- Save any supporting material relating to entrepreneurship in the session_1_research folder.
Appendix 3: Digital Citizenship Checklist
The nine digital citizenship elements that you learned about in Lesson 1 should guide your actions and behaviors whenever you use the computer and other forms of digital technology. As you work on the different activities during this Technology and Entrepreneurship program, use this checklist to make sure that all of your digital communication reflects all applicable digital citizenship elements. It is recommended that you write your answers on a separate sheet of paper.
- If your work reflects the digital citizenship element, circle Yes.
- If your work does not reflect the digital citizenship element, circle No. Then go back and make the necessary changes to your document.
- If a digital citizenship element is not relevant to a particular activity, circle N/A, which stands for Not Applicable. (For example, if you have completed an activity that does not contain any text, pictures, music, videos, or other content from another Website, you can circle both N/A in the Digital Law section.)
Element 1: Digital Access
Yes No N/A As partners, we take turns and share the computer so we both have equal access to digital technology.
Element 2: Digital Communication
Yes No N/A We understand that our digital communication is not private, and therefore, we have not written or included any other information that might upset or offend other people.
Element 3: Digital Etiquette
Yes No N/A We have been respectful and considerate in our use of digital technology to gather and share information with others.
Element 4: Digital Rights and Responsibilities
Yes No N/A Our digital communication is honest, and it contains information that is truthful or based in fact.
Yes No N/A Any information that we borrow and include in our digital communication comes from trustworthy Websites and other sources.
Yes No N/A We have mentioned all the sources from which we have borrowed information for our digital communication.
Element 5: Digital Health and Wellness
Yes No N/A While using the computer to conduct research and prepare our digital communication, we have engaged in behaviors that help us maintain our physical and emotional health. For example, we took breaks.
Element 6: Digital Security
Yes No N/A Our digital communication does not contain any personal information, including our full names, addresses, telephone numbers, dates of birth, Website usernames and passwords, credit card numbers, or bank account information.
Yes No N/A In preparing our digital communication, we have been sensitive to other people’s privacy and have not asked others to provide any personal information.
Element 7: Digital Literacy
Yes No N/A Our digital communication reflects appropriate use of digital technology.
Yes No N/A We have entered keywords to search for and find the information we need for our project.
Yes No N/A After doing some online research to learn more about the company and/or organization that published the Website (or Websites) where we found information that we used in our work, we have determined that the source is trustworthy and that the information is accurate and factual.
Element 8: Digital Commerce
Yes No N/A Any digital communication that will be used for business purposes is honest and factual. It does not contain information that is potentially misleading or confusing to customers.
Yes No N/A After doing some online research to learn more about the company that published the commercial Website (or Websites) that we accessed to complete our work, we have determined that the company is legitimate and trustworthy and that it is safe to enter personal information that is required to get the information or content that we need (such as entering a full name and e-mail address to register for a site).
Element 9: Digital Law
Yes No N/A Any text, pictures, music, videos, or other content used in our digital communication have been downloaded or copied legally. (NOTE: We may need to ask for permission, or perhaps even pay a fee, for any text, pictures, music, videos, or other Internet content that is used for business purposes or to make money.)
Yes No N/A We have provided the source, including the name of the Website and its URL, for any content that we have downloaded and used legally for limited use (both personal or educational).
Appendix 4: Create an Email Account
Have you ever needed an efficient way to communicate? One way of sending and receiving messages instantly is through the computer using electronic mail or ‘email’ as it is popularly known. Whether for business or personal use, you can use email to communicate instantly.
Look at the following example.
Email Message Example
To communicate with the help of the computer using email, you will need:
- An email address
- A password
- The email address of the person to whom you wish to send the email
- Internet connection
To use email, you need to first register for an email account on a Website that offers such a service.
Steps on How to Create an Email Account and send Emails
Select An Email Service
- Start the web browser.
- Click to place your cursor in the Address or Location bar. Type email.
- Press the Enter key on your keyboard. You will notice that a list of popular Websites offering free email services will appear.
- Click on a Website that interests you.
Note: If you are unable to decide which Website to select, you can take help from others you know who have already created their email accounts.
Note: To select a Website move your cursor over it. You will notice the cursor changes to a hand.
Create An Email Account
- Read the page and look for Sign Up or Create an Account. Then, click on it.
- You will be directed to the registration page which appears like a form.
- Fill in the registration details in the boxes, such as your: Name and Surname, Date of Birth, Country or Location, Gender, Postal Code NOTE: You will notice that some boxes have the drop-down menu which allows you to select one option from several choices. Just click on the down arrow and move your cursor to the option you would like to choose. When it is highlighted, click on it. Also, remember that while it is fine to provide personal information to create an email account or register for any other online account, the same details should not be shared freely elsewhere on the internet such as on business websites, discussion forums, and online communities.
- Type your desired email ID or login/username. NOTE: You can create your email ID or login/username as you wish. You can have your name, your birthday, favourite place or a combination of these as your email ID or login name. For e.g. name@example.com NOTE: An e-mail address has two parts. The username, that is, the name by which you choose to identify your account and the name of the e-mail service provider. For e.g. name@example.com is an e-mail address in which name is your email ID or username and example is the e-mail service provider. The symbol @ differentiates the user from the e-mail service provider. Look at the following examples: name@example.com, name.surname@example.com, birthday@example.com, favouriteplace_favouritenumber@example.com NOTE: You will notice that some boxes have the drop-down menu which allows you to select one option from several choices. Just click on the down arrow and move your cursor to the option you would like to choose. When it is highlighted, click on it.
- Click Check or Check Availability to see if the email ID or login/username you created is available. NOTE: Sometimes an email ID or username may already be taken, so it is important that the email ID you create is unique. If the e-mail address you typed already exists, the page provides four alternative e-mail addresses for you to choose from. You can either click one of the four e-mail addresses or type a new username.
- In the box below, type a password for your email ID. Type your password again. To protect your account and your privacy, do not share your password with anyone. NOTE: When you type the password, every character in the password will appear as dots. This is to prevent unauthorized users from viewing and misusing your password.
- Choose a question in the Security Question box. Or, if you wish, you can type your own question. Then, type an answer to your question. NOTE: You will notice that some boxes have the drop-down menu which allows you to choose one option from several choices. Just click on the down arrow and move your cursor to the option you would like to choose. When it is highlighted, click on it. This question, in combination with your answer, will be used by the Website to identify your account information and provide a new password in case you forget your current password.
- Type the characters you see in the box or picture.
- Click the ‘I Accept’ box to agree to follow the terms of service.
- Click Create My Account.
- Your email account is created and you are now registered to send and receive emails on that Website. NOTE: Some Websites will directly take you to your account. While for some, a welcome screen is displayed with your email account details. Click Continue.
- You will notice that you are directed to your email account.
Read and Compost (type) an email message
- Click Inbox. Then click on the welcome message to read it.
- To compose a new message, click New or Compose Mail. NOTE: Some Websites will have the drop-down menu which allows you to choose one option from several choices. Just click on the down arrow and select Email message.
- Click the ‘To’ box and type the email address of the person you wish to send your message. NOTE: If you want to include more than one address in the To box, type a semicolon after each address, for e.g., name@example.com; name_number@sample.com.
- If you wish to send a copy of your message to another person, type the e-mail address of that person in the ‘Cc’ box. NOTE: Cc stands for Carbon Copy.
- Type a short title of your message in the Subject box. NOTE: The Subject box usually contains a short title about your message, for example, “Hello” or “Greetings”.
- Click on the space below the Subject box. Type your message. NOTE: Keep in mind that your private messages can easily be forwarded to others, so be sure not to write anything that others might find offensive or upsetting.
Send Your Email
- Click Send to send your message.
Check New Email Message
- To check if you have received new messages in your inbox, click Inbox. NOTE: A list of email messages will be displayed in the Inbox. The messages in the list are organized in chronological order. The name of the sender, the subject, the date and the size of the message are listed along with the message.
- Click on a message to open it.
Delete Email Message
- To delete a message or several messages, click Inbox. Select the checkbox beside the messages you want to delete, and then click Delete. NOTE: After you delete an email message, a permanent record of the message is usually kept by the email provider. Therefore, you should always think before writing and sending an email message to anyone.
Reply To An Email Message
- To reply to a message, select the message. Then, click Reply. NOTE: Some Websites will have the drop-down menu which allows you to choose one option from several choices. Just click on the down arrow and move your cursor to the option you would like to choose. When it is highlighted, click on it.
- You will notice that you will be directed to the compose page. The sender’s email address and subject will already be filled in.
- Click on the space below the Subject box. Type your message.
- If you wish to attach a file to your email, see Attach a file to your email.
- If you wish to save the message as a draft, click Save Draft or Save Now.
- Click Send to send your message.
Sign Out Of Your Email Service
- Click Sign Out to exit your email service.
Sign In To Your Email Service With Your Email Account
- Now that you have registered with an email service provider, you can send and receive email messages using your own email account.
- To send an email using your email account, click to place your cursor in the Address or Location bar. Type the address of the Website where you have created your email account.
- Type your email address in the email ID or Username box.
- Type your password in Password box.
- Click Sign In.
- To compose an email, see Read and compose (type) an email message.
- To send an email with an attachment, see Attach a file to your email.
- To view messages in your Inbox, see Check new email message.
- To delete a message, see Delete email message.
- To reply to a message, see Reply to an email message.
- Click Sign Out to exit your email service.
Appendix 5: Bookmarking and Tagging Web Pages on Your Computer
A common feature of most Web browsers is the tool to ‘bookmark’ a Web page or a Website. By bookmarking a Website, you can access it without having to type the Website address each time you want to visit.
NOTE: The instructions given below are specific to bookmarking Websites locally, i.e., the Websites you have bookmarked on a particular computer can only be accessed on that computer. Bookmarked Websites will differ from computer to computer.
How to Bookmark a Web page on Your Computer
- Start the Web browser.
- Click to place your cursor in the Address or Location bar. Type the address, or URL, of the Website for which you would like the information. Press the Enter key on your keyboard or click the Go button. Then, wait as the Web page loads on your computer. NOTE: Make sure that you type the Website address correctly since a typing error may take you to a different Website that does not work.
- If you do not know the address or URL of a Website that you want to bookmark, you can click to place the cursor in the Search box. Then type a keyword (or keywords) that describe what you are looking for. Press the Enter key on your keyboard or click the Go button. Then, a list of relevant Websites will appear. Click the links to view the Websites and find one that you like.
- If you would like to visit this page or any Website again, you can bookmark it. NOTE: If you wish, you can store this Website in the default folder or you can choose to create a new folder to store your bookmarked Websites.
- If you are using Mozilla Firefox* , to store your bookmarked Website in a new folder, on your Bookmarks Toolbar, click Bookmarks | Bookmark This Page. Then, next to the Folder field, click Show all the bookmarked folders button to expand the menu. Click New Folder. Type the name that you want for your folder. To tag the Website, add the relevant words in the Tags field. Click Done.
- If you are using Internet Explorer*, to store your bookmarked Website in a new folder, on your Favorites Toolbar, click Favorites | Add to Favorites. Then, click New Folder. Type the name that you want for your folder. Click Create. Then, click Add.
- Follow steps 5 or 6, depending on your Web browser to add more bookmarks and/or tag them.
- Click the Close button at the top-right corner of the browser window to exit.
NOTE: If you are using Mozilla Firefox*:
- To quickly search for the Website that you have tagged on your computer, click Bookmarks Recent Tags. Select the Website from the tag list.
- To tag or organize already bookmarked Websites click Bookmarks | Bookmark This Page. Then, below the Folder field, tag your Website by adding words in the Tags field. Click Done.
Appendix 6: Bookmarking and Tagging Web Pages on a Social Bookmarking Website
Social bookmarking Websites allow you to save and annotate Websites you want to find later, and also make it easy to share and "tag" Websites with keywords. These tags are used to categorize and organize your favorite Websites; then other users can take these bookmarks and add them to their own collection. A social bookmarking site is also like a search engine, except that it only searches entries on its database that other people have recommended (or tagged).
Online bookmarking sites are very similar to the favorites or bookmarks you keep on your computer, except that you can access them from any Internet-connected computer. You can usually import your current computer-based favorites so you can access them online.
Important Notes:
- The instructions given below are specific to a social bookmarking site and may differ from other social bookmarking sites. The site below is a suggested site only. You or the staff member may select another bookmarking site to use for this activity.
- To access the bookmarking site suggested below, you will need to register for the site. To register for this or any social networking site, you may need to first set up an active email account. Please consult with the staff member on how to set up an email account. (Refer to Appendix 4– Create an Email Account). However, before you set up an email account or register for a social bookmarking site or any other external Website, you must become familiar with some basic rules regarding Digital Citizenship (Refer to the nine elements of digital citizenship on page 16 and to Appendix 3 – Digital Citizenship Checklist). Please make sure that the staff member reviews basic rules of Digital Citizenship before registering on any Website.
How to Bookmark a Webpage or Website on a Social Bookmarking Website
- Start the Web browser.
- Click to place your cursor in the Address or Location bar. Type http://www.diigo.com/. NOTE: Make sure that you type the Website address correctly since a typing error may take you to a different Website that does not work.
- Press the Enter key on your keyboard or click the Go button. Then, wait as the Web page loads on your computer.
- Click Join Diigo to create your account.
- Type your desired Username in the Username box.
- Fill in the registration details in the boxes, such as your: Name and Surname (NOTE: It is strongly recommended that you do NOT use your real name. Please use a name that you will remember, but that is different than your real name. While it is it is fine to provide personal information to register for an online account, the same details should not be shared freely elsewhere on the internet such as on business websites, discussion forums, and online communities.) Email
- In the box below, type a password. Type your password again. To protect your privacy and account security, do not share your password with anyone. NOTE: When you type the password, every character in the password will appear as dots. This is to prevent unauthorized users from viewing and misusing your password.
- Type the characters you see in the box.
- Click Continue.
- You will be directed to a page to set up your profile. Fill in the basic information in the boxes. Then click Save and continue. Or, you can click Skip and fill in the details later.
- You will be directed to a page to find and add your friends who are using the same site. Fill in the required information in the boxes. Then click Find your Friends. Or, you can click Skip and fill in the boxes later.
- Click Sign In. Type in your username and password to sign into your account. NOTE: You will be sent an email to activate your account. Access your email and click on the link in the message where it directs you to activate your Diigo* account. Once you click the link to activate your account, you will be directed to a page to install the Diigo toolbar. As you will be working on a common computer, it is advised that you do not install the toolbar and skip this page.
- Once you have signed in to your Diigo account, click on My Library.
- When you sign in for the first time, you will not have any saved bookmarks, you can add bookmarks or import bookmarks directly from your browser that you had saved earlier on your computer. To import bookmarks view instructions below.
- To directly add a bookmark by click the Tools link located at the top right of the page. Right- click Post to Diigo and select Add to Favorites.
- Go to the Website you want to bookmark. In your browser toolbar, click Favorites | Post to diigo. You will be directed to Add New Bookmark page. By default, the URL, Title and Description of the Website will be automatically filled in. You can choose to edit these fields as you wish. Type in the tag words in the Tags field box. Select your privacy settings from the Privacy drop down box. Click Add New Bookmark.
- You will be directed to the Website you bookmarked. Just click the Back button on your browser toolbar to go to your Diigo page.
- Click the Close button at the top-right corner of the browser window to exit.
To import bookmarks using Mozilla Firefox
- Click the Tools link located at the top right of the page. Then click Import Bookmarks from the list.
- From your browser toolbar, click Bookmarks | Organize Bookmarks. A Library window will pop-up.
- Click Import and Backup. Then, click Export HTML and save the file to a location on your computer. Close the pop-up window.
- Select the exported file by following the instructions given on the Web page. Type Tags in the field box provided. Select your privacy settings. Click Import Now.
- Or, you can directly add a bookmark by typing or copy-pasting the Website address in the box below Add a bookmark in the My Library page. Then, click Add.
- You will be directed to Add New Bookmark page. By default, the URL, Title and Description of the Website will be automatically filled in. You can choose to edit these fields as you wish. Type in the tag words in the Tags field box. Select your privacy settings from the Privacy drop down box. Click Add New Bookmark.
- You may be directed to the Website you bookmarked. Just click the Back button on your browser toolbar to go to your Diigo page.
To import bookmarks using Internet Explorer
- Click the Tools link located at the top right of the page.
- From your browser toolbar click File | Import and Export. A wizard window will pop-up. Click Next.
- Select Export Favorites. Then, click Next.
- Select the folder you want exported and then click Next.
- Export the file to a location on your computer. Click Next. Then, click Finish and click OK.
- Select the exported file by following the instructions given on the Web page. Type tags in the field box provided. Select your privacy settings. Click Import Now.
To add and edit tags for already bookmarked Websites, do the following:
- Go to My Library.
- Go to the bookmarked Website you want to edit.
- Click Edit.
- Make necessary edits in the boxes provided.
- Click Save.
Appendix 7: Create Your Reflection Journal
Option A - Create and save your Reflection Journal
- Double-click your Course folder on your desktop.
- Right-click inside the folder to display a shortcut menu. Point to New, and then click Folder. Rename the new folder as “reflection_journal”.
- Double-click the reflection_journal folder.
- Start the word processing software, and open a new, blank document.
- Save the document as <your name>_reflection_journal.
- Open this document every time you have to write your reflection journal entries
- Remember to save your work once you are finished.
Option B - How to Post a Blog
This appendix includes the steps and suggestions for registering in a blogging site and posting blogs for the Learn Technology and Entrepreneurship Course for your own personal journal. These instructions apply to the blog site, www.blogger.com.
Important Notes:
- The instructions given below are specific to a blog site and may differ from other blog sites. The site below is a suggested site only. You or the staff member may select another blog site to use for this activity.
- To access the blog site suggested below, you will need to register for the site. To register for this or any external site, you may need to first set up an active email account. Please consult with the staff member on how to set up an email account. (Refer to Appendix 4– Create an Email Account). However, before you set up an email account or register for a blog site or any other external Website, you must become familiar with some basic rules regarding Digital Citizenship. Please make sure that the staff member reviews the nine elements of digital citizenship before registering on any Website (Refer to the Digital Citizenship activity on page 16 and Appendix 3 – Digital Citizenship Checklist).
- When you set up your blog site, be sure to make it available only to other learners and the staff member for this course. Do not give permission to others to view or comment on the site created for this course.
Select a Blog Site
- Start the Web browser.
- Click to place your cursor in the Address or Location bar. Type https://www.blogger.com/start. NOTE: Make sure that you type the Website address correctly since a typing error may take you to a different Website that does not work.
- Press the Enter key on your keyboard or click the Go button. Then, wait as the Web page loads on your computer.
Register for a Blog Account
- If you already have a Google account, sign in by typing your Username and Password. Click SIGN IN. Proceed to step 5.
- If you don’t already have a Google account, click CREATE A BLOG.
- You will be directed to the registration page which looks like a form. Type your email address in the box provided. Retype your email address in the box below. NOTE: You can use any email address to sign up for a Google account.
- Type your password in the box provided. Retype your password in the box below. To protect your privacy and account security, do not share your password with anyone.
- Type a display name that you would like for your blog post.
- You may be asked to verify some random letters on the screen. Type the letters you see in the box.
- Click to place a checkmark next to the I accept the Terms of Service box to agree to the terms.
- Click CONTINUE.
- Type a title for your blog and an address.
- Click Check Availability to see if the blog address you created is available. NOTE: Sometimes a blog address may already be taken, so it is important that the blog address you create is unique. If the blog address you typed already exists, the page provides alternative blog addresses for you to choose from. You can either click one of the addresses or type a new blog address.
- Click CONTINUE.
- Choose a template from the library by clicking the circle next to the name of the template. Then, click CONTINUE. NOTE: You can change the template later if you wish.
- Your blog is created.
Post a Blog
- Click START BLOGGING.
- Use the text editor to create posts for your blog. You can type as much as you want. Remember that your blog postings are not private and can be read by others. Any information you post should be factual and honest. Also, be sure not to write anything that might offend or upset others, or that might embarrass yourself.
- You can change the look of your words, the alignment, or even the color of your text by using the toolbar above the text box. You can even add an image, video or a link to your text.
- Click PUBLISH POST to post your blog entry.
- Click the View Blog link to view the blog you just posted.
- Your blog is ready for viewing.
- If you wish to edit the blog post you just created, click the icon that looks like a pencil.
- If you wish to add a new post, click the New Post link. These links can be found on the top right corner of your home page or in the edit page.
- Click Sign Out to exit your blog site.
- Now that you have a blog account, just sign in to your blog site with your account details to add or update your blog posts.
Security Settings for Viewing Your Blog
- Sign in to your blog site with your account details.
- You will land on your Dashboard page. Click Settings.
- In the Settings tab, click Permissions.
- In the Permissions page, select the option Only people I choose. (NOTE: Even if you choose this option, the information on your blog may be copied and pasted to other people’s blogs, so always be careful about what you write.
- In the Invite some people to read your blog box, type the email addresses of the other learners and your facilitator for this course and proceed to step 11.
- Or, if you already have the email addresses of the other learners and your facilitator for this course, on your contacts list in your Gmail account, click Choose from contacts.
- Click the email addresses to select the other learners and your facilitator for this course that you want, to read your blog.
- If you wish to save this list as a group, click Save as Group….
- Type a name you would like for your group. Then, click OK.
- Click Done.
- Then, click Invite.
- The email addresses you selected will be added to your Blog Readers list. If you have missed out adding any email addresses of the learners. Click Add Readers.
- Repeat steps 5 – 11.
Security Settings for Posting Comments to Your Blog
- Sign in to your blog site with your account details.
- You will land on your Dashboard page. Click Settings.
- In the Settings tab, click Comments.
- Select Users with Google Accounts from the Who Can Comment list.
- Select Always from the Comment Moderation list.
- Click Save Settings.
- To view and comment on other learners’ blogs, you need to accept the invitation sent by them.
To Accept an Invitation
- Login to your email account, and open the invitation email.
- Click on the link provided in the email. This will take you to the Blog invitation page.
- Login with your details and click ACCEPT INVITATION.
- Click View Blog to view and add comments to the blog.
- For other questions, visit the help section at blogger.com: http://www.google.com/support/blogger/
Appendix 8: Common Reasons for Becoming an Entrepreneur
- It will give me personal satisfaction.
- I have always wanted to do this.
- I want to be my own boss, and like to do things my own way.
- I want to do something different.
- I want to be innovative and creative.
- I want to be a pioneer and start something new.
- I like the challenge it provides.
- I want to give back to the society.
- I want to change the way things are done.
- I want to pass on my vision/wealth to the next generation.
- I am inspired by people who have done it before.
- I want to achieve something great.
- It gives me independence and freedom.
- It gives scope for innovation and creativity.
- I can take a take a long term view of things.
- I have a lot of great ideas and I want to implement them.
- I want to be an inspiration and example to others.
- I enjoy being a leader.
Appendix 9: How to Create a Mind Map Online
This document includes the steps and suggestions for registering in an online productivity suite and posting content for the Learn Technology and Entrepreneurship Course. These instructions apply to the site, www.mywebspiration.com/
Important Notes:
- The instructions given below are specific to an online collaborative site and may differ from other sites. The site below is a suggested site only. You or the staff member may select another site to use for this activity.
- To access the site suggested below, you will need to register for the site. To register for this or any external site, you may need to first set up an active email account. Please consult with the staff member on how to set up an email account. (Refer to Appendix 4– Create an Email Account). However, before you set up an email account or register for a site or any other external website, you must become familiar with some basic rules regarding Digital Citizenship (Refer to the nine Digital Citizenship elements on page 16 and to Appendix 3– Digital Citizenship Checklist). Make sure that your course facilitator reviews basic rules of Internet Safety before registering on any website.
- When you register for this site, be sure to make it available only to other learners and the staff member for this course. Do not give permission to others to view or comment on the site created for this course.
Select an online collaborative site
- Start the web browser.
- Click to place your cursor in the Address or Location bar. Type http://www.mywebspiration.com/. NOTE: Make sure that you type the Website address correctly since a typing error may take you to a different website that does not work.
- Press the Enter key on your keyboard or click the Go button. Then, wait as the Web page loads on your computer.
Register for a Mywebspiration Account
- Click SIGN UP.
- Think of a username and type it in the Username box.
- Type your email address in the Email address box.
- Type a password in the Password box. To protect your personal privacy and account security, do not share your password with anyone.
- Retype your password in box below to confirm.
- Fill in the registration details in the boxes, such as your: Name and Surname, Age, Postal or Pin Code. NOTE: You will notice that some boxes have the drop-down menu which allows you to select one option from several choices. Just click on the down arrow and move your cursor to the option you would like to choose. When it is highlighted, click on it. Also, remember that while it is fine to provide personal information to register for an online account, the same details should not be shared freely elsewhere on the internet such as on business websites, discussion forums, and online communities.
- Click to place a checkmark next to the Terms of Use box to agree to the terms.
- Click Sign Up.
- Your account has been created. NOTE: Once your account is created, you will receive an email notification with details of your account information.
Create a New Diagram
- Click LAUNCH WEBSPIRATION.
- Click Diagram.
- In the Name box, type a title for your diagram. Add tag words in the Tags box. Then, click Save
- Your new diagram is created. You will notice a symbol with your document name is automatically created in the workspace.
Create your mind map
- Use the Symbols Palette to select a text box.
- Hold the left mouse button and drag the text box on your workspace.
- Inside this text box type a title for your mind map. You can change the look of your words, or size, or even the color of your text by using the toolbar located at the bottom of the page.
- Click the oval shape that is already present on your workspace. Select the text and type “Business Ideas” to indicate the central topic of the mind map.
- Select the rectangle shape from the Symbols palette. (See Appendix 15 for basic flowchart shapes.)
- Hold the left mouse button and drag the rectangle shape below the oval shape on your workspace.
- Inside this rectangle, type a word or few words that describe a source for generating a business idea you decided with your partner during planning time. Make the shape bigger or smaller. Click one of the square-shaped connection points, hold your left mouse button and drag it outward or inward. You can change the look of your words, or size, or even the color of your text by using the toolbar located at the bottom of the page.
- Draw a line connecting this source box to the central topic box. To connect the two shapes, select the shape where you want the link to begin. Then, click one of the diamond-shaped connection points, hold your left mouse button and drag it to the connection point of the other shape.
- Click the connector to change the arrow style. Then, click the Arrow Direction tool located at the bottom of the page. Select No Arrows.
- Next to this box where you typed the source for a business idea, draw another rectangle. Then, type a keyword or keywords in the rectangle that associate with the source you typed in earlier. Draw as many rectangles as the number of keywords you associate with this source. Make the boxes bigger or smaller as needed. Branch out the boxes by drawing and connecting lines to the source box.
- Next, you will show the possible business ideas that are generated from the keywords listed. Draw a rectangle and inside this, type the business idea that you had decided with your partner during planning time. Draw as many rectangles as the number of business ideas that can be generated from the keywords listed earlier. Branch out these rectangles with the shapes that you drew in step 10 by drawing and connecting lines.
- Make the boxes bigger or smaller as needed. You can also change the look of words inside the boxes. Move the shapes as you think fit.
- Use the toolbar located at the bottom of the page, or the Effect tool, to add color to the boxes and lines. Maintain the same color for each of the main topics and its branches. You may want to choose a lighter or darker color shade for the boxes as they branch out.
- To make your presentation more attractive, add pictures next to the boxes to represent your ideas. Scroll through the Symbols Palette library to select and add the pictures. Or, click Edit | Insert Graphic | From File on the toolbar to select a picture from your computer. Make sure you resize and move each picture as needed.
- Repeat steps 7 – 14 for the remaining sources, keywords and business ideas that you had identified and listed while planning with your partner. (NOTE: You can draw or copy and paste the shapes and lines around the empty space on the workspace. If you choose to copy and paste the shapes, use the Copy and Paste options tool . Select the existing text in the boxes and replace with new information.)
- Take a screenshot of the mind map. Save the picture for use in an electronic presentation. Then, exit the graphics paint software.
- Double-click your Course folder on your desktop. Locate the folder “marketing_research”.
- Double-click the marketing_research folder. Locate the folder “session_2_ generating_business_ideas”.
- Save the image in the session_2_generating_business_ideas folder.
- Click Document | Close to close the document.
- Or, click Document | Quit to exit the panel.
- To update your documents, Click LAUNCH WEBSPIRATION. Then, click Recently Opened and select the document you want to edit.
- Now that you have an account, just sign in to the site with your account details.
Appendix 10: Description of Costs
Every business is different, and has different types of expenses. Some very small businesses, particularly those that do not need to operate with a facility like an office or storefront, or hire employees, may have only a few of the expenses listed below. On the other hand, those that do need a facility like an office or a storefront, or which need equipment or employees, may need to invest in most of the expenses listed below in order to start the business. Below are typical types of expenses for many new businesses. For the business you want to create, consider which of the types of expenses below you might need to incur to start your business.
Initial costs/One-time costs: These are costs that are incurred when you start your business and are not a part of repeated spending. Areas which involve initial costs include the following:
- Furniture: If you need an office or have a place for customers, you are also likely to need furniture for your business office. It is bought for continued use and not for resale; for example, desks and chairs, chest of drawers and so on. You may also acquire furniture on rent as an alternative to purchasing.
- Equipment: Generally, many businesses will need office equipment such as computers and printers, as well as communication equipment such as telephone and fax machine. Also, you should consider the equipment and machinery you will need to run your special type of business. For example, if you are making a product, you will need the types of machinery and tools that are needed to carry out manufacturing, trading or production activities. If you are opening a restaurant, you will need equipment for cooking. If you are operating a delivery service, you will need a bicycle or a vehicle to get around and make deliveries.
- Land and Building: Some businesses will need a place or facility to conduct their business. Entrepreneurs must either take office premises on rent or buy their own property. If you buy property, your own premises, you will have to spend a lump-sum amount from your funds or arrange for mortgage, whereas if you use somebody else’s premises you will have to pay rent to that person. NOTE: If furniture, equipment and/or property are acquired on rent, it will become an ongoing expense which is explained later in the document. Similarly if a property is purchased on a mortgage loan, it will become an ongoing expense.
- Cash in Hand: This is the minimum amount that you need to have to run the business operations until you start generating revenue from your sales. Although this is not an expense, this has to be included in the startup costs as this amount is required to start the business. This is estimated taking into consideration your expenses and your expected earnings.
Ongoing/Recurring costs: In most business, these costs have to be incurred regularly every month in order to perform the relevant business operations. Areas which involve ongoing costs are:
- Utilities: Utilities refers to water, electricity and gas. These are required for operating any business that uses a facility, and payments for these services are made on a monthly basis.
- Rent/Mortgage Payments: Rent refers to the periodic payment made for the use of furniture, equipment or office premises. Generally, it is paid on a monthly basis. A business has to spend on rental payments if these items are not bought by paying the required amount. Similarly, if a property is purchased on a mortgage loan, periodic payments have to be made for the repayment of the loan.
- Salaries: Salaries are the payments made to the managers and workers who perform business activities. Generally, employees are paid every month for the services they render to your business.
- Raw Materials: Raw materials refer to the inputs used for making a product; for example, in a restaurant the ingredients that go into making a food item are the raw materials. A furniture manufacturer would use wood as raw material to make his products. Raw material costs are dependent on the production and sales of your products or services and are therefore a variable cost.
- Insurance: In many locations, it is a government requirement that Insurance policies are taken to ensure that business does not go through a financial loss because of the destruction of property such as furniture, equipment, land and building in case of an unexpected happening such as a fire or theft. The premium payment on these policies involves repeated spending.
- Advertising: These refer to the costs that are incurred to generate awareness of a business and its products or services; for example, placing an announcement of your Opening day in the newspapers. Every business has to spend money to attract customers and keep itself ahead of competitors.
- Miscellaneous Expenses: These refer to all the areas where money is spent to conduct business which are not covered by the other terms used to refer to costs; for example, costs incurred on transportation of goods from one place to another and on proper storage and packaging of goods to keep them safe and well preserved. NOTE: There are certain costs that will differ from one business idea to another. One such cost is the Raw Materials cost. If the business idea involves making products such a candle then there is a need to spend on raw materials such as wax. On the other hand, if the business idea involves providing a service such as tutoring, then there will not be any costs on raw materials. Similarly, if the business idea is to buy a product from the manufacturer and sell it to the customer there will be no cost on raw material. However, in this case, the cost that is incurred will be the cost of buying the product from the manufacturer. For example, for selling pencils in your shop you will have to incur the costs of buying pencils from the manufacturer.
Appendix 11: Estimating Costs
Research plays an important role for estimating your startup costs. While you will be using guess estimates or estimates based on approximations for your exercise on startup costs, in a real-life scenario, you will have to do proper research before you decide on the startup costs.
- Equipment, Furniture, Decoration etc: Research various vendors and distributors and get their price lists. Find out if they will offer any discounts for bulk purchases.
- Property Costs: Look around the locality in which you want to set up the office, and ask for the rental prices and property prices in such localities. Make a rough estimate based on your research.
- Utilities: These are fixed costs that will depend on your location. Find out if the rent includes utilities costs. Estimate based on your requirement.
- Salaries: Do you have a rough guess about how many employees you may need? You will be doing a proper organizational chart later in the course. Based on your count of how many employees you require, estimate the salaries. You should be aware of how much the competitors and the market is paying for similar people. Do not forget to include a salary for yourself.
- Insurance: This will be provided by insurance companies. Talk to different insurance companies and find out what the insurance costs will be. Choose the best offer.
- Advertising: While estimating this cost, you will not only have to consider how much you will be spending on the actual promotion, but also how much you will be paying the advertising agencies. Consider the promotional methods you want to use and research the costs for those methods. Other expenses include printing costs for your promotional material.
- Raw Materials and Miscellaneous Expenses: Costs such as raw materials, transportation and some other miscellaneous expenses recur every month. Talk to different vendors, get their price lists, compare, and enquire about their deals and offers. Negotiate and renegotiate for a long term relationship.
Appendix 12: Sources of Funds
Every business needs to arrange for required funds before it can start operating. Funds are needed to buy equipment, raw material as well as for the day to day operations of the business. Many entrepreneurs face the dilemma of identifying the various sources of finance and choosing the right source because their personal savings may not be enough for their needs. Some of the most common sources of finance for any business include:
- Bank Loans: Most entrepreneurs may find that their personal savings are not sufficient to start and operate a business. In such a case, they apply for a Bank loan. The duration of these loans varies from short term to long term. Interest has to be paid on the money borrowed.
- Personal Savings: Sometimes, entrepreneurs may invest their own money in the business. However, personal savings are usually limited and may be insufficient to satisfy all the financial needs of the business.
- Venture Capital: There are groups of individuals or companies in the market that study business proposals and decide to fund them if the proposal is attractive. They are called Venture Capitalists. They analyze a business plan to evaluate whether the business will be profitable. If the entrepreneur has a well prepared business plan, the investor or venture capitalist will arrange for the required funds. Most venture capitalists look for high profits and are even willing to provide guidance for the success of the business.
- Loans from friends and family: Entrepreneurs may also arrange for funds by borrowing money from their friends and family. This is an easier way to raise money as the interest on such a loan may be low or not required, as compared to a bank loan.
Appendix 13: Advertising and Promotion Methods
Knowing what methods are available for promotion helps you decide on the best mix of promotion for your product or service. Some things to consider while choosing your promotion mix (different methods of promotion) are the relevance of the promotional method for your product or service, the reach of the promotional medium, the cost for the promotion and how it will help you achieve your business goals. Following is a list of the most common types of promotion methods.
Offline Marketing: This method of marketing involves advertising and promotion through more traditional media such as newspapers, radio and television:
- Print Advertising: Print advertising includes newspapers and magazines. You can use this type of advertising to target a particular market based on who reads the newspaper or magazine. For example, if you are in the food business, you can advertise in a cookery magazine which will reach the desired target market. You can also limit the advertisement to the region. For example, if you want to target the audience in region X, you can publish your advertisement only in the newspapers which are circulated in that region.
- Television and Radio Advertising: These are advertisements that are aired on television and radio. Today, there are various channels on both radio and TV that you can choose to reach your target market. These advertisements reach a wide audience, but they are comparatively more expensive than the other forms of advertising.
- Flyers and/or Brochures: A very low-tech and low-cost way to advertise is to produce and distribute flyers or brochures about your business. These can be distributed in places where potential customers are likely to see them, including at their homes, places of work or posted in public places such as community kiosks. This would be very appropriate for a small business operating on a small budget, or a new business in a community where many of the potential customers live and work in an area in close proximity to the business.
- Point of Sale Display (POP/POS): POS is a form of promotion that that is found near, on, or next to the point of purchase, such as the billing counter, a restaurant table, a ticket counter. They are intended to draw the customers' attention to products or services and any offers that you may have on them. A best example of POS is a display stand placed at the billing counter.
- Outdoor Advertising: Outdoor advertising is also called out-of-home advertising. As the name implies, it is advertising which is usually used to target customers in locations outside of homes. Examples of outdoor advertising are hoardings or billboards, kiosks and advertisements on buses.
- Direct Mail: In this form of promotion, brochures and flyers related to the products or services are sent through the mail to the target market, and usually have a message which will prompt the customer to take an action which will generate sales. To use direct mail as a promotional method, you need to have a database of the target market with their address lists. A new form of direct mail is email marketing, where the promotional material is sent to the customer’s email address instead of the postal address.
- Public Relations: Public relations is communications often in the form of news distributed in a non-personal form in media which may include newspaper, magazine, radio, television, Internet or other form of media for publication. Such communication may consist of a variety of activities or events where your business has participated. These activities are published with the intention of creating a positive image for the business and the product or service. Public relations activities may include establishing a visible presence at trade shows and other public or private events. It may also include the preparation and distribution of press releases, which are newsworthy articles, intended to be published in the media for the purpose of showcasing the activities of the business to the public.
- Sales Promotion: This form of promotion can be used seasonally. Sales promotions are short term incentives, which encourage buying of products or services, such as seasonal discount offers, gift coupons and so forth.
- Other Methods: Other than these, the business can also participate in events such as trade shows, fests, exhibitions, etc, to promote its product or service.
Online Marketing: This form of marketing involves marketing through the Internet. Online marketing has opened up incredible avenues for businesses. There are numerous online methods to reach prospective customers, which are really affordable and will fetch results. Some of the online promotion methods include:
- Business Website: Irrespective of whether your business is on an online venture or a traditional business set-up, it helps to have an online identity. The business Website should not only have information about your business and product or service, but you should also use this space to promote your business.
- Banner Advertisements: These are graphic advertisements, which can also be video advertisements that are placed on relevant Websites. These Websites will link to the business Website, when a visitor clicks on the banner advertisement, thereby creating recognition for your business and also getting traffic to your Website.
- Pay-Per-Click Advertisements or Search Engine Marketing: This form of Internet marketing promotes the product or service offered or the Website by increasing its visibility on search engines such as Google and Yahoo*. By paying these search engines, businesses can make their pay-per-click advertisements appear on the search engine page when the relevant keywords are searched. For example, if a customer searches for restaurant or world cuisine, Yummy World may appear not only in the search results, but also as an advertisement in the sidebar.
- Search Engine Optimization: This is non-paid form of Internet marketing where using various methods, the businesses ensure that the Website turns up in the top search results when relevant keywords are searched in a search engine such as Google or Yahoo. One of the key factors to ensure that your Website shows up in the web results is to include the keywords that your prospective customers may use to search for products or services similar to yours, while writing descriptions in your business Website.
- Email Marketing: As described earlier, email marketing is a form of online direct mail method. Your business advertisements and promotional offers are sent out to email addresses of potential customers.
- Affiliate Marketing: In this form of Internet promotion, the business allows other Websites to have links to their Website. These other Websites are called affiliates. Affiliates are paid whenever a customer visits your Website through the affiliate’s Website. This form of promotion is more useful for online businesses.
- Social Media: Other than the above methods described, there are several other innovative methods of Internet marketing. Some of the examples include having a presence on the social media Websites, blogs, wikis, providing bookmark links, providing subscription feeds and so forth.
Appendix 14: Basic FlowChart Shapes
Terminator
This shape tells you where the flowchart begins and ends. You need to enter the words to show the entry and exit points of the flow chart. For example, you can enter “Start” or “Begin” to show the start of the flowchart and “End” or “Exit” to show the end of the flow chart.
Connectors

The connectors show the sequence of the flow chart. These are lines with an arrow at one end. Flow charts are usually drawn top to bottom or from left to right.
Process or Rectangle
A rectangle is the most common shape in the flow chart. It is used to show a process, task, action or operation.. The text in the rectangle almost always includes a verb, for example, “Take order” “Give invoice” “Make payment”.
Decision Box

To indicate a decision, a trapezium is used in the flow chart. A decision is usually shown with a question and the flow chart shows which sequence to follow based on the answer to the question. In the example below, if your answer is “yes”, you follow the sequence to the right and if your answer is “no” you follow the sequence below.

Appendix 15: How to Create an Operational Flow Chart Online
This document includes the steps and suggestions for registering in an online productivity suite and posting content for the Learn Technology and Entrepreneurship Course. These instructions apply to the site, www.mywebspiration.com/.
Important Notes:
- The instructions given below are specific to an online collaborative site and may differ from other sites. The site below is a suggested site only. You or the staff member may select another site to use for this activity.
- To access the site suggested below, you will need to register for the site. To register for this or any external site, you may need to first set up an active email account. Please consult with the staff member on how to set up an email account. (Refer to Appendix 4 – Create an Email Account). However, before you set up an email account or register for a site or any other external website, you must become familiar with some basic rules regarding Digital Citizenship. (Refer to the nine elements of Digital Citizenship on page 16 and to Appendix 3 – Digital Citizenship Checklist). Make sure that your course facilitator reviews basic rules of Digital Citizenship before registering on any website.
- When you register for this site, be sure to make it available only to other learners and the staff member for this course. Do not give permission to others to view or comment on the site created for this course.
For directions on how to set up a webspiration account, see Appendix 9
Create a New Diagram
- Launch Webspiration
- Click Diagram.
- In the Name box, type a title for your diagram. Add tag words in the Tags box. Then, click Save.
- Your new diagram is created. You will notice a symbol with your document name is automatically created in the workspace.
Create your operational flowchart
- Use the Symbols Palette to select a text box.
- Hold the left mouse button and drag the text box on your workspace.
- Inside this text box type a title for your flow chart. You can change the look of your words, or size, or even the colour of your text by using the toolbar located at the bottom of the page.
- Click the oval shape that is already present on your workspace. Select the text and type ‘Start’ to indicate the starting point of the operational flow chart process.
- Select the rectangle shape from the Symbols palette. (See Appendix 15 for basic flowchart shapes.)
- Hold the left mouse button and drag the rectangle shape below the oval shape on your workspace.
- Inside this rectangle, type words to describe a process, task, action or operation as the first step to get your product or service ready for the customer. Make the shape bigger or smaller. Click one of the square-shaped connection points, hold your left mouse button and drag it outward or inward. You can change the look of your words, or size, or even the color of your text by using the toolbar located at the bottom of the page
- To connect the two shapes, select the shape where you want the link to begin. Then, click one of the diamond-shaped connection points, hold your left mouse button and drag it to the connection point of the other shape.
- Notice that the two shapes are now connected.
- Continue adding individual steps as rectangles connected by one-way arrows, till the product or service is delivered.
- From the information you decided on with your partner during planning time, when your operational process reaches a decision point; add a diamond shape or decision box. (See Appendix 15 for basic flowchart shapes.)
- To add a diamond shape or decision box, click the down arrow next to the Symbol Library name to view the Symbols Library menu.
- Go to Thinking-Planning and pick Flowchart 1.
- Or, you can also scroll through the arrows at the bottom of the Symbols Palette.
- Inside this shape, type the decision in the form of a question.
- Answer the question by drawing two paths emerging out of the diamond shape. Draw text boxes and type a possible answer for each path. (NOTE: Each path must re-enter the process or exit the decision point.)
- You may notice that your connectors are not linked correctly between shapes.
- Click the connector to change the link style. Click the Link Style tool located at the bottom of the page. Select Right Angle.
- You will notice your connector style has changed.
- Repeat steps 10 - 18 till you reach the last step in the process.
- Draw an oval or terminator shape. (See Appendix 15 for basic flowchart shapes.)
- Inside this shape, type “End” to indicate the end point of the operational flow chart process.
- Click Document | Close to close the document.
- Or, click Document | Quit to exit the panel.
- To update your documents, Click LAUNCH WEBSPIRATION. Then, click Recently Opened and select the document you want to edit.
- Now that you have an account, just sign in to the site with your account details.
Appendix 16: Analyzing Your Business Idea – Additional Examples
Service Business Idea Example – Internet Cafe

Competitor Analysis Example

SWOT Analysis Example

SWOT Diagram Example
Product/Service Business Idea Example – Greeting Card and Gift Wrapping
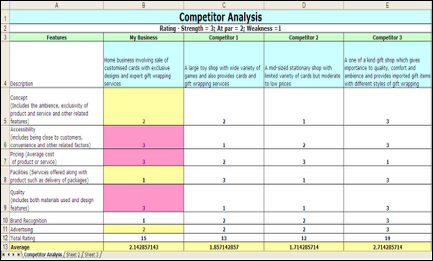
Competitor Analysis Example

SWOT Analysis Example

SWOT Diagram Example
Appendix 17: Finalizing Your Business Idea – Additional Examples
Service Business Idea Example – Internet Cafe


Business Idea Presentation Example
Product/Service Business Idea Example – Greeting Card and Gift Wrapping
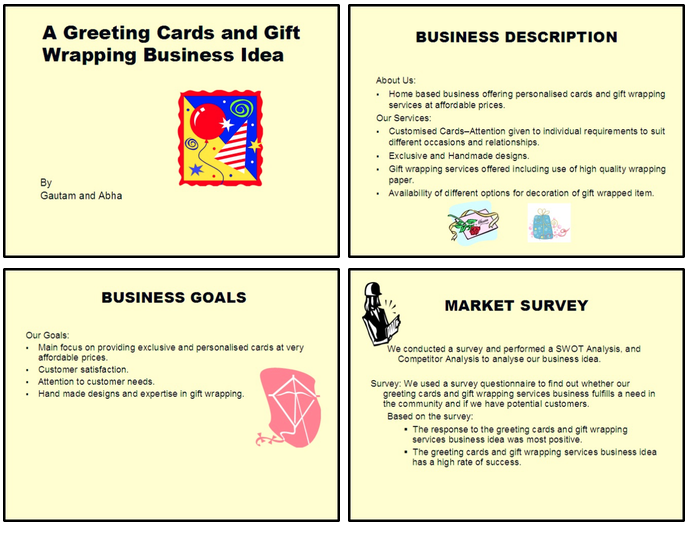

Business Idea Presentation Example
Appendix 18: Estimating Startup Costs – Additional Examples
Service Business Idea Example – Internet Cafe
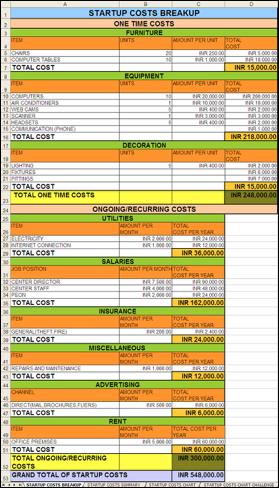
Startup Costs Breakup Worksheet Example

Startup Costs Summary Worksheet Example

Startup Costs Chart Example
Product/Service Business Idea Example – Greeting Card and Gift Wrapping

Startup Costs Breakup Worksheet Example

Startup Costs Summary Worksheet Example

Startup Costs Chart Example
Appendix 19: Pricing – Additional Examples
Service Business Idea Example – Internet Cafe

Pricing Worksheet Example
Product/Service Business Idea Example – Greeting Card and Gift Wrapping

Pricing Worksheet Example
Appendix 20: Preparing Your Budget – Additional Examples
Service Business Idea Example – Internet Cafe

Sales Forecast Worksheet Example
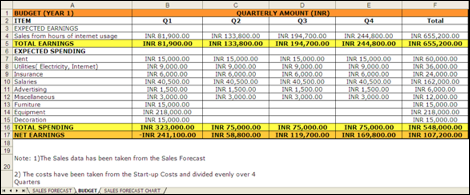
Budget Worksheet Example
Product/Service Business Idea Example – Greeting Card and Gift Wrapping

Sales Forecast Worksheet Example

Budget Worksheet Example
Appendix 21: Developing a Marketing Strategy – Additional Examples
Service Business Idea Example – Internet Cafe

Marketing Strategy Presentation Example
Product/Service Business Idea Example – Greeting Card and Gift Wrapping

Marketing Strategy Presentation Example
Appendix 22: Branding and Advertising Your Business – Additional Examples
Service Business Idea Example – Internet Café

Logo Example

Advertisement Example
Product/Service Business Idea Example – Greeting Card and Gift Wrapping

Logo Example

Advertisement Example
Appendix 23: Creating a Website for Your Business – Additional Examples
Service Business Idea Example – Internet Cafe

Website Homepage Example

Website Services Page Example

Website Rates Page Example

Website Contact Us Page Example
Product/Service Business Idea Example – Greeting Card and Gift Wrapping

Website Homepage Example
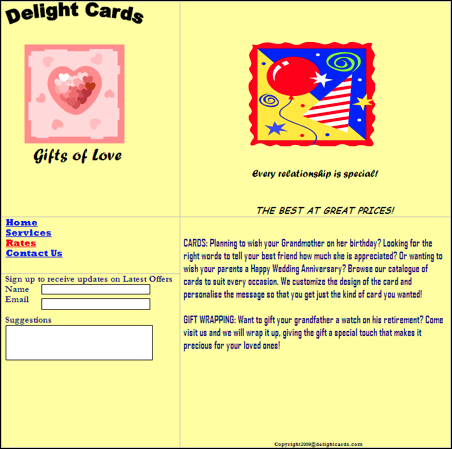
Website Products and Services Page Example

Website Rates Page Example

Website Contact Us Page Example
Appendix 24: Understanding Core Business Operations – Additional Examples
Service Business Idea Example – Internet Cafe

Operational Flow Chart Example
Product/Service Business Idea Example – Greeting Card and Gift Wrapping

Operational Flow Chart Example
Appendix 25: Organizational Structure – Additional Examples
Service Business Idea Example – Internet Cafe

Organizational Structure Presentation Example
Product/Service Business Idea Example – Greeting Card and Gift Wrapping
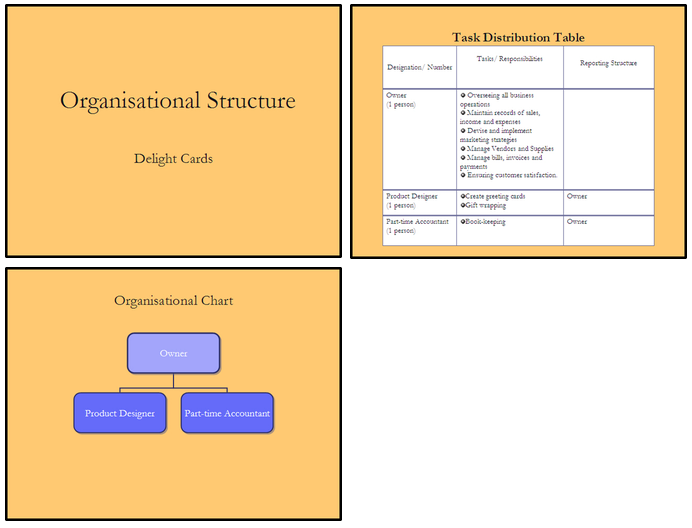
Organizational Structure Presentation Example
Appendix 26: Glossary
Administration: a function that involves the general management of an organization. Typical activities handled by Administration include hiring and managing staff, accounting, managing payroll, maintaining documents and records, ordering materials and supplies, establishing operating procedures and rules and so forth.
Advertisement: a form of communication used to create awareness and provide information about a product or service. Advertisements may be announced through different media such as print, television, radio and internet.
Brand: mark, symbol, images or name that is used to distinguish your product/service and business from that of competitors.
Branding: creating an identity or reputation for your business and its product or service.
Budget: financial estimate of earnings and expenses over a period of time. It is a forecast which helps in knowing and planning the business expenses, so that the business can run without difficulty.
Business Goals: a statement or a target that a business hopes to achieve to be successful within a specified time period. They may be in the form of financial goals such as desired profit or marketing goals such as capturing a large number of customers, quality service and so on.
Business Plan: an outline which summarizes the goals of a business enterprise, background information about the enterprise, details about the product or service being offered, and the ways to achieve the business goals. It offers information on the business idea, the steps to implement the idea and set up the business.
Closed-ended questions: questions where the respondents choose from among the answer choices given in the questionnaire.
Competitor Analysis: a method used to compare your business with the identified competition on various factors. It helps in identifying areas where your business has an advantage over its competitors as well as areas where your business needs improvement.
Core Operations: essential functions that have to be performed to provide the product or service to the customers in a timely and efficient way.
Cost price: the amount you spend on making the product or service or each unit available to the customer.
Customer Service: a function that involves looking after the requirements of the customers and attending to any problems faced by them regarding the use of a product or service..
Data: collected information from surveys, research or interviews which may be used to analyze a particular issue or idea.
Department: division within the organization. Departments may be created on the basis of functions, products or locations. For example, departments based on functions are classified as Administration, Marketing, Customer Service and so on.
Designation: a title given to a person performing a particular set of tasks in an organization. For example, Marketing Manager is a designation which is given to a person performing a set of tasks related to marketing function.
Digital Citizenship: a set of behaviors, organized into nine elements, that explain how to appropriately use different forms of digital technology, including the Internet, email, instant and text messaging, and social media and blogs.
Direct Mailers: promotional material such as newsletters or catalogues which is sent directly through mail to the target market. Direct mailers can be sent via post or email.Earnings: income that a business generates over a period of time.
Expenses: amount of money that a business has to spend in order to generate earnings.
Feedback: a response to a particular activity or idea. Feedback can be obtained through surveys and is used to analyze the idea or activity for which feedback is given.
Finance: function of maintaining records of the earnings and expenses of the business. It also involves ensuring that adequate funds are available at all times for the smooth operation of the business, and may involve the investment of the business’ financial assets.
Flow chart: a visual representation of a series of actions directed to achieve results.. An operational flow chart provides a visual representation of the core operations of the business.
Flyer: a printed advertisement, usually using just one sheet or paper, to promote a product or a service. It is intended for circulation among potential customers through various methods.
4 Ps: term used to denote the four main areas in which strategic decisions are taken for the effective marketing of a product or service. The areas are Product (Service) Positioning, Place of availability or distribution method, Pricing and Promotion.
Homepage: main page of a Website which opens when anyone navigates to the site. It has links to the other Web pages of the Website and serves as the introductory and summary page of the Website.
Industries: business activities or enterprises grouped together because they are involved in a common or similar enterprise, either manufacturing similar or related products or providing similar or related services. For example, Food and Beverages Industry or Travel and Tourism Industry.
Keyword: word used as a reference point for finding other words or information. In the context of Internet search, a keyword is used to find information on a subject. In the context of the Mind Map, a keyword helps you in finding other words or ideas by association.
Market Research: a systematic collection and analysis of data related to the target market, competitors and market conditions such as economy among other things, to understand their potential impact on a business
Marketing: a function that involves market research, and the development and implementation of marketing strategies, to ensure effective promotion and sale of the product or service.
Marketing Strategy: a comprehensive plan which explains the approach a business will take towards the 4Ps (see above) and the usage of the marketing budget to achieve the marketing goals.
Net Earnings: difference between the earnings and expenses. It refers to the excess of earnings over expenses. If the Net Earnings are negative, it means that the business is incurring a loss. Negative net earnings are often seen in the initial phase of the business as start-up expenses are often high, and it takes time before earnings exceed expenses.
Office premises: the physical place where work related tasks are typically performed in many businesses that employ office workers.
One-time costs: costs that are incurred when you start your business and are not a part of repeated spending.
Ongoing/Recurring Costs: costs that have to be incurred regularly (every month, quarter, or year) in order to perform the relevant business operations.
Open-ended questions: questions that allow the respondents to write their own thoughts, rather than select from the given answers.
Organizational Chart: visual representation of the organizational structure.
Organizational Structure: formal arrangement of departments and job designations across the organization.
Place (Distribution): the place of availability or the distribution method through which the customers obtain the product or service. This is one of the 4 Ps and decisions are taken on how to make the product or service available to the customer as a part of your Marketing Strategy. They include identifying the various methods of distribution and making a choice amongst them for delivering the product or service to the customer.
Press releases: announcements made to news media which mention achievements of or information related to the business.
Price: is the amount for which a product or service is sold to the customer. This is one of the 4 Ps and decisions are taken on the price that should be set for the product or service as a part of the Marketing Strategy.
Product (Service) Positioning: the process through which the product or service is established in the market. This is one of the 4Ps and decisions are taken about the product or service including branding, labeling and packaging as part of the Marketing Strategy.
Production: function performed to make the product or service ready for use by the customer.
Promotion: the process by which information about the product or service is made known to the customer. This is one of the 4 Ps and decisions are taken on the different ways to communicate the value and utility of the product or service to the buyer as a part of the Marketing Strategy. They include decisions on promotional strategy, advertising methods, choice of advertising media and so on.
Rating scale: a tool used to measure Quantitative Data.
Selling price: amount that is charged to customers for each unit of product or service.
Special offers: promotional and sales offers by the business, usually in the form of selling the products or services at reduced prices for a limited period of time.
Startup Costs: costs that are incurred at the time of setting up business. While some of these may have to be incurred regularly to keep the business running, others are incurred only once during the initial phase.
Survey Questionnaire: method of collecting information by posing a series of questions and requires respondents to give answers or information.
SWOT Analysis: method used to examine the strengths, weaknesses, opportunities and threats of a business. Strengths and weaknesses are typically based on the factors found in the organization itself such as the employees, the qualities of the product or service and so forth. Opportunities and threats are most frequently based on the factors outside of the organization such as competitors, market conditions and other such factors but could also include internal factors.
Tagline: few words that help in association and recollection of the product or service offered by your business.
Target market: group of customers which offer maximum potential as prospective buyers and for whom a product or a service is offered. The business offers products and services according to the needs and preferences of the target market.
Unit: single quantity of your product or service.
USP-Unique Selling Proposition: feature that differentiates your product or service from other similar products or services in the market and makes it more attractive to the buyer.
Vendors: individuals or organizations that supply goods and services to a business.
Webpage: a single page or document appearing on the Internet.
Website: a group of inter-linked Web pages containing information on a specific topic that can be accessed through the Internet.
Terms of Use and License
Terms of Use
These resources provided by Intel are 'open' and are available for educational use. Many hold Creative Commons licenses that allow them to be repurposed, modified and adapted for a diverse array of local contexts.
Each resource has one of three conditions of use labels. These at-a-glance labels can help you quickly distinguish whether a resource can be changed or shared without further permission required. In addition, you can find the specific license or terms of permitted use for each resource.
- Remix and Share Your remixing, redistributing, or making derivatives works comes with some restrictions, including how it is shared. Includes Creative Commons Attribution Share Alike (CC BY-SA), Creative Commons Attribution NonCommercial Share Alike (CC BY-NC-SA), Creative Commons Attribution NonCommercial (CC BY-NC), GNU Free Documentation License (GFDL);
- Share Only Your redistributing comes with some restrictions. Do not remix or make derivative works. Includes Creative Commons No Derivatives (CC ND).
- Read the Fine Print Everything else. All Rights Reserved. US-based educators have certain permissions under Fair Use and the TEACH Act. Includes educational and personal uses of copyrighted materials, custom licenses and terms, permission to print only, unknown restrictions, and any other redistribution restrictions of the DMCA and of your own country.
License
All Intel Content is protected under U.S. and international copyrights. Intel owns and retains all rights, title and interest, including all rights under copyright, in and to all Intel Content. Your rights to use, share and adapt Intel Content under the Creative Commons (“CC”) License are merely those of a non-exclusive licensee, and you do not acquire copyright ownership with respect to any Intel Content.
Except as expressly otherwise noted, all Intel Content (including Intel Curriculum Material) is made available to Users in accordance with the Creative Commons Attribution-Noncommercial 3.0 Unported (CC BY-NC) License (http://creativecommons.org/licenses/by-nc/3.0/), as amended and updated by Creative Commons from time to time (the “CC BY-NC License”), which is incorporated herein by this reference.
The CC BY-NC License allows you to freely share and adapt Intel Content, provided that:
- You give proper attribution to Intel in the manner specified by Intel, but not in any way that suggests that Intel endorse you or your use;
- You may not use, copy, reproduce, perform, display, distribute, transmit, disseminate, modify, adapt, create derivative works from, or otherwise exploit Intel Content for commercial purposes, including for commercial advantage or private monetary compensation;
- For any reuse or distribution of Intel Content, you must make clear to others the CC BY-NC License terms (the best way to do this is with a link to http://creativecommons.org/licenses/by-nc/3.0/); and,
- You comply with all other requirements as may be specified in the CC BY-NC License. The CC BY-NC license supersedes and replaces any Creative Commons license previously adopted by Intel for Intel Content.
NOTE: Notwithstanding the above, the CC BY-NC License does not apply to photos, images and other materials contained in Intel Content which have been licensed by Intel from Shutterstock.com and/or other commercial stock photo/image agencies (you can easily identify such a photo or image by looking at the credit embedded within or associated with the photo or image) (each, a “Licensed Stock Photo”). You are allowed to retain a copy of a Licensed Stock Photo for your own personal, non-commercial use only, BUT (i) you may not modify, alter, adapt, or otherwise create any derivative work from a Licensed Stock Photo and (ii) you may not distribute, transmit or disseminate a Licensed Stock Photo or any copy or derivative work thereof, to any third party, whether by itself, as part of Intel Content, as part of your Curriculum Contributions, or otherwise.
If you wish to use Intel Content for commercial purposes, you must contact Intel to enter into a separate license agreement governing commercial use of Intel Content.
If you do not agree to the terms of the CC BY-NC License, please refrain from using Intel Content in any manner, including downloading, copying, reproducing, printing, editing, modifying, distributing or transmitting such content, in any media or by any means, whether now known or hereafter developed. If you accept the terms of the CC BY-NC License and proceed to use any Intel Content, then any breach or violation by you of the CC BY-NC License will automatically constitute a violation of the TOU and may subject you to liability to Intel for copyright infringement. Also, to the extent you have violated the CC BY-NC License and made modifications or improvements to, or have prepared derivative works based upon, Intel Content or have otherwise incorporated Intel Content into your own content for commercial purposes, your violation of the CC BY-NC License will automatically subject such modifications, improvements or derivative works by you, or your own content that is mixed with Intel Content, to a perpetual, royalty-free, worldwide license to Intel, and Intel may, in its sole discretion, elect to exercise the foregoing license in addition to or without prejudice to any other remedies available.
2018 Based on materials originally developed by IntelⓇ Corporation
*Other brands and names may be claimed as the property of others.