Learn Easy Steps: Create a Brochure
Learn: Easy Steps
Activity Card: Create a Brochure
Have you ever needed an easy and inexpensive way to advertise your business? You can create a brochure which is a small leaflet or pamphlet that contains product or service information. In a business, brochures are used to introduce and advertise products or services to potential customers.
Look at the following example:
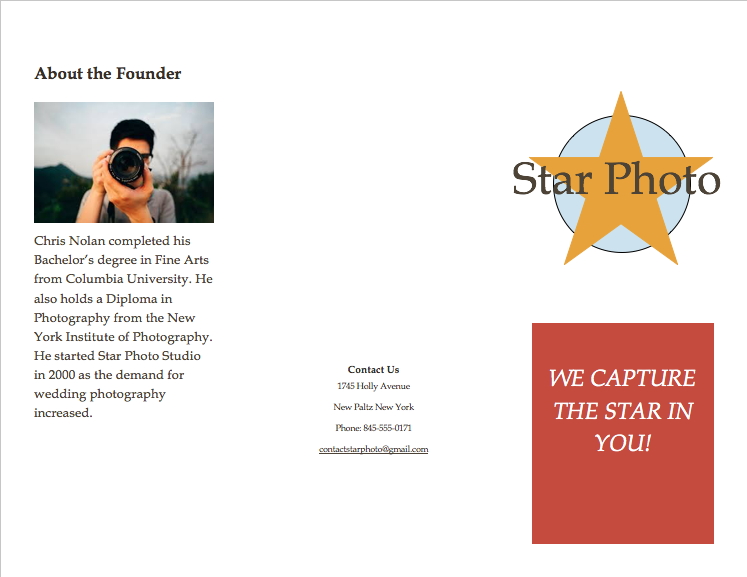
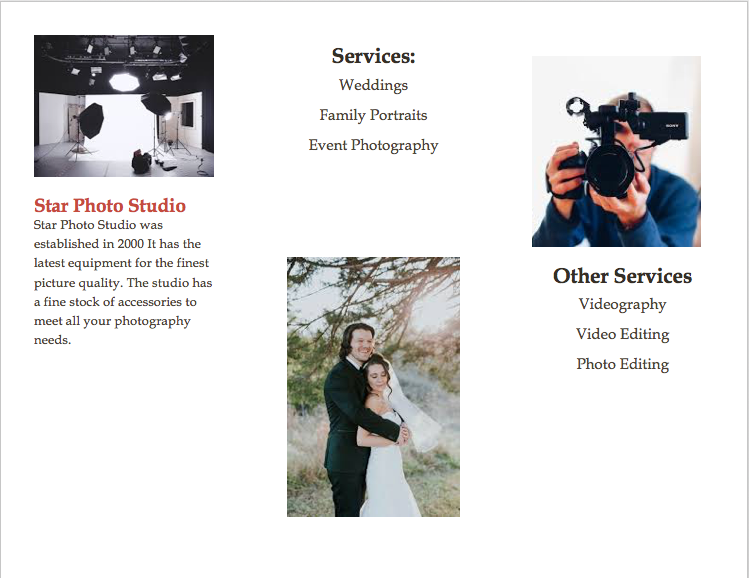
As in the example above, a Brochure created on the computer typically:
- Is made using a single sheet of paper that is printed on both sides and folded (tri-fold). It is set up in columns.
- Contains information about the products and services offered by the business
- Includes the company logo
- Incorporates pictures that help make the written information clear or attractive to the potential customer
- Contains information about how to get in touch with the business to obtain the product or service
Steps to Create a Brochure
Set the Page to Landscape
- Start the word processing software, and open a new, blank document.
- Set up the page to print sideways (landscape).
- Make the margins or the empty spaces along the edges of the page smaller, so there is more room for the brochure information.
- Save your work. Make sure you save your work after every few steps you complete.
Format Page to Three Columns
- Format the page so it has three columns.
- Save your work.
Add Information in the First Column
- Type a heading in the first column. Then, type a few sentences about your product or service below the heading or anything else you would like to write about. Note: The first column on the left side of the page will be the inside flap of your brochure or the first thing people will see when they open the front cover. Here might be a good place to put some information about the product or service you are advertising. However, you should feel free to put any information you want here.
- Change the look of the heading and sentences. You might want to make the heading bigger and change its style and color so it stands out.
- Change the line spacing or indents for the sentences
- Save your work.
Save Heading and Sentences as Styles
- When you have finished formatting the heading and sentences, save both as styles that you can use to quickly change the look of other headings and sentences in the brochure.
- Save your work.
Insert a Picture
- Add a picture if you want.
- Change the text wrapping of the picture, and move and resize it as needed.
- Save your work.
Insert a Column Break
- Put the cursor at the end of or below the last word or picture in the first column. Then, insert a column break so you can work on the middle column, which will be the back side of the folded brochure.
- Save your work.
Add Information in the Middle Column
- 1. In this column, you might want to type the address, telephone number, and even the Web site URL and e-mail address. Note: If you have completed the Logo and Letterhead activity earlier, you might want to look at it and use that same information. However, you should feel free to put other information here if you wish.
- Change the position and look of the information any way you like. If you think you might use any of this formatting again in your brochure, save the formats as new text styles.
- Save your work.
Insert Another Column Break
- Put the cursor at the end of or below the last word or picture in the middle column. Then, insert a column break so you can work on the right column, which will be the front panel of the folded brochure. Note: You might need to go back to the Web site URL and the email address and remove any hyperlink formatting that appears on its own.
- Save your work.
Add Information in the Right Column
- In this column you might want to put the company logo and a slogan, or a phrase about the company (product or service) that catches people’s attention. You may also change the look and position of the text. Note: If you have completed the Logo and Letterhead activity earlier, you might want to look at the slogan you put in the footer of the letterhead project.
- Add a picture or insert the saved logo file, and change its text wrapping. Then, change its size and position as you wish.
- Save your work.
Insert a Page Break
- Put the cursor at the end of or below the last word or picture in that column. Then, insert a page break.
- Save your work.
Add Information on the Panels
- Type a heading for the left panel, and below, type the information you want to include. Use the saved text styles to change the look of the words. Note: Think about the information you would like to include on these three panels, which will be seen when the brochure is unfolded all the way. You might want to list the business product or services, along with some prices for each item.
- Add a picture, if you want. Make sure you change the text wrapping of the picture so you can easily resize or move it.
- Repeat Step 1 and 2 to finish the middle and right panels on this page. Note: Remember to insert a column break to end one column and start work on the next.
- If you wish, you might want to make a bulleted list of the business products and services, or use tabs to line up your information.
- You can also change the picture into a watermark behind the words on a panel.
- Save your work.
Brochure Challenge (Optional)
- Draw a street map that shows readers where the business is located. Feel free to change the line width, line color, and fill colors as you wish. If you want to add words to the map, just make new text boxes and type the information inside. Then, insert the saved image on the middle column. Change its size and position as you wish.
- Add a box that says “Designed By” to your brochure. Find an empty space at the bottom of one of the panels of your brochure, such as the middle panel on the first page (the back of the folded brochure). Make a text box, and then type “Designed by” followed by your name. You can also change the look of the words and the text box any way you wish.
- Save your work.
Review Your Work
Look over your brochure. Make sure it has the following elements:
- Two pages with three columns of information about the products and services offered
- Text styles that have been used to format headings, sentences, and paragraphs so they look the same throughout the brochure
- The company logo or other information to clearly identify your business
- Pictures that help make the written information clear or more attractive to potential customers
If any of these elements are missing, add them now. You should also make any other desired changes.Remember to save your work when you are finished.
Optional: Print Your Brochure
- Preview your brochure before you print it. Click File. Then, click Print Preview.
- To print your brochure, click File. Then, click Print. A Print window pops up.
- To select the printer you want to use, click the arrow in the Name or Printer list and select the printer. Note: You will notice that the box has a drop-down menu or a list which allows you to select one option from several printer choices. If there is a drop-down menu, just click on the down arrow and move your cursor to the option you would like to choose. If a list is displayed, scroll to the printer that you want. Highlight your choice, and then click on it.
- To select the page you want to print, place your cursor on that page and click Current Page. Or, click Pages, and then type the page number that you would like to print. Note: If your brochure covers only page 1, then by default, the page will be automatically selected for printing. You may skip this step and move to Step 5.
- To print more than one copy, click the up arrow in the Number of copies list. Note: By default, the number of copies to be printed is 1. Just click on the up arrow to print more than one copy. Click on the down arrow to print fewer copies.
- Click OK or click Print.
Terms of Use and License
Terms of Use
These resources provided by the Intel are 'open' and are available for educational use. Many hold Creative Commons licenses that allow them to be repurposed, modified and adapted for a diverse array of local contexts.
Each resource has one of three conditions of use labels. These at-a-glance labels can help you quickly distinguish whether a resource can be changed or shared without further permission required. In addition, you can find the specific license or terms of permitted use for each resource.
- Remix and Share Your remixing, redistributing, or making derivatives works comes with some restrictions, including how it is shared. Includes Creative Commons Attribution Share Alike (CC BY-SA), Creative Commons Attribution NonCommercial Share Alike (CC BY-NC-SA), Creative Commons Attribution NonCommercial (CC BY-NC), GNU Free Documentation License (GFDL);
- Share Only Your redistributing comes with some restrictions. Do not remix or make derivative works. Includes Creative Commons No Derivatives (CC ND).
- Read the Fine Print Everything else. All Rights Reserved. US-based educators have certain permissions under Fair Use and the TEACH Act. Includes educational and personal uses of copyrighted materials, custom licenses and terms, permission to print only, unknown restrictions, and any other redistribution restrictions of the DMCA and of your own country.
License
All Intel Content is protected under U.S. and international copyrights. Intel owns and retains all rights, title and interest, including all rights under copyright, in and to all Intel Content. Your rights to use, share and adapt Intel Content under the Creative Commons (“CC”) License are merely those of a non-exclusive licensee, and you do not acquire copyright ownership with respect to any Intel Content.
Except as expressly otherwise noted, all Intel Content (including Intel Curriculum Material) is made available to Users in accordance with the Creative Commons Attribution-Noncommercial 3.0 Unported (CC BY-NC) License (http://creativecommons.org/licenses/by-nc/3.0/), as amended and updated by Creative Commons from time to time (the “CC BY-NC License”), which is incorporated herein by this reference.
The CC BY-NC License allows you to freely share and adapt Intel Content, provided that:
- You give proper attribution to the Intel in the manner specified by Intel, but not in any way that suggests that Intel endorse you or your use;
- You may not use, copy, reproduce, perform, display, distribute, transmit, disseminate, modify, adapt, create derivative works from, or otherwise exploit the Intel Content for commercial purposes, including for commercial advantage or private monetary compensation;
- For any reuse or distribution of Intel Content, you must make clear to others the CC BY-NC License terms (the best way to do this is with a link to http://creativecommons.org/licenses/by-nc/3.0/); and,
- You comply with all other requirements as may be specified in the CC BY-NC License. The CC BY-NC license supersedes and replaces any Creative Commons license previously adopted by the Intel for Intel Content.
NOTE: Notwithstanding the above, the CC BY-NC License does not apply to photos, images and other materials contained in Intel Content which have been licensed by Intel from Shutterstock.com and/or other commercial stock photo/image agencies (you can easily identify such a photo or image by looking at the credit embedded within or associated with the photo or image) (each, a “Licensed Stock Photo”). You are allowed to retain a copy of a Licensed Stock Photo for your own personal, non-commercial use only, BUT (i) you may not modify, alter, adapt, or otherwise create any derivative work from a Licensed Stock Photo and (ii) you may not distribute, transmit or disseminate a Licensed Stock Photo or any copy or derivative work thereof, to any third party, whether by itself, as part of the Intel Foundation Content, as part of your Curriculum Contributions, or otherwise.
If you wish to use Intel Content for commercial purposes, you must contact Intel to enter into a separate license agreement governing commercial use of Intel Content.
If you do not agree to the terms of the CC BY-NC License, please refrain from using Intel Content in any manner, including downloading, copying, reproducing, printing, editing, modifying, distributing or transmitting such content, in any media or by any means, whether now known or hereafter developed. If you accept the terms of the CC BY-NC License and proceed to use any Intel Content, then any breach or violation by you of the CC BY-NC License will automatically constitute a violation of the TOU and may subject you to liability to Intel for copyright infringement. Also, to the extent you have violated the CC BY-NC License and made modifications or improvements to, or have prepared derivative works based upon, Intel Content or have otherwise incorporated Intel Content into your own content for commercial purposes, your violation of the CC BY-NC License will automatically subject such modifications, improvements or derivative works by you, or your own content that is mixed with Intel Content, to a perpetual, royalty-free, worldwide license to Intel, and Intel may, in its sole discretion, elect to exercise the foregoing license in addition to or without prejudice to any other remedies available.
2018 Based on materials originally developed by IntelⓇ Corporation