How to U
OVERVIEW
Select the Launch Open Author button on the Contribute page toBegin Creating an Open Author Resource.
There are three stages to creating Open Educational Resources using Open Author.
![]()
- Write Mode - Add headings, text and media to build the content of your resource
- Describe Mode - Enter important information that makes searching for resources easier. You can also align your resource to Common Core State Standards.
- Publish Mode - Select a license for your resource that says how people will be allowed to use your work, then publish!
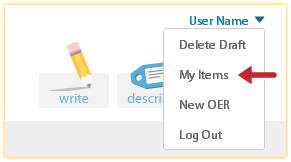
As soon as you start creating a resource, it is automatically saved in the Drafts folder of ‘My Items’. You can open ‘My Items’ using the dropdown menu below your username.
Once you publish your resource, it will be available on OER Commons.
WHERE IS MY RESOURCE?
As soon as you start creating a resource, it is automatically saved in the Drafts folder of ‘My Items’. You can open ‘My Items’ using the dropdown menu below your username.
You can also find My Items on OER Commons under My OER. Here, you can find resources from OER Commons that you saved, your unpublished draft resources and published resources. You can create your own folders to organize resources. You will need to be logged in to open My OER and see My Items.
Once you publish your resource, other users will be able to search for it on OER Commons and it will be moved to your ‘Published Items’ folder.
WRITE MODE
Write Mode is where you create your Open Educational Resource. First, you can add a title. Then, build your resource by adding headings, text, images, videos, etc.
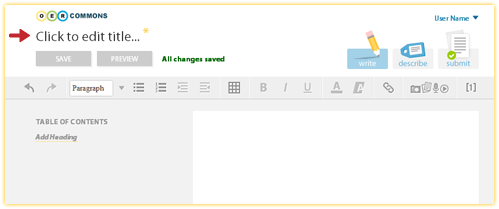
Table of Contents
You can use the Table of Contents (TOC) to add structure to your resource. Once you publish, the TOC becomes a clickable outline that helps readers navigate your content.
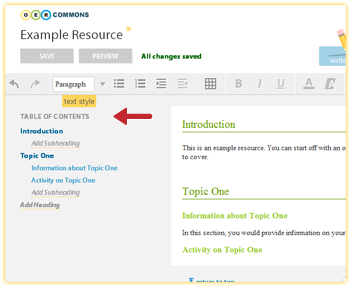
You can create headings and subheadings directly in the Table of Contents by clicking “Add Heading”. You can also select text, and use the Text Style drop down menu to change the text to a heading.
Toolbar Intro
Many buttons on the Open Author toolbar are exactly what you would expect from any text editor. However, there are a few special features.
- Undo/Redo
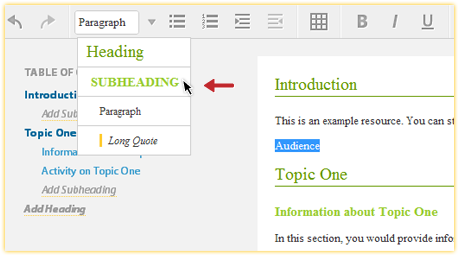
- Text Style- Use this drop down menu to change text to a heading, subheading, a regular paragraph, or a long quote
- Bulleted and numbered lists
- Increase/decrease text indent- You can also use these buttons to create outlines from bulleted or numbered lists
- Insert a Table
- Text Formatting
- Link
- Insert Media- Use this button to insert images, audio, video and other documents. For more details, see Adding Media
- Insert Reference- Use this button to cite source material. A footnote will automatically be created at the bottom of your resource. You can include as much information as you want in the reference, but we recommend including a minimum of author, title and link to the source you cite.
Adding Media
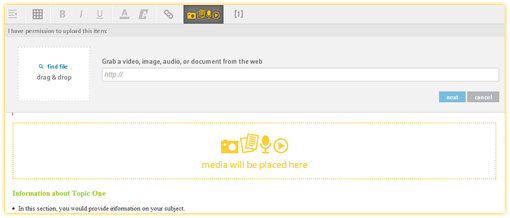
You can use the same Insert Media button to add many different types of content to your resource. Media is added at the location of your cursor when you click the ‘Insert Media’ button. A yellow box saying ‘media will be placed here’ will show you the location. You can add media in two ways: uploading a file from your computer or inserting media from a website. You don’t have to tell Open Author what type of media you are adding before selecting the file.
Uploading Media
To upload media, click “Find File” or drag and drop a file into the box on the left. You will then see a progress bar as the media uploads.
Supported file and media types include:
- Image files (.jpg, .png, .gif)
- Audio files (.mp3)
- Video files (.mpg, .wmv, mp4, .flv)
- Documents (.pdf, .doc, .docx, .ppt, etc)
Currently, .doc and .pdf files can only be attached to your resource as files for other users to download. If you want to insert the text of a document into your Open Author resource, we recommend copying and pasting into Open Author in addition to attaching the document.
Inserting Media from the Web
If your media is located on a web page, you can copy the URL of the media and paste it into the text box on the right. You can paste a link to a YouTube or TeacherTube video or Flickr image. Open Author will be able to insert the video or image from that link.
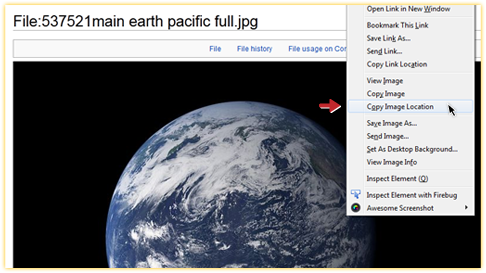
Hint: For sites other than Flickr, you might need to copy and paste the link to the image and not the link to the whole page that the image is on.
- In Firefox, right click the image and select “Copy Image Location”
- In Chrome, right click the image and select “Copy Image URL”
- In Safari, control + click the image and select “Copy Image Address”
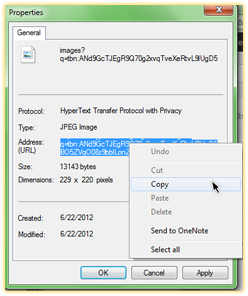
- In Internet Explorer, right click the image and select “Properties”. Highlight the link next to ‘Image (URL):’. Right click on that link and select ‘Copy’.
If you’re not sure which link to use, just try pasting it into Open Author. If the image appears in your resource, then you have the right link! If you do not see any options when you right click, or if an inserted video does not work, it may be protected by copyright.
Name and Submit
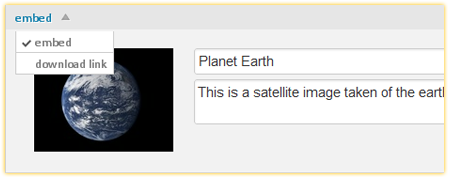
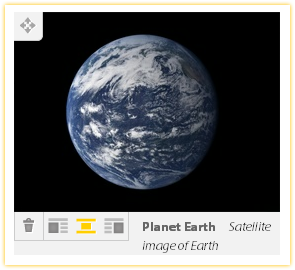
Once a video or image is brought in to Open Author, you can edit the name of the image and add a description. These will appear as a title and caption below the image or video in your resource once you click ‘Submit’.
Alternatively, you can choose to display an image as a download link only by clicking on the dropdown in the upper left corner. If you have a long list of images to include in your resource, this can help you save space.
Note:
If the license on a YouTube video does not allow for it to be embedded, the video will not be displayed in your resource.
Once inserted, video and images can be moved around your resource using the move handle in the upper left. On the lower left, icons appear for deleting the image, and changing its alignment to Left, Center or Right.
DESCRIBE MODE
In Describe Mode, you enter important information about your resource that greatly increases its ‘discoverability’. These descriptors include: a brief abstract that will appear in OER Commons, your learning goals, as well as the subject, keywords, grade, language, and learning resource type.

Describing your resource is an important step because our system searches over these descriptors to find resources for users. Your resource might be just what another user is searching for, so make it easy to find by filling in as much detail as you can. This section is part of what makes your resource an “Open Educational Resource”, increasing its value beyond that of text and media alone.
SUBMIT MODE
Open Author will license your resource under a Creative Commons license. You can choose the details of how people can use your work using the following options:
Modification of Your Work
Can others create derivative works based on your resource?
Examples of derivative works are translations, adapting the resource for a different age group or student population, and adding additional content. Your original resource is not affected. Other users will be able to make a copy that they can edit as they see fit. This is called ‘remixing’.
- Yes- The licensor permits others to make derivative works based on your resource.
- Yes, share alike- The licensor permits others to make derivative works based on your resource, but only if they also publish under an open license with compatible permissions.
- No- The licensor permits others to copy, distribute and transmit only unaltered copies of the work, no derivative works can be based on it.
Commercial Use of Your Work
Can others use your work for commercial purposes? Example: including your work in a textbook sold for profit
Author Name
Your resource will be published under your OER Commons User Name. You can click the pencil icon to edit your user name directly from Open Author.
You will also see a link to edit your OER Commons profile. We recommend completing your profile to give the people who use your resource a better understanding of your professional background and experience. You can also add links to social media like Twitter and Facebook to allow interested readers to follow you online.
KEYBOARD SHORTCUTS
| save | ⌘S | ctrl+S |
| undo | ⌘Z | ctrl+Z |
| redo | ⌘⇧Z | ctrl+Y |
| heading | ⌘⇧1 | ctrl+shift+1 |
| subheading | ⌘⇧2 | ctrl+shift+2 |
| paragraph | ⌘⇧3 | ctrl+shift+3 |
| bullet list | ⌘⇧4 | ctrl+shift+4 |
| numbered list | ⌘⇧5 | ctrl+shift+5 |
| increase indent | ⌘] | ctrl+] |
| decrease indent | ⌘[ | ctrl+[ |
| bold | ⌘B | ctrl+B |
| italicize | ⌘I | ctrl+I |
| underline | ⌘U | ctrl+U |
| link | ⌘K | ctrl+K |
| focus on | ||
|---|---|---|
| user menu | ⎇1 | alt+1 |
| write toolbar | ⎇Q | alt+Q |
| editing area | ⎇A | alt+A |
| Next Step button | ⎇Z | alt+Z |
LAUNCH OPEN AUTHOR
To begin Creating an Open Author resources, select the Launch Open Autor button on the Contribute page.